2014 MERCEDES-BENZ E-SEDAN fuel cap release
[x] Cancel search: fuel cap releasePage 12 of 430
ECO display
Function/notes ............................. 185
On-board computer .......................242
ECO start/stop function
Automatic engine start ..................164
Automatic engine switch-off ..........163
Deactivating/activating .................164
General information .......................163
Important safety notes ..................163
Introduction ................................... 163
Electronic Stability Program
see ESP ®
(Electronic Stability Program)
Emergency release
Driver's door .................................... 90
Fuel filler fla p................................. 177
Trunk ............................................... 97
Vehicle ............................................. 90
Emergency spare wheel
Important safety notes ..................410
Points to remember .......................410
Removing ....................................... 411
Storage location ............................ 411
Stowing .......................................... 412
Technical data ............................... 414
Emergency Tensioning Devices
Function .......................................... .59
Safety guideline s............................. 41
Emergency unlocking
Tailgate ............................................ 97
Emissions control
Service and warranty information ....23
Engine
Check Engine warning lamp ........... 292
Display message ............................ 269
ECO start/stop function ................163
Engine number ............................... 417
Irregular running ............................ 166
Jump-starting ................................. 362
Starting problems ..........................166
Starting the engine with the
SmartKey ....................................... 161
Starting with KEYLESS-GO .............161
Switching off .................................. 182
Tow-starting (vehicle) ..................... 367
Engine electronics
Problem (malfunction) ...................166Engine oil
Adding ........................................... 338
Additives ........................................ 422
Checking the oil level ..................... 337
Checking the oil level using the
dipstick .......................................... 338
Display message ............................ 271
Filling capacity ............................... 422
Notes about oil grades ................... 422
Notes on oil level/consumption ....337
Temperature (on-board computer) .253
Viscosity ........................................ 423
ESP ®
(Electronic Stability
Program) AMG menu (on-board computer) ...254
Deactivating/activating (AMG
vehicles) .......................................... 74
Deactivating/activating (except
AMG vehicles) ................................ 247
Deactivating/activating (notes;
except AMG vehicles) ......................73
Display message ............................ 258
ETS/4ETS ........................................ 72
Function/notes ................................ 72
General notes .................................. 72
Important safety information ...........72
Warning lamp ................................. 289
ETS/4ETS (Electronic Traction
System) ................................................ 72
Exhaust check ................................... 184
Exhaust pipe (cleaning instructions) 347
Exterior lighting Setting options .............................. 128
see Lights
Exterior mirrors
Adjusting ....................................... 122
Dipping (automatic) .......................124
Folding in/out (automatically). ......123
Folding in/out (electrically). ..........123
Folding in when locking (on-board
computer) ...................................... 252
Out of position (troubleshooting) ...124
Setting ........................................... 123
Storing settings (memory function) 125
Storing the parking position ..........124
Eyeglasses compartment .................29910
IndexProCarManuals.com
Page 13 of 430
F
Filler cap see Fuel filler flap
First-aid kit ........................................ .352
Flat tire MOExtended tires ..........................354
Preparing the vehicle .....................354
TIREFIT kit ...................................... 355
Floormats ........................................... 334
Folding bench seat (cargo
compartment) .................................... 114
Fuel Additives ........................................ 420
Consumption statistics ..................241
Displaying the current
consumption .................................. 242
Displaying the range ......................242
Driving tips .................................... 184
Flexible fuel vehicles ......................420
Fuel gauge ....................................... 31
Grade (gasoline) ............................ 419
Important safety notes ..................418
Premium-grade unleaded gasoline .419
Problem (malfunction) ...................179
Quality (diesel )............................... 420
Refueling ........................................ 175
Tank content/reserve fuel .............419
Fuel filler flap
Emergency release ........................177
Opening/closing ............................ 176
Fuel filter (display message) ............272
Fuel level Calling up the range (on-board
computer) ...................................... 242
Fuel tank
Capacity ........................................ 419
Problem (malfunction) ...................179
Fuse allocation chart (vehicle tool
kit) ...................................................... 352
Fuses Allocation chart ............................. 367
Before changing ............................. 367
Fuse box in the cargo
compartment ................................. 369
Fuse box in the engine
compartment ................................. 368Fuse box in the trunk
.....................368
Important safety notes ..................367 G
Garage door opener Clearing the memory .....................333
Important safety notes ..................331
Opening/closing the garage door ..333
Programming (button in the rear-
view mirror) ................................... 331
Gear indicator (on-board computer) 253
Genuine parts ...................................... 22
Glove box ........................................... 299 H
Handbrake see Parking brake
HANDS-FREE ACCESS .......................... 93
Hazard warning lamps ......................132
Head bags Display message ............................ 263
Headlamps
Fogging up ..................................... 135
see Automatic headlamp mode
Head restraints
Adjusting ....................................... 110
Adjusting (angle) ............................ 111
Adjusting (electrically) ...................111
Adjusting (rear) .............................. 112
Installing/removing (rear) ..............112
Luxury ............................................ 111
Heating
see Climate control
High-beam headlamps
Changing bulbs .............................. 137
Display message ............................ 267
Switching on/off ........................... 132
Hill start assist .................................. 162
HOLD function Activating ....................................... 202
Deactivating ................................... 203
Display message ............................ 274
Function/notes ............................. 202
Hood
Closing .......................................... .337
Display message ............................ 283 Index
11ProCarManuals.com
Page 179 of 430
vehicle with the SmartKey or with KEYLESS-
GO.
The position of the fuel filler cap is displayed
8 in the instrument cluster. The arrow
next to the filling pump indicates the side of
the vehicle.
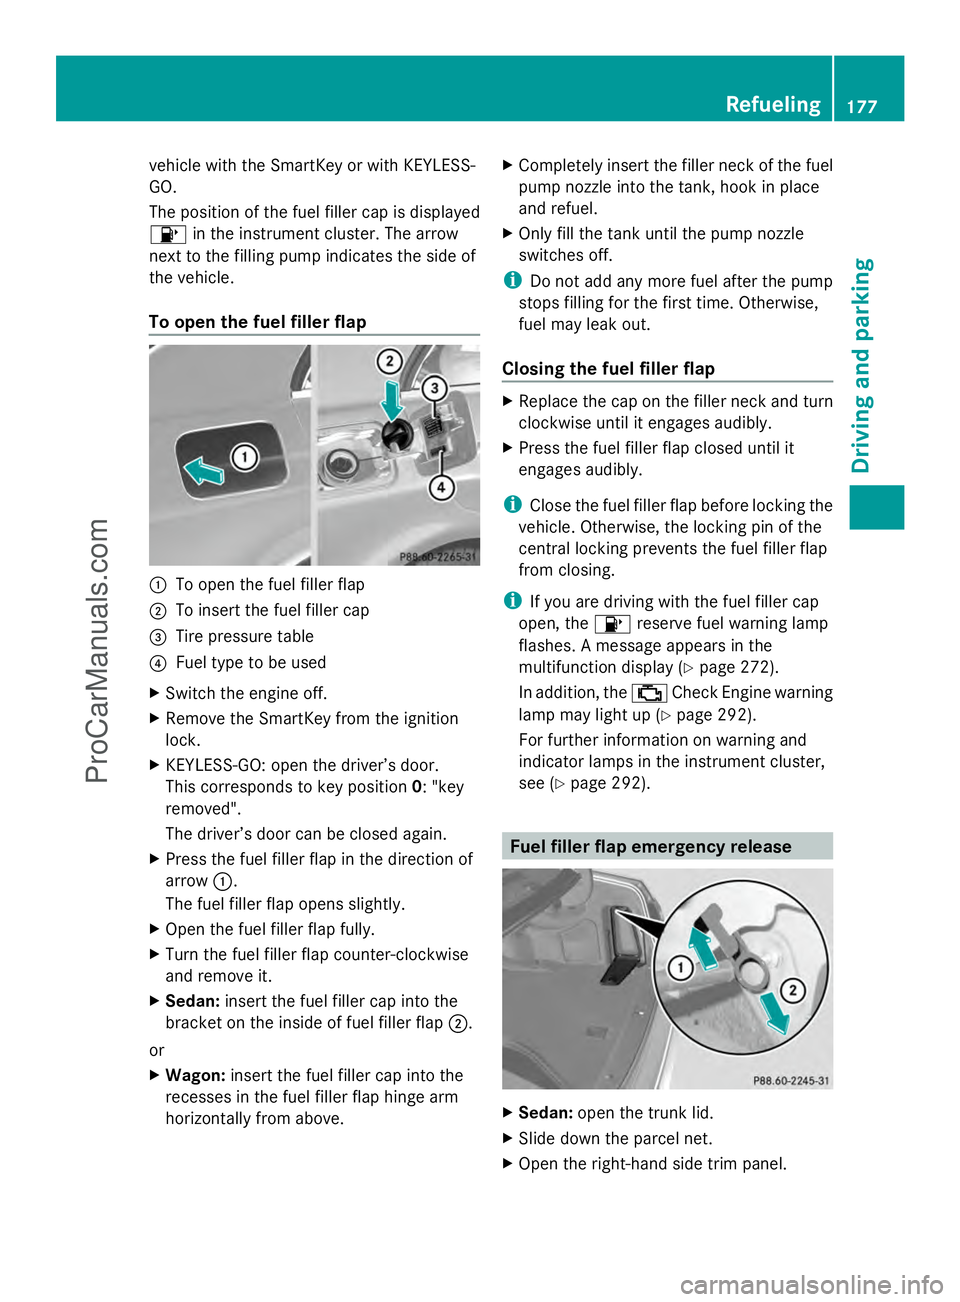
To open the fuel filler flap :
To open the fuel filler flap
; To insert the fuel filler cap
= Tire pressure table
? Fuel type to be used
X Switch the engine off.
X Remove the SmartKey from the ignition
lock.
X KEYLESS-GO: open the driver’s door.
This corresponds to key position 0: "key
removed".
The driver’s door can be closed again.
X Press the fuel filler flap in the direction of
arrow :.
The fuel filler flap opens slightly.
X Open the fuel filler flap fully.
X Turn the fuel filler flap counter-clockwise
and remove it.
X Sedan: insert the fuel filler cap into the
bracket on the inside of fuel filler flap ;.
or
X Wagon: insert the fuel filler cap into the
recesses in the fuel filler flap hinge arm
horizontally from above. X
Completely insert the filler neck of the fuel
pump nozzle into the tank, hook in place
and refuel.
X Only fill the tank until the pump nozzle
switches off.
i Do not add any more fuel after the pump
stops filling for the first time. Otherwise,
fuel may leak out.
Closing the fuel filler flap X
Replace the cap on the filler neck and turn
clockwise until it engages audibly.
X Press the fuel filler flap closed until it
engages audibly.
i Close the fuel filler flap before locking the
vehicle. Otherwise, the locking pin of the
central locking prevents the fuel filler flap
from closing.
i If you are driving with the fuel filler cap
open, the 8reserve fuel warning lamp
flashes. A message appears in the
multifunction display (Y page 272).
In addition, the ;Check Engine warning
lamp may light up (Y page 292).
For further information on warning and
indicator lamps in the instrument cluster,
see (Y page 292). Fuel filler flap emergency release
X
Sedan: open the trunk lid.
X Slide down the parcel net.
X Open the right-hand side trim panel. Refueling
177Driving and parking Z
ProCarManuals.com
Page 183 of 430
residues crystallize after time and
contaminate the affected surfaces.
! DEF is not a fuel additive and must not be
added to the fuel tank. If DEF is added to
the fuel tank, this can lead to engine
damage.
! Only screw on the DEF refill bottle hand-
tight. It could otherwise be damaged.
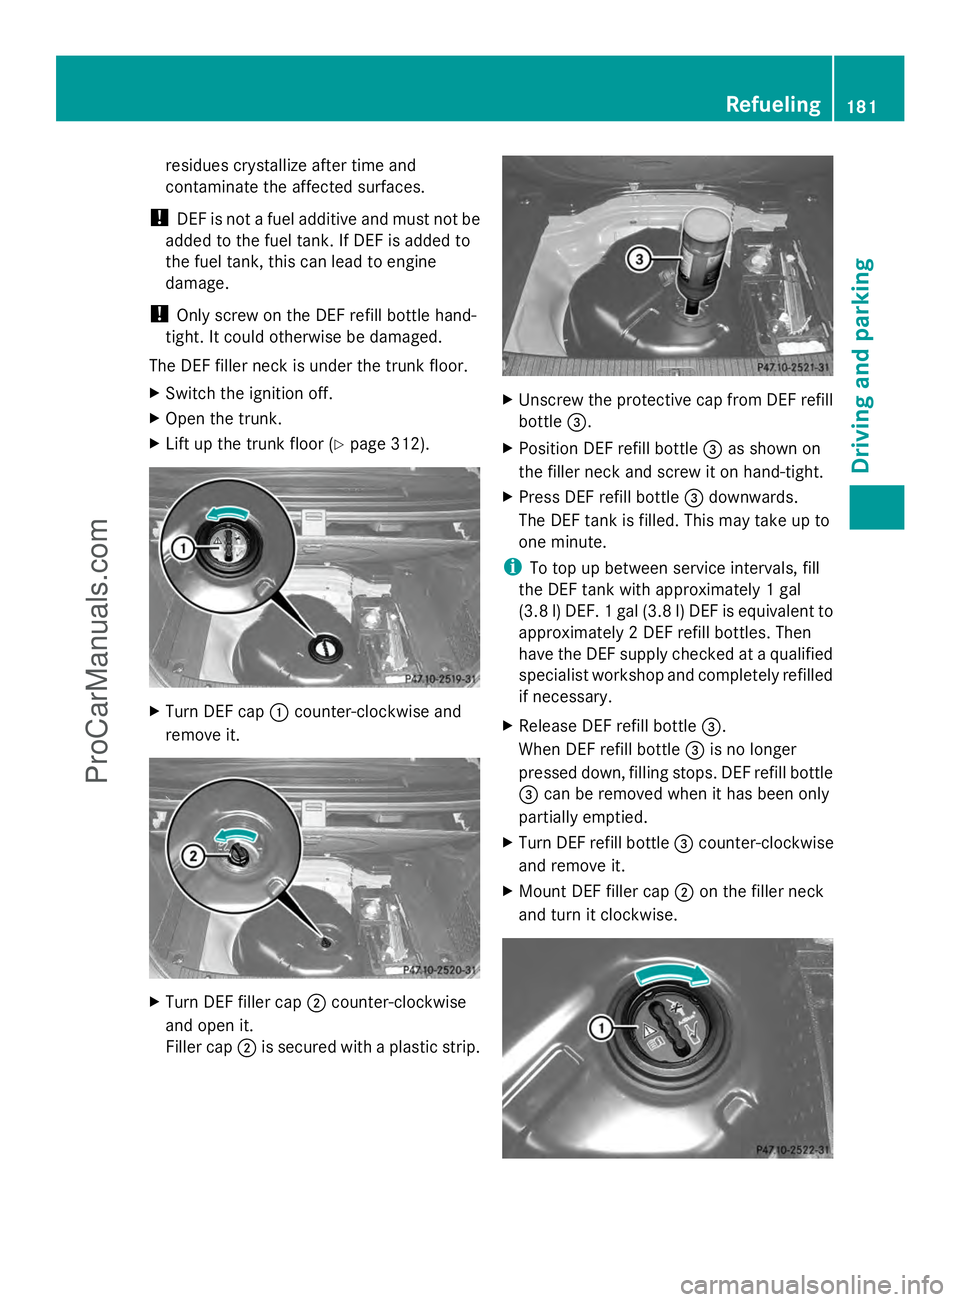
The DEF filler neck is under the trunk floor.
X Switch the ignition off.
X Open the trunk.
X Lift up the trunk floor ( Ypage 312). X
Turn DEF cap :counter-clockwise and
remove it. X
Turn DEF filler cap ;counter-clockwise
and open it.
Filler cap ;is secured with a plastic strip. X
Unscrew the protective cap from DEF refill
bottle =.
X Position DEF refill bottle =as shown on
the filler neck and screw it on hand-tight.
X Press DEF refill bottle =downwards.
The DEF tank is filled. This may take up to
one minute.
i To top up between service intervals, fill
the DEF tank with approximately 1 gal
(3.8 l) DEF. 1 gal (3.8 l) DEF is equivalent to
approximately 2 DEF refill bottles. Then
have the DEF supply checked at a qualified
specialist workshop and completely refilled
if necessary.
X Release DEF refill bottle =.
When DEF refill bottle =is no longer
pressed down, filling stops. DEF refill bottle
= can be removed when it has been only
partially emptied.
X Turn DEF refill bottle =counter-clockwise
and remove it.
X Mount DEF filler cap ;on the filler neck
and turn it clockwise. Refueling
181Driving and parking Z
ProCarManuals.com
Page 359 of 430
G
WARNING
If the required tire pressure is not reached
after the specified time, the tire is too badly
damaged. The tire sealant cannot repair the
tire in this instance. Damaged tires and a tire
pressure that is too low can significantly
impair the vehicle's braking and driving
characteristics. There is a risk of accident.
Do not continue driving. Contact a qualified
specialist workshop.
Tire pressure reached G
WARNING
A tire temporarily sealed with tire sealant
impairs the driving characteristics and is not
suitable for higher speeds. There is a risk of
accident.
You should therefore adapt your driving style
accordingly and drive carefully. Do not exceed
the specified maximum speed with a tire that
has been repaired using tire sealant.
! Residue from the tire sealant may come
out of the filler hose after use. This could
cause stains.
Therefore, place the filler hose in the plastic
bag which contained the TIREFIT kit. H
Environmental note
Have the used tire sealant bottle disposed of
professionally, e.g. at a qualified specialist
workshop.
If a tire pressure of 180 kPa (1.8 bar/26 psi)
has been attained after five minutes:
X Switch off the tire inflation compressor.
X Unscrew the filler hose from the valve of
the faulty tire.
X Stow the tire sealant bottle and the tire
inflation compressor.
X Pull away immediately.
The maximum speed for a tire sealed with
tire sealant is 50 mph (80 km/h). The upper
part of the TIREFIT sticker must be affixed to the instrument cluster in the driver's
field of vision.
X Stop after driving for approximately ten
minutes and check the tire pressure with
the tire inflation compressor.
The tire pressure must now be at least
130 kPa (1.3 bar/19 psi). G
WARNING
If the required tire pressure is not reached
after driving for a short period, the tire is too
badly damaged. The tire sealant cannot repair
the tire in this instance. Damaged tires and a
tire pressure that is too low can significantly
impair the vehicle's braking and driving
characteristics. There is a risk of accident.
Do not continue driving. Contact a qualified
specialist workshop.
X Correct the tire pressure if it is still at least
130 kPa (1.3 bar/19 psi) (for the values,
see the Tire and Loading Information
placard on the driver's side B-pillar or tire
pressure table on the fuel filler flap).
X To increase the tire pressure: switch on
the tire inflation compressor. X
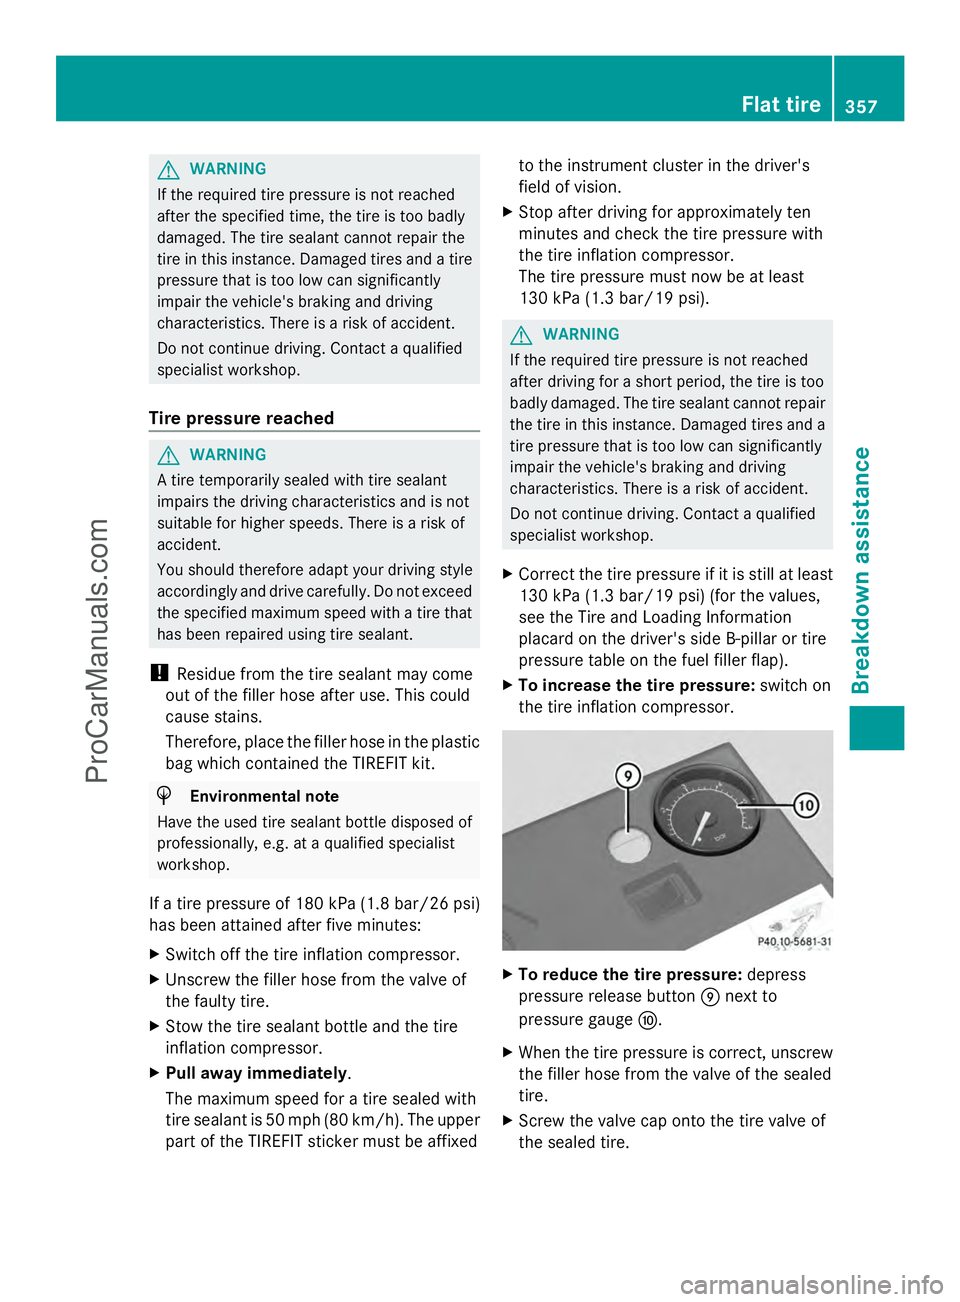
To reduce the tire pressure: depress
pressure release button Enext to
pressure gauge F.
X When the tire pressure is correct, unscrew
the filler hose from the valve of the sealed
tire.
X Screw the valve cap onto the tire valve of
the sealed tire. Flat tire
357Breakdown assistance Z
ProCarManuals.com
Page 381 of 430
when adjusting the tire pressure
(Y
page 376).
i The actual values for tires are vehicle-
specific and may deviate from the values in
the illustration. Checking the tire pressures
Important safety notes Observe the notes on tire pressure
(Y
page 376).
Information on air pressure for the tires on
your vehicle can be found:
R on the vehicle's Tire and Loading
Information placard on the B-pillar
(Y page 383)
R on the tire pressure label on the fuel filler
flap ( Ypage 176)
R in the "Tire pressure" section
R under "Tire pressure" (Y page 376)
Checking tire pressures manually To determine and set the correct tire
pressure, proceed as follows:
X Remove the valve cap of the tire that is to
be checked.
X Press the tire pressure gauge securely onto
the valve.
X Read the tire pressure and compare it with
the recommended value on the Tire and
Loading Information placard (Y page 376).
X If the tire pressure is too low, increase it to
the recommended value.
X If the tire pressure is too high, release air
by pressing down the metal pin in the valve.
Use the tip of a pen, for example. Then,
check the tire pressure again using the tire
pressure gauge.
X Screw the valve cap onto the valve.
X Repeat these steps for the other tires. Tire pressure loss warning system
(Canada only)
General notes While the vehicle is in motion, the tire
pressure loss warning system monitors the
set tire pressure using the rotational speed of
the wheels. This enables the system to detect
significant pressure loss in a tire. If the speed
of rotation of a wheel changes as a result of
a loss of pressure, a corresponding warning
message will appear in the multifunction
display.
You can recognize the tire pressure loss
warning by the Run Flat Indicator Run Flat Indicator
Active Press 'OK' to Restart
Active Press 'OK' to Restart message
which appears in the Service
Servicemenu of the
multifunction display. Information on the
message display can be found in the
"Restarting the tire pressure loss warning
system" section (Y page 380).
Important safety notes The tire pressure warning system does not
warn you of an incorrectly set tire pressure.
Observe the notes on the recommended tire
pressure (Y
page 376).
The tire pressure loss warning does not
replace the need to regularly check the tire
pressure. An even loss of pressure on several
tires at the same time cannot be detected by
the tire pressure loss warning system.
The tire pressure monitor is not able to warn
you of a sudden loss of pressure, e.g. if the
tire is penetrated by a foreign object. In the
event of a sudden loss of pressure, bring the
vehicle to a halt by braking carefully. Avoid
abrupt steering maneuvers.
The function of the tire pressure loss warning
system is limited or delayed if:
R snow chains are mounted on your vehicle's
tires.
R road conditions are wintry.
R you are driving on sand or gravel. Tire pressure
379Wheels and tires Z
ProCarManuals.com
Page 423 of 430
If you or others come into contact with fuel,
observe the following:
R Wash away fuel from skin immediately
using soap and water.
R If fuel comes into contact with your eyes,
immediately rinse them thoroughly with
clean water. Seek medical assistance
without delay.
R If fuel is swallowed, seek medical
assistance without delay. Do not induce
vomiting.
R Immediately change out of clothing which
has come into contact with fuel.
Flexible Fuel vehicles can be refueled with the
following fuel types:
R premium-grade unleaded gasoline
R E85 fuel
R a mixture of E85 fuel and premium-grade
unleaded gasoline
i Flexible Fuel vehicles can be recognized
by the Ethanol up to E85 sticker on the
inside of the fuel filler flap.
Fuel consumption
The energy content of E85 fuel is less than
that of the same amount of premium-grade
gasoline. The amount of fuel consumed when
operating the vehicle with E85 fuel is
therefore higher than with premium-grade
gasoline.
Maintenance
Inform your authorized Mercedes-Benz
Center that you are operating or have
operated the vehicle with E85 fuel.
Low outside temperatures
If the outside temperature is below 32 ‡
(0 †), the starting procedure can take
noticeably longer when operating with E85
fuel.
E85 fuel is not suitable for use at outside
temperatures under -4 ‡ (-20 †). DEF
Important safety notes Comply with the important safety notes for
service products when handling DEF
(Y
page 418).
DEF is a water-soluble fluid for the exhaust
gas aftertreatment of diesel engines. It is:
R not poisonous
R colorless and odorless
R not flammable
When you open the DEF container, small
amounts of ammonia vapor may be released.
Ammonia vapors have a pungent odor and are
particularly irritating to the skin, to mucous
membranes and to the eyes. You may
experience a burning sensation in your eyes,
nose and throat. Coughing and watering of
the eyes are possible.
Do not inhale ammonia vapors. Fill the DEF
tank only in well-ventilated areas.
Low outside temperatures DEF freezes at a temperature of
approximately 12 ‡ (-11 †). The vehicle is
delivered from the factory equipped with a
DEF preheating system. Winter operation can
thus be guaranteed even at temperatures
below 12 ‡ (-11 †).
Additives
!
Only use DEF in accordance with ISO
22241. Do not use additives with DEF and
do not dilute DEF with water. This may
destroy the BlueTEC exhaust gas
aftertreatment system.
Purity !
Impurities in DEF (e.g. due to other
service products, cleaning agents or dust)
lead to:
R increased emission values
R damage to the catalytic converter Service products and filling capacities
421Technical data Z
ProCarManuals.com