2014 MERCEDES-BENZ E-SEDAN clock
[x] Cancel search: clockPage 92 of 430
The vehicle is locked automatically when the
ignition is switched on and the wheels are
turning.
You could therefore lock yourself out if:
R the vehicle is being pushed.
R the vehicle is being towed.
R the vehicle is on a roller dynamometer.
You can also switch the automatic locking
function on and off using the on-board
computer (Y page 251). Unlocking the driver's door
(mechanical key)
If the vehicle can no longer be unlocked with
the SmartKey, use the mechanical key.
X Take the mechanical key out of the
SmartKey (Y page 84).
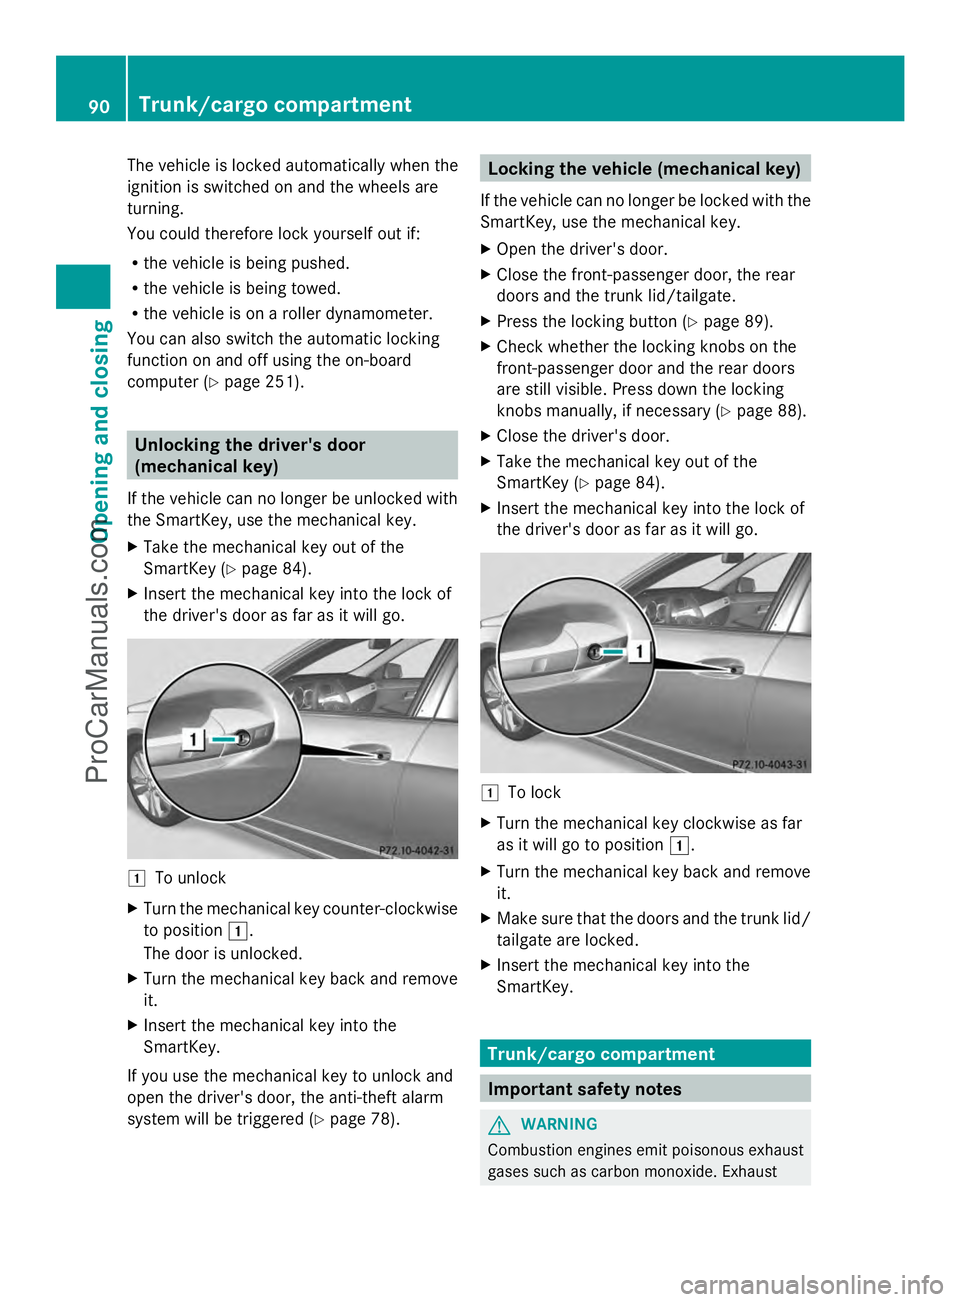
X Insert the mechanical key into the lock of
the driver's door as far as it will go. 1
To unlock
X Turn the mechanical key counter-clockwise
to position 1.
The door is unlocked.
X Turn the mechanical key back and remove
it.
X Insert the mechanical key into the
SmartKey.
If you use the mechanical key to unlock and
open the driver's door, the anti-theft alarm
system will be triggered (Y page 78). Locking the vehicle (mechanical key)
If the vehicle can no longer be locked with the
SmartKey, use the mechanical key.
X Open the driver's door.
X Close the front-passenger door, the rear
doors and the trunk lid/tailgate.
X Press the locking button (Y page 89).
X Check whether the locking knobs on the
front-passenger door and the rear doors
are still visible. Press down the locking
knobs manually, if necessary ( Ypage 88).
X Close the driver's door.
X Take the mechanical key out of the
SmartKey (Y page 84).
X Insert the mechanical key into the lock of
the driver's door as far as it will go. 1
To lock
X Turn the mechanical key clockwise as far
as it will go to position 1.
X Turn the mechanical key back and remove
it.
X Make sure that the doors and the trunk lid/
tailgate are locked.
X Insert the mechanical key into the
SmartKey. Trunk/cargo compartment
Important safety notes
G
WARNING
Combustion engines emit poisonous exhaust
gases such as carbon monoxide. Exhaust 90
Trunk/cargo compartmentOpening and closing
ProCarManuals.com
Page 99 of 430
X
Insert the mechanical key into the trunk lid
lock as far as it will go.
X Turn the mechanical key clockwise from
position 1to position 2.
X Remove the mechanical key.
X Insert the mechanical key into the
SmartKey. Unlocking the trunk (Sedan)
! The trunk lid swings upwards when
opened. Therefore, make sure that there is
sufficient clearance above the trunk lid.
If the trunk cannot be unlocked with the
SmartKey or KEYLESS-GO, use the
mechanical key.
If you use the mechanical key to unlock and
open the trunk lid, the anti-theft alarm system
will be triggered (Y page 78).
X Take the mechanical key out of the
SmartKey (Y page 84).
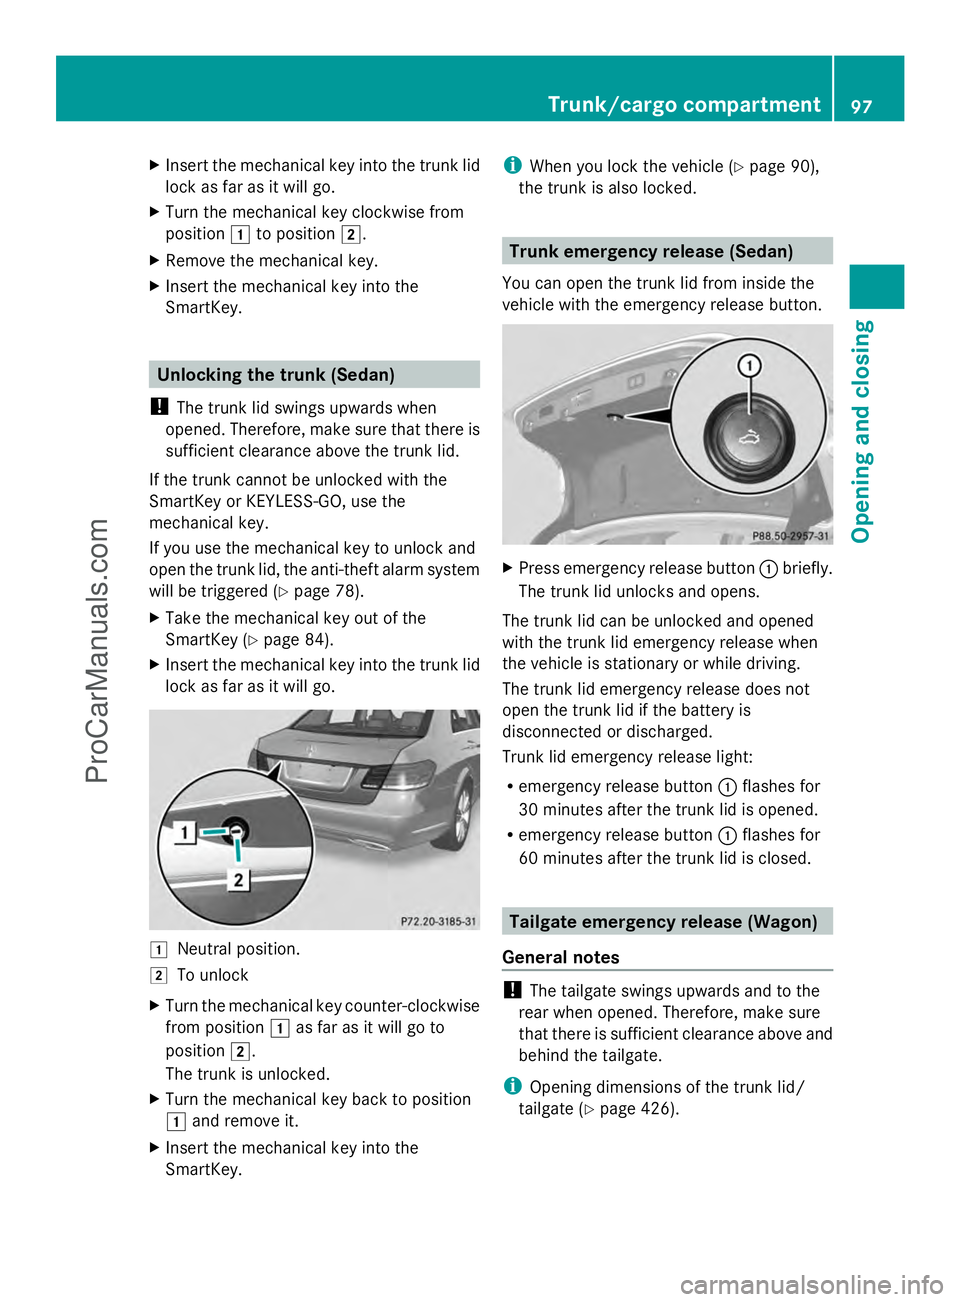
X Insert the mechanical key into the trunk lid
lock as far as it will go. 1
Neutral position.
2 To unlock
X Turn the mechanical key counter-clockwise
from position 1as far as it will go to
position 2.
The trunk is unlocked.
X Turn the mechanical key back to position
1 and remove it.
X Insert the mechanical key into the
SmartKey. i
When you lock the vehicle (Y page 90),
the trunk is also locked. Trunk emergency release (Sedan)
You can open the trunk lid from inside the
vehicle with the emergency release button. X
Press emergency release button :briefly.
The trunk lid unlocks and opens.
The trunk lid can be unlocked and opened
with the trunk lid emergency release when
the vehicle is stationary or while driving.
The trunk lid emergency release does not
open the trunk lid if the battery is
disconnected or discharged.
Trunk lid emergency release light:
R emergency release button :flashes for
30 minutes after the trunk lid is opened.
R emergency release button :flashes for
60 minutes after the trunk lid is closed. Tailgate emergency release (Wagon)
General notes !
The tailgate swings upwards and to the
rear when opened. Therefore, make sure
that there is sufficient clearance above and
behind the tailgate.
i Opening dimensions of the trunk lid/
tailgate (Y page 426). Trunk/cargo compartment
97Opening and closing Z
ProCarManuals.com
Page 100 of 430
If the tailgate can no longer be opened from
outside the vehicle, use the emergency
release on the inside of the tailgate.
On vehicles with a folding bench seat, you can
use the handle to open the tailgate from
inside the vehicle (Y page 92).
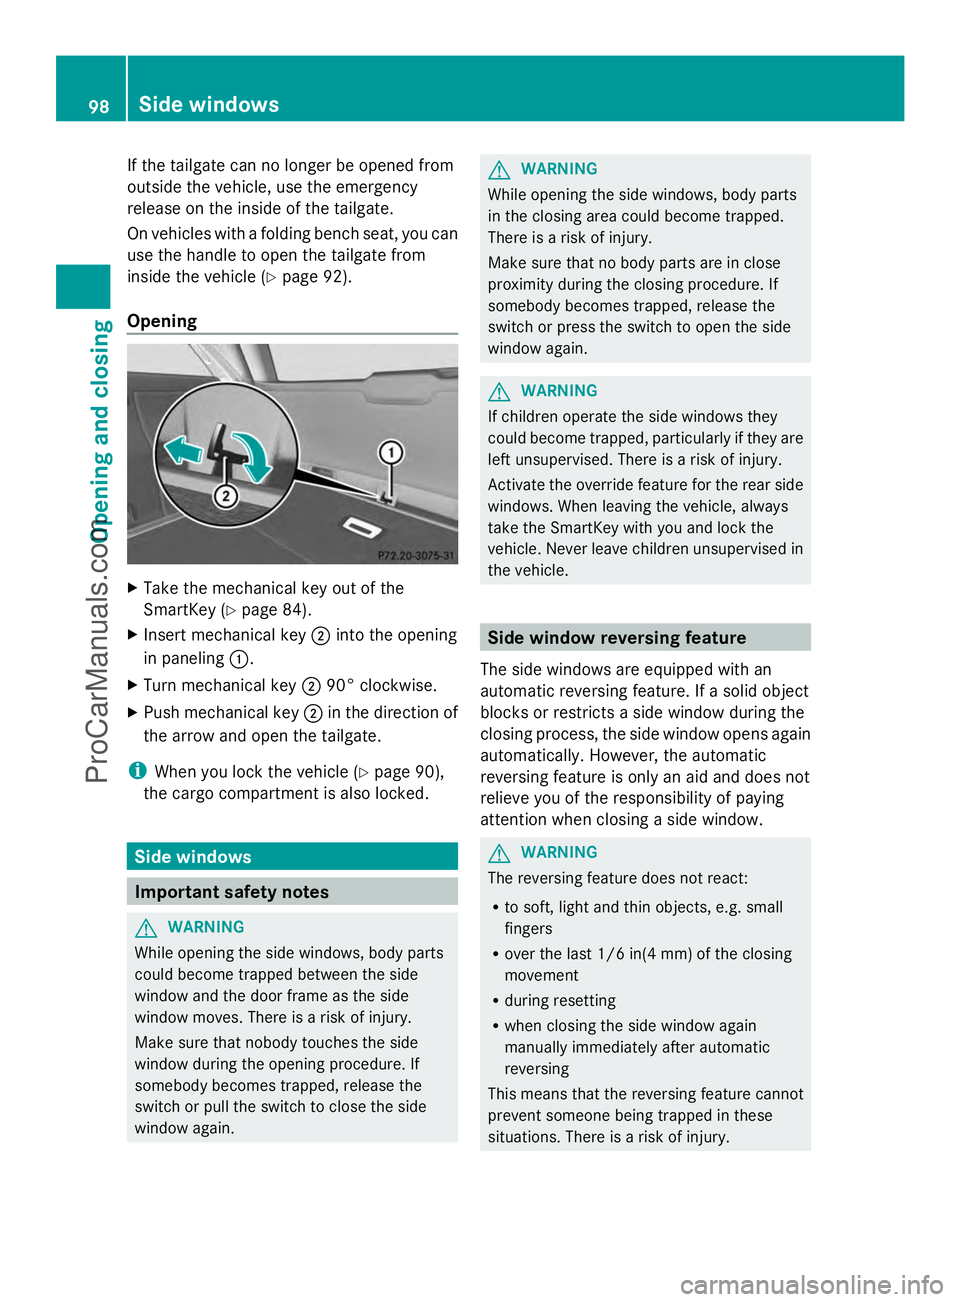
Opening X
Take the mechanical key out of the
SmartKey (Y page 84).
X Insert mechanical key ;into the opening
in paneling :.
X Turn mechanical key ;90° clockwise.
X Push mechanical key ;in the direction of
the arrow and open the tailgate.
i When you lock the vehicle (Y page 90),
the cargo compartment is also locked. Side windows
Important safety notes
G
WARNING
While opening the side windows, body parts
could become trapped between the side
window and the door frame as the side
window moves. There is a risk of injury.
Make sure that nobody touches the side
window during the opening procedure. If
somebody becomes trapped, release the
switch or pull the switch to close the side
window again. G
WARNING
While opening the side windows, body parts
in the closing area could become trapped.
There is a risk of injury.
Make sure that no body parts are in close
proximity during the closing procedure. If
somebody becomes trapped, release the
switch or press the switch to open the side
window again. G
WARNING
If children operate the side windows they
could become trapped, particularly if they are
left unsupervised. There is a risk of injury.
Activate the override feature for the rear side
windows. When leaving the vehicle, always
take the SmartKey with you and lock the
vehicle. Never leave children unsupervised in
the vehicle. Side window reversing feature
The side windows are equipped with an
automatic reversing feature. If a solid object
blocks or restricts a side window during the
closing process, the side window opens again
automatically. However, the automatic
reversing feature is only an aid and does not
relieve you of the responsibility of paying
attention when closing a side window. G
WARNING
The reversing feature does not react:
R to soft, light and thin objects, e.g. small
fingers
R over the last 1/6 in(4 mm) of the closing
movement
R during resetting
R when closing the side window again
manually immediately after automatic
reversing
This means that the reversing feature cannot
prevent someone being trapped in these
situations. There is a risk of injury. 98
Side windowsOpening and closing
ProCarManuals.com
Page 140 of 430
X
Switch off the lights.
X Open the hood.
X Turn housing cover :counter-clockwise
and pull it out.
X Using the handle extension, turn bulb
holder ;counter-clockwise and pull it out.
X Take the bulb out of bulb holder ;.
X Insert the new bulb into bulb holder ;.
X Insert bulb holder ;into the lamp and turn
it clockwise.
X Align housing cover :and turn it
clockwise until it engages.
Turn signal (static LED headlamps) X
Switch off the lights.
X Open the hood.
X Turn housing cover :counter-clockwise
and pull it out.
X Turn bulb holder ;counter-clockwise and
pull it out.
X Take the bulb out of bulb holder ;.
X Insert the new bulb into bulb holder ;.
X Insert bulb holder ;into the lamp and turn
it clockwise.
X Align housing cover :and turn it
clockwise until it engages. Windshield wipers
Switching the windshield wipers on/
off
! Do not operate the windshield wipers
when the windshield is dry, as this could
damage the wiper blades. Moreover, dust
that has collected on the windshield can
scratch the glass if wiping takes place when
the windshield is dry.
If it is necessary to switch on the windshield
wipers in dry weather conditions, always
use washer fluid when operating the
windshield wipers.
! If the windshield wipers leave smears on
the windshield after the vehicle has been
washed in an automatic car wash, wax or
other residues may be the reason for this.
Clean the windshield using washer fluid
after washing the vehicle in an automatic
car wash.
! Intermittent wiping with rain sensor: due
to optical influences and the windshield
becoming dirty in dry weather conditions,
the windshield wipers may be activated
inadvertently. This could then damage the
windshield wiper blades or scratch the
windshield.
For this reason, you should always switch
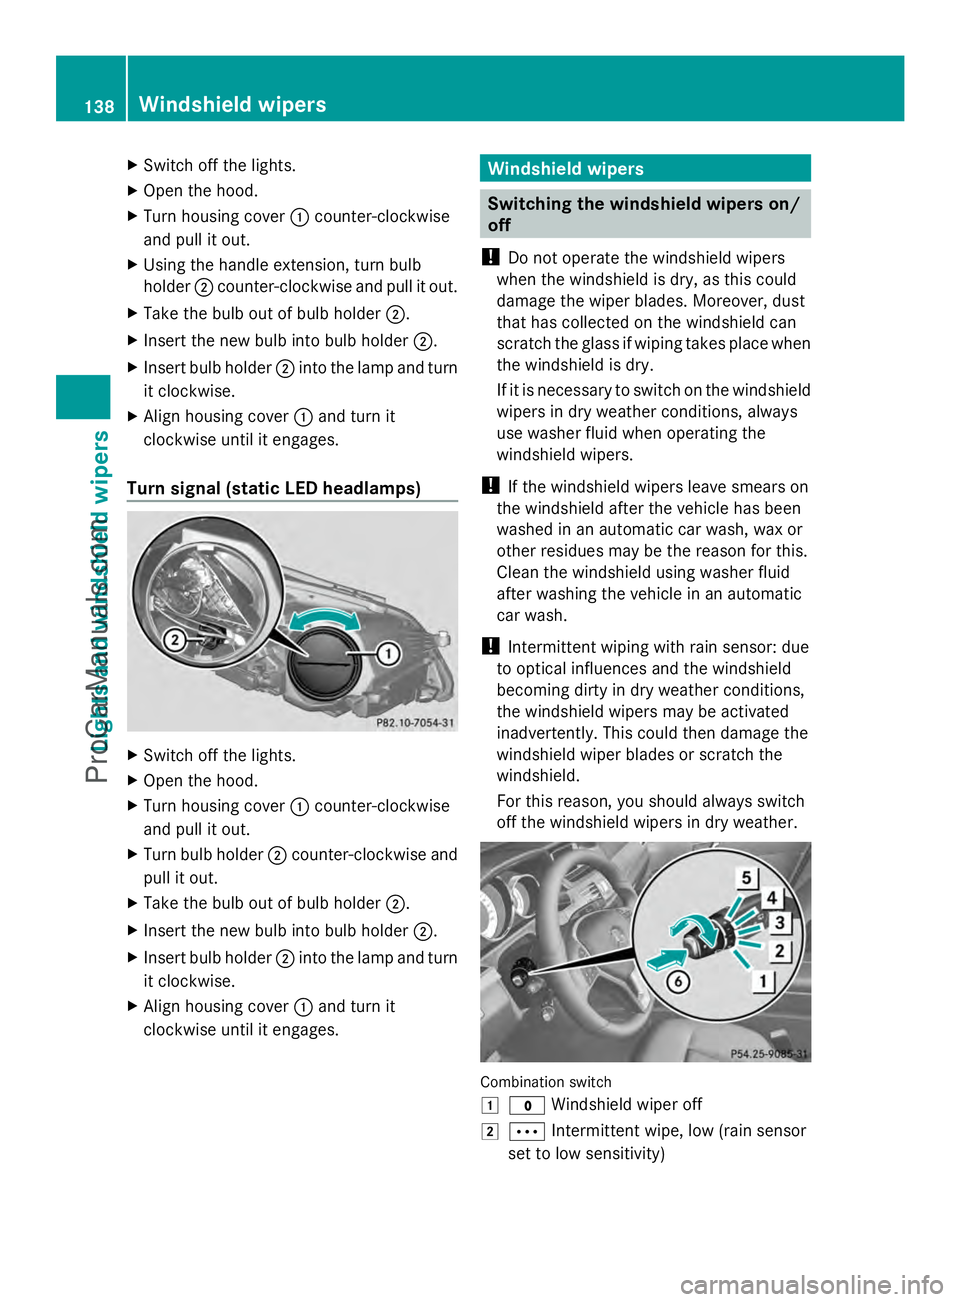
off the windshield wipers in dry weather. Combination switch
1
$ Windshield wiper off
2 Ä Intermittent wipe, low (rain sensor
set to low sensitivity) 138
Windshield wipersLights and windshield wipers
ProCarManuals.com
Page 158 of 430
X
To open/close: turn thumbwheel =up or
down. Setting the glove box air vent
! Close the air vent when heating the
vehicle.
At high outside temperatures, open the air
vent and activate the "cooling with air
dehumidification" function. Otherwise,
temperature-sensitive items stored in the
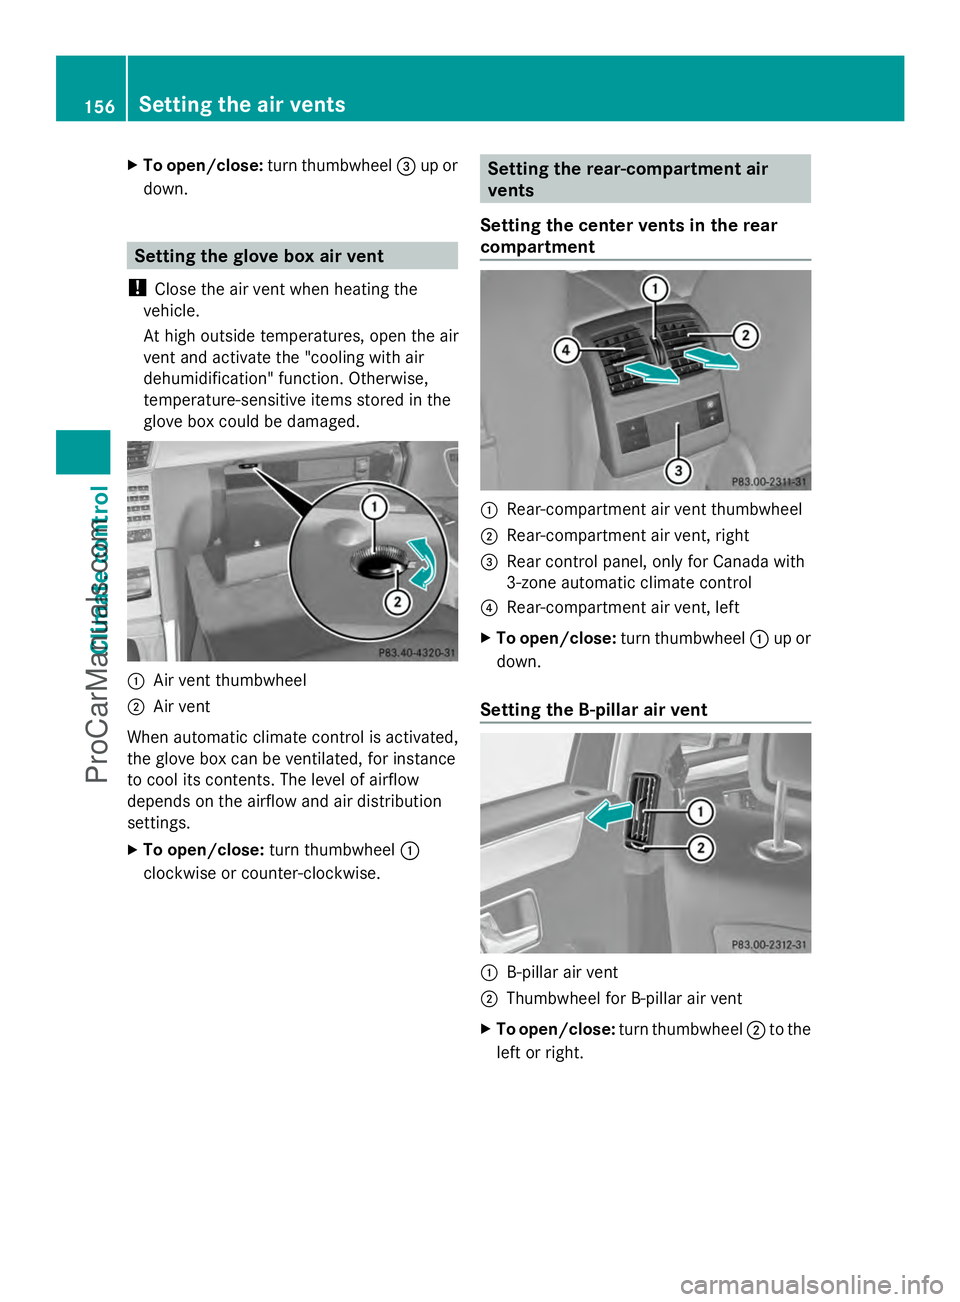
glove box could be damaged. :
Air vent thumbwheel
; Air vent
When automatic climate control is activated,
the glove box can be ventilated, for instance
to cool its contents. The level of airflow
depends on the airflow and air distribution
settings.
X To open/close: turn thumbwheel :
clockwise or counter-clockwise. Setting the rear-compartment air
vents
Setting the center vents in the rear
compartment :
Rear-compartment air vent thumbwheel
; Rear-compartment air vent, right
= Rear control panel, only for Canada with
3-zone automatic climate control
? Rear-compartment air vent, left
X To open/close: turn thumbwheel :up or
down.
Setting the B-pillar air vent :
B-pillar air vent
; Thumbwheel for B-pillar air vent
X To open/close: turn thumbwheel ;to the
left or right. 156
Setting the air ventsClimate control
ProCarManuals.com
Page 179 of 430
vehicle with the SmartKey or with KEYLESS-
GO.
The position of the fuel filler cap is displayed
8 in the instrument cluster. The arrow
next to the filling pump indicates the side of
the vehicle.
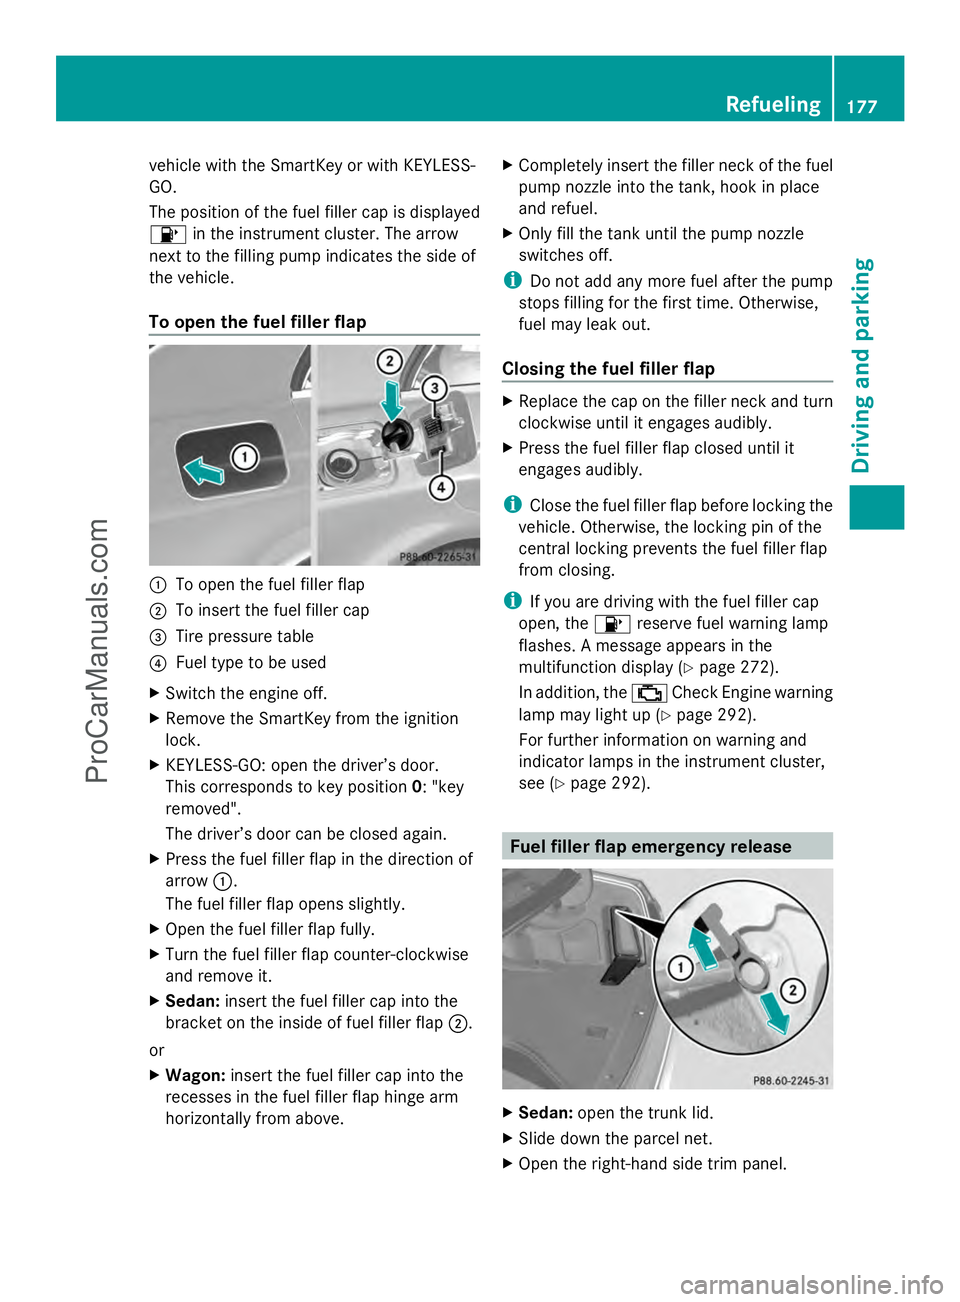
To open the fuel filler flap :
To open the fuel filler flap
; To insert the fuel filler cap
= Tire pressure table
? Fuel type to be used
X Switch the engine off.
X Remove the SmartKey from the ignition
lock.
X KEYLESS-GO: open the driver’s door.
This corresponds to key position 0: "key
removed".
The driver’s door can be closed again.
X Press the fuel filler flap in the direction of
arrow :.
The fuel filler flap opens slightly.
X Open the fuel filler flap fully.
X Turn the fuel filler flap counter-clockwise
and remove it.
X Sedan: insert the fuel filler cap into the
bracket on the inside of fuel filler flap ;.
or
X Wagon: insert the fuel filler cap into the
recesses in the fuel filler flap hinge arm
horizontally from above. X
Completely insert the filler neck of the fuel
pump nozzle into the tank, hook in place
and refuel.
X Only fill the tank until the pump nozzle
switches off.
i Do not add any more fuel after the pump
stops filling for the first time. Otherwise,
fuel may leak out.
Closing the fuel filler flap X
Replace the cap on the filler neck and turn
clockwise until it engages audibly.
X Press the fuel filler flap closed until it
engages audibly.
i Close the fuel filler flap before locking the
vehicle. Otherwise, the locking pin of the
central locking prevents the fuel filler flap
from closing.
i If you are driving with the fuel filler cap
open, the 8reserve fuel warning lamp
flashes. A message appears in the
multifunction display (Y page 272).
In addition, the ;Check Engine warning
lamp may light up (Y page 292).
For further information on warning and
indicator lamps in the instrument cluster,
see (Y page 292). Fuel filler flap emergency release
X
Sedan: open the trunk lid.
X Slide down the parcel net.
X Open the right-hand side trim panel. Refueling
177Driving and parking Z
ProCarManuals.com
Page 183 of 430
residues crystallize after time and
contaminate the affected surfaces.
! DEF is not a fuel additive and must not be
added to the fuel tank. If DEF is added to
the fuel tank, this can lead to engine
damage.
! Only screw on the DEF refill bottle hand-
tight. It could otherwise be damaged.
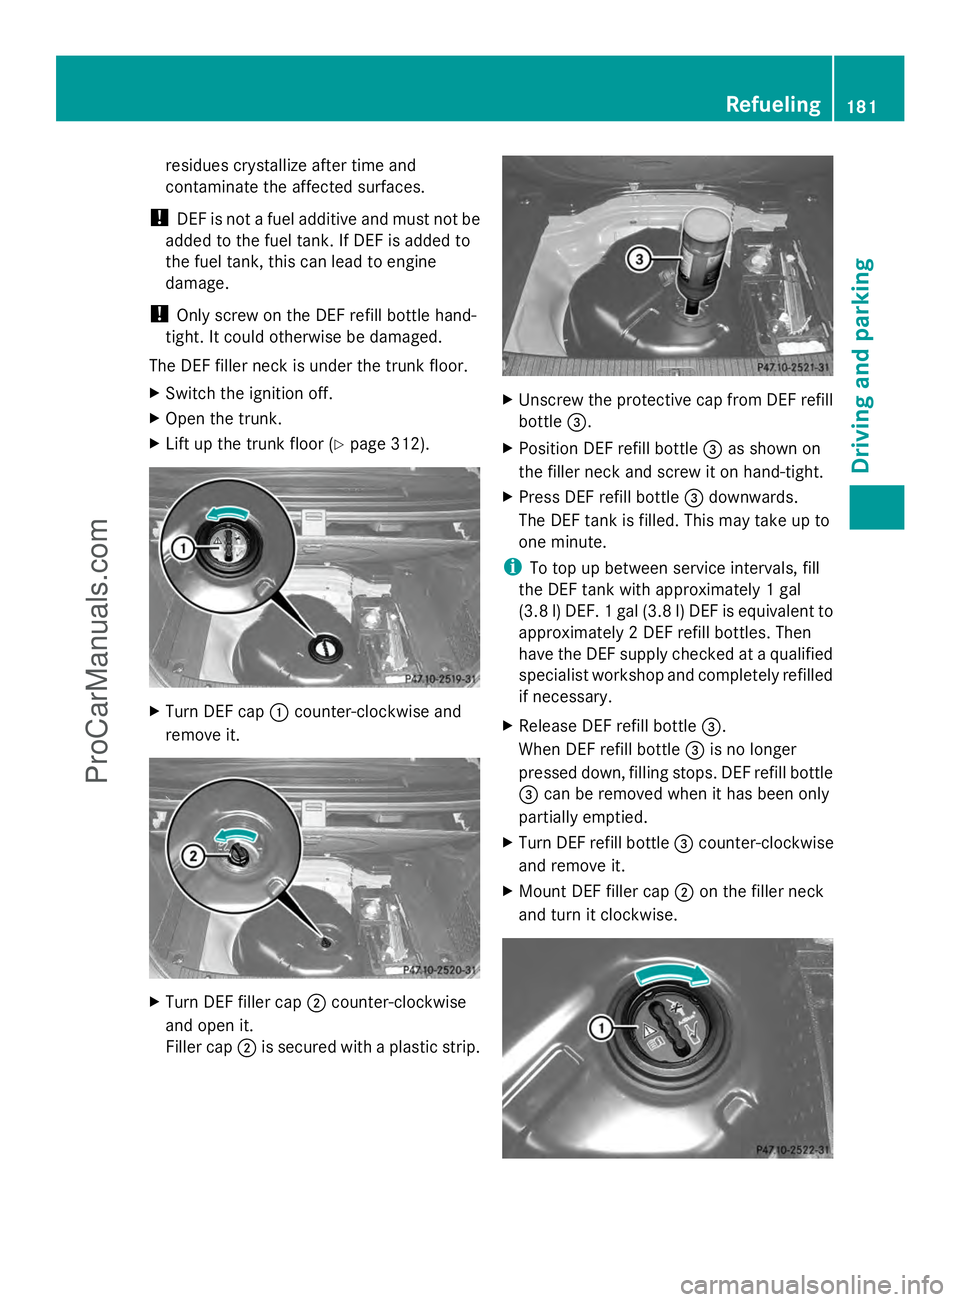
The DEF filler neck is under the trunk floor.
X Switch the ignition off.
X Open the trunk.
X Lift up the trunk floor ( Ypage 312). X
Turn DEF cap :counter-clockwise and
remove it. X
Turn DEF filler cap ;counter-clockwise
and open it.
Filler cap ;is secured with a plastic strip. X
Unscrew the protective cap from DEF refill
bottle =.
X Position DEF refill bottle =as shown on
the filler neck and screw it on hand-tight.
X Press DEF refill bottle =downwards.
The DEF tank is filled. This may take up to
one minute.
i To top up between service intervals, fill
the DEF tank with approximately 1 gal
(3.8 l) DEF. 1 gal (3.8 l) DEF is equivalent to
approximately 2 DEF refill bottles. Then
have the DEF supply checked at a qualified
specialist workshop and completely refilled
if necessary.
X Release DEF refill bottle =.
When DEF refill bottle =is no longer
pressed down, filling stops. DEF refill bottle
= can be removed when it has been only
partially emptied.
X Turn DEF refill bottle =counter-clockwise
and remove it.
X Mount DEF filler cap ;on the filler neck
and turn it clockwise. Refueling
181Driving and parking Z
ProCarManuals.com
Page 184 of 430
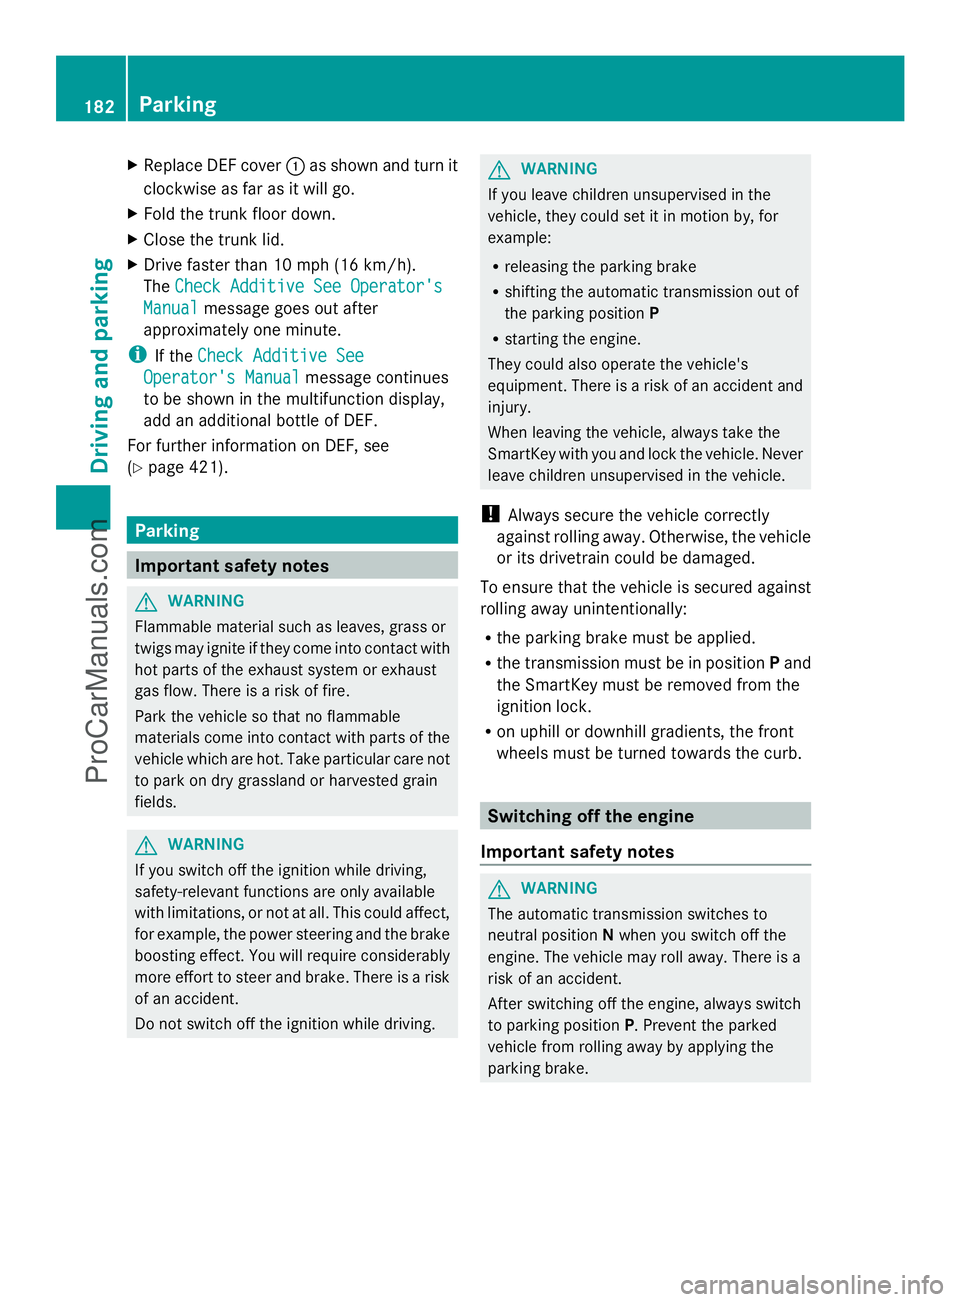
X
Replace DEF cover :as shown and turn it
clockwise as far as it will go.
X Fold the trunk floor down.
X Close the trunk lid.
X Drive faster than 10 mph (16 km/h).
The Check Additive See Operator's Check Additive See Operator's
Manual
Manual message goes out after
approximately one minute.
i If the Check Additive See
Check Additive See
Operator's Manual
Operator's Manual message continues
to be shown in the multifunction display,
add an additional bottle of DEF.
For further information on DEF, see
(Y page 421). Parking
Important safety notes
G
WARNING
Flammable material such as leaves, grass or
twigs may ignite if they come into contact with
hot parts of the exhaust system or exhaust
gas flow. There is a risk of fire.
Park the vehicle so that no flammable
materials come into contact with parts of the
vehicle which are hot. Take particular care not
to park on dry grassland or harvested grain
fields. G
WARNING
If you switch off the ignition while driving,
safety-relevant functions are only available
with limitations, or not at all. This could affect,
for example, the power steering and the brake
boosting effect. You will require considerably
more effort to steer and brake. There is a risk
of an accident.
Do not switch off the ignition while driving. G
WARNING
If you leave children unsupervised in the
vehicle, they could set it in motion by, for
example:
R releasing the parking brake
R shifting the automatic transmission out of
the parking position P
R starting the engine.
They could also operate the vehicle's
equipment. There is a risk of an accident and
injury.
When leaving the vehicle, always take the
SmartKey with you and lock the vehicle. Never
leave children unsupervised in the vehicle.
! Always secure the vehicle correctly
against rolling away. Otherwise, the vehicle
or its drivetrain could be damaged.
To ensure that the vehicle is secured against
rolling away unintentionally:
R the parking brake must be applied.
R the transmission must be in position Pand
the SmartKey must be removed from the
ignition lock.
R on uphill or downhill gradients, the front
wheels must be turned towards the curb. Switching off the engine
Important safety notes G
WARNING
The automatic transmission switches to
neutral position Nwhen you switch off the
engine. The vehicle may roll away. There is a
risk of an accident.
After switching off the engine, always switch
to parking position P. Prevent the parked
vehicle from rolling away by applying the
parking brake. 182
Pa
rkingDriving an d parking
ProCarManuals.com