2014 MERCEDES-BENZ E-SEDAN clock
[x] Cancel search: clockPage 205 of 430
i
If depressing the brake pedal the first
time does not activate the HOLD function,
wait briefly and then try again.
Deactivating the HOLD function The HOLD function is deactivated
automatically if:
R
you accelerate and the transmission is in
position Dor R.
R you shift the transmission to position P.
R you depress the brake pedal again with a
certain amount of pressure until ë
disappears from the multifunction display.
R you activate DISTRONIC PLUS.
When the HOLD function is activated, the
transmission is shifted automatically to
position Pif:
R the driver's door is open and the driver's
seat belt is unfastened.
R the engine is switched off, unless it is
automatically switched off by the ECO
start/stop function.
R a system malfunction occurs.
R the power supply is not sufficient. RACE START
Important safety notes i
Observe the safety notes for the SPORT
handling mode (Y page 74).
RACE START is intended solely for activation
on dedicated race circuits.
RACE START enables optimal acceleration
from a standing start. The precondition for
this is a suitable high-grip road surface.
i RACE START is only available in AMG
vehicles. Conditions for activation You can activate RACE START if:
R
the doors are closed.
R the engine is running and it has reached an
operating temperature of approximately
176 ‡ (80 †). This is the case when the
engine oil temperature in the multifunction
display stops flashing.
R SPORT handling mode is activated.
(Y page 74)
R the steering wheel is in the straight-ahead
position.
R the vehicle is stationary and the brake
pedal is depressed (left foot).
R the transmission is in position D.
Activating RACE START X
Depress the brake pedal with your left foot
and keep it depressed.
X Turn the drive program selector clockwise
(Y page 171) until the RSlamp lights up.
The RACE START Confirm: Paddle UP RACE START Confirm: Paddle UP
Cancel: Paddle DOWN
Cancel: Paddle DOWN message appears
in the multifunction display.
i If the activation conditions are no longer
fulfilled, RACE START is canceled. The
RACE START Canceled RACE START Canceled message appears
in the multifunction display.
X To cancel: pull the left steering wheel
paddle shifter (Y page 172).
or
X To confirm: pull the right steering wheel
paddle shifter (Y page 172).
The RACE START Available Depress RACE START Available Depress
gas pedal
gas pedal message appears in the
multifunction display.
i If you do not depress the accelerator
pedal fully within two seconds, RACE
START is canceled. The RACE START Not RACE START Not
Possible See Operator's Manual
Possible See Operator's Manual
message appears in the multifunction
display. Driving systems
203Driving and parking Z
ProCarManuals.com
Page 301 of 430
There is a risk of injury, particularly in the
event of sudden braking or a sudden change
in direction.
R Always stow objects so that they cannot be
thrown around in such situations.
R Always make sure that objects do not
protrude from stowage spaces, parcel nets
or stowage nets.
R Close the lockable stowage spaces while
driving.
R Always stow and secure heavy, hard,
pointed, sharp-edged, fragile or bulky
objects in the trunk/cargo compartment.
Observe the loading guidelines (Y page 298).
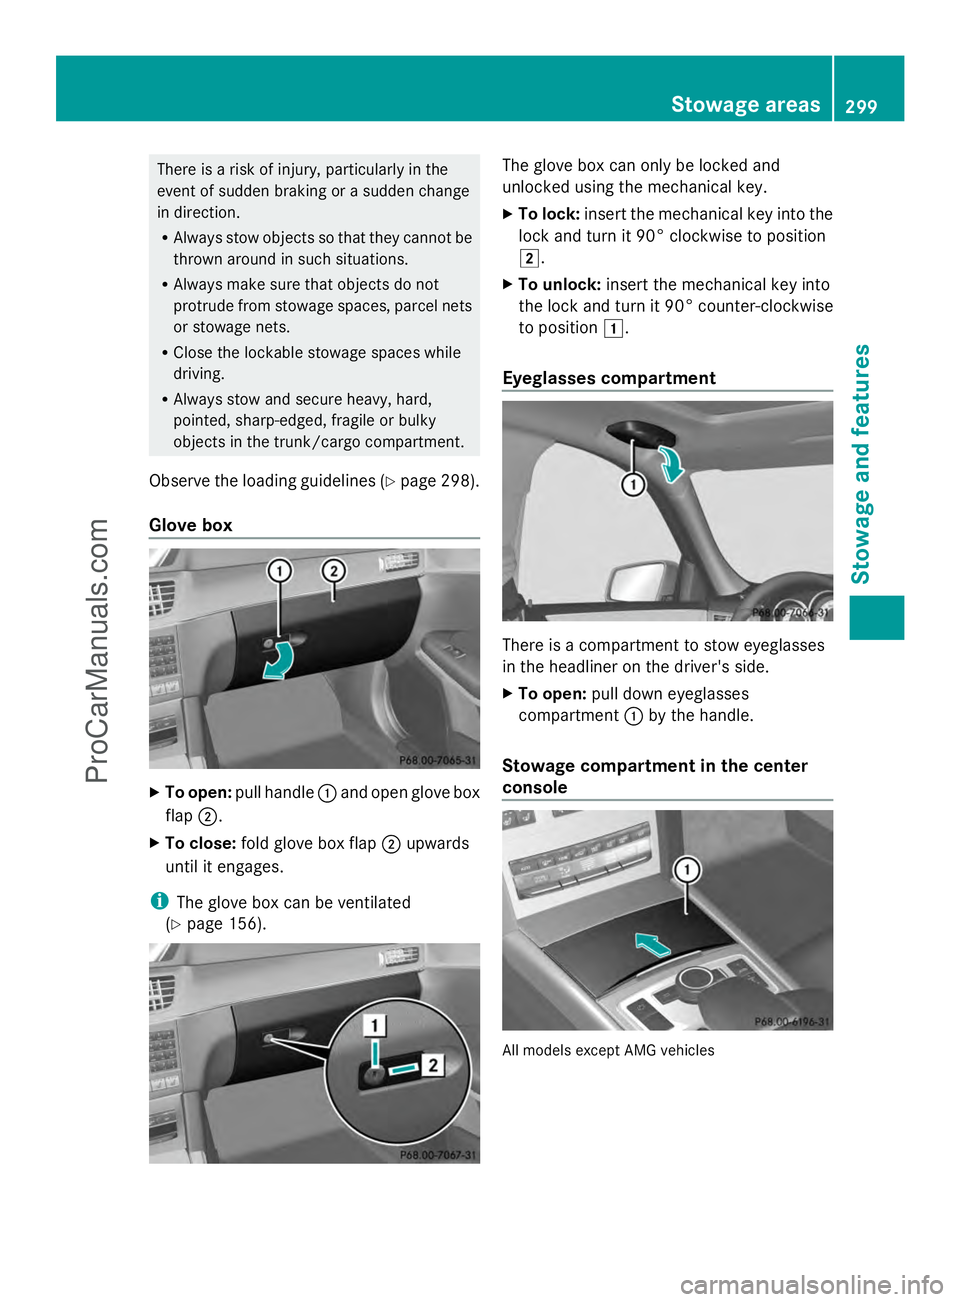
Glove box X
To open: pull handle :and open glove box
flap ;.
X To close: fold glove box flap ;upwards
until it engages.
i The glove box can be ventilated
(Y page 156). The glove box can only be locked and
unlocked using the mechanical key.
X
To lock: insert the mechanical key into the
lock and turn it 90° clockwise to position
2.
X To unlock: insert the mechanical key into
the lock and turn it 90° counter-clockwise
to position 1.
Eyeglasses compartment There is a compartment to stow eyeglasses
in the headliner on the driver's side.
X
To open: pull down eyeglasses
compartment :by the handle.
Stowage compartment in the center
console All models except AMG vehicles Stowage areas
299Stowage and features Z
ProCarManuals.com
Page 313 of 430
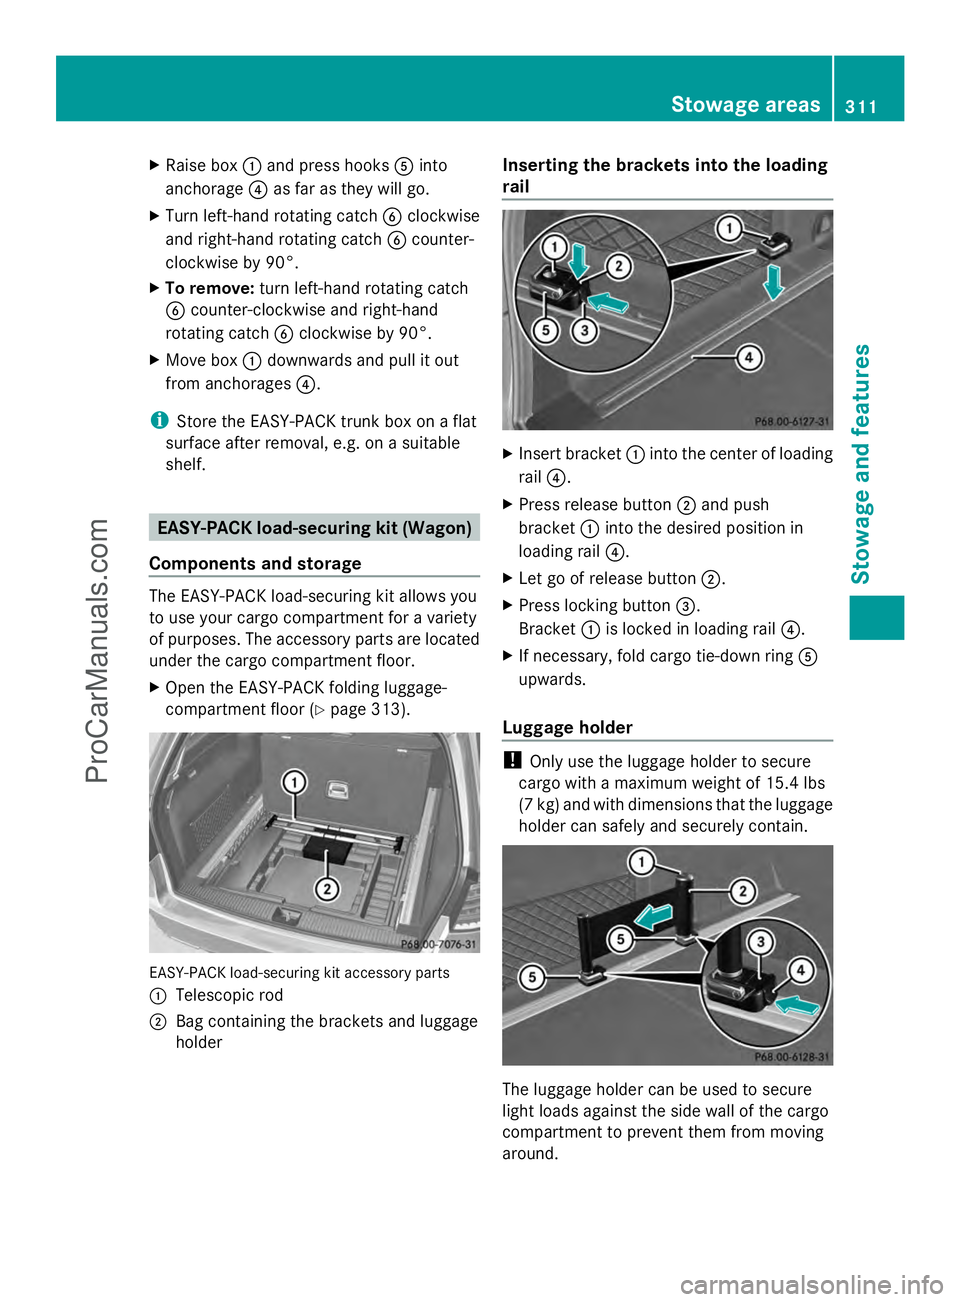
X
Raise box :and press hooks Ainto
anchorage ?as far as they will go.
X Turn left-hand rotating catch Bclockwise
and right-hand rotating catch Bcounter-
clockwise by 90°.
X To remove: turn left-hand rotating catch
B counter-clockwise and right-hand
rotating catch Bclockwise by 90°.
X Move box :downwards and pull it out
from anchorages ?.
i Store the EASY-PACK trunk box on a flat
surface after removal, e.g. on a suitable
shelf. EASY-PACK load-securing kit (Wagon)
Components and storage The EASY-PACK load-securing kit allows you
to use your cargo compartment for a variety
of purposes. The accessory parts are located
under the cargo compartment floor.
X Open the EASY-PACK folding luggage-
compartment floor (Y page 313).EASY-PACK load-securing kit accessory parts
: Telescopic rod
; Bag containing the brackets and luggage
holder Inserting the brackets into the loading
rail
X
Insert bracket :into the center of loading
rail ?.
X Press release button ;and push
bracket :into the desired position in
loading rail ?.
X Let go of release button ;.
X Press locking button =.
Bracket :is locked in loading rail ?.
X If necessary, fold cargo tie-down ring A
upwards.
Luggage holder !
Only use the luggage holder to secure
cargo with a maximum weight of 15.4 lbs
(7 kg) and with dimensions that the luggage
holder can safely and securely contain. The luggage holder can be used to secure
light loads against the side wall of the cargo
compartment to prevent them from moving
around. Stowage areas
311Stowage and fea tures Z
ProCarManuals.com
Page 341 of 430
engine or to the catalytic converter. Have
excess engine oil siphoned off.
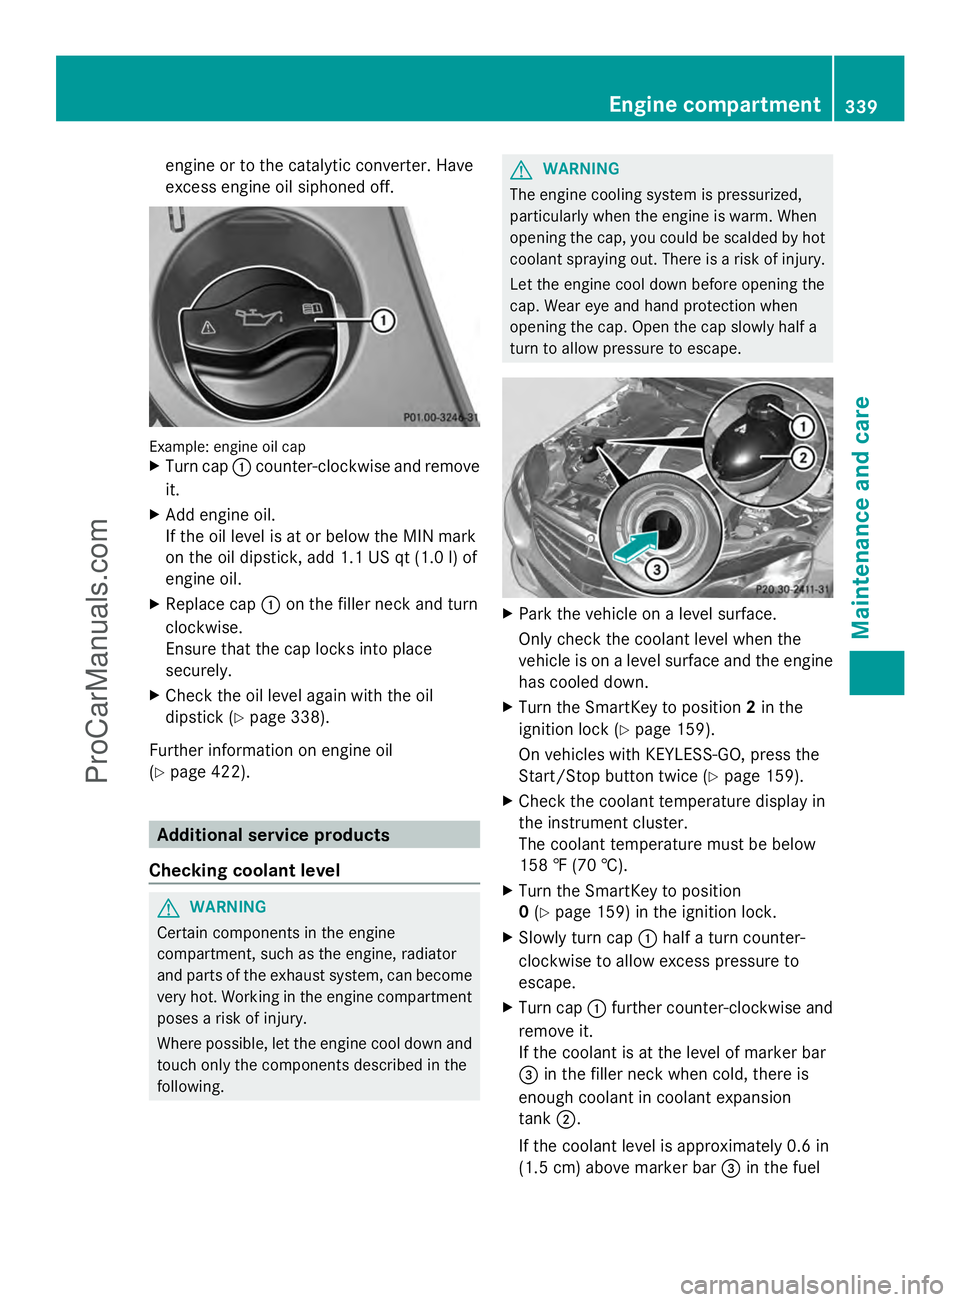
Example: engine oil cap
X
Turn cap :counter-clockwise and remove
it.
X Add engine oil.
If the oil level is at or below the MIN mark
on the oil dipstick, add 1.1 US qt (1.0 l) of
engine oil.
X Replace cap :on the filler neck and turn
clockwise.
Ensure that the cap locks into place
securely.
X Check the oil level again with the oil
dipstick (Y page 338).
Further information on engine oil
(Y page 422). Additional service products
Checking coolant level G
WARNING
Certain components in the engine
compartment, such as the engine, radiator
and parts of the exhaust system, can become
very hot. Working in the engine compartment
poses a risk of injury.
Where possible, let the engine cool down and
touch only the components described in the
following. G
WARNING
The engine cooling system is pressurized,
particularly when the engine is warm. When
opening the cap, you could be scalded by hot
coolant spraying out. There is a risk of injury.
Let the engine cool down before opening the
cap. Wear eye and hand protection when
opening the cap. Open the cap slowly half a
turn to allow pressure to escape. X
Park the vehicle on a level surface.
Only check the coolant level when the
vehicle is on a level surface and the engine
has cooled down.
X Turn the SmartKey to position 2in the
ignition lock (Y page 159).
On vehicles with KEYLESS-GO, press the
Start/Stop button twice (Y page 159).
X Check the coolant temperature display in
the instrument cluster.
The coolant temperature must be below
158 ‡ (70 †).
X Turn the SmartKey to position
0 (Y page 159) in the ignition lock.
X Slowly turn cap :half a turn counter-
clockwise to allow excess pressure to
escape.
X Turn cap :further counter-clockwise and
remove it.
If the coolant is at the level of marker bar
= in the filler neck when cold, there is
enough coolant in coolant expansion
tank ;.
If the coolant level is approximately 0.6 in
(1.5 cm) above marker bar =in the fuel Engine compartment
339Maintenance and care Z
ProCarManuals.com
Page 342 of 430
filler neck when warm, there is enough
coolant in expansion tank ;.
X If necessary, add coolant that has been
tested and approved by Mercedes-Benz.
X Replace cap :and turn it clockwise as far
as it will go.
For further information on coolant, see
(Y page 423).
Adding washer fluid to the windshield
washer system G
WARNING
Certain components in the engine
compartment, such as the engine, radiator
and parts of the exhaust system, can become
very hot. Working in the engine compartment
poses a risk of injury.
Where possible, let the engine cool down and
touch only the components described in the
following. G
WARNING
Windshield washer concentrate is highly
flammable. If it comes into contact with hot
engine components or the exhaust system it
could ignite. There is a risk of fire and injury.
Make sure that no windshield washer
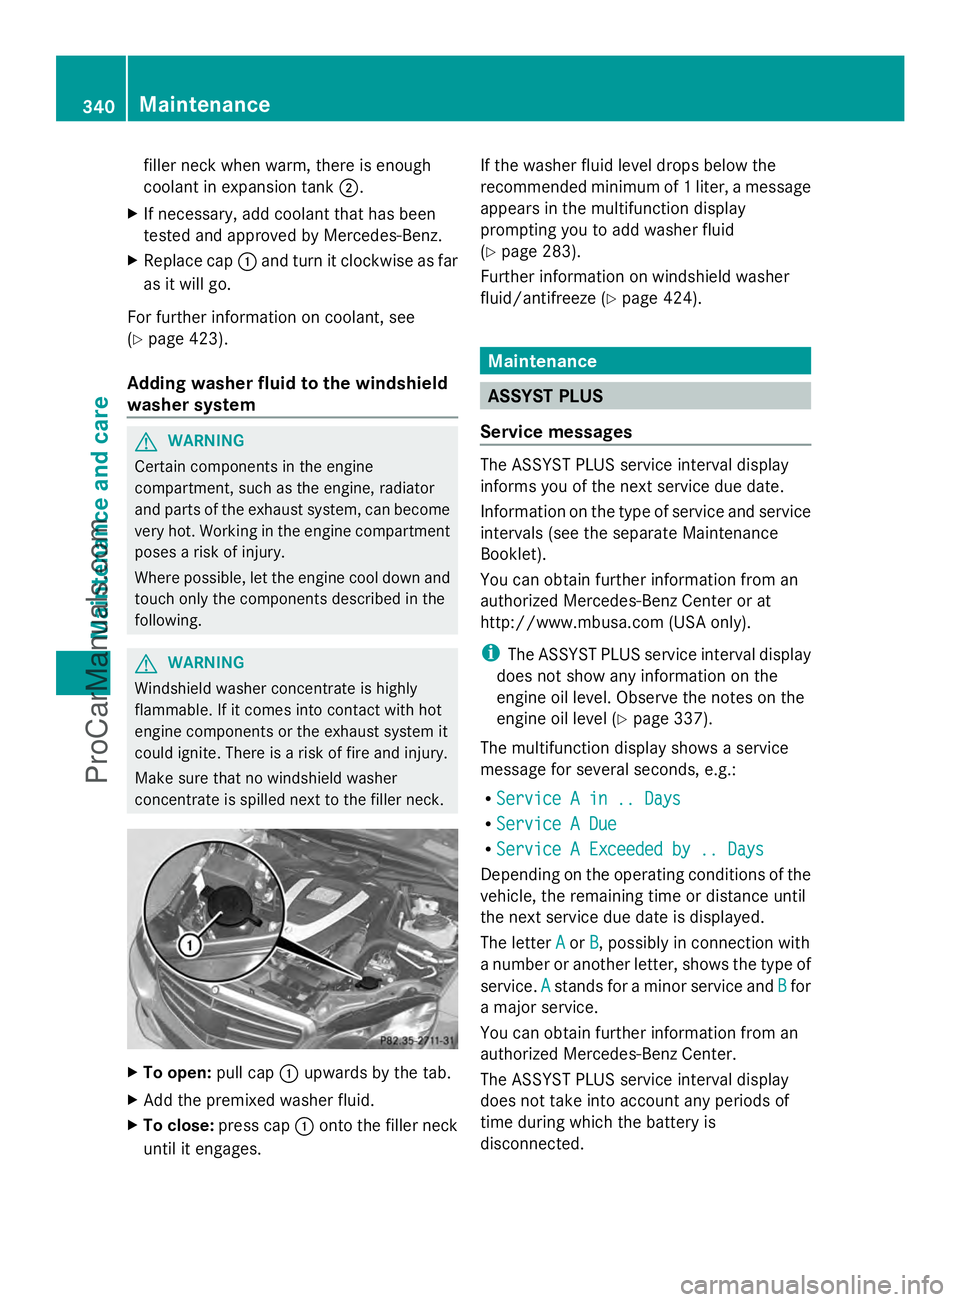
concentrate is spilled next to the filler neck. X
To open: pull cap:upwards by the tab.
X Add the premixed washer fluid.
X To close: press cap :onto the filler neck
until it engages. If the washer fluid level drops below the
recommended minimum of 1 liter, a message
appears in the multifunction display
prompting you to add washer fluid
(Y
page 283).
Further information on windshield washer
fluid/antifreeze (Y page 424). Maintenance
ASSYST PLUS
Service messages The ASSYST PLUS service interval display
informs you of the next service due date.
Information on the type of service and service
intervals (see the separate Maintenance
Booklet).
You can obtain further information from an
authorized Mercedes-Benz Center or at
http://www.mbusa.com (USA only).
i
The ASSYST PLUS service interval display
does not show any information on the
engine oil level. Observe the notes on the
engine oil level (Y page 337).
The multifunction display shows a service
message for several seconds, e.g.:
R Service A in .. Days Service A in .. Days
R Service A Due
Service A Due
R Service A Exceeded by .. Days
Service A Exceeded by .. Days
Depending on the operating conditions of the
vehicle, the remaining time or distance until
the next service due date is displayed.
The letter A Aor B
B, possibly in connection with
a number or another letter, shows the type of
service. A Astands for a minor service and B
Bfor
a major service.
You can obtain further information from an
authorized Mercedes-Benz Center.
The ASSYST PLUS service interval display
does not take into account any periods of
time during which the battery is
disconnected. 340
MaintenanceMaintenance and care
ProCarManuals.com
Page 362 of 430
vehicle literature. You could otherwise fail to
recognize dangers e.g. due to high voltage.
For safety reasons, Mercedes-Benz
recommends that you only use batteries
which have been tested and approved for
your vehicle by Mercedes-Benz. These
batteries provide increased impact
protection to prevent vehicle occupants from
suffering acid burns should the battery be
damaged in the event of an accident.
In order for the battery to achieve the
maximum possible service life, it must always
be sufficiently charged.
The vehicle battery, like other batteries, can
discharge over time if you do not use the
vehicle. In this case, have the battery
disconnected at a qualified specialist
workshop. You can also charge the battery
with a charger recommended by Mercedes-
Benz. Contact a qualified specialist workshop
for further information.
Have the battery condition of charge checked
more frequently if you use the vehicle mainly
for short trips or if you leave it standing idle
for a lengthy period. Consult a qualified
specialist workshop if you wish to leave your
vehicle parked for a long period of time.
i Remove the SmartKey if you park the
vehicle and do not require any electrical
consumers. The vehicle will then use very
little energy, thus conserving battery
power.
i If the power supply has been interrupted,
e.g. if you reconnect the battery, you will
have to:
R set the clock. Information on setting the
clock can be found in the separate
operating instructions.
On vehicles with COMAND and a
navigation system, the clock is set
automatically.
R reset the function for folding the exterior
mirrors in/out automatically, by folding
the mirrors out once (Y page 123). Charging the battery
G
WARNING
During charging and jump-starting, explosive
gases can escape from the battery. There is a
risk of an explosion.
Particularly avoid fire, open flames, creating
sparks and smoking. Ensure there is sufficient
ventilation while charging and jump-starting.
Do not lean over a battery. G
WARNING
Battery acid is caustic. There is a risk of injury.
Avoid contact with the skin, eyes or clothing.
Do not inhale any battery gases. Do not lean
over the battery. Keep children away from
batteries. Wash battery acid immediately with
water and seek medical attention. G
WARNING
A discharged battery can freeze at
temperatures below freezing point. When
jump-starting the vehicle or charging the
battery, gases can escape from the battery.
There is a risk of an explosion.
Allow the frozen battery to thaw out before
charging it or jump-starting.
! Only use battery chargers with a
maximum charging voltage of 14.8 V.
! Only charge the battery using the jump-
starting connection point.
The jump-starting connection point is in the
engine compartment (Y page 362).
X Open the hood.
X Connect the battery charger to the positive
terminal and ground point in the same
order as when connecting the donor
battery in the jump-starting procedure
(Y page 362).
If, at low temperatures, the indicator lamps/
warning lamps in the instrument cluster do
not light up, it is highly likely that the
discharged battery has frozen. In this case,
you may neither charge the battery nor jump- 360
Battery (vehicle)Breakdown assistance
ProCarManuals.com
Page 367 of 430
!
When towing, pull away slowly and
smoothly. If the tractive power is too high,
the vehicles could be damaged.
! Do not tow with sling-type equipment.
This could damage the vehicle.
! When towing vehicles with KEYLESS-GO,
use the key instead of the Start/Stop
button. Otherwise, the automatic
transmission may shift to position Pwhen
the driver's or front-passenger door are
opened, which could lead to damage to the
transmission.
! The vehicle can be towed a maximum of
30 miles (50km). The towing speed of
30 mph (50 km/h) must not be exceeded.
If the vehicle has to be towed more than
30 miles (50km), the entire vehicle must be
raised and transported.
HYBRID vehicles : make sure that you read
the "HYBRID" supplement included in the
vehicle literature. You could otherwise fail to
recognize dangers e.g. due to high voltage.
It is better to have the vehicle transported
than to have it towed.
If the vehicle has suffered transmission
damage, have it transported on a transporter
or trailer.
The automatic transmission must be in
position Nwhen the vehicle is being towed.
The battery must be connected and charged.
Otherwise, you:
R cannot turn the SmartKey to position 2in
the ignition lock
R cannot shift the automatic transmission to
position N
i Disarm the automatic locking feature
before the vehicle is towed (Y page 89). You
could otherwise be locked out when
pushing or towing the vehicle. Installing/removing the towing eye
Installing the towing eye G
WARNING
The exhaust tail pipe may be very hot. There
is a risk of burns when removing the rear
cover.
Do not touch the exhaust pipe. Take particular
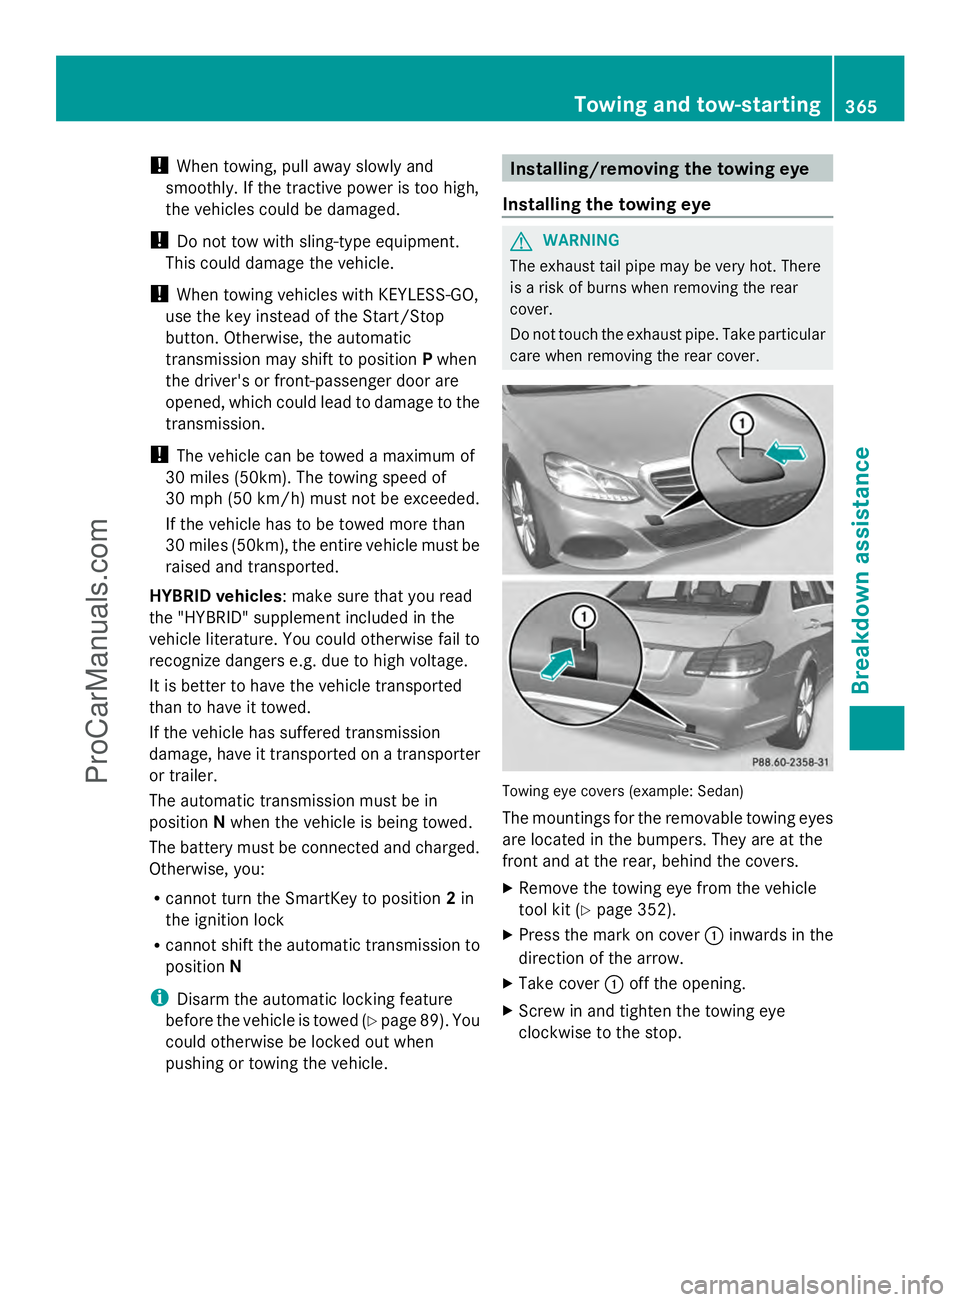
care when removing the rear cover. Towing eye covers (example: Sedan)
The mountings for the removable towing eyes
are located in the bumpers. They are at the
front and at the rear, behind the covers.
X
Remove the towing eye from the vehicle
tool kit (Y page 352).
X Press the mark on cover :inwards in the
direction of the arrow.
X Take cover :off the opening.
X Screw in and tighten the towing eye
clockwise to the stop. Towing and tow-starting
365Breakdown assistance Z
ProCarManuals.com
Page 400 of 430
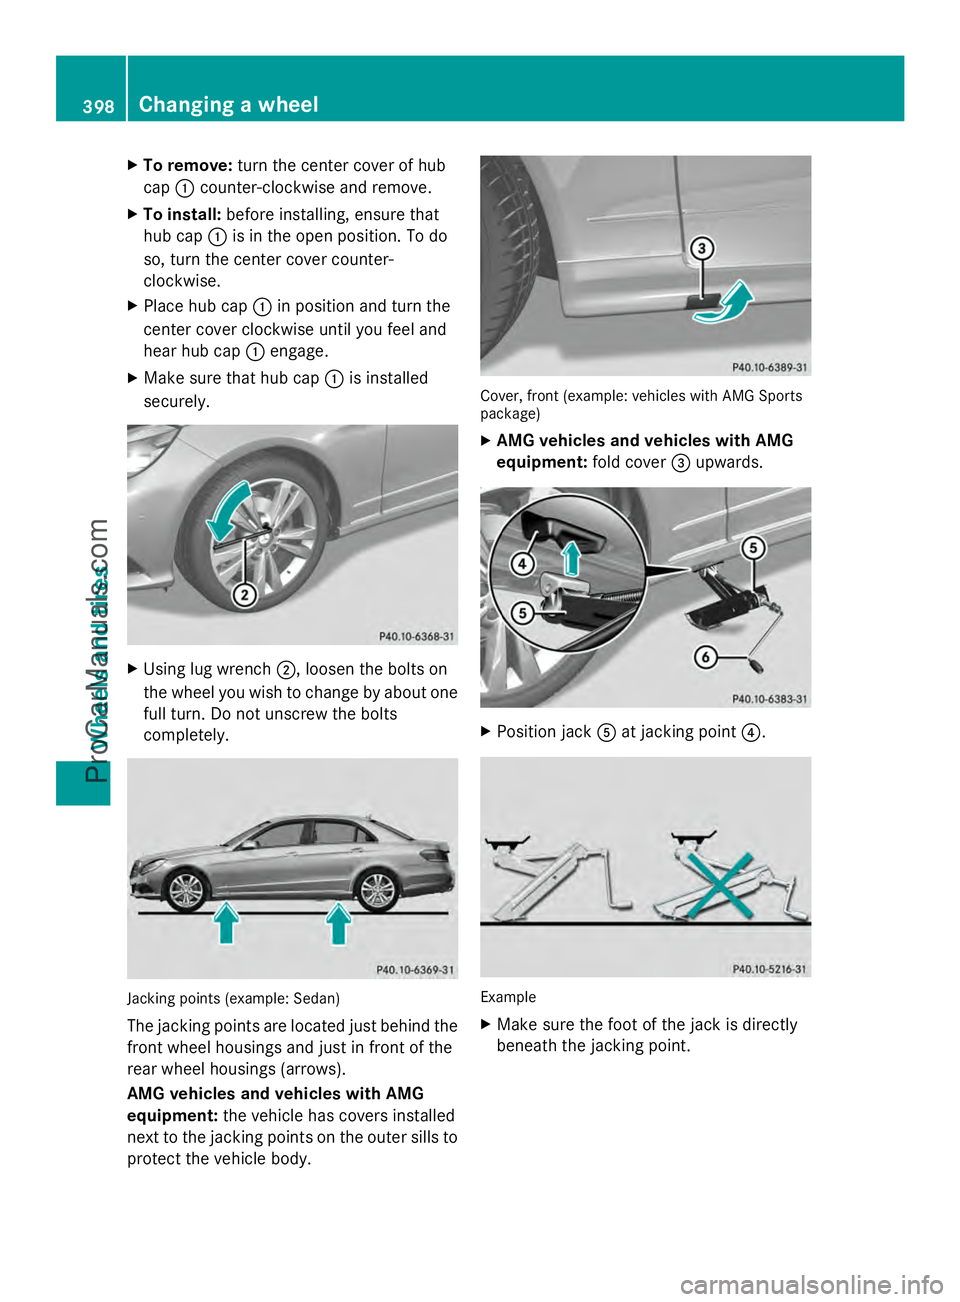
X
To remove: turn the center cover of hub
cap :counter-clockwise and remove.
X To install: before installing, ensure that
hub cap :is in the open position. To do
so, turn the center cover counter-
clockwise.
X Place hub cap :in position and turn the
center cover clockwise until you feel and
hear hub cap :engage.
X Make sure that hub cap :is installed
securely. X
Using lug wrench ;, loosen the bolts on
the wheel you wish to change by about one
full turn. Do not unscrew the bolts
completely. Jacking points (example: Sedan)
The jacking points are located just behind the
front wheel housings and just in front of the
rear wheel housings (arrows).
AMG vehicles and vehicles with AMG
equipment: the vehicle has covers installed
next to the jacking points on the outer sills to
protect the vehicle body. Cover, front (example: vehicles with AMG Sports
package)
X
AMG vehicles and vehicles with AMG
equipment: fold cover=upwards. X
Position jack Aat jacking point ?. Example
X
Make sure the foot of the jack is directly
beneath the jacking point. 398
Changing a wheelWheels and tires
ProCarManuals.com