2014 MERCEDES-BENZ E-SEDAN remove seats
[x] Cancel search: remove seatsPage 24 of 430

Protection of the environment
General notes
H
Environmental note
Daimler's declared policy is one of
comprehensive environmental protection.
The objectives are for the natural resources
that form the basis of our existence on this
planet to be used sparingly and in a manner
that takes the requirements of both nature
and humanity into account.
You too can help to protect the environment
by operating your vehicle in an
environmentally responsible manner.
Fuel consumption and the rate of engine,
transmission, brake and tire wear are affected
by these factors:
R operating conditions of your vehicle
R your personal driving style
You can influence both factors. You should
bear the following in mind:
Operating conditions:
R avoid short trips as these increase fuel
consumption.
R always make sure that the tire pressures
are correct.
R do not carry any unnecessary weight.
R remove roof racks once you no longer need
them.
R a regularly serviced vehicle will contribute
to environmental protection. You should
therefore adhere to the service intervals.
R always have service work carried out at a
qualified specialist workshop.
Personal driving style:
R do not depress the accelerator pedal when
starting the engine.
R do not warm up the engine when the vehicle
is stationary.
R drive carefully and maintain a safe distance
from the vehicle in front.
R avoid frequent, sudden acceleration and
braking. R
change gear in good time and use each gear
only up to Ôof its maximum engine speed.
R switch off the engine in stationary traffic.
R keep an eye on the vehicle's fuel
consumption. Environmental concerns and
recommendations
Wherever the operating instructions require
you to dispose of materials, first try to
regenerate or re-use them. Observe the
relevant environmental rules and regulations
when disposing of materials. In this way you
will help to protect the environment. Genuine Mercedes-Benz parts
H
Environmental note
Daimler AG also supplies reconditioned major
assemblies and parts which are of the same
quality as new parts. They are covered by the
same Limited Warranty entitlements as new
parts.
! Air bags and Emergency Tensioning
Devices, as well as control units and
sensors for these restraint systems, may be
installed in the following areas of your
vehicle:
R doors
R door pillars
R door sills
R seats
R cockpit
R instrument cluster
R center console
Do not install accessories such as audio
systems in these areas. Do not carry out
repairs or welding. You could impair the
operating efficiency of the restraint
systems. 22
IntroductionProCarManuals.com
Page 56 of 430
Resetting triggered NECK-PRO head
restraints/NECK-PRO luxury head
restraints NECK-PRO head restraints
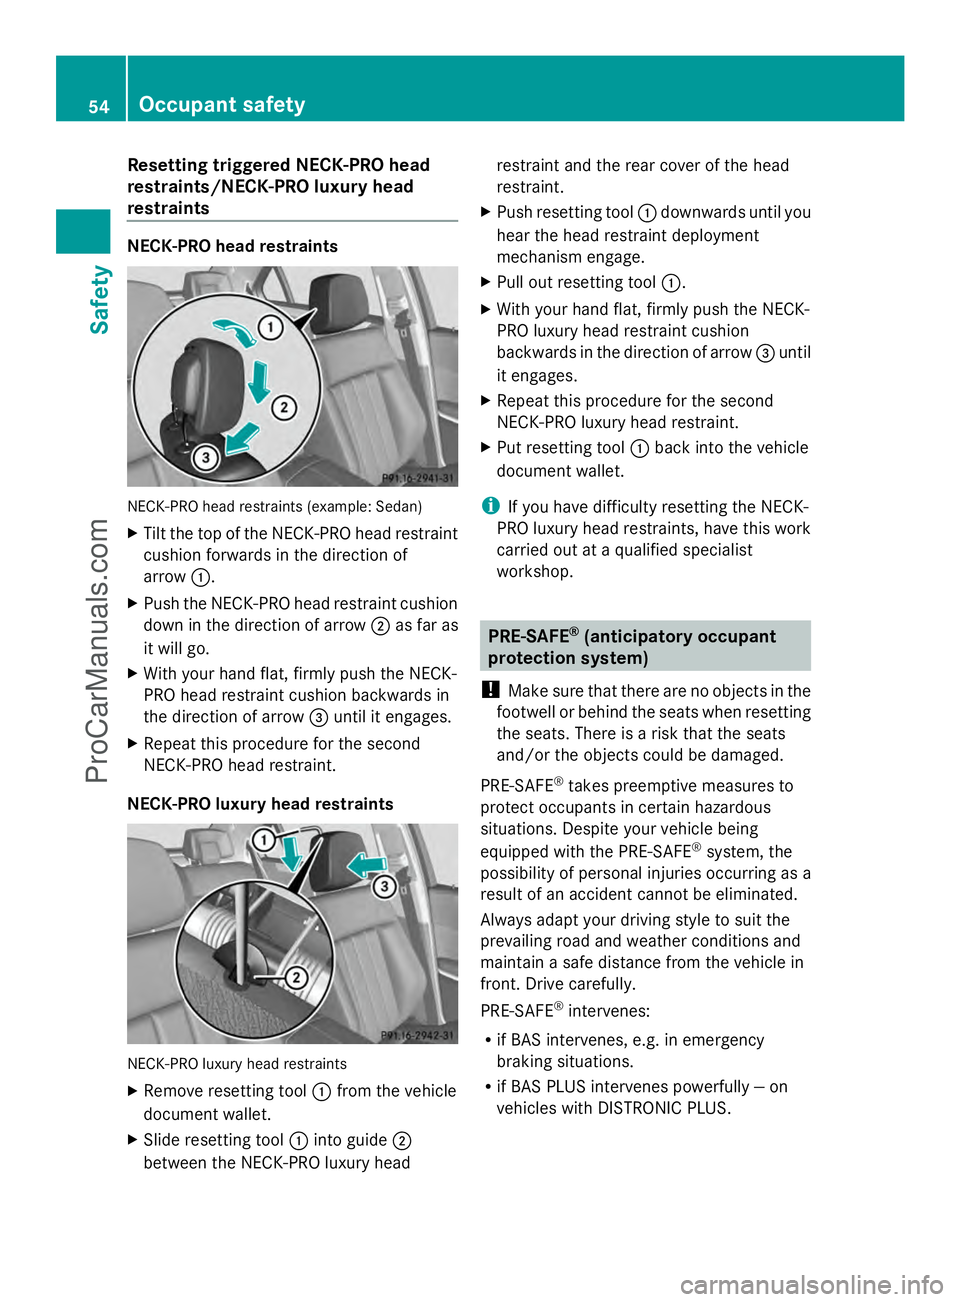
NECK-PRO head restraints (example: Sedan)
X Tilt the top of the NECK-PRO head restraint
cushion forwards in the direction of
arrow :.
X Push the NECK-PRO head restraint cushion
down in the direction of arrow ;as far as
it will go.
X With your hand flat, firmly push the NECK-
PRO head restraint cushion backwards in
the direction of arrow =until it engages.
X Repeat this procedure for the second
NECK-PRO head restraint.
NECK-PRO luxury head restraints NECK-PRO luxury head restraints
X
Remove resetting tool :from the vehicle
document wallet.
X Slide resetting tool :into guide ;
between the NECK-PRO luxury head restraint and the rear cover of the head
restraint.
X Push resetting tool :downwards until you
hear the head restraint deployment
mechanism engage.
X Pull out resetting tool :.
X With your hand flat, firmly push the NECK-
PRO luxury head restraint cushion
backwards in the direction of arrow =until
it engages.
X Repeat this procedure for the second
NECK-PRO luxury head restraint.
X Put resetting tool :back into the vehicle
document wallet.
i If you have difficulty resetting the NECK-
PRO luxury head restraints, have this work
carried out at a qualified specialist
workshop. PRE-SAFE
®
(anticipatory occupant
protection system)
! Make sure that there are no objects in the
footwell or behind the seats when resetting
the seats. There is a risk that the seats
and/or the objects could be damaged.
PRE-SAFE ®
takes preemptive measures to
protect occupants in certain hazardous
situations. Despite your vehicle being
equipped with the PRE-SAFE ®
system, the
possibility of personal injuries occurring as a
result of an accident cannot be eliminated.
Always adapt your driving style to suit the
prevailing road and weather conditions and
maintain a safe distance from the vehicle in
front. Drive carefully.
PRE-SAFE ®
intervenes:
R if BAS intervenes, e.g. in emergency
braking situations.
R if BAS PLUS intervenes powerfully — on
vehicles with DISTRONIC PLUS. 54
Occupant safetySafety
ProCarManuals.com
Page 64 of 430
Children that are too large for a child restraint
must travel in seats using normal seat belts.
Position the shoulder belt across the chest
and shoulder, not the face or neck. A booster
seat may be necessary to achieve proper seat
belt positioning for children over 41 lbs
(18 kg) until they reach a height where a lap/
shoulder belt fits properly without a booster
seat.
When the child restraint is not in use, remove
it from the vehicle or secure it with the seat
belt to prevent the child restraint from
becoming a projectile in the event of an
accident. G
WARNING
If children are left unsupervised in the vehicle,
they could:
R open the doors, thus endangering other
people or road users.
R get out and disrupt traffic.
R operate the vehicle's equipment.
Additionally, children could set the vehicle in
motion if, for example, they:
R release the parking brake.
R shifting the automatic transmission out of
park position P
R Start the engine.
There is a risk of an accident and injury.
When leaving the vehicle, always take the
SmartKey with you and lock the vehicle. Never
leave children or animals unattended in the
vehicle. Always keep the SmartKey out of
reach of children. G
WARNING
If persons, particularly children are subjected
to prolonged exposure to extreme heat or
cold, there is a risk of injury, possibly even
fatal. Never leave children unattended in the
vehicle. G
WARNING
If the child restraint system is subjected to
direct sunlight, parts may get very hot. Children may burn themselves on these parts,
particularly on the metal parts of the child
restraint system. There is a risk of injury.
If you leave the vehicle, taking the child with
you, always ensure that the child restraint
system is not exposed to direct sunlight.
Protect it with a blanket, for example. If the
child restraint system has been exposed to
direct sunlight, let it cool down before
securing the child in it. Never leave children
unattended in the vehicle.
If an infant or child is traveling in the vehicle:
R Secure the child with a child or infant seat
restraint system appropriate to the age and
weight of the child.
R Make sure that the infant or child is
properly secured at all times while the
vehicle is in motion.
Mercedes-Benz recommends that you always
properly secure all infants and children with
a child or infant seat restraint system for the
trip.
The use of seat belts and infant and child
restraint systems is required by law in:
R all 50 states
R the U.S. territories
R the District of Columbia
R all Canadian provinces
Infants and children must always be seated in
an appropriate infant or child restraint system
recommended for the size and weight of the
child. The infant or child restraint system
must be properly secured in accordance with
the manufacturer's instructions.
All infant or child restraint systems must meet
the following standards:
R U.S. Federal Motor Vehicle Safety
Standards 213 and 225
R Canadian Motor Vehicle Safety Standards
213 and 210.2
Confirmation that the child restraint system
corresponds to the standards can be found
on an instruction label on the child restraint
system. This confirmation can also be found 62
Children in the vehicleSafety
ProCarManuals.com
Page 112 of 430
!
To avoid damage to the seats and the seat
heating, observe the following information:
R keep liquids from spilling on the seats. If
liquid is spilled on the seats, dry them as
soon as possible.
R if the seat covers are damp or wet, do not
switch on the seat heating. The seat
heating should also not be used to dry
the seats.
R clean the seat covers as recommended;
see "Interior care".
R do not transport heavy loads on the
seats. Do not place sharp objects on the
seat cushions, e.g. knives, nails or tools.
The seats should only be occupied by
passengers, if possible.
R when the seat heating is in operation, do
not cover the seats with insulating
materials, e.g. blankets, coats, bags,
seat covers, child seats or booster seats.
! Make sure that there are no objects in the
footwell or behind the seats when resetting
the seats. There is a risk that the seats
and/or the objects could be damaged.
i The head restraints in the front seats are
installed with the NECK-PRO system
(Y page 53). For this reason, it is not
possible to remove the head restraints
from the front seats.
Vehicles without the through-loading
feature: the head restraints cannot be
removed from the rear compartment seats.
For more information, contact a qualified
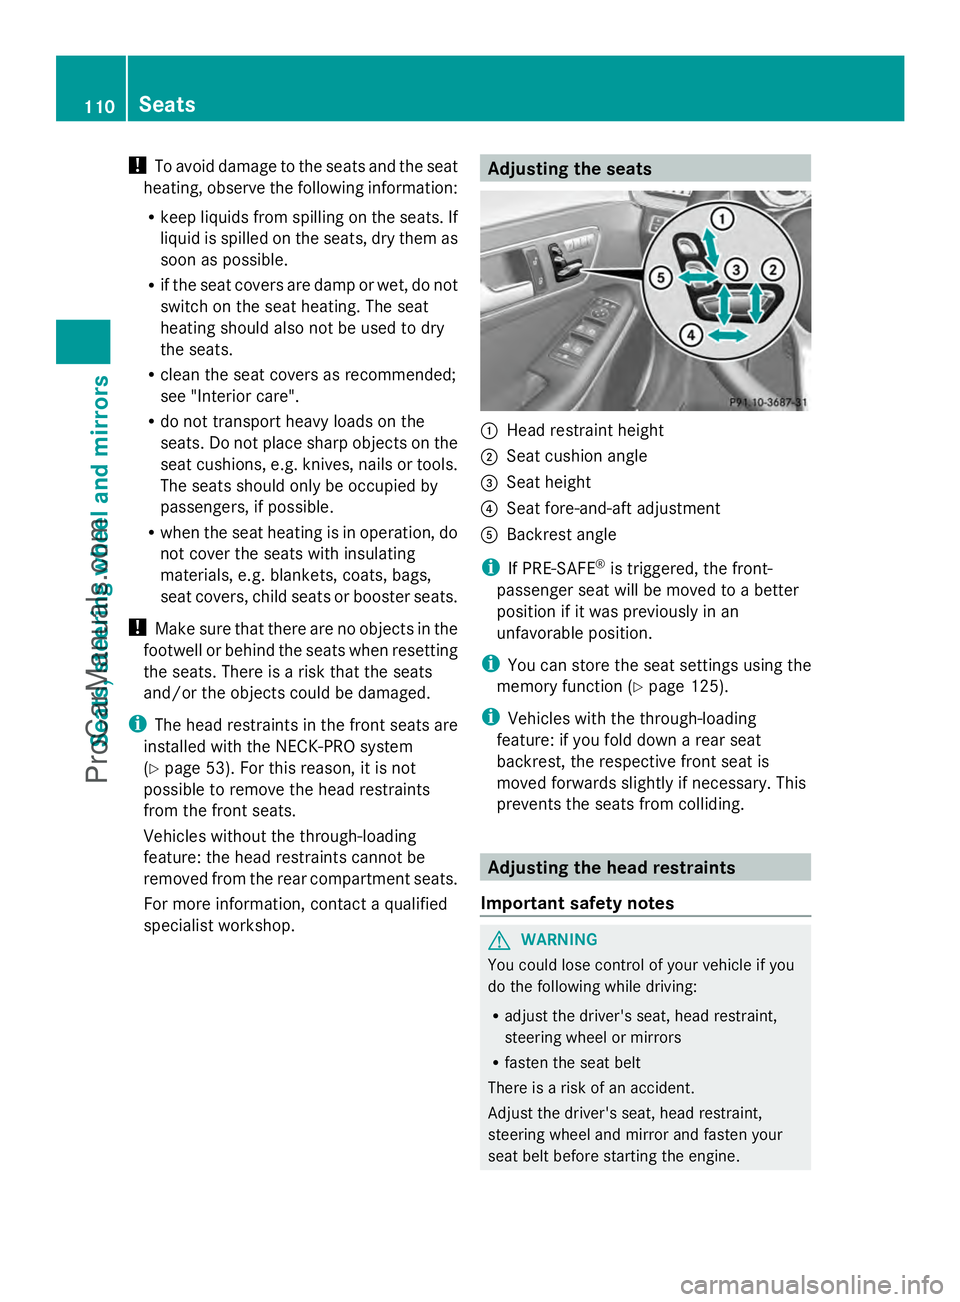
specialist workshop. Adjusting the seats
:
Head restraint height
; Seat cushion angle
= Seat height
? Seat fore-and-aft adjustment
A Backrest angle
i If PRE-SAFE ®
is triggered, the front-
passenger seat will be moved to a better
position if it was previously in an
unfavorable position.
i You can store the seat settings using the
memory function (Y page 125).
i Vehicles with the through-loading
feature: if you fold down a rear seat
backrest, the respective front seat is
moved forwards slightly if necessary. This
prevents the seats from colliding. Adjusting the head restraints
Important safety notes G
WARNING
You could lose control of your vehicle if you
do the following while driving:
R adjust the driver's seat, head restraint,
steering wheel or mirrors
R fasten the seat belt
There is a risk of an accident.
Adjust the driver's seat, head restraint,
steering wheel and mirror and fasten your
seat belt before starting the engine. 110
SeatsSeats, steering wheel and mirrors
ProCarManuals.com
Page 114 of 430

Rear seat head restraints
Lowering the rear seat head restraints
from the front X
Turn the SmartKey to position 2in the
ignition lock (Y page 159).
X Press button :.
Adjusting the rear seat head restraint
height Example: Sedan
X
To raise: pull the head restraint up to the
desired position.
X To lower: press release catch :and push
the head restraint down until it is in the
desired position.
i If you pull the head restraint forward
slightly, you will require less effort when
making adjustments. Adjusting the rear seat head restraint
angle
Example: Sedan
X
Pull or push the top of the head restraint
until it is in the desired position.
Removing and installing the rear seat
head restraints G
WARNING
If head restraints are not installed and
adjusted correctly, they cannot provide
protection as intended. There is an increased
risk of injury in the head and neck area, e.g.
in the event of an accident or when braking.
Always drive with the head restraints
installed. Before driving off, make sure for
every vehicle occupant that the center of the
head restraint supports the back of the head
at about eye level. Example: Sedan
The rear head restraints can only be removed
and re-installed on vehicles with the through-
loading facility.112
SeatsSeats, steering wheel and mirrors
ProCarManuals.com
Page 115 of 430
X
Release the rear seat backrest and fold it
slightly forwards ( Ypage 303).
X To remove: pull the head restraint up to
the stop.
X Press release catch :and pull the head
restraint out of the guides.
X To re-install: replace the head restraint so
that the notches on the bar are on the left
when viewed in the direction of travel.
X Push the head restraint down until you hear
it engage in position.
X Fold back the rear seat backrest until it
engages. Adjusting the active multicontour
seat
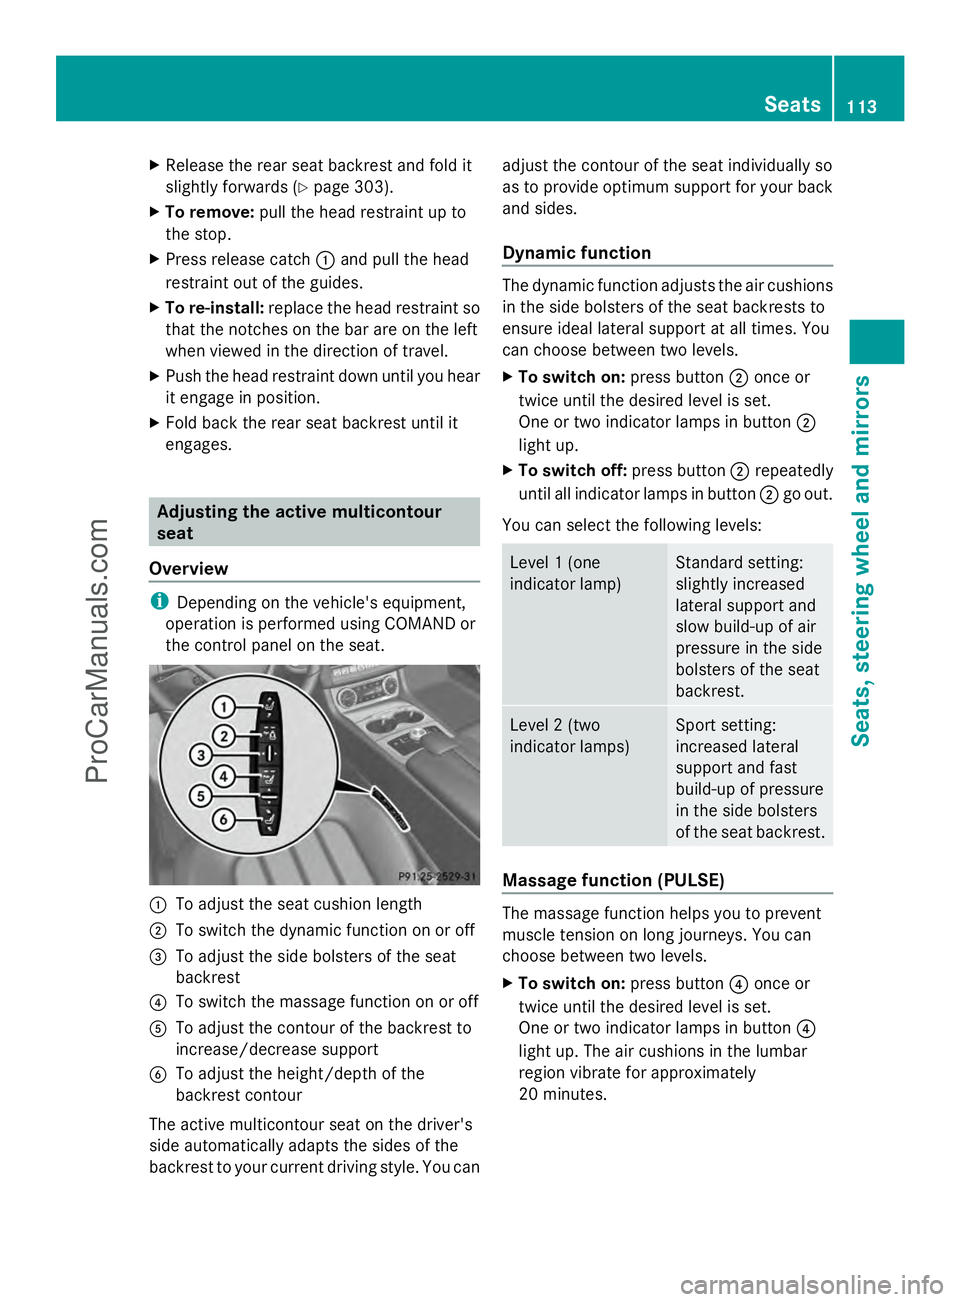
Overview i
Depending on the vehicle's equipment,
operation is performed using COMAND or
the control panel on the seat. :
To adjust the seat cushion length
; To switch the dynamic function on or off
= To adjust the side bolsters of the seat
backrest
? To switch the massage function on or off
A To adjust the contour of the backrest to
increase/decrease support
B To adjust the height/depth of the
backrest contour
The active multicontour seat on the driver's
side automatically adapts the sides of the
backrest to your current driving style. You can adjust the contour of the seat individually so
as to provide optimum support for your back
and sides.
Dynamic function The dynamic function adjusts the air cushions
in the side bolsters of the seat backrests to
ensure ideal lateral support at all times. You
can choose between two levels.
X
To switch on: press button;once or
twice until the desired level is set.
One or two indicator lamps in button ;
light up.
X To switch off: press button;repeatedly
until all indicator lamps in button ;go out.
You can select the following levels: Level 1 (one
indicator lamp) Standard setting:
slightly increased
lateral support and
slow build-up of air
pressure in the side
bolsters of the seat
backrest. Level 2 (two
indicator lamps) Sport setting:
increased lateral
support and fast
build-up of pressure
in the side bolsters
of the seat backrest. Massage function (PULSE)
The massage function helps you to prevent
muscle tension on long journeys. You can
choose between two levels.
X
To switch on: press button?once or
twice until the desired level is set.
One or two indicator lamps in button ?
light up. The air cushions in the lumbar
region vibrate for approximately
20 minutes. Seats
113Seats, ste ering wheel and mirrors Z
ProCarManuals.com
Page 117 of 430
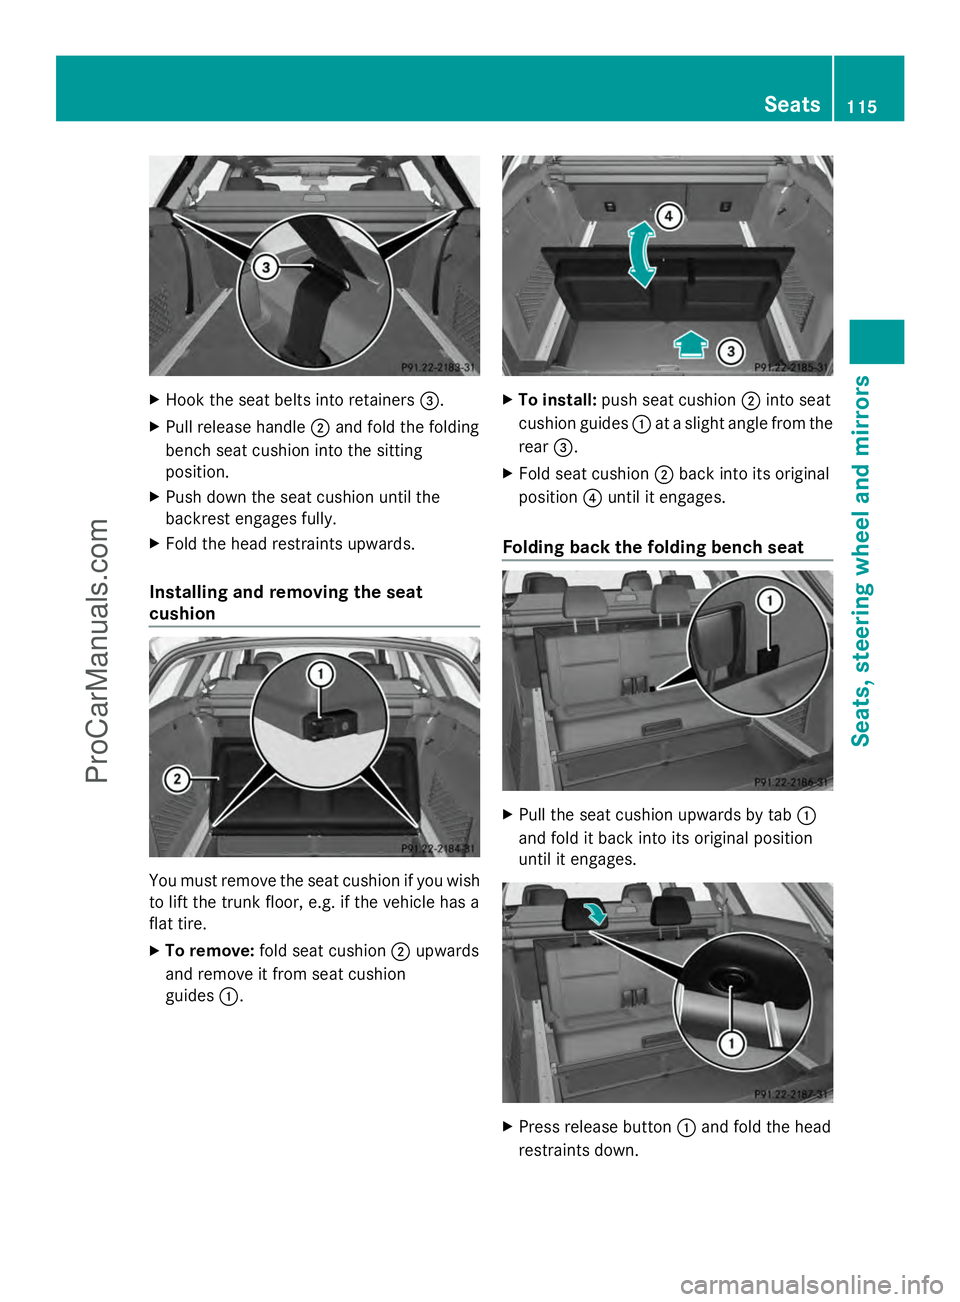
X
Hook the seat belts into retainers =.
X Pull release handle ;and fold the folding
bench seat cushion into the sitting
position.
X Push down the seat cushion until the
backrest engages fully.
X Fold the head restraints upwards.
Installing and removing the seat
cushion You must remove the seat cushion if you wish
to lift the trunk floor, e.g. if the vehicle has a
flat tire.
X To remove: fold seat cushion ;upwards
and remove it from seat cushion
guides :. X
To install: push seat cushion ;into seat
cushion guides :at a slight angle from the
rear =.
X Fold seat cushion ;back into its original
position ?until it engages.
Folding back the folding bench seat X
Pull the seat cushion upwards by tab :
and fold it back into its original position
until it engages. X
Press release button :and fold the head
restraints down. Seats
115Seats, steering wheel and mirrors Z
ProCarManuals.com
Page 122 of 430
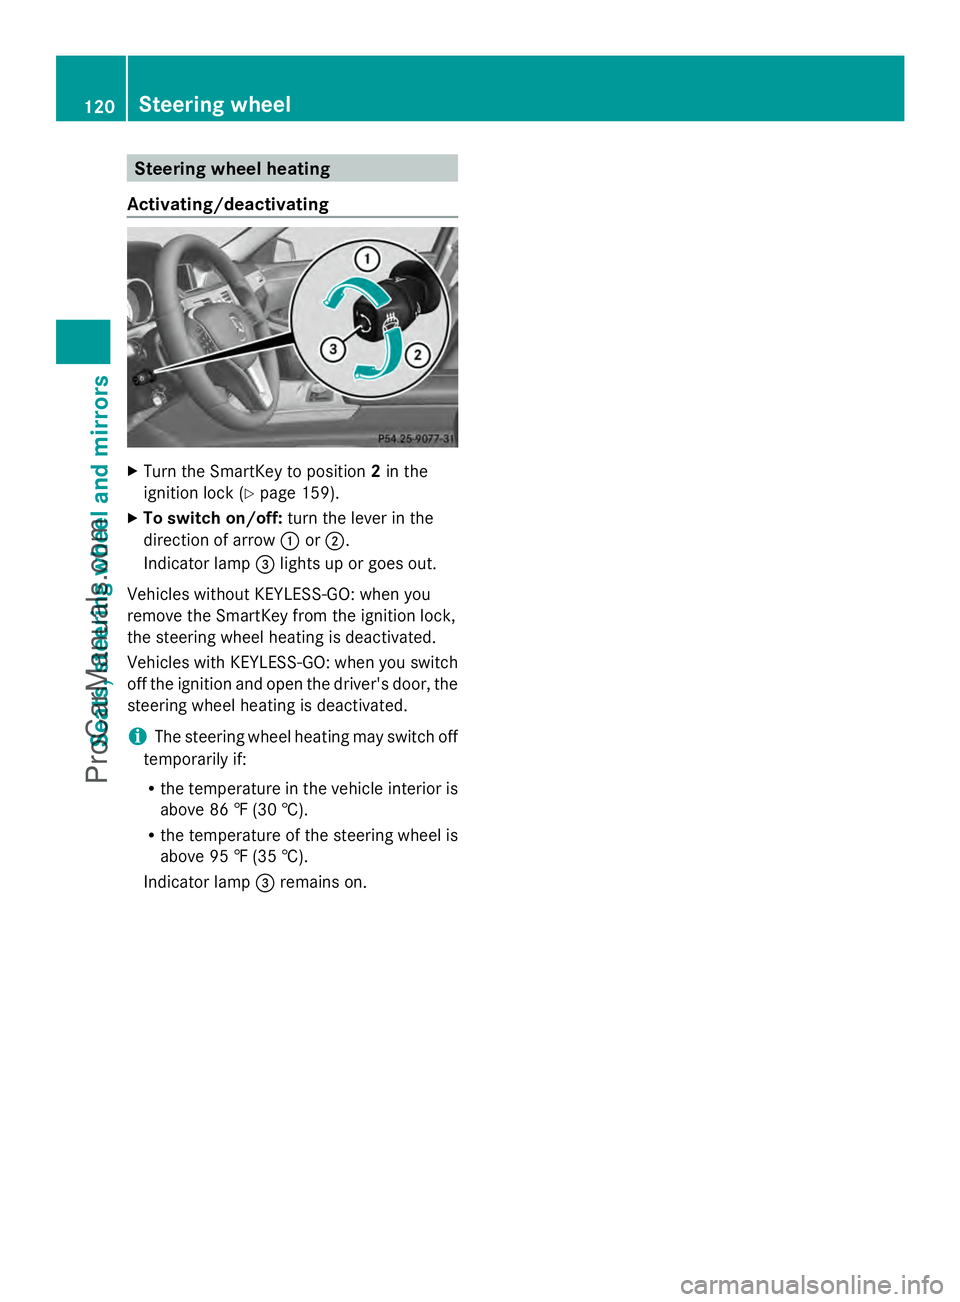
Steering wheel heating
Activating/deactivating X
Turn the SmartKey to position 2in the
ignition lock (Y page 159).
X To switch on/off: turn the lever in the
direction of arrow :or;.
Indicator lamp =lights up or goes out.
Vehicles without KEYLESS-GO: when you
remove the SmartKey from the ignition lock,
the steering wheel heating is deactivated.
Vehicles with KEYLESS-GO: when you switch
off the ignition and open the driver's door, the
steering wheel heating is deactivated.
i The steering wheel heating may switch off
temporarily if:
R the temperature in the vehicle interior is
above 86 ‡ (30 †).
R the temperature of the steering wheel is
above 95 ‡ (35 †).
Indicator lamp =remains on. 120
Steering wheelSeats, steering wheel and mirrors
ProCarManuals.com