2014 MERCEDES-BENZ E-SEDAN oil dipstick
[x] Cancel search: oil dipstickPage 12 of 430

ECO display
Function/notes ............................. 185
On-board computer .......................242
ECO start/stop function
Automatic engine start ..................164
Automatic engine switch-off ..........163
Deactivating/activating .................164
General information .......................163
Important safety notes ..................163
Introduction ................................... 163
Electronic Stability Program
see ESP ®
(Electronic Stability Program)
Emergency release
Driver's door .................................... 90
Fuel filler fla p................................. 177
Trunk ............................................... 97
Vehicle ............................................. 90
Emergency spare wheel
Important safety notes ..................410
Points to remember .......................410
Removing ....................................... 411
Storage location ............................ 411
Stowing .......................................... 412
Technical data ............................... 414
Emergency Tensioning Devices
Function .......................................... .59
Safety guideline s............................. 41
Emergency unlocking
Tailgate ............................................ 97
Emissions control
Service and warranty information ....23
Engine
Check Engine warning lamp ........... 292
Display message ............................ 269
ECO start/stop function ................163
Engine number ............................... 417
Irregular running ............................ 166
Jump-starting ................................. 362
Starting problems ..........................166
Starting the engine with the
SmartKey ....................................... 161
Starting with KEYLESS-GO .............161
Switching off .................................. 182
Tow-starting (vehicle) ..................... 367
Engine electronics
Problem (malfunction) ...................166Engine oil
Adding ........................................... 338
Additives ........................................ 422
Checking the oil level ..................... 337
Checking the oil level using the
dipstick .......................................... 338
Display message ............................ 271
Filling capacity ............................... 422
Notes about oil grades ................... 422
Notes on oil level/consumption ....337
Temperature (on-board computer) .253
Viscosity ........................................ 423
ESP ®
(Electronic Stability
Program) AMG menu (on-board computer) ...254
Deactivating/activating (AMG
vehicles) .......................................... 74
Deactivating/activating (except
AMG vehicles) ................................ 247
Deactivating/activating (notes;
except AMG vehicles) ......................73
Display message ............................ 258
ETS/4ETS ........................................ 72
Function/notes ................................ 72
General notes .................................. 72
Important safety information ...........72
Warning lamp ................................. 289
ETS/4ETS (Electronic Traction
System) ................................................ 72
Exhaust check ................................... 184
Exhaust pipe (cleaning instructions) 347
Exterior lighting Setting options .............................. 128
see Lights
Exterior mirrors
Adjusting ....................................... 122
Dipping (automatic) .......................124
Folding in/out (automatically). ......123
Folding in/out (electrically). ..........123
Folding in when locking (on-board
computer) ...................................... 252
Out of position (troubleshooting) ...124
Setting ........................................... 123
Storing settings (memory function) 125
Storing the parking position ..........124
Eyeglasses compartment .................29910
IndexProCarManuals.com
Page 339 of 430

Always switch off the windshield wipers and
the ignition before opening the hood.
! Make sure that the windshield wipers are
not folded away from the windshield. You
could otherwise damage the windshield
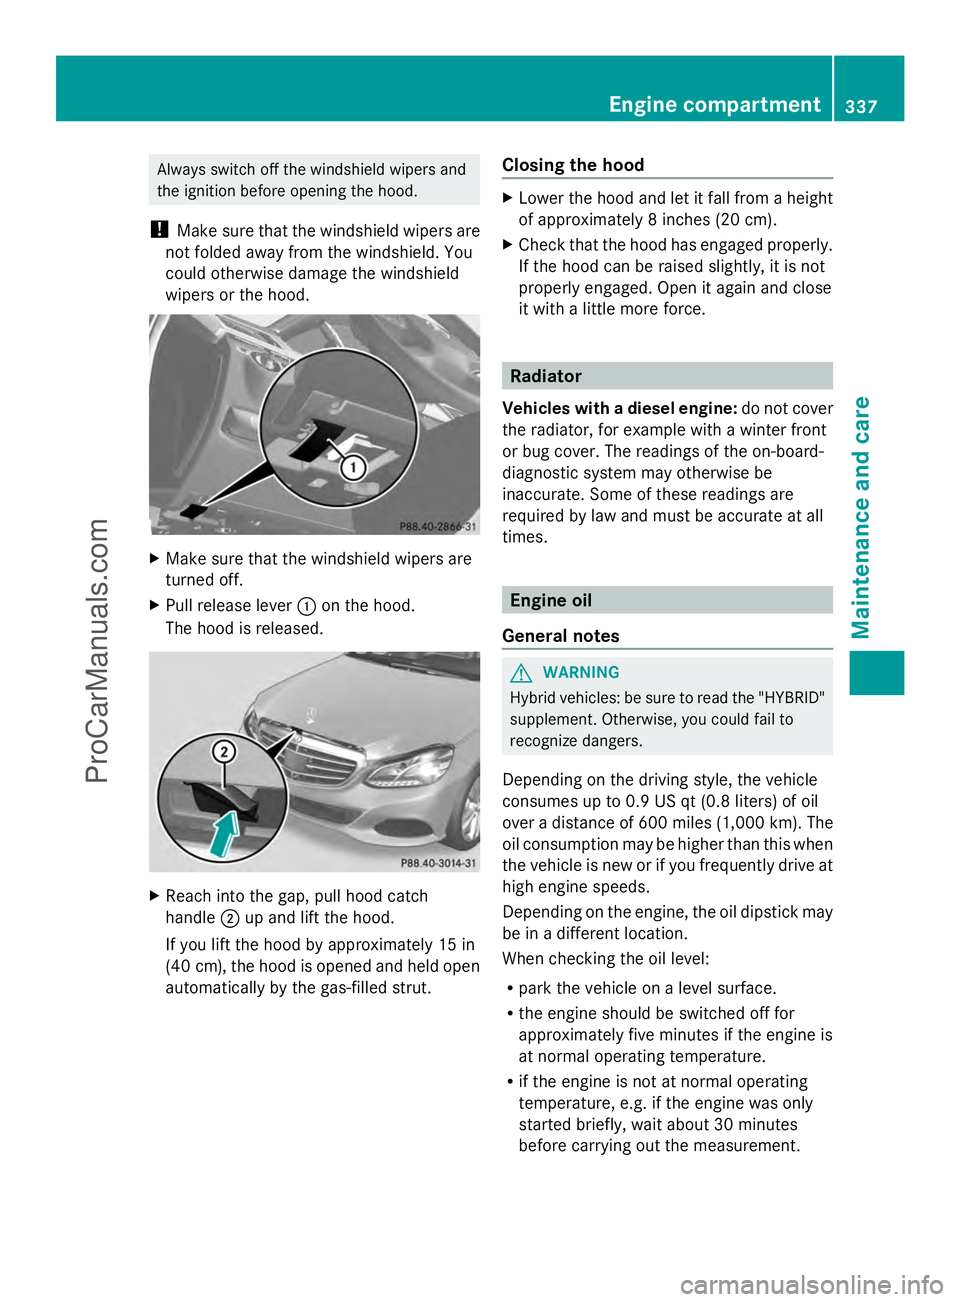
wipers or the hood. X
Make sure that the windshield wipers are
turned off.
X Pull release lever :on the hood.
The hood is released. X
Reach into the gap, pull hood catch
handle ;up and lift the hood.
If you lift the hood by approximately 15 in
(40 cm), the hood is opened and held open
automatically by the gas-filled strut. Closing the hood X
Lower the hood and let it fall from a height
of approximately 8 inches (20 cm).
X Check that the hood has engaged properly.
If the hood can be raised slightly, it is not
properly engaged. Open it again and close
it with a little more force. Radiator
Vehicles with a diesel engine: do not cover
the radiator, for example with a winter front
or bug cover. The readings of the on-board-
diagnostic system may otherwise be
inaccurate. Some of these readings are
required by law and must be accurate at all
times. Engine oil
General notes G
WARNING
Hybrid vehicles: be sure to read the "HYBRID"
supplement. Otherwise, you could fail to
recognize dangers.
Depending on the driving style, the vehicle
consumes up to 0.9 US qt (0.8 liters) of oil
over a distance of 600 miles (1,000 km). The
oil consumption may be higher than this when
the vehicle is new or if you frequently drive at
high engine speeds.
Depending on the engine, the oil dipstick may
be in a different location.
When checking the oil level:
R park the vehicle on a level surface.
R the engine should be switched off for
approximately five minutes if the engine is
at normal operating temperature.
R if the engine is not at normal operating
temperature, e.g. if the engine was only
started briefly, wait about 30 minutes
before carrying out the measurement. Engine compartment
337Maintenance and care Z
ProCarManuals.com
Page 340 of 430

Checking the oil level using the oil
dipstick G
WARNING
Certain components in the engine
compartment, such as the engine, radiator
and parts of the exhaust system, can become
very hot. Working in the engine compartment
poses a risk of injury.
Where possible, let the engine cool down and
touch only the components described in the
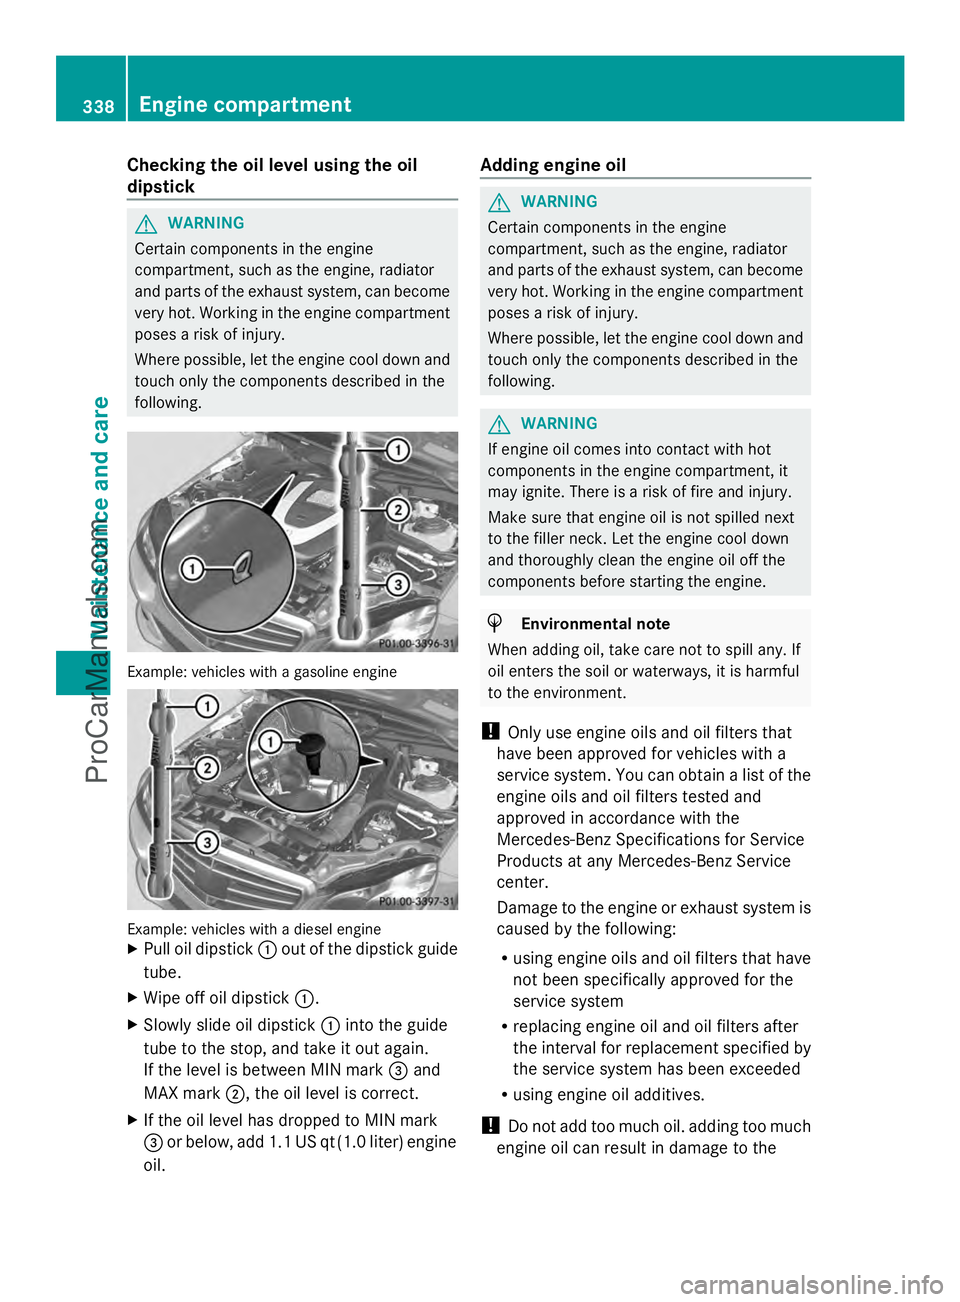
following. Example: vehicles with a gasoline engine
Example: vehicles with a diesel engine
X
Pull oil dipstick :out of the dipstick guide
tube.
X Wipe off oil dipstick :.
X Slowly slide oil dipstick :into the guide
tube to the stop, and take it out again.
If the level is between MIN mark =and
MAX mark ;, the oil level is correct.
X If the oil level has dropped to MIN mark
= or below, add 1.1 US qt (1.0 liter) engine
oil. Adding engine oil G
WARNING
Certain components in the engine
compartment, such as the engine, radiator
and parts of the exhaust system, can become
very hot. Working in the engine compartment
poses a risk of injury.
Where possible, let the engine cool down and
touch only the components described in the
following. G
WARNING
If engine oil comes into contact with hot
components in the engine compartment, it
may ignite. There is a risk of fire and injury.
Make sure that engine oil is not spilled next
to the filler neck. Let the engine cool down
and thoroughly clean the engine oil off the
components before starting the engine. H
Environmental note
When adding oil, take care not to spill any. If
oil enters the soil or waterways, it is harmful
to the environment.
! Only use engine oils and oil filters that
have been approved for vehicles with a
service system. You can obtain a list of the
engine oils and oil filters tested and
approved in accordance with the
Mercedes-Benz Specifications for Service
Products at any Mercedes-Benz Service
center.
Damage to the engine or exhaust system is
caused by the following:
R using engine oils and oil filters that have
not been specifically approved for the
service system
R replacing engine oil and oil filters after
the interval for replacement specified by
the service system has been exceeded
R using engine oil additives.
! Do not add too much oil. adding too much
engine oil can result in damage to the 338
Engine compartmentMaintenance and care
ProCarManuals.com
Page 341 of 430

engine or to the catalytic converter. Have
excess engine oil siphoned off.
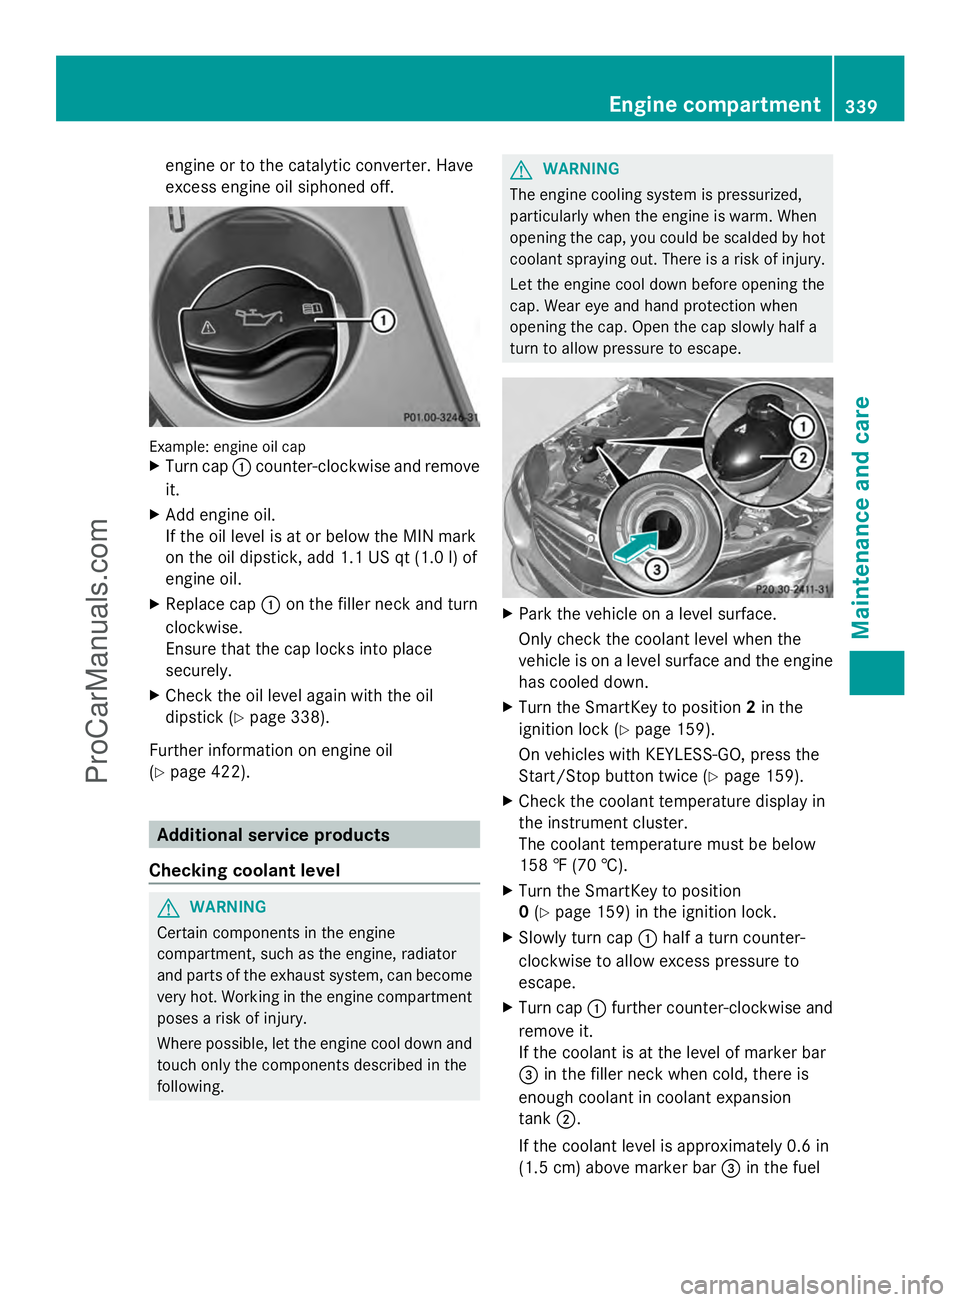
Example: engine oil cap
X
Turn cap :counter-clockwise and remove
it.
X Add engine oil.
If the oil level is at or below the MIN mark
on the oil dipstick, add 1.1 US qt (1.0 l) of
engine oil.
X Replace cap :on the filler neck and turn
clockwise.
Ensure that the cap locks into place
securely.
X Check the oil level again with the oil
dipstick (Y page 338).
Further information on engine oil
(Y page 422). Additional service products
Checking coolant level G
WARNING
Certain components in the engine
compartment, such as the engine, radiator
and parts of the exhaust system, can become
very hot. Working in the engine compartment
poses a risk of injury.
Where possible, let the engine cool down and
touch only the components described in the
following. G
WARNING
The engine cooling system is pressurized,
particularly when the engine is warm. When
opening the cap, you could be scalded by hot
coolant spraying out. There is a risk of injury.
Let the engine cool down before opening the
cap. Wear eye and hand protection when
opening the cap. Open the cap slowly half a
turn to allow pressure to escape. X
Park the vehicle on a level surface.
Only check the coolant level when the
vehicle is on a level surface and the engine
has cooled down.
X Turn the SmartKey to position 2in the
ignition lock (Y page 159).
On vehicles with KEYLESS-GO, press the
Start/Stop button twice (Y page 159).
X Check the coolant temperature display in
the instrument cluster.
The coolant temperature must be below
158 ‡ (70 †).
X Turn the SmartKey to position
0 (Y page 159) in the ignition lock.
X Slowly turn cap :half a turn counter-
clockwise to allow excess pressure to
escape.
X Turn cap :further counter-clockwise and
remove it.
If the coolant is at the level of marker bar
= in the filler neck when cold, there is
enough coolant in coolant expansion
tank ;.
If the coolant level is approximately 0.6 in
(1.5 cm) above marker bar =in the fuel Engine compartment
339Maintenance and care Z
ProCarManuals.com