2014 MERCEDES-BENZ B-CLASS SPORTS run flat
[x] Cancel search: run flatPage 7 of 360
AUT
Olights
Display message ............................ 223
see Lights
Automatic engine start (ECO start/
stop function) .................................... 140
Automatic engine switch-off (ECO
start/stop function) ..........................139
Automatic headlamp mode ..............105
Automatic transmission Automatic drive program ...............147
Changing gea r............................... 146
DIRECT SELECT leve r..................... 143
Display message ............................ 233
Drive program displa y.................... 144
Driving tips .................................... 146
Emergency running mode ..............150
Engaging drive position .................. 145
Engaging neutra l............................ 144
Engaging revers egear ................... 144
Engaging the par kposition ............ 144
Holding the vehicle stationary on
uphill gradients .............................. 146
Kickdow n....................................... 146
Manual drive program ....................147
Overview ........................................ 143
Problem (malfunction) ...................150
Progra mselecto rbutton ................ 146
Pulling away ................................... 138
Starting the engine ........................137
Steering wheel paddle shifters ......147
Transmission position displa y........ 144
Transmission positions ..................145
Automatic transmission
emergency mode ............................... 150 B
Backup lamp Changing bulbs .............................. 115
Display message ............................ 222
Bag hook ............................................ 257
BAS (Brake Assist System) .................64
Battery (SmartKey) Checking .......................................... 76
Important safety notes ....................76
Replacing ......................................... 76Battery (vehicle)
Charging ........................................ 302
Display message ............................ 225
Important safety notes ..................299
Jump starting ................................. 303
Belt force limiter
Activatio n......................................... 55
Function .......................................... .55
Blind Spo tAssist
Activating/deactivating .................201
Display message ............................ 227
Notes/function .............................. 184
Brake Assist
see BAS (Brake Assist System)
Brake fluid
Display message ............................ 214
Notes ............................................. 350
Brake lamps
Adaptive .......................................... .67
Changin gbulbs .............................. 115
Display message ............................ 221
Brakes
ABS .................................................. 63
Adaptive Brake Assist ......................65
BAS .................................................. 64
Brake fluid (notes) .........................350
Display message ............................ 208
Driving tips .................................... 157
Important safety notes ..................157
Maintenance .................................. 158
Parking brake ................................ 153
Warning lamp ................................. 239
Breakdown
see Flat tire
see Towing away/tow-starting
Bulbs
see Replacing bulbs C
Calling up amalfunction
see Display messages
Car
see Vehicle
Care
Carpets .......................................... 291
Carw ash. ....................................... 286
Display ........................................... 290 Index
5
Page 20 of 360
Labeling (overview)
........................329
Load bearing index (definition) ......335
Load index ..................................... 332
Load index (definition) ...................334
M+S tires ....................................... 314
Maximum loaded vehicle weight
(definition) ..................................... 334
Maximum loa donatire (definition) 334
Maximum permissible tire
pressure (definition) ....................... 334
Maximum tire loa d......................... 327
Maximum tire loa d(definition) .......334
MOExtended tires ..........................314
Optional equipment weight
(definition) ..................................... 335
PSI (pounds per square inch)
(definition) ..................................... 334
Replacing ....................................... 336
Service life ..................................... 314
Sidewall (definition) .......................335
Speed rating (definition) ................334
Storing ........................................... 336
Structure and characteristics
(definition) ..................................... 333
Summer tires ......................... 160, 314
Temperature .................................. 329
TIN (Tire Identification Number)
(definition) ..................................... 335
Tire bea d(definition) ...................... 335
Tire pressure (definition) ................335
Tire pressure s(recommended )...... 333
Tire size (data) ............................... 340
Tire size designation, load-bearing
capacity, spee drating .................... 330
Tire tread ....................................... 313
Tire tread (definition) .....................335
Total loa dlimit (definition) .............335
Traction ......................................... 328
Traction (definition) .......................335
Trea dwear ..................................... 328
Uniform Tire Quality Grading
Standard s...................................... 328
Uniform Tire Quality Grading
Standard s(definition) .................... 333
Unladen weight (definition) ............334
Wea rindicato r(definition) .............335
Whee lrim (definition ).................... 333
see Flat tire Top Tether
............................................ 60
Towing Important safety guidelines ...........305
Installing the towing eye. ...............306
Removing the towing eye. ..............306
Towing away
With both axle sonthe ground .......307
With front axle raised ..................... 307
Tow-starting
Emergency engine starting ............308
Important safety notes ..................305
Installing the towing eye. ...............306
Removing the towing eye. ..............306
Transmission
see Automatic transmission
Transmission position display .........144
Transporting the vehicle ..................307
Trim pieces (cleaning instructions) .290
Trip computer (on-board computer) 194
Trip odometer Calling up ....................................... 193
Resetting (on-board computer) ......195
Trunk
see Tailgate
Turn signals
Changing bulbs (front) ...................114
Changing bulbs (rear) ....................115
Display message ............................ 220
Switching on/off ........................... 106
Type identification plate
see Vehicle identification plate U
Unlocking Emergency unlocking .......................81
From insid ethe vehicle (central
unlocking button) ............................. 80 V
Vanity mirror (in the sun visor) ........263
Vehicle Correct use ...................................... 25
Data acquisition ............................... 26
Equipment ....................................... 22
Individua lsettings .......................... 202
Limited Warranty ............................. 2618
Index
Page 233 of 360
Tires
Display messages Possible causes/consequence
sand 000B Solutions
Tir
ePressure Check Tires Canad
aonly:
The tire pressure loss warnin gsystem has detecte dasignificant
los sinp ressure.
Aw arning tone also sounds.
G WARNING
Wit htirep ressure swhicha re to olow, there is ariskoft he
following hazards:
R they may burst, especiallyast he load and vehicle speed
increase.
R they may wear excessively and/or unevenly, which may greatly
impair tire traction.
R the driving characteristics, as well as steering and braking, may
be greatly impaired.
There is arisk of an accident.
X Stop the vehicle without making any sudden steering or braking
maneuvers. Pay attention to the traffic conditionsasy ou do so.
X Secure the vehicle against rolling away (Y page 152).
X Check the tires and, if necessary, follow the instructions for a
flat tire (Y page 295).
X Check the tire pressures and, if necessary, correct the tire
pressure.
X Restart the tire pressure loss warning system when the tire
pressure is correct (Y page 319).Check Tire Pressure
Then Restart Run
Flat Indicator Canada only:
The tire pressure loss warning system generated
adisplay
message and has not been restarted since.
X Set the correct tire pressure in all four tires.
X Restart the tire pressure loss warning system (Y page 319).Run Flat Indicator
Inoperative Canada only:
The tire pressure loss warning system is faulty.
X
Visit aqualified specialist workshop. Correct Tire
Pressure The tire pressure is too low in at least one of the tires, or the tire
pressure difference between the wheels is too great.
X
Check the tire pressures at the next opportunity (Y page 320).
X If necessary, correct the tire pressure.
X Restart the tire pressure monitor (Y page 322). Display messages
231On-board computer and displays Z
Page 262 of 360
X
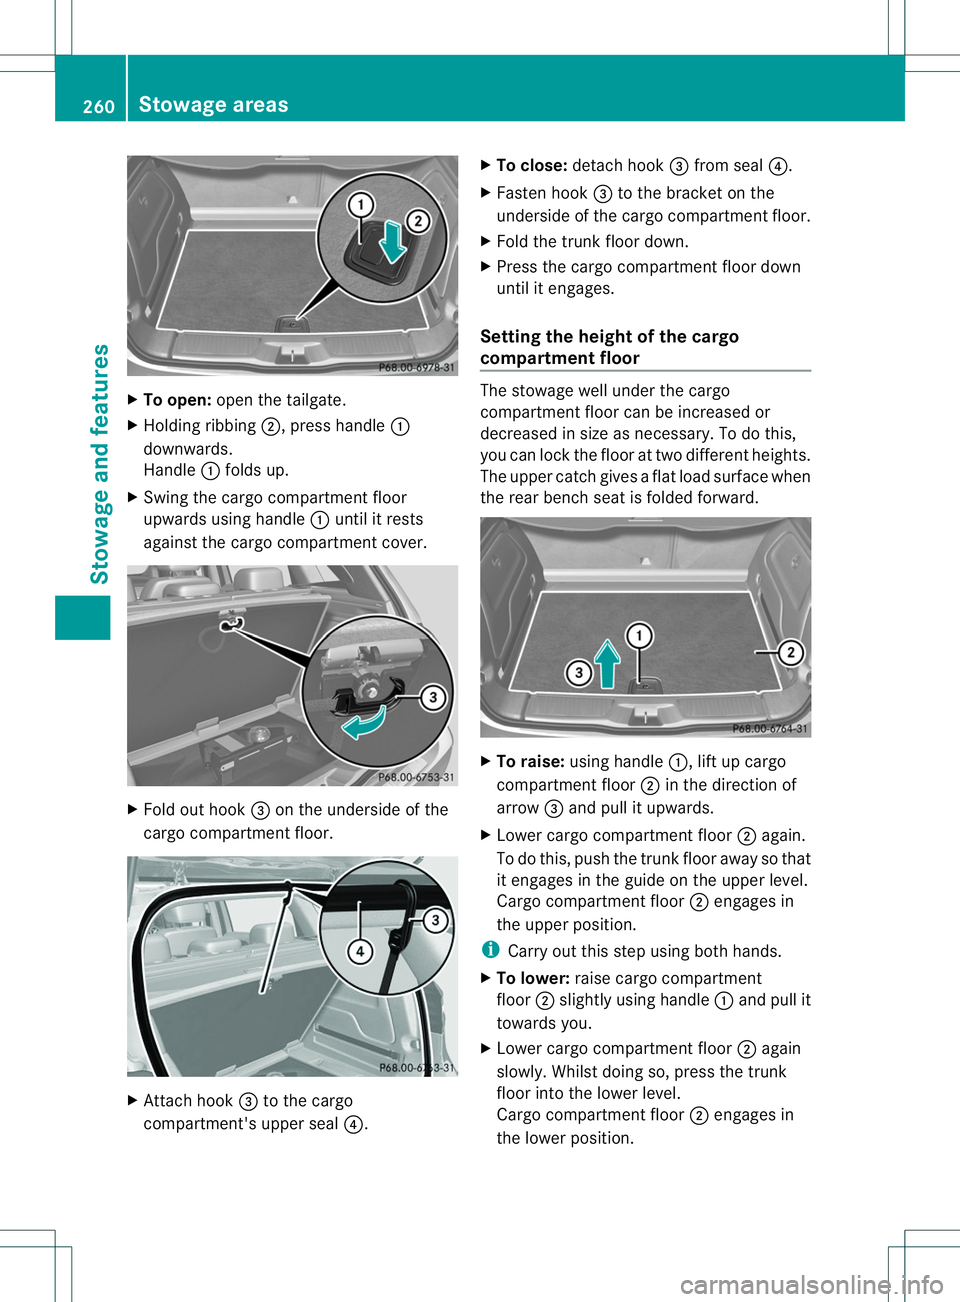
To open: open the tailgate.
X Holding ribbing 0010,press handle 001A
downwards.
Handle 001Afolds up.
X Swing the cargo compartment floor
upwards using handle 001Aunti litr ests
against the cargo compartment cover. X
Fol do ut hook 0023on th eunderside of the
cargo compartment floor. X
Attach hook 0023to the cargo
compartment's upper seal 0021.X
To close: detach hook 0023from seal 0021.
X Fasten hook 0023to the bracket on the
underside of the cargo compartment floor.
X Fold the trunk floor down.
X Press the cargo compartment floor down
until it engages.
Setting the height of the cargo
compartment floor The stowage well under the cargo
compartment floor can be increased or
decreased in size as necessary. To do this,
you can lock the floor at two different heights.
The upper catchg
ivesaflat load surface when
the rear bench seat is folded forward. X
To raise: using handle 001A,lift up cargo
compartment floor 0010in the direction of
arrow 0023and pull it upwards.
X Lower cargo compartment floor 0010again.
To do this, push the trunk floor away so that
it engages in the guide on the upper level.
Cargo compartment floor 0010engages in
the upper position.
i Carry out this step using both hands.
X To lower: raise cargo compartment
floor 0010slightly using handle 001Aand pull it
towards you.
X Lower cargo compartment floor 0010again
slowly. Whilst doing so, press the trunk
floor into the lower level.
Cargo compartment floor 0010engages in
the lower position. 260
Stowage areasStowage and features
Page 297 of 360
X
Open the tailgate.
X Lift the cargo compartment floor up
(Y page 259).
i Towing eye 0010is located under tire
inflation compressor 001A.
Vehiclesw ithatire-change tool kit X
Open the tailgate.
X Lift the carg ocompartmen tfloor up
(Y page 259).
X Remove the tire-change too lkit.
The tire-chang etoolkit contains:
R Jack
R Lug wrench
R One pair of gloves
R Foldin gwheel chock Flat tire
Preparing th
evehicle
Your vehicle may be equipped with:
R MOExtende dtires (tires with run-flat
properties )(Y page 295)
Vehicle preparation is not necessary on
vehicles with MOExtende dtires.
R aT IREFIT kit (Y page 294)
Information on changing/mounting awheel
(Y page 337).
X Stop the vehicle on solid, non-slippery and
level ground, as far away as possible from
traffic.
X Switch on the hazar dwarnin glamps.
X Secure the vehicle against rollin gaway
(Y page 152).
X If possible ,brin gthe front wheels int othe
straight-ahead position.
X Switch off the engine.
X Remove the SmartKey fro mthe ignition
lock. X
All occupant smust get out of the vehicle.
Make sure that the yare not endangered as
the ydos o.
X Make sure that no one is near the danger
area while awheel is being changed.
Anyone who is not directly assisting in the
wheel change should, for example, stand
behin dthe barrier.
X Get out of the vehicle. Pay attention to
traffic conditions when doing so.
X Close the driver's door.
i Vehicles equipped with MOExtende dtires
are not equipped with aTIREFIT kit at the
factory. It is therefore recommende dthat
you additionally equip your vehicle with a
TIREFIT kit if you moun ttires that do not
feature run-flat properties ,e.g. winter tires.
AT IREFIT kit can be obtained fro ma
qualified specialist workshop. MOExtended tires (tires with run-flat
properties)
General notes With MOExtende
dtires (tires with run flat
characteristics), you can continue to drive
your vehicle even if there is atotal loss of
pressure in one or mor etires. The affected
tir em ust not show any clearly visible damage.
You can recognize MOExtende dtires by the
MOExtende dmarking which appears on the
sidewall of the tire. You will fin dthis marking
nex ttot he tire size designation, the load-
bearing capacity and the speed index
(Y page 330).
MOExtended tires may only be used in
conjunction with an active tire pressure loss
warning system.
If the pressur eloss warning message
appears in the multifunction display:
R Observe the instructions in the display
messages (Y page 231).
R Check the tire for damage.
R If driving on, observe the following notes. Flat tire
295Breakdown assistance
Page 298 of 360
The maximum driving distanc
eis
approximately 50 miles (80 km) when the
vehicle is partially laden and approximately
18 miles (30 km) when the vehicle is fully
laden.
In addition to the vehicle load, the driving
distanc epossible depends upon:
R Speed
R Road condition
R Outside temperature
The driving distanc epossible in run-flat mode
may be reduced by extreme driving
conditions/maneuvers, or it can be increased
through amoderate style of driving.
The maximum permissible distanc ewhich
can be driven in run-flat mode is counted from
the moment the tire pressure loss warning
appears in the multifunction display.
You must not exceed amaximum speed of
50 mph (80 km/h).
i When replacing one or all tires, make sure
that you use only tires:
R of the size specified for the vehicle and
R marked "MOExtended"
If at ire has gone flat and cannot be
replaced with aMOExtended tire, a
standard tire may be used as atemporary
measure. Make sure that you use the
proper size and type (summer or winter
tire).
i Vehicles equipped with MOExtended tires
are not equipped with aTIREFIT kit at the
factory. It is therefore recommended that
you additionally equip your vehicle with a
TIREFIT kit if you mount tires that do not
feature run-flat properties, e.g. winter tires.
AT IREFIT kit can be obtained from a
qualified specialist workshop.
Important safety notes G
WARNING
When driving in emergenc ymode, the driving
characteristics deteriorate, e.g. when cornering, acceleratin
gquickly and when
braking. There is arisk of an accident.
Do not exceed the stated maximum speed.
Avoid abrupt steerin gand driving maneuvers,
and driving over obstacles (curbs, potholes,
off-road). This applies in particular to aladen
vehicle.
Stop driving in emergenc ymode if:
R you hear banging noises.
R the vehicle start stoshake.
R you see smoke and smell rubber.
R ESP ®
is intervening constantly.
R there are tears in the sidewalls of the tire.
After driving in emergenc ymode, have the
wheel rims checked at aqualified specialist
workshop with regard to their further use. The
defective tire must be replaced in every case. TIREFIT kit
Important safety notes TIREFIT is
atire sealant.
You can use TIREFIT to seal punctures of up
to 0.16in(4m m),particularl ythose in the tire
tread. Yo ucan us eTIREFIT at outside
temperatures down to 000F4‡(000F20 †). G
WARNING
In the following situations, the tir esealan tis
unabl etop rovide sufficient breakdown
assistance, as it is unabl etosealthe tire
properly:
R there ar ecutsorp unctures in the tir elarger
tha nthose mentioned above.
R the wheel rim is damaged.
R you have driven at very low tire pressures
or on aflat tire.
There is arisk of an accident.
Do not drive the vehicle. Contact aqualified
specialist workshop. 296
Flat tireBreakdown assistance
Page 300 of 360
X
Press on/of fswitch 0021on th etirei nflation
compressor to ON.
The tir einflatio ncompressor is switched
on. The tire is inflated.
i First,t ire sealant is pumped into the tire.
The pressure can briefly rise to
approximately 500 kPa (5 bar/73 psi).
Do not switch off the tire inflation
compressor during this phase.
X Let the tire inflation compressor run for a
maximum of ten minutes. The tire should
then have attained apressure of at least
200 kPa (2.0 bar/29 psi).
! Do not operate the tire inflation
compressor for longer than ten minutes at
at ime without abreak. It may otherwise
overheat.
The tire inflation compressor can be
operated again once it has cooled down.
If at ire pressure of 200 kPa (2.0 ba r/29 psi)
is achieved after amaximu moften minutes,
see (Y page298).
If at ire pressure of 200 kPa (2.0 ba r/29 psi)
is not achieved after amaximu moften
minutes, see (Y page298).
i If tire sealant leaks out, allow it to dry .It
can then be removed like alayer of film.
If yourc lothes are soiled with tir esealant,
have the mcleaned with perchloroethylene
at ad ry cleaner as soon as possible.
Tir ep ressur enot reached If
ap ressure of 200 kPa (2.0 ba r/29 psi )has
not bee nachieved after ten minutes:
X Switch off the tire inflation compressor.
X Unscrew the filler hose from the valve of
the faulty tire.
X Very slowly drive forwards or reverse
approximately 30 ft (10 m).
X Pump up the tire again.
After amaximu moften minutes, the tire
pressure must be at least 200 kPa (2.0 bar/
29 psi). G
WARNING
If the required tire pressure is not reached
after the specified time, the tire is too badly
damaged. The tire sealant cannot repair the
tire in this instance. Damaged tires and atire
pressure that is too low can significantly
impair the vehicle's braking and driving
characteristics .There is arisk of accident.
Do not continue driving. Contact aqualified
specialist workshop.
Tire pressure reached G
WARNING
At ire temporarily sealed with tir esealant
impairs the drivin gcharacteristics and is not
suitable for higher speeds. There is arisk of
accident.
You should therefore adapt your drivin gstyle
accordingly and drive carefully. Do not exceed
the specified maximum speed with atiret hat
has been repaire dusing tir esealant.
! After use, excess tir esealant may run out
of the filler hose. This could cause stains.
Therefore, place the filler hose in the plastic
bag that contained the TIREFIT kit. H
Environmental note
Have the used tir esealant bottle dispose dof
professionally, e.g. at aqualifie dspecialist
workshop.
If at ire pressure of 200 kPa (2.0 ba r/29 psi)
has bee nachieved afte rten minutes:
X Switc hoff the tire inflation compressor.
X Unscrew the filler hose from the valve of
the faulty tire.
X Stow the tire sealant bottle and the tire
inflation compressor.
X Pull away immediately.
The maximum speed for atire sealed with tire
sealant is 50 mph (80k m/h). The upper part
of the TIREFIT sticker must be affixed to the
instrument cluster in the driver' sfieldof
vision. 298
Flat tireBreakdown assistance
Page 314 of 360
Useful information
i This Operator's Manual describes all
models and all standard and optional
equipment of your vehicle available at the
time of publication of the Operator's
Manual. Country-specific differences are
possible. Please not ethat your vehicle may
not be equipped with all features
described. This also applies to safety-
related system sand functions.
i Read the information on qualified
specialist workshops: (Y page 25).Important safet
ynotes G
WARNING
If wheels and tires of the wrong size are used,
the wheel brakes or suspension components
may be damaged. There is arisk of an
accident.
Always replac ewheels and tires with those
that fulfill the specifications of the original
part.
When replacing wheels, make sure to use the
correct:
R designation
R model
When replacing tires, make sure to use the
correct:
R designation
R manufacturer
R model G
WARNING
Af lat tir eseverely impairs the driving,
steerin gand braking characteristics of the
vehicle. There is arisk of accident.
Tires without run-flat characteristics:
R do not drive with aflat tire.
R immediately replac ethe flat tir ewith your
emergenc yspare wheel or spare wheel, or
consult aqualified specialist workshop. Tires with run-flat characteristics:
R
pay attention to the information and
warnin gnotices on MOExtended tires (tires
with run-flat characteristics).
Accessories that are not approved for your
vehicle by Mercedes-Ben zorthat are not
being used correctly can impair operating
safety.
Before purchasing and using non-approved
accessories, visit aqualified specialist
workshop and inquire about:
R suitability
R legal stipulations
R factory recommendations
Information on dimensions and types of
wheels and tires for your vehicle can be found
(Y page 340).
Information on air pressure for the tires on
your vehicle can be found:
R on the vehicle's Tire and Loading
Information placard on the B-pillar
R on the tire pressure label on the fuel filler
flap
R under "Tire pressure"
i Further information on wheels and tires
can be obtained at any qualified specialist
workshop. Operation
Information on driving
R If the vehicle is heavily loaded, check the
tire pressures and correct them if
necessary.
R While driving, pay attention to vibrations,
noises and unusual handling
characteristics, e.g. pulling to one side.
This may indicate that the wheels or tires
are damaged. If you suspect that atire is
defective, reduce your speed immediately.
Stop the vehicle as soon as possible to
check the wheels and tires for damage.
Hidden tire damage could also be causing 312
OperationWheels and tires