Page 103 of 236
Using the Navigation
Navigation l
3-21
Route Calculation
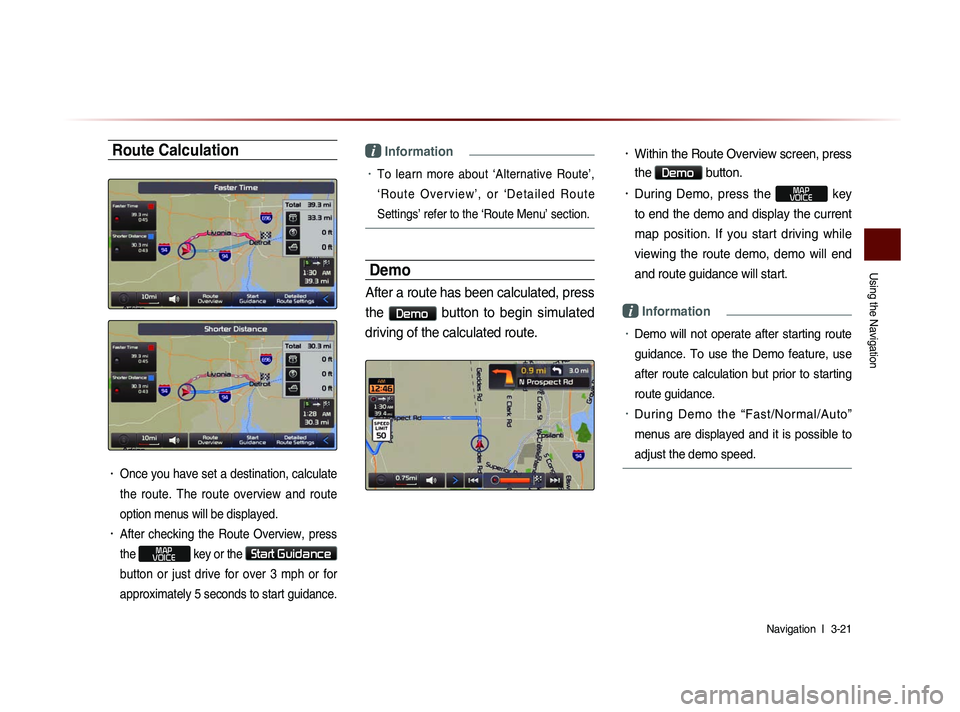
• Once you have set a destination, calculate
the route. The route overview and route
option menus will be displayed.
• After checking the Route Overview, press
the
MAP
VOICE key or the Start Guidance
button or just drive for over 3 mph or for
approximately 5 seconds to start guidance.
i Information
• To learn more about ‘Alternative Route’,
‘ R o u t e O v e r v i e w ’ , o r ‘ D e t a i l e d R o u t e
Settings’ refer to the ‘Route Menu’ section.
Demo
After a route has been calculated, press
the
Demo button to begin simulated
driving of the calculated route.
• Within the Route Overview screen, press
the
Demo button.
• During Demo, press the MAP
VOICE key
to end the demo and display the current
map position. If you start driving while
viewing the route demo, demo will end
and route guidance will start.
i Information
• Demo will not operate after starting route
guidance. To use the Demo feature, use
after route calculation but prior to starting
route guidance.
• During Demo the “Fast/Normal/Auto”
menus are displayed and it is possible to
adjust the demo speed.
Page 104 of 236
3-22
Using the Navigation
Add Waypoint
After searching for waypoints, press the
Add Waypoint button to add the way-
point to the current route.
Route Recalculation
Once a route has been set, the Recalculate
button is displayed at the top of the menus.
Pressing the Recalculate button will dis-
play a pop-up that allows you to change route
options. Once the settings are changed,
the route is recalculated by reflecting the
changes.
i Information
• For more information on Faster Time,
Shorter Distance, and other route calcula-
tion options, refer to the route calculation
section.
Cancel Route
In the Map menu screen, press the
Cancel Route button.
i Information
• You can cancel the route by pressing
the
Cancel Route button that is dis-
played after pressing the
Menu button.
Page 105 of 236
Using the Navigation
Navigation l
3-23
Route Guidance
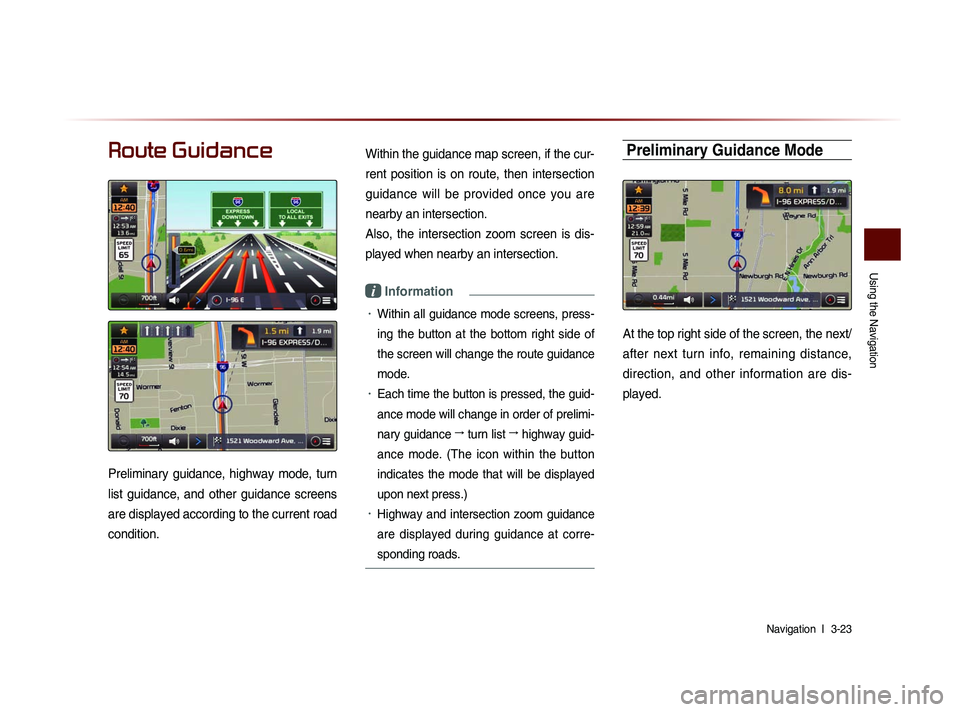
Preliminary guidance, highway mode, turn
list guidance, and other guidance screens
are displayed according to the current road
condition.
Within the guidance map screen, if the cur-
rent position is on route, then intersection
guidance will be provided once you are
nearby an intersection.
Also, the intersection zoom screen is dis-
played when nearby an intersection.
i Information
• Within all guidance mode screens, press-
ing the button at the bottom right side of
the screen will change the route guidance
mode.
• Each time the button is pressed, the guid-
ance mode will change in order of prelimi-
nary guidance →
turn list →
highway guid-
ance mode. (The icon within the button
indicates the mode that will be displayed
upon next press.)
• Highway and intersection zoom guidance
are displayed during guidance at corre-
sponding roads.
Preliminary Guidance Mode
At the top right side of the screen, the next/
after next turn info, remaining distance,
direction, and other information are dis-
played.
Page 106 of 236
3-24
Using the Navigation
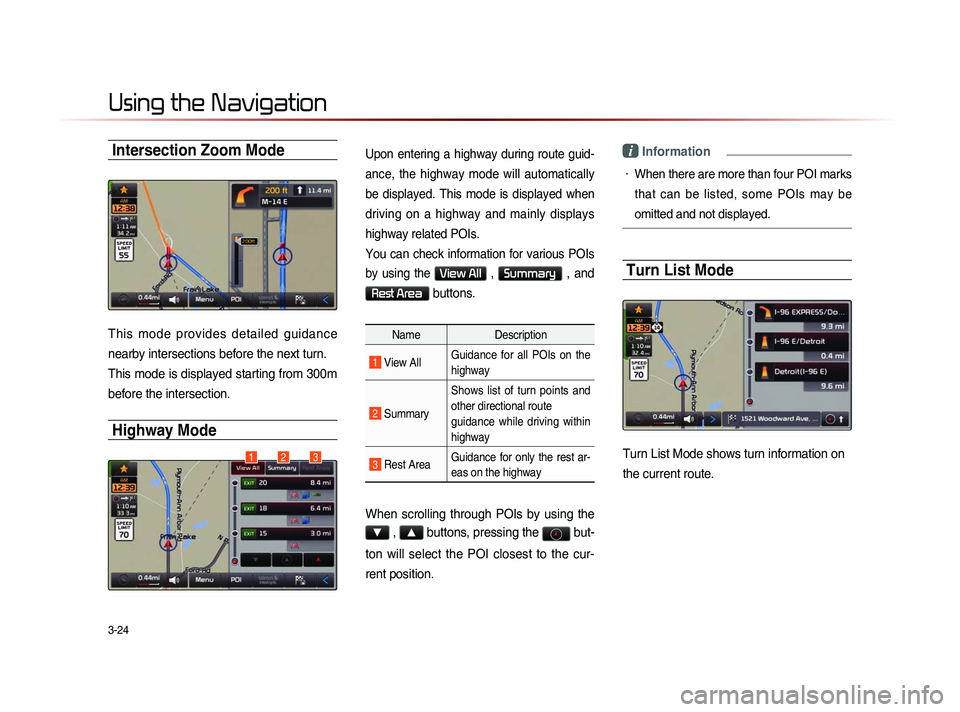
Intersection Zoom Mode
This mode provides detailed guidance
nearby intersections before the next turn.
This mode is displayed starting from 300m
before the intersection.
Highway Mode
Upon entering a highway during route guid-
ance, the highway mode will automatically
be displayed. This mode is displayed when
driving on a highway and mainly displays
highway related POIs.
You can check information for various POIs
by using the
View All , Summary , and
Rest Area buttons.
NameDescription
1 View AllGuidance for all POIs on the
highway
2
Summary Shows list of turn points and
other directional route
guidance while driving within
highway
3 Rest Area
Guidance for only the rest ar-
eas on the highway
When scrolling through POIs by using the
▼ , ▲ buttons, pressing the
but-
ton will select the POI closest to the cur-
rent position.
i Information
• When there are more than four POI marks
that can be listed, some POIs may be
omitted and not displayed.
Turn List Mode
Turn List Mode shows turn information on
the current route.123
Page 108 of 236
3-26
Using the Navigation
Cancel Route
Press the ROUTE
key ▶ Press
Cancel Route .
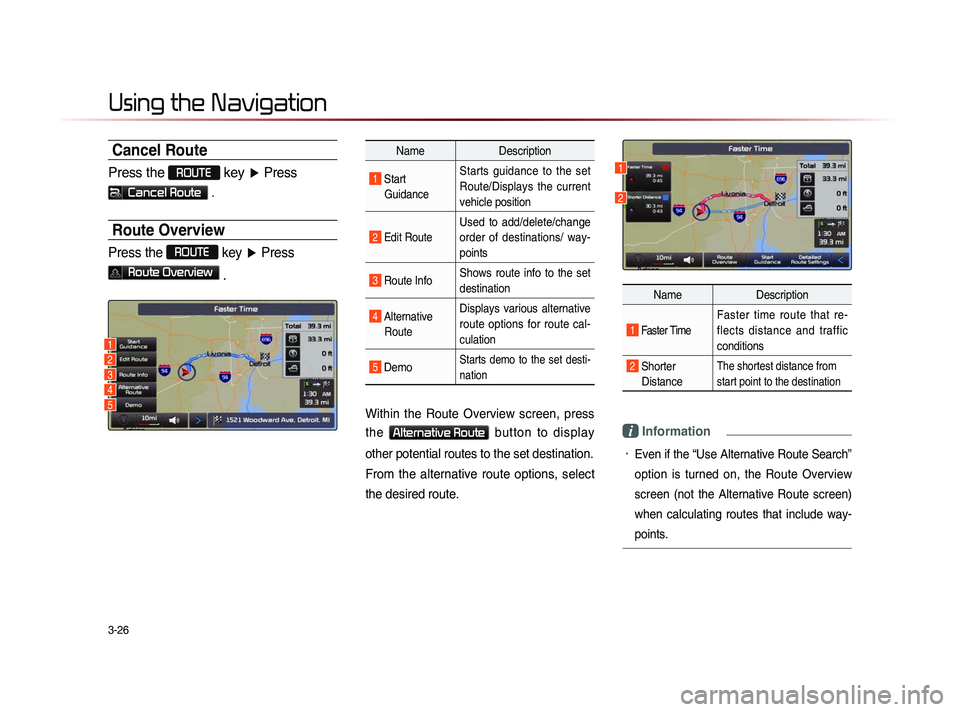
Route Overview
Press the ROUTE
key ▶ Press
Route Overview
.
Name Description
1 Start
GuidanceStarts guidance to the set
Route/Displays the current
vehicle position
2 Edit Route
Used to add/delete/change
order of destinations/ way-
points
3 Route Info Shows route info to the set
destination
4 Alternative
RouteDisplays various alternative
route options for route cal-
culation
5 DemoStarts demo to the set desti-
nation
Within the Route Overview screen, press
the
Alternative Route button to display
other potential routes to the set destination.
From the alternative route options, select
the desired route.
Name Description
1 Faster Time
Faster time route that re-
flects distance and traffic
conditions
2 Shorter
DistanceThe shortest distance from
start point to the destination
i Information
• Even if the “Use Alternative Route Search”
option is turned on, the Route Overview
screen (not the Alternative Route screen)
when calculating routes that include way-
points.
1
2
1
3
2
4
5
Page 109 of 236
Using the Navigation
Navigation l
3-27
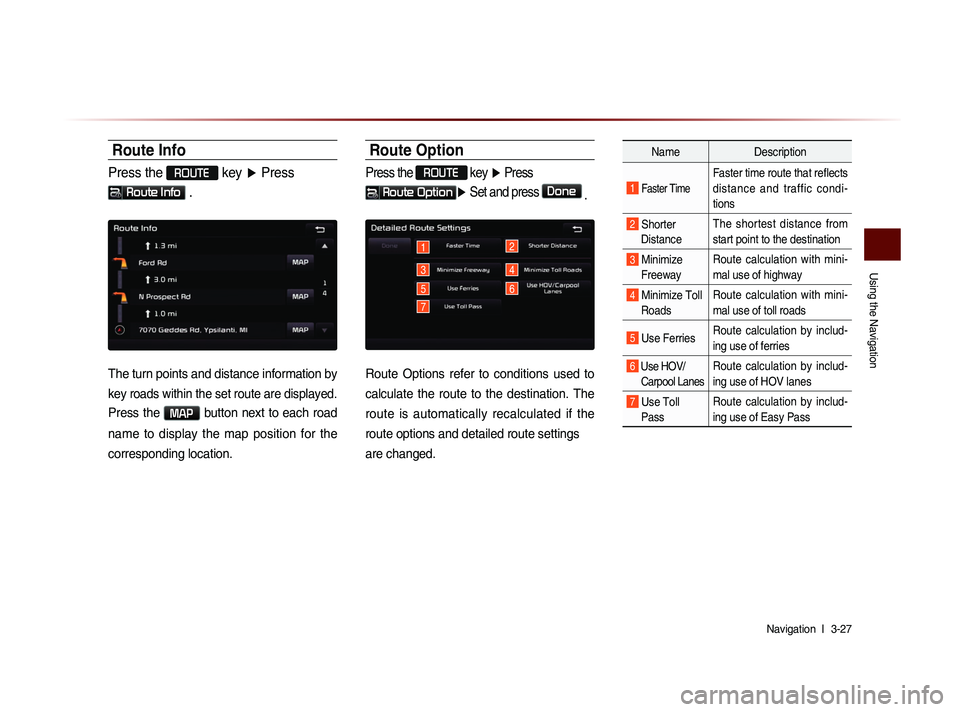
Route Info
Press the ROUTE key ▶ Press
Route Info .
The turn points and distance information by
key roads within the set route are displayed.
Press the MAP button next to each road
name to display the map position for the
corresponding location.
Route Option
Press the ROUTE
key ▶ Press
Route Option▶ Set and press Done
.
1
3
5
2
4
7
6
Route Options refer to conditions used to
calculate the route to the destination. The
route is automatically recalculated if the
route options and detailed route settings
are changed.
Name Description
1 Faster Time
Faster time route that reflects
distance and traffic condi-
tions
2 Shorter
Distance The shortest distance from
start point to the destination
3 Minimize
Freeway Route calculation with mini-
mal use of highway
4 Minimize Toll
Roads Route calculation with mini-
mal use of toll roads
5 Use Ferries
Route calculation by includ-
ing use of ferries
6 Use HOV/
Carpool LanesRoute calculation by includ-
ing use of HOV lanes
7 Use Toll Pass Route calculation by includ-
ing use of Easy Pass
Page 110 of 236
3-28
Using the Navigation
Detour
Press the ROUTE key ▶ Press
Detour .
The Detour menu is used to redefine the
route by setting a detour to a certain dis-
tance from the current position.
Avoid Streets
Press the ROUTE key ▶ Press
Avoid Streets ▶ Select the streets
you want to avoid and press
Done .
This feature is used to select specific
streets to avoid within the current route.
Select
Avoid to avoid the particular
streets in the route overview that are
desired to be avoided.
Edit Route
Press the ROUTE key ▶ Press
Edit Route ▶ Set and press Done
.
The Edit Route menu displays the start
point, waypoints, and the destination in list
format and is used to edit corresponding
positions or the order of destinations within
the route.
Page 112 of 236
3-30
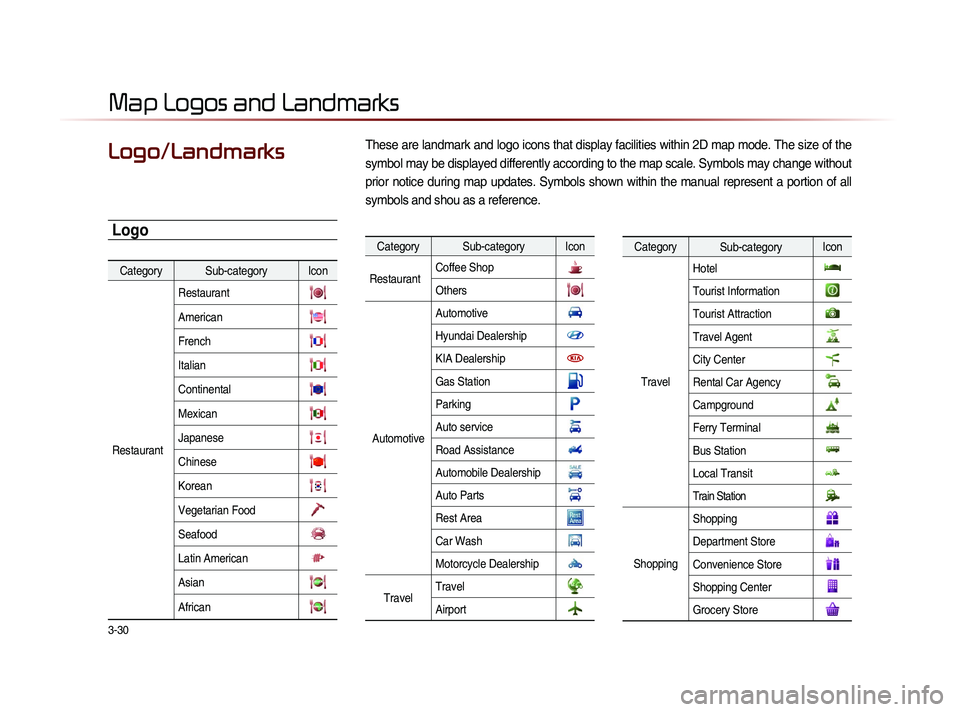
These are landmark and logo icons that display facilities within 2D map mode. The size of the
symbol may be displayed differently according to the map scale. Symbols may change without
prior notice during map updates. Symbols shown within the manual represent a portion of all
symbols and shou as a reference. Logo/Landmarks
Map Logos and Landmarks
Category Sub-category Icon
Restaurant Restaurant
American
French
Italian
Continental
Mexican
Japanese
Chinese
Korean
Vegetarian Food
Seafood
Latin American
Asian
African
Category Sub-category Icon
Restaurant Coffee Shop
Others
AutomotiveAutomotive
Hyundai Dealership
KIA Dealership
Gas Station
Parking
Auto service
Road Assistance
Automobile Dealership
Auto Parts
Rest Area
Car Wash
Motorcycle Dealership
Travel
TravelAirport
Category
Sub-category Icon
Travel Hotel
Tourist Information
Tourist Attraction
Travel Agent
City Center
Rental Car Agency
Campground
Ferry Terminal
Bus Station
Local Transit
Train Station
Shopping
Shopping
Department Store
Convenience Store
Shopping Center
Grocery Store
Logo