Page 188 of 236

8-2
Using Setup
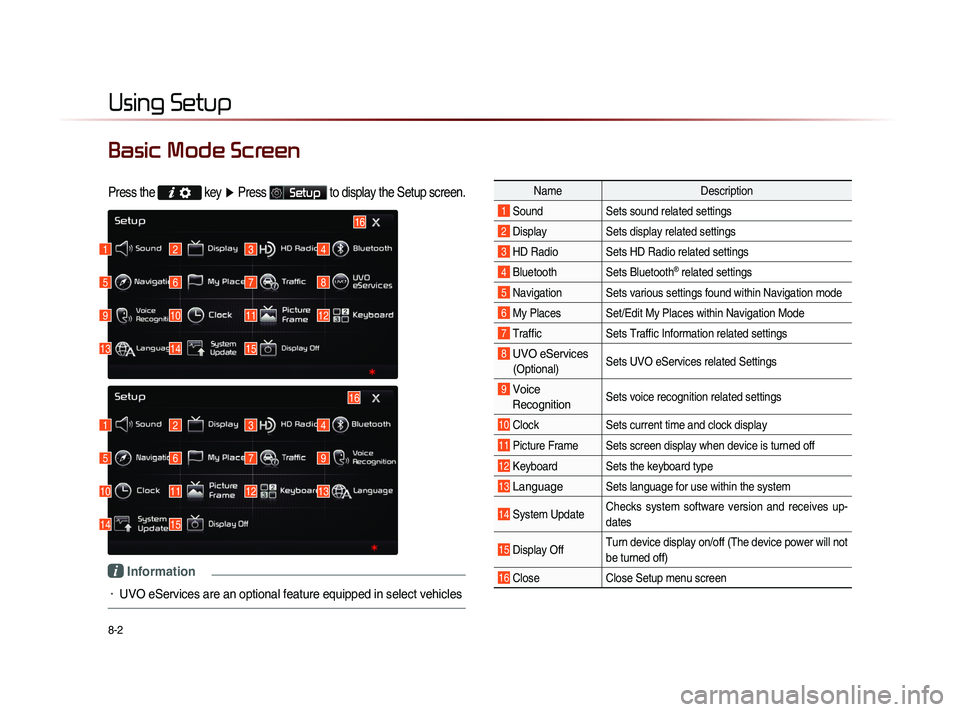
Basic Mode Screen
Press the key
▶ Press Setup to display the Setup screen.
Name Description
1 Sound Sets sound related settings
2 Display Sets display related settings
3 HD Radio Sets HD Radio related settings
4 Bluetooth Sets Bluetooth® related settings
5 Navigation Sets various settings found within Navigation mode
6 My Places Set/Edit My Places within Navigation Mode
7 Traffic Sets Traffic Information related settings
8 UVO eServices
(Optional)Sets UVO eServices related Settings
9 Voice
Recognition Sets voice recognition related settings
10 Clock Sets current time and clock display
11 Picture Frame Sets screen display when device is turned off
12 Keyboard Sets the keyboard type
13 Language Sets language for use within the system
14 System Update Checks system software version and receives up-
dates
15 Display Off Turn device display on/off (The device power will not
be turned off)
16 Close
Close Setup menu screen
1
1
5
5
9
10
13
14
2
2
6
6
10
11
14
15
3
3
7
7
11
12
4
4
8
9
12
13
16
15
16
i Information
• UVO eServices are an optional feature equipped in select vehicles
Page 189 of 236
Using Setup
Setup l
8-3
Starting Mode
Press the key
▶ Press
Setup to display the Setup screen.
Within Setup, you can check and change
the settings for all features found within the
Navigation system.
Sound
Press the
key ▶ Press Setup
▶ Press Sound
.
Setting Balance/Fader
Press the Sound button ▶ Press
Fader/Balance
▶ Set and press
Done
.
Use the ▲ , ▼ , ◀ , ▶ buttons to
move the cursor on the control screen to
the desired position.
Press
Center to restore sound to the
center position.
i Information
• The Balance/Fader settings allows you to
set the sound position. For example, you
can set the sound close to the driver-seat
so that the volume is relatively lower in
the passenger or rear seats.
Setting Bass/Mid/Treble
Press the Sound button ▶ Press
Bass/Mid/Treble ▶ S e t a n d p r e s s
Done
.
Use the ◀ or ▶ buttons to adjust the
Bass/Mid/Treble settings.
Page 191 of 236
Using Setup
Setup l
8-5
Setting Beep
Press the Sound button ▶ Press
Beep ▶ Set and press Done
.
Each press of this button turns the BEEP
tone on/off.
i Information
• When the light on the left side of the but-
ton is turned on, this indicates that the
BEEP tone is active. Press the
Beep
button again to turn off the BEEP tone.
Display
Press the
key ▶ Press Setup
▶ Press
Display
.
Adjusting Brightness
Press the Display button ▶ Press
Brightness ▶ Set and press Done
.
Use the ◀ or ▶ buttons to adjust the dis-
play brightness.
Setting Display Mode
Press the Display button ▶ Press
Display Mode ▶ Set and press Done .
Name Description
1 Automatic Adjusts the brightness auto-
m a t i c a l l y a c c o r d i n g t o s u r -
rounding brightness
2 Daylight
Always maintains the bright-
ness on high
3 Night Always maintains the bright-
ness on low
1
2
3
Page 197 of 236
Using Setup
Setup l
8-11
Navigation
Press the key ▶ Press Setup
▶ Press
Navigation
.
Main
Press the Navigation button ▶
Press
Main ▶ Set and press Done .
This menu is used to set general naviga-
tion options.
Name Description
1 Unit Sets whether to display dis-
tance as kilometers or miles
2 Estimated
Time of Sets whether to display esti-
mated time of arrival or travel
on the route info display
screen
3 Distance
and Time to Sets whether to display dis-
tance and time to destination
or to waypoint on the route
info display screen
4 Display
Previous
Destinations
upon Start-up Sets whether to display the
previous destinations popup
upon starting system
5 Driving Speed Setting Sets basic info to calculate
estimated arrival time to des-
tination or waypoint
6 Auto search
when fuel gauge
reads lowAutomatically search for gas
stations when fuel gauge
reads low
i Information
• When you have finished with the settings,
press the
Done button to save changes.
1
2
3
4
5
6
Page 198 of 236
8-12
Using Setup
Driving Speed Setting
Press the Edit button within the "Driving
Speed Setting" menu to set the estimated
driving speed for residential roads, main
streets, and expressways. The set driving
speed is applied to calculate the estimated
time to reach the destination or waypoint.
The changed driving speed is used to cal-
culate the estimated time until the destina-
tion or waypoint.
Press the
Default button to reset the driv-
ing speed settings.
i Information
• D e f a u l t D r i v i n g S p e e d S e t t i n g s f o r
Residential, Main Streets, and Expressways
are 20mph, 35mph, and 60mph, respec-
tively.
Display
Press the Navigation button ▶ Press
Display▶ Set and press Done .
This menu is used to set the color of the
Route Indicator line displayed when receiv-
ing route guidance.
Page 199 of 236

Using Setup
Setup l
8-13
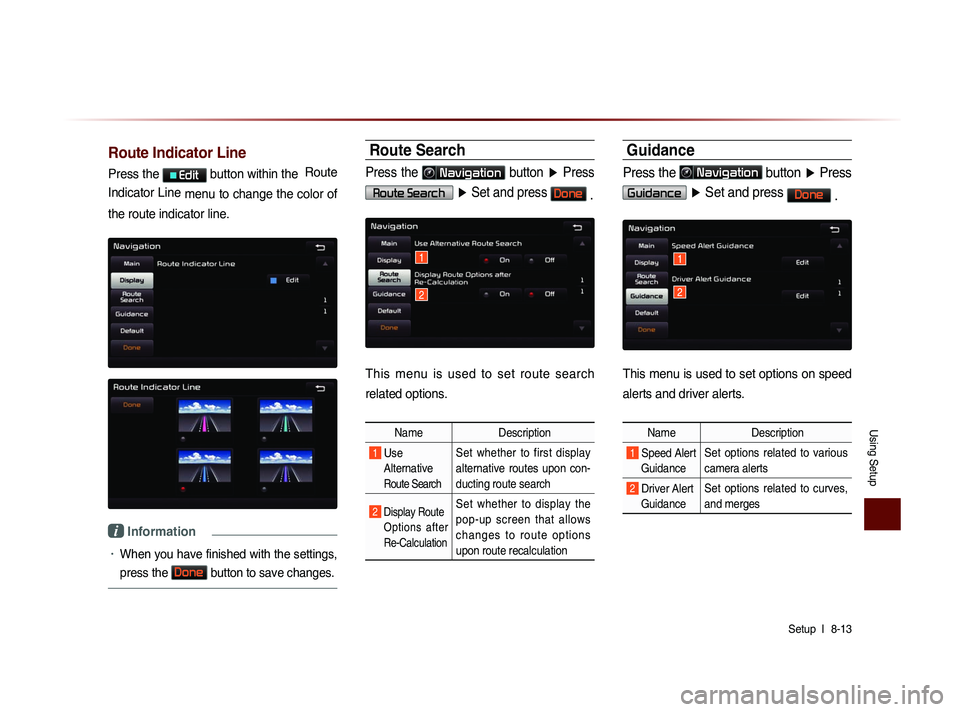
Route Indicator Line
Press the Edit button within the Route
Indicator Line menu to change the color of
the route indicator line.
i Information
• When you have finished with the settings,
press the
Done
button to save changes.
Route Search
Press the Navigation button ▶ Press
Route Search ▶ Set and press Done .
This menu is used to set route search
related options.
Name Description
1 Use
Alternative
Route Search
Set whether to first display
alternative routes upon con-
ducting route search
2 Display Route Options after
Re-Calculation Set whether to display the
pop-up screen that allows
c h a n g e s t o r o u t e o p t i o n s
upon route recalculation
Guidance
Press the Navigation button ▶ Press
Guidance ▶ Set and press Done
.
This menu is used to set options on speed
alerts and driver alerts.
Name Description
1 Speed Alert
Guidance Set options related to various
camera alerts
2 Driver Alert
Guidance Set options related to curves,
and merges
1
2
1
2
Page 204 of 236

8-18
Using Setup
Name Description
1 Data Radio ID C h e c k i n f o r m a t i o n o n
SIRIUS traffic data service
activation and activation ID
2 Display Traffic
and Flow Data
on Map Sets whether to display real-
time traffic information on
map
3 Voice Prompt
for Traffic and
Flow Warning S e t s w h e t h e r t o r e c e i v e
voice prompts for real-time
traffic information and condi-
tions
4 Provide
Re-Routing
Options S e t s w h e t h e r t o u s e r e -
routing options by reflecting
traffic conditions
i Information
• SIRIUS Traffic Data service requires a
separate subscription. To subscribe to
this service, please contact the number
displayed on the screen.
UVO eServices Settings
(Optional)
UVO eServices Settings
Within the eServices Settings screen,
UVO eServices related features can be
set, such as activating UVO eServices and
changing the Registered Phone.
For safety reasons, Settings can not be
adjusted while driving. Park the vehicle
b e f o r e m a k i n g a n y c h a n g e s t o y o u r
Settings.
Press the
key, then press
Setup icon on the touch screen.
P r e s s UVO eServices ic o n o n t h e
touch screen.
Page 207 of 236
Using Setup
Setup l
8-21
Voice Recognition
Settings
Press the key
▶ Press Setup
▶ Press
Voice Recognition ▶ Set and
press
Done .
This menu is used to set voice recognition
mode between Normal and Expert mode.
Name Description
1 Normal When using voice recognition,
provides detailed prompts and
is suited for beginner users
2 Expert When using voice recognition,
omits certain prompts and is
suited for experienced users
Clock Settings
Press the key
▶ Press Setup
▶ Press
Clock ▶ Set and press
Done
.
This menu is used to set the time used
within the Navigation system.
Name Description
1 GPS Time Displays time according to
the received GPS time
2 Daylight
Saving Time Turns on/off daylight saving
time feature
3 Time Format
Converts the digital clock
display to 12 or 24 hours
i Information
• When Daylight Savings Time is turned on,
the clock is moved forward one hour.
1
2
1
2
3