Page 113 of 286
, or
• take the vehicle out of reverse gear. The
acoustic parking system is immediately de
activated, and the rear view ca")
Switching off
• Drive faster than 9 mph (15 km/h), or
• take the vehicle out of reverse gear. The
acoustic parking system is immediately de
activated, and the rear view camera picture is deactivated automatically after a period
of about 15 seconds, or
• switch off the ignition.
The delay in deactivating the camera provides
an uninterrupted view behind the vehicle es
pecially when maneuvering in tight parking
spaces and prevents the picture from turning
off the every time you sh ift out of reverse .
If the warning message appears in the display but not the rear view camera picture, read and
confirm the warning message . The acoustic
d istance signal is always active.
If you press a function button on the MMI
control console, the rear view camera picture
disappears . The rear view camera picture reap
pears the next time you park.
Further information on the warning message
and the MMI control console can be found in
the MMI instruction booklet.
A WARNING
- Only use the rearview camera to assist
you if it shows a good, clear picture. For
example, the image may be affected by
the sun shining into the lens, dirt on the
lens or if there is a defect.
- Use the rearview camera only with the
rear lid completely closed. Make sure any
objects you may have mounted on the
rear lid do not block the rearview cam
era.
(D Tips
- The rear v iew camera picture is available
as soon as the MMI Display or the MMI is
switched on, or the start-up phase is
completed.
- The sensors must be kept clean and free
of snow and ice for the park assist to op
erate.
Park assist 111
- You can change the vo lume and pitch of
the signals as we ll as the disp lay
~page 113.
-What appears in the display is time-de
layed.
Reverse Parking
App lies to vehicles: wit h parking system (rear, with rear
v iew camera}
Parking mode 1 can be used when parking in
a garage or parking space.
Fig. 112 MMI Display: Aim ing at a park ing spot
Fig. 113 MMI Disp lay : Al ign ing the veh icle
• Switch the MMI on and select the reverse
gea r.
• Turn the steering wheel until the orange ori
entation lines (!) appear in the parking spot
i=> fig. 112. Use the markings @to help you
estimate the distance from an obstacle.
Each marking corresponds to 3 ft (1 m). The
blue area represents an extens ion of the ve
hicle's outline by approximately 16 ft (5 m)
to the rear.
• Wh ile driving in reverse gear, adjust the
steer ing whee l angle to fit the parking space
with the aid of the orange orientation lines
i::>0 .@ marks the rear bumper. You should
stop driving in reve rse as soon as and no
Ill>-
Page 114 of 286

112 Park ass is t
later than when the red o rientation line ©
abuts an object
9 _& !
A WARNING
- The rear view camera does not show the entire area beh ind the veh icle
¢ page 109, fig. 110. Watch out espe
c ially for small children and an imals. The
rear view camera cannot always detect
them, posing r isk of a n accident!
- Please note that objects not touch ing the
ground can appear to be furthe r away
t han they really are (for example, the
bumper o f a parked vehi cle, a trailer
hi tch, or the rear of a truck). In this case,
yo u should not use the help lines to he lp
with parking, which poses danger of an
acc ident!
(D Note
- Low obs tacles alrea dy signaled by a
warning can disappea r from the system's
detection range as they are approached
and will not contin ue to be signaled. Ob
j ects such as barrier cha ins, trailer draw
bars, thin pa inted vertical po les or fen
ces may not be detected by the system, pos ing risk of damage.
- In the MMI d isplay, the direction of trav
el of the vehicle rea r is represented de
pend ing on the stee ring w heel a ngle.
The vehicle fron t swings out more than
t h e ve hicle re ar. Main tain plen ty of di s
ta nce from an obs tacle so that your o ut
side mir ro r or a corne r of your veh icle
does not collide with any obstacles - dan ger of acc ident!
Parallel Parking
Applies to vehicles: wit h parking system (rear, with rear
v iew camera)
Use parking mode 2 to help you park on the
edge of a street.
Fig . 1 14 MM I Disp lay : b lu e surface in th e park ing spot
F ig . 11 5 MMI Disp lay : Blu e curve o n the curb
The following steps apply on ly when there is
no obstacle (such as a wall) near the parking
spot. Otherwise, please read the "Tips on
Parking Next to Obstacles"
¢page 113.
.,. Activate the t urn signa l.
.,. Posit ion your veh icle para llel to the edge of
the street, approximately 3
ft (1 m) from a
parked ve hicle.
.,. Switch the MMI on and select the reverse
gea r. The parking aid turns on and parking
mode 1 appears on th e display .
.,. Press the
Mode 9 fig . 114 C!) control b utton
on the MMI contro l conso le. Parking mode 2
appears .
.,. Back up in reverse gear and alig n your vehi
cle so that the blue area @borders on the
rear end of the vehicle or on the park ing
spot line. The blue area represents an exten
sion of the vehicle's out line by approximate-
ly 16
ft (Sm) to the rea r. The long side of ..,.
Page 115 of 286

the blue area should be o n the curb. The en
tire b lue area must fit into the parking spot.
~ While the vehicle is stationary, t urn the
steering wheel to the right as far as it will go.
~ Back into the park ing spot . Stop the vehicle
as soon a s the blue curve touches the curb
¢ fig . 115.
~ While the vehicle is stationary, tu rn the
steering wheel to the left as far as it w ill go.
~ Continue to back up into the park ing spot
until the vehicle is parked paralle l to the
curb .@ marks the rear bumper . You should
stop dr iving in reverse as soon as and no lat
er than when the red orientation line@
abuts an object¢,& ! Keep an eye on the
front of your vehicle wh ile doing this ¢(D .
Par kin g ne xt to obst acles
When there is an obstacle (such as a wall)
next to the parking spot, choose a spot with
more space on the sides. Position the long
side of the blue area so that there i s sufficien t
space from the curb . The area must not be on
the curb . You w ill also need to start turning
the steeri ng whee l much ear lie r. T he re should
be a suffic ien t amo unt of space between the
curb and the b lue curve, and the blue c urve
¢
fig . 115 mus t not touch the curb .
&_ WARNING
-The rear view came ra does not show the
entire area behind the vehicle
¢ page 109, fig. 110. Watch out espe
c ially for small children and an imals. The
rear view camera cannot a lways detect
them, posing risk of an accident!
- Please note that objects not touch ing the
ground can appear to be further away
than they really are (for example, the bumper of a pa rked vehicle, a t railer
hi tc h, or the rear of a tru ck) . In this case,
yo u should not use the help lines to he lp
with park ing, which poses danger of an
accident!
P ark a ssis t 113
@ Note
In the MMI display, the direction of travel
of the vehicle rear is represented depend
i ng on the steering wheel angle . The vehi
cle front swings out more than the vehicle
rear. Maintain p lenty of d istance from an
obstacle so that your outs ide mirror or a
corner of you r vehicle does not coll ide with
any obstacles - dange r of accident!
(D Tips
The left o r right orie ntation lines and su r
faces will be displayed, depending on the
turn s ignal being used .
Adjusting the display and warning tones
Applies to vehicles: with parking system (rear, with rear
view camera)
The display and warning tones are adjus ted in
the radio or MM!*.
~ Select: !CAR ! function button > Par king sys
tem .
Or
--~ Select: !C AR ! function but ton> Car systems *
contro l butto n > Driver ass ist > Parking aid .
Di splay
- Off -when the parking system is switched
off, only a udible s ignals a re g iv en .
- On -when the parking system is switched
on, the picture from the rear view camera is
disp layed.
Warning tones
- Rear volum e -
rear sensor vo lume
- Rear frequency -rear senso r frequency
- Music volume while parking -when the
park ing system is sw itched on, the volume
of t he active audio sour ce is lowered.
The newly adjusted value is briefly heard from
the sig nal generato r. Th e settings are auto
matically stored and assigned to the remote
control key. ..,.
Page 116 of 286
114 Park assist
_&. WARNING
-Always make sure that the volume and
frequency of the warning tones is adjust
ed so that you can easily hear the acous
tic distance signal even if the radio is
playing, the air-conditioner blower is on
High or there is a high level of outside
noise.
- Check the settings whenever someone
else has driven the vehicle before you.
@ Tips
-The warning tones can also be adjusted
directly from the rear view camera im
age . Simply press the Settings* control
button.
- Changed settings are activated when
parking assist is switched on again.
Error messages
Applies to vehicles: wit h parking system (rear, wit h rear
v iew camera)
-
If a warning tone is audible for about five sec
onds when you turn on the ignition, there is a malfunction in the system. Have the problem
corrected by your authorized Audi dealer.
Keep the sensors in the rear bumper clean and
free from ice so that the acoustic park assist
system can function properly.
Page 117 of 286

Homelink
Universal remote
control
Description
Applies to vehicles: with Home link
The HomeLink universal remote control can
be programmed with the remote control for
devices that are already present.
With Home Link, you can control devices such
as the garage door, security systems, house
lights , etc. comfortably from the inside of you
vehicle.
Homelink makes it possible for you to rep lace
three different remote controls from dev ices
in your home with one universal remote. This
feature works for most garage door and exte
rior door motor signals. Programming the in
dividual remote control for your remote con
trol takes place near the center of the radiator
grille. There is a control module attached at
this location .
A one-time programming of the sensor must be performed before you are able to use sys
tems with Homelink. If the system does not activate after performing the one-time pro
gramming, check whether the system uses a rolling coder:!.>
page 118 for vehicles without
the
MMI*.
,& WARNING
-
- Never use the Homelink transmitter
with any garage door opener that does
have not the safety stop and reverse fea
ture as requ ired by federa l safety stand
ards. This includes any garage door open
er model manufactured before April 1,
1982.
-A garage door opener which cannot de
tect an object, signaling the door to stop
and reverse does not meet current feder
al safety standards . Using a garage door
opener without these features increases
risk of serious injury or death.
Homelink 115
- For safety reasons never release the
parking brake or start the engine while
anyone is standing in front of the vehicle .
- A garage door or an estate gate may
sometimes be set in motion when the
Homelink remote control is being pro
grammed. If the device is repeatedly ac
tivated, th is can overstrain motor and
damage its electrical components - an
overheated mo tor is a fire hazard!
- To avoid possib le injuries or property
damage, please always make abso lutely
certa in that no persons or objects are lo
cated in the range of motion of any
equipment being operated.
(0 Tips
- If you would like more information on
Homelink, where to purchase the Home
Link compat ible products, or would like
to purchase the Home Link Home Light
ing Package, please call toll-free :
1-800-355-3515.
-For Declaration of Compliance to United
States FCC and Industry Canada regula
tions
¢ page 267.
-For security reasons, we recommend that
you clear the programmed buttons be
fore selling the vehicle.
Operation
App lies to vehicles : with Homeli nk
,~
1~
1 r ·O : O ·) 1111 ~
®
Fig.
116 Headl iner: controls
Req uirement: The buttons must be program-
med
¢page 116 or ¢page 117. ..,_
Page 118 of 286

116 Homelink
• To open the garage door, press the p rogram
med button . The LED @will light up or
flash.
• To close the garage door, pre ss the button
again.
@ Tips
To open the garage door, press the button, but do not press it for longer ten seconds
or the Homelink module will switch to
programming mode.
Programming the transmitter (version A)
Appl ies to vehicles: with Home link and MMI
Fig. 1 17 D ista nce between t he ra d iato r grille and t he
hand tran sm itter
You can p rogram the fixed code and ro lling
code systems using the descr ibed procedure.
Programming the button
• Turn the ign ition on .
• The re a re two ways to program the button :
P res s the but ton
¢ page 115, fig. 116 tha t
you wou ld like to p rogram. Use the instruc
tions that appear in the MM I* to pe rform
the p rogramming. Or
• Se lect : ICAR ifunct ion button>
Car sy stems*
con trol but ton > Vehicle sett ing s> Garage
door opener
> Program garage door open·
er .
If this path is not ava ilable, program
Homelink as desc ribed in vers ion B
~ page 117.
• Se lect t he button t hat yo u wo uld like to p ro
gram.
• Fo llow the ins tructions in the MMI* .
• If the garage door open ing must also be
synchronized w it h the Homel ink modu le, refer to the owner
's manua l for the garage
door opener .
Remote con tro l unit s fo r garage door ope ne rs
in Canada are se t to stop t ransmi tting radio
frequency signa ls afte r two seconds . This time
may not be sufficient for the Homelink sys
tem to learn the radio frequency signa l. Per
form all other steps as described above.
Erasing /Clearing the programmed button
s etting s
• To erase all of the programmed buttons at
the same time, select : ICAR !function b utton
> Car Systems * control butto n > Vehicle set·
tings
> Garag e door opener > Clear pro·
gram setting s> Yes .
The prog rammed but
tons can not be erased individua lly. Repro
gram the buttons if ne cess ary.
• Reprogr am an individua l bu tton in the same
manner that you wou ld for the one-time
programming .
Displaying the version /status /country
code
• Sele ct: !CAR I function bu tton > Car sy stem s*
contro l but to n > Vehicle settings > Garage
door opener
> Version information .
(D Tips
- Programming throug h the MMI* is not
possible with all infotainment systems.
If this is the case , program Homelink as
descr ibed in version B
c:) page 117.
-The required distance betwee n the hand
transm itter and the Homelink module in
the radiator gr ille
¢ fig. 117 depends on
the system that you are prog ramming .
- Depending on the mode l of the garage
door opener, you may need to release the
butto n on the remote and press it again
w hen programming. When program ·
m ing a new device, keep the butto n
presse d for at least 15 seconds before
t ry ing ag ain w ith the transmit ter in a dif
fere nt posi tion. W atch o ut for the emer
gency flasher during tha t time.
Page 119 of 286

Applies to vehicles: with Horne link
Fig. 118 D istance between t he rad ia to r gr ille a nd the
h and trans mitter
Programming: phase 1 on t")
Programming the transmitter (version B)
Applies to vehicles: with Horne link
Fig. 118 D istance between t he rad ia to r gr ille a nd the
h and trans mitter
Programming: phase 1 on the control unit
1. Sw itch on the ig nit io n (do no t start the
engine ).
2. Press and hold bot h of the outer Home
Link buttons
r=> page 115, fig. 116 until
the LED @ turns off completely (about
20
seconds). Th is procedure clears the stand
ard codes that were set at the factory and
does
not need to be repeated agai n to
p rog ram the othe r buttons.
3 . Briefly press the Homelink button that
you would like to prog ram .
4 . Wai t unti l the LED @ beg ins to blink
q ui ckly . The Home Lin k modu le wi ll now
remai n in learning mode for
5 minutes .
5. Now stand in front of your vehicle with
the original hand transmitter for the ga rage door opener or for the device that
you would like to allocate to the Home
Link button.
Programming: pha se 2 on the radiator
grille
6 . Hold the orig inal hand t ransmitter some
what towa rds the center o f you r vehicle 's
radiato r gr ille
r=> fig . 118 .
7. Now activate (p ress) t he hand transmit
ter.
8 . Pay a ttention to the t urn sign als for yo ur
vehicle when activating the ha nd trans
mitter . If t he emergency flashers b link
three times, the programming was suc
cessful. If the emergency flasher only bli nks one t ime, the 5 minute t ime limit
Homelink 11 7
for the adaptat ion has expired or the pro
gram ming was unsuccessful. Repeat the
programming from step 3 on the controls
o r se lect another distance from the radia
tor grille.
9. If the garage door or other devices sti ll
fail to be activated w it h the Homelin k
control buttons after p rogramming is
comple ted, it is possib le tha t these sys
tems might be w ork ing wi th a roll ing co de
ins tead of the normal fixed co de.
A Roll
ing code programming must be per
formed
r=> page 118 .
Program the rema ining tw o butt ons accor ding
to the instructions mentioned above . Beg in
similar ly w ith the 3rd step if the program
m ing connection was successful for t he fi rst
button .
Remote con trol units fo r garage door opene rs
in Canada are set to stop tra nsmitting radio
frequency signa ls after two seconds . This t ime
may not be suffic ient for the Homelink sys
tem to learn the radio frequency signa l. Per
form all other steps as described above.
Erasing the buttons
.,. Switch on the ignition (do not sta rt the en
gi ne).
.,. Press and hold both o f the outer buttons un
til the LED@ turns off completely (abo ut
20 seconds) to e rase a ll of the buttons si
m ultaneously .
.,. Programmed b uttons ca nnot be erased ind i
vidua lly. Reprogram the butto ns if necessa
ry .
Reprogramming the buttons
.,. Switch o n the ignition (do not start t he en
gine) .
.,. To reprogram an individua l bu tto n, press
and hold the button unt il the LED @ starts
t o f lash quickly (a fter ab out ten seconds) .
Release t he bu tton imme dia tely. The Home
L ink module will now remai n in learning
mo de for 5 min utes.
.,. Continue with step 5.
Page 120 of 286

118 Homelink
-Programming using the Homelink but
tons is not poss ible with all infotainment
systems. If this is the case, program Homelink as described in vers ion A
¢ page 116.
-The requ ired distance between the hand
transmitter and the Homelink module in
the radiator grille
¢ fig . 118 depends on
the system that you are programming.
- Depend ing on the model of the garage
door opener, you may need to release the
button o n the remote and press it again
when prog ramming . W hen p rogram
ming a new dev ice, keep the button
pressed for a t le ast 15 se con ds before
trying again wi th the transmitte r in a dif
ferent posit ion . Watch out for the emer
gency flasher during that time.
Programming the rolling code
App lies to vehicles: with Home link
Additionally, a rolling code programming for
the Homelink universal remote control is re
quired for some systems.
Identifying the rolling code
"' Press the prev io usly progr amme d Homelink
bu tton aga in and ho ld it down .
"' Look at th e LED @¢
page 115, fig . 116 . If
the LED b links quickly, the features, s uch as
the garage door opene r, are equipped with
t he rolling code .
"' Program the rolling code as follows :
Activating the g arage door opene r motor
unit
"' Locate the setting button on the garage
door opener motor unit . The exact location
and co lor of t he button may vary depend ing
on the ga rage door opener ma nufactu rer .
"' Press the sett ing button on the ga rage door
opener motor unit (usually th is w ill act ivate
a "se tting ligh t disp lay" on the mo to r u nit).
Now you w ill have abo ut
30 second s time to
perform the Homelink button programming
on the cont ro ls.
Programming on the controls
"' Press the Homelink bu tton tha t was a lready
programmed and hol d for two seconds .
"' To end ro llin g code programming , press and
hold t he Home link button for two seconds
aga in.
"' The Home link button may need to be press
ed a t hird t ime to end the adjustment proce
dure for some ga rage doo r openers .
After the controls have been programmed, the
garage door opener shou ld recognize the
Homelink signa l and operate when the Home
Lin k button is pressed . N ow you may prog ram
t h e other buttons as needed .
(D Tips
- Programming the rolling code can be
perfor med quicke r and more easily with
the help of a se cond person .
- If d iff iculties should ar ise when pro
gramming the rolling code, consult the
operating instructions fo r th e garage
door opener or o ther dev ices for po ssible
so lutions.
 1
1 2
2 3
3 4
4 5
5 6
6 7
7 8
8 9
9 10
10 11
11 12
12 13
13 14
14 15
15 16
16 17
17 18
18 19
19 20
20 21
21 22
22 23
23 24
24 25
25 26
26 27
27 28
28 29
29 30
30 31
31 32
32 33
33 34
34 35
35 36
36 37
37 38
38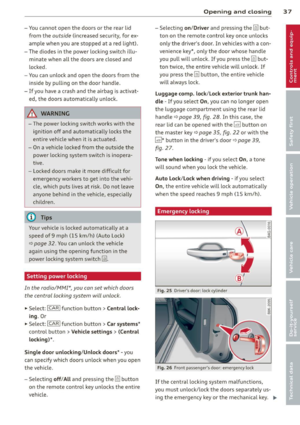 39
39 40
40 41
41 42
42 43
43 44
44 45
45 46
46 47
47 48
48 49
49 50
50 51
51 52
52 53
53 54
54 55
55 56
56 57
57 58
58 59
59 60
60 61
61 62
62 63
63 64
64 65
65 66
66 67
67 68
68 69
69 70
70 71
71 72
72 73
73 74
74 75
75 76
76 77
77 78
78 79
79 80
80 81
81 82
82 83
83 84
84 85
85 86
86 87
87 88
88 89
89 90
90 91
91 92
92 93
93 94
94 95
95 96
96 97
97 98
98 99
99 100
100 101
101 102
102 103
103 104
104 105
105 106
106 107
107 108
108 109
109 110
110 111
111 112
112 113
113 114
114 115
115 116
116 117
117 118
118 119
119 120
120 121
121 122
122 123
123 124
124 125
125 126
126 127
127 128
128 129
129 130
130 131
131 132
132 133
133 134
134 135
135 136
136 137
137 138
138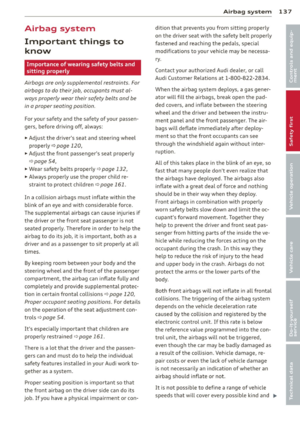 139
139 140
140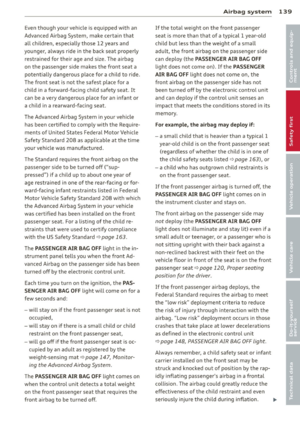 141
141 142
142 143
143 144
144 145
145 146
146 147
147 148
148 149
149 150
150 151
151 152
152 153
153 154
154 155
155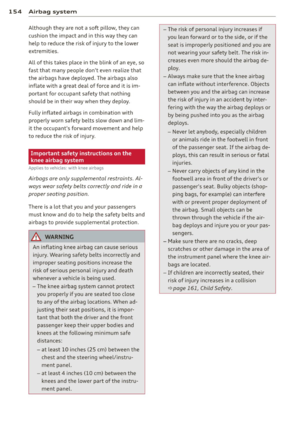 156
156 157
157 158
158 159
159 160
160 161
161 162
162 163
163 164
164 165
165 166
166 167
167 168
168 169
169 170
170 171
171 172
172 173
173 174
174 175
175 176
176 177
177 178
178 179
179 180
180 181
181 182
182 183
183 184
184 185
185 186
186 187
187 188
188 189
189 190
190 191
191 192
192 193
193 194
194 195
195 196
196 197
197 198
198 199
199 200
200 201
201 202
202 203
203 204
204 205
205 206
206 207
207 208
208 209
209 210
210 211
211 212
212 213
213 214
214 215
215 216
216 217
217 218
218 219
219 220
220 221
221 222
222 223
223 224
224 225
225 226
226 227
227 228
228 229
229 230
230 231
231 232
232 233
233 234
234 235
235 236
236 237
237 238
238 239
239 240
240 241
241 242
242 243
243 244
244 245
245 246
246 247
247 248
248 249
249 250
250 251
251 252
252 253
253 254
254 255
255 256
256 257
257 258
258 259
259 260
260 261
261 262
262 263
263 264
264 265
265 266
266 267
267 268
268 269
269 270
270 271
271 272
272 273
273 274
274 275
275 276
276 277
277 278
278 279
279 280
280 281
281 282
282 283
283 284
284 285
285