2013 NISSAN LEAF navigation
[x] Cancel search: navigationPage 76 of 275

3-20Navigation
INFO:
In some cases, when a city name has been
entered, the number of matching destinations in
the “Matches” column may be different from the
number displayed on the list screen. If this
occurs, enter more characters to further reduce
the number of matches.
FINDING ADDRESS
When the address of the destination is known,
use the following method to enter the address
and then have the system calculate a route. A
location near the preferred destination can also
be searched by entering the house number if the
map data contains the relevant data.
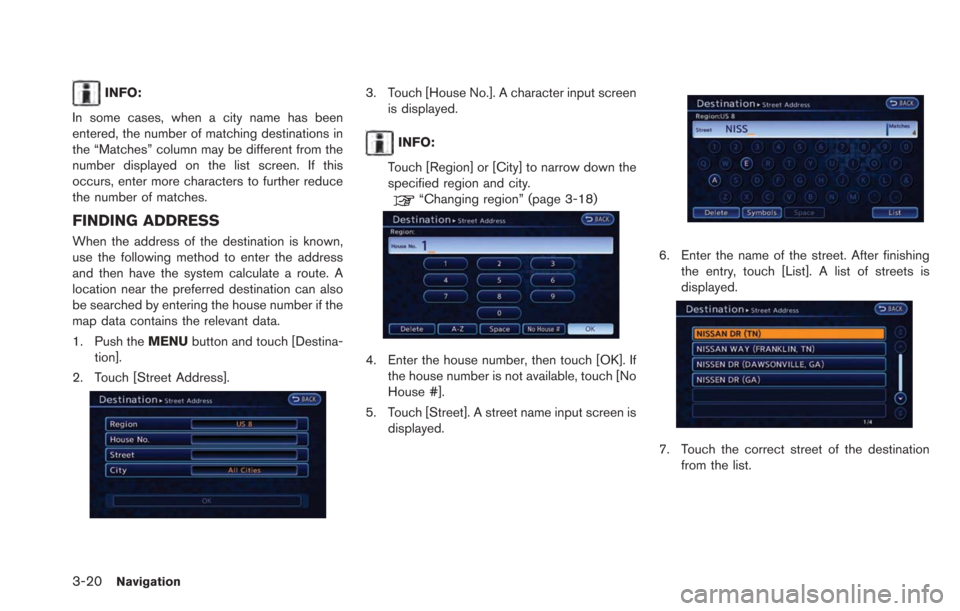
1. Push the MENUbutton and touch [Destina-
tion].
2. Touch [Street Address].
3. Touch [House No.]. A character input screen is displayed.
INFO:
Touch [Region] or [City] to narrow down the
specified region and city.
“Changing region” (page 3-18)
4. Enter the house number, then touch [OK]. If the house number is not available, touch [No
House #].
5. Touch [Street]. A street name input screen is displayed.
6. Enter the name of the street. After finishingthe entry, touch [List]. A list of streets is
displayed.
7. Touch the correct street of the destination
from the list.
Page 77 of 275

INFO:
In some cases, when a street name has
been entered, the number of matching
destinations in the "Matches" column may
be different from the number displayed on
the list screen. If this occurs, enter more
characters to further reduce the number of
matches.
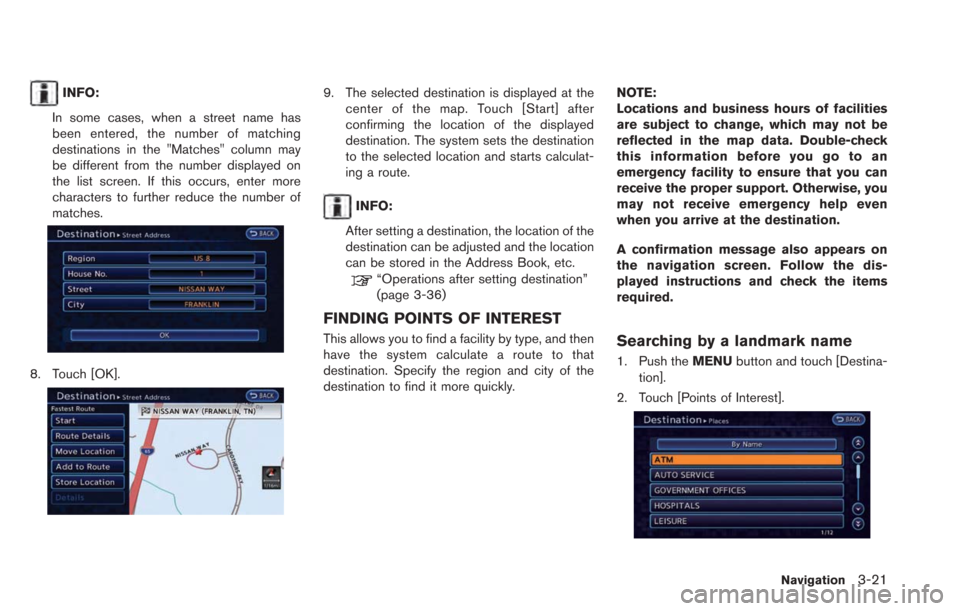
8. Touch [OK].
9. The selected destination is displayed at the center of the map. Touch [Start] after
confirming the location of the displayed
destination. The system sets the destination
to the selected location and starts calculat-
ing a route.
INFO:
After setting a destination, the location of the
destination can be adjusted and the location
can be stored in the Address Book, etc.
“Operations after setting destination”
(page 3-36)
FINDING POINTS OF INTEREST
This allows you to find a facility by type, and then
have the system calculate a route to that
destination. Specify the region and city of the
destination to find it more quickly. NOTE:
Locations and business hours of facilities
are subject to change, which may not be
reflected in the map data. Double-check
this information before you go to an
emergency facility to ensure that you can
receive the proper support. Otherwise, you
may not receive emergency help even
when you arrive at the destination.
A confirmation message also appears on
the navigation screen. Follow the dis-
played instructions and check the items
required.Searching by a landmark name
1. Push the
MENUbutton and touch [Destina-
tion].
2. Touch [Points of Interest].
Navigation3-21
Page 78 of 275
![NISSAN LEAF 2013 1.G Navigation Manual 3-22Navigation
3. Touch [By Name]. A character input screenis displayed.
4. Enter the name of the destination facility.After finishing the entry, touch [List]. A list
screen is displayed.
INFO:
When [ NISSAN LEAF 2013 1.G Navigation Manual 3-22Navigation
3. Touch [By Name]. A character input screenis displayed.
4. Enter the name of the destination facility.After finishing the entry, touch [List]. A list
screen is displayed.
INFO:
When [](/manual-img/5/324/w960_324-77.png)
3-22Navigation
3. Touch [By Name]. A character input screenis displayed.
4. Enter the name of the destination facility.After finishing the entry, touch [List]. A list
screen is displayed.
INFO:
When [City] is touched, a city can be
specified by typing the city name.
“Specifying city” (page 3-19)
5. Touch the preferred destination facility from the list.
INFO:
.In some cases, when a POI name has
been entered, the number of matching
destinations in the "Matches" column
may be different from the number dis-
played on the list screen. If this occurs,
enter more characters to further reduce
the number of matches.
.By selecting [By Distance], you can sortthe list by the nearest distance. The
position of the selected location is
displayed in the preview on the right side
of the screen.
.By selecting [By Category], you candisplay the list that summarizes the
entered names into categories. Select
the category to narrow down the search.
6. The selected destination is displayed at the center of the map. Touch [Start] after
confirming the location of the displayed
destination. The system sets the destination
to the selected location and starts calculat-
ing a route.
INFO:
After setting a destination, the location of the
destination can be adjusted and the location can
be stored in the Address Book, etc.
“Operations after setting destination”
(page 3-36)
Searching from the landmark cate-
gory
1. Push the MENUbutton and touch [Destina-
tion].
2. Touch [Points of Interest]. The main category list is displayed.
Page 79 of 275
![NISSAN LEAF 2013 1.G Navigation Manual 3. Touch the main category. The subcategorylist is displayed.
4. Touch the subcategory from the list.
5. Set the narrow down conditions for thelandmarks.
An example of choosing [By Name] is
explained NISSAN LEAF 2013 1.G Navigation Manual 3. Touch the main category. The subcategorylist is displayed.
4. Touch the subcategory from the list.
5. Set the narrow down conditions for thelandmarks.
An example of choosing [By Name] is
explained](/manual-img/5/324/w960_324-78.png)
3. Touch the main category. The subcategorylist is displayed.
4. Touch the subcategory from the list.
5. Set the narrow down conditions for thelandmarks.
An example of choosing [By Name] is
explained below.
Narrow down conditions:
.[By Name]:
Input the facility name to narrow down
the target facility.
.[Select a City]:Input the city to narrow down the target
city.
.[Near Current Location]:Shows a list of facilities that are near
current vehicle location.
.[Near Destination]:When the destination is set, indicates the
facility list around the destination.
6. Touch [By Name]. A character input screen is displayed.
7. Enter the name of the destination facility.After finishing the entry, touch [List]. A list
screen is displayed.
8. Touch the preferred destination facility fromthe list.
INFO:
.In some cases, when a POI name has
been entered, the number of matching
destinations in the "Matches" column
may be different from the number dis-
played on the list screen. If this occurs,
enter more characters to further reduce
the number of matches.
.By selecting [By Distance], you can sortthe list by the nearest distance. The
position of the selected location is
displayed in the preview on the right side
of the screen.
.By selecting [New Category], you canperform a search from another category.
Navigation3-23
Page 80 of 275
![NISSAN LEAF 2013 1.G Navigation Manual 3-24Navigation
9. The selected destination is displayed at thecenter of the map. Touch [Start] after
confirming the location of the displayed
destination. The system sets the destination
to the select NISSAN LEAF 2013 1.G Navigation Manual 3-24Navigation
9. The selected destination is displayed at thecenter of the map. Touch [Start] after
confirming the location of the displayed
destination. The system sets the destination
to the select](/manual-img/5/324/w960_324-79.png)
3-24Navigation
9. The selected destination is displayed at thecenter of the map. Touch [Start] after
confirming the location of the displayed
destination. The system sets the destination
to the selected location and starts calculat-
ing a route.
INFO:
After setting a destination, the location of the
destination can be adjusted and the location can
be stored in the Address Book, etc.
“Operations after setting destination”
(page 3-36)
SETTING HOME AS DESTINATION
The home location can be set as the destination
to which the system calculates a route. This
function is especially useful when searching for
a route to return to the home location. 1. Puch the
MENUbutton and touch [Destina-
tion].
2. Touch [Home].
3. The home location is displayed, and the system sets the home location as the
destination.
INFO:
If the home location is not stored yet, the
system will automatically display a screen for
storing it.
“Storing home location” (page 1-12)
4. The entire route to the home location is shown on the map. Touch [Start] after
confirming the displayed route. The system
starts route guidance to the home location.
INFO:
Before starting route guidance, the route con-
dition can be changed and the route can be
stored in the Address Book, etc.
“Procedures after setting route”
(page 3-39)
Setting by voice command
1. Push the
button located on the steering
wheel.
2. After the tone sounds, speak a command.
To set the home location as the destination:
"Navigation" "Home"
Page 81 of 275

FINDING CHARGING STATION
It is possible to set the destination to a charging
station and then have the system calculate a
route.
There are many ways to search for a charging
station.
.Find from MENUbutton.
“Nearby current location” (page 3-25)
. Find from
(Zero Emission menu) button.“Specifying search condition ”
(page 3-26)
. Find from [CARWINGS]*.
“Viewing from Zero Emission button”
(page 2-6)
. Find from [Map Menu]* on current location
map.
“Viewing from map menu” (page 2-7)
*: Full/vacant information of charging station can
be checked.
CAUTION
Detailed charging station information
may not be available in all areas and
current charging station locations may
not be up to date. For up to date
information about charging stations,
such as business hours or charging equipment, NISSAN recommends that
you directly access the information on
your own. Additionally, always check
the Li-ion battery available charge and
set a reasonable driving schedule.
Nearby current location
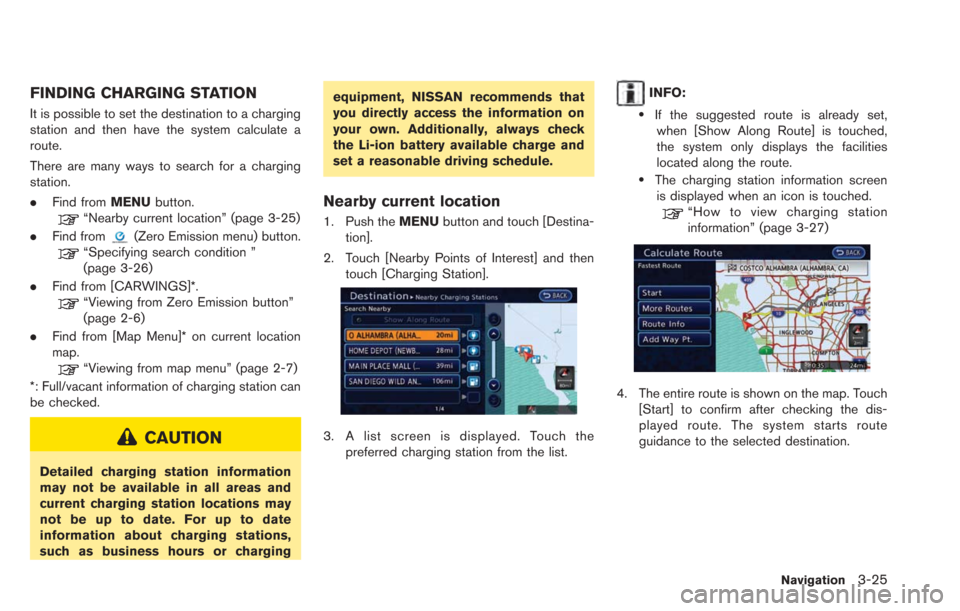
1. Push the
MENUbutton and touch [Destina-
tion].
2. Touch [Nearby Points of Interest] and then touch [Charging Station].
3. A list screen is displayed. Touch thepreferred charging station from the list.
INFO:
.If the suggested route is already set,when [Show Along Route] is touched,
the system only displays the facilities
located along the route.
.The charging station information screenis displayed when an icon is touched.
“How to view charging station
information” (page 3-27)
4. The entire route is shown on the map. Touch [Start] to confirm after checking the dis-
played route. The system starts route
guidance to the selected destination.
Navigation3-25
Page 82 of 275

3-26Navigation
INFO:
Before starting route guidance, the route con-
dition can be changed and the route can be
stored in the Address Book, etc.
“Procedures after setting route”
(page 3-39)
NOTE:
Charging stations that have been searched
for using this function are not necessarily
equipped with devices that can be used to
charge a LEAF. Be sure to confirm this in
advance before setting a charging station
as the destination.
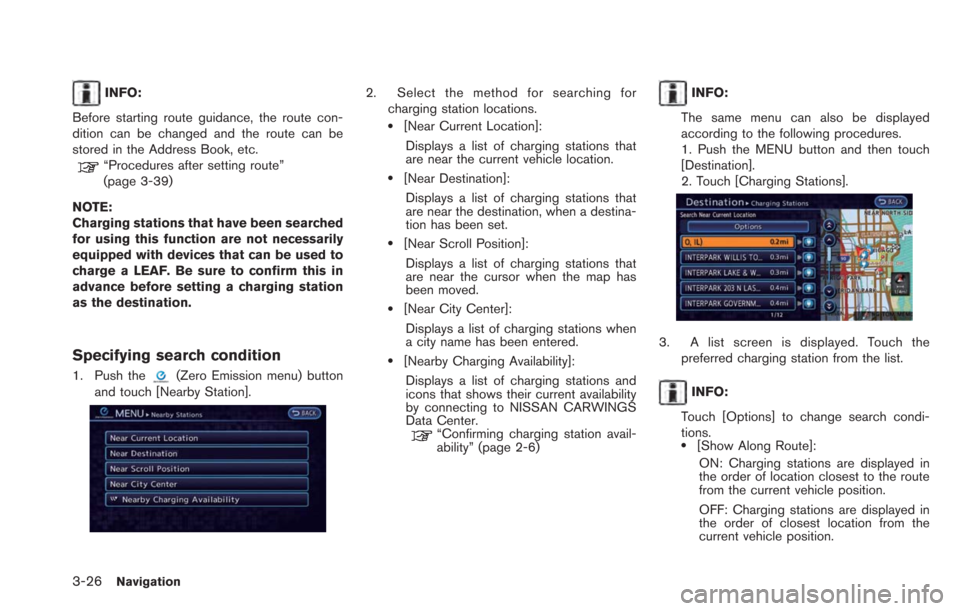
Specifying search condition
1. Push the(Zero Emission menu) button
and touch [Nearby Station].
2. Select the method for searching for charging station locations.
.[Near Current Location]:
Displays a list of charging stations that
are near the current vehicle location.
.[Near Destination]:Displays a list of charging stations that
are near the destination, when a destina-
tion has been set.
.[Near Scroll Position]:Displays a list of charging stations that
are near the cursor when the map has
been moved.
.[Near City Center]:
Displays a list of charging stations when
a city name has been entered.
.[Nearby Charging Availability]:Displays a list of charging stations and
icons that shows their current availability
by connecting to NISSAN CARWINGS
Data Center.
“Confirming charging station avail-
ability” (page 2-6)
INFO:
The same menu can also be displayed
according to the following procedures.
1. Push the MENU button and then touch
[Destination].
2. Touch [Charging Stations].
3. A list screen is displayed. Touch the preferred charging station from the list.
INFO:
Touch [Options] to change search condi-
tions.
.[Show Along Route]: ON: Charging stations are displayed in
the order of location closest to the route
from the current vehicle position.
OFF: Charging stations are displayed in
the order of closest location from the
current vehicle position.
Page 83 of 275
![NISSAN LEAF 2013 1.G Navigation Manual .[Show Quick Charging Stations Only]:ON: Only the Quick Charge Stations are
displayed in the order of closest location
from the current vehicle position.
OFF: All charging stations are displayed
in th NISSAN LEAF 2013 1.G Navigation Manual .[Show Quick Charging Stations Only]:ON: Only the Quick Charge Stations are
displayed in the order of closest location
from the current vehicle position.
OFF: All charging stations are displayed
in th](/manual-img/5/324/w960_324-82.png)
.[Show Quick Charging Stations Only]:ON: Only the Quick Charge Stations are
displayed in the order of closest location
from the current vehicle position.
OFF: All charging stations are displayed
in the order of the closest location from
the current vehicle position.
4. The entire route is shown on the map. Touch [Start] to confirm after checking the
displayed route. The system starts route
guidance to the selected destination.
How to view charging station infor-
mation
Touch any icon displayed on the list screen to
show the charging station information screen.
Detailed information about a charging station
can be checked.
Contents of charging station information
.Facility name
. Type of charging devices
: Normal charge icon
: Quick charge icon (for vehicle equipped for
quick charging)
.Type and number of charge connectors
. Whether this facility is open 24 hours a day,
whether the business hours are fixed
Available settings
The following settings are available from the
information screen. Displayed items vary de-
pending on the received information.
. [Show Map]:
Displays a map screen for the selected
charging station. The charging station on
this screen can be set as the destination.
“Operations after setting destination”
(page 3-36) .
[Call]:
Makes a call to the selected charging
station. A cellular phone needs to be
connected beforehand.
“Connecting cellular phone”
(page 1-13)
. [Details]:
Displays the following information about the
selected charging station.
— Address
— Phone number
— Whether there is a charge for using
charging equipment at this facility or not
NOTE:
Equipment that is displayed on the char-
ging station information screen is not
necessarily compatible with a LEAF. Be
sure to check whether equipment can be
used with a LEAF beforehand.
Navigation3-27