2013 NISSAN LEAF display
[x] Cancel search: displayPage 12 of 275
0-2Introduction
This manual uses special words, symbols and
icons, organized by function.
Please refer to the following items and familiarize
yourself with them.
FOR SAFE OPERATION
WARNING
This is used to indicate the presence of
a hazard that could cause death or
serious personal injury. To avoid or
reduce the risk, the procedures must
be followed precisely.
CAUTION
This is used to indicate the presence of
a hazard that could cause minor or
moderate personal injury or damage to
your vehicle. To avoid or reduce the risk,
the procedures must be followed care-
fully.NOTE:
Indicates items that help you understand
and maximize the performance of your
vehicle. If ignored, they may lead to a
malfunction or poor performance.
REFERENCE SYMBOLS
INFO:
This indicates information that is necessary for
efficient use of your vehicle or accessories.
Reference page:
This indicates the title and page that you should
refer to.
[]:
This indicates a key/item displayed on the
screen.
Voice Command:
This indicates an operation by voice command.
This system is primarily designed to help you
reach your destination, and it also performs
other functions as outlined in this manual.
However, you, the driver, must use the system
safely and properly. Information concerning road
conditions, traffic signs and the availability of
services may not always be up-to-date. The
system is not a substitute for safe, proper and
legal driving.
Before using the navigation system, please read
the following safety information. Always use the
system as outlined in this manual.
WARNING
. When the driver wants to operate
the navigation system, first park the
vehicle in a safe location and set the
parking brake. Operating the sys-
tem while driving can distract the
driver and may result in a serious
accident.
. Do not rely on route guidance alone.
Always be sure that all driving
maneuvers are legal and safe in
order to avoid accidents.
. Do not disassemble or modify this
system. If you do, it may result in
accidents, fire or electrical shock.
HOW TO USE THIS MANUAL SAFETY INFORMATION
Page 16 of 275
IT-2LEAF Navigation System overview
UNIQUE EV FUNCTIONS
In addition to the conventional navigation func-
tions, the LEAF navigation system also offers
specific support for driving an EV.
CAUTION
Charging station information may not
be detailed in all areas or reflect current
charging station locations. For up to
date information about charging sta-
tions, such as business hours or char-
ging equipment, NISSAN recommends
that you directly access the information
on your own. Additionally, always check
the remaining amount of battery charge
and set a reasonable driving schedule.
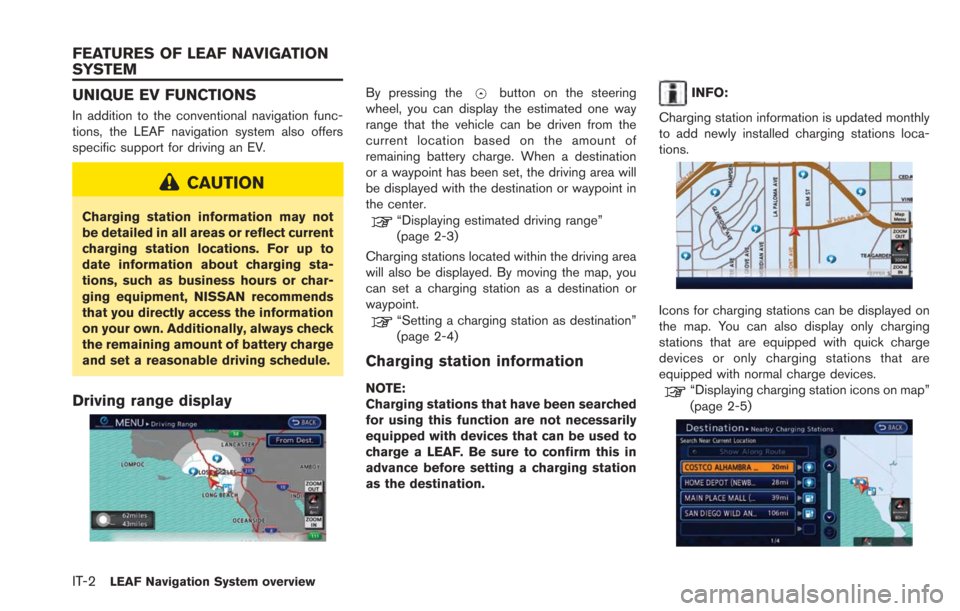
Driving range display
By pressing thebutton on the steering
wheel, you can display the estimated one way
range that the vehicle can be driven from the
current location based on the amount of
remaining battery charge. When a destination
or a waypoint has been set, the driving area will
be displayed with the destination or waypoint in
the center.
“Displaying estimated driving range”
(page 2-3)
Charging stations located within the driving area
will also be displayed. By moving the map, you
can set a charging station as a destination or
waypoint.
“Setting a charging station as destination”
(page 2-4)
Charging station information
NOTE:
Charging stations that have been searched
for using this function are not necessarily
equipped with devices that can be used to
charge a LEAF. Be sure to confirm this in
advance before setting a charging station
as the destination.
INFO:
Charging station information is updated monthly
to add newly installed charging stations loca-
tions.
Icons for charging stations can be displayed on
the map. You can also display only charging
stations that are equipped with quick charge
devices or only charging stations that are
equipped with normal charge devices.
“Displaying charging station icons on map”
(page 2-5)
FEATURES OF LEAF NAVIGATION
SYSTEM
Page 17 of 275
You can search for charging stations near the
current location, set a charging station as a
destination or waypoint, and check detailed
information about charging stations.
“Finding charging station” (page 3-25)
When connecting to the NISSAN CARWINGS
Data Center, the system will periodically perform
an automatic update of information for charging
stations near your home. The system will also
automatically update information for charging
stations near the current vehicle location when
the Li-ion battery charge is low. You can also
manually update the charging stations around
your current vehicle location at any time.
“Updating charging station information”
(page 2-7)
Energy information display
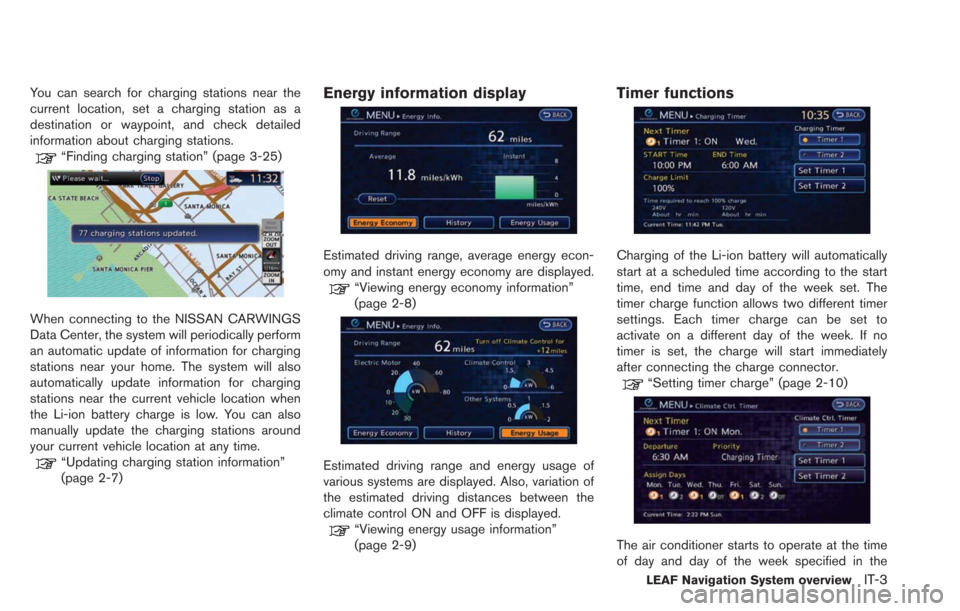
Estimated driving range, average energy econ-
omy and instant energy economy are displayed.
“Viewing energy economy information”
(page 2-8)
Estimated driving range and energy usage of
various systems are displayed. Also, variation of
the estimated driving distances between the
climate control ON and OFF is displayed.
“Viewing energy usage information”
(page 2-9)
Timer functions
Charging of the Li-ion battery will automatically
start at a scheduled time according to the start
time, end time and day of the week set. The
timer charge function allows two different timer
settings. Each timer charge can be set to
activate on a different day of the week. If no
timer is set, the charge will start immediately
after connecting the charge connector.
“Setting timer charge” (page 2-10)
The air conditioner starts to operate at the time
of day and day of the week specified in the
LEAF Navigation System overviewIT-3
Page 21 of 275
1 Getting Started
Control buttons and functions ................................................ 1-2Control panel ........................................................................\
1-2
Steering wheel switches .................................................... 1-4
USB connector and Auxiliary input jack ........................ 1-4
Start-up screen ........................................................................\
.. 1-5
Functions disabled while driving ............................................ 1-6
Basic operation ........................................................................\
.. 1-7 Selecting item ....................................................................... 1-7
Adjusting volume and others ............................................ 1-7
Scrolling message or list ................................................... 1-7
How to input letters and numbers .................................. 1-7
Viewing display screens........................................................... 1-9
Map screen........................................................................\
.... 1-9
Zero Emission menu screen ............................................. 1-9 Menu screen ....................................................................... 1-9
Status screen................................................................... 1-10
FM·AM radio screen ....................................................... 1-10
SiriusXM Satellite Radio screen ................................. 1-10
CD·AUX screen ............................................................... 1-10
Items to be set initially .......................................................... 1-11
Subscription to CARWINGS
TMservice.................... 1-11
Inputting user ID and password ................................. 1-11
Storing home location ................................................... 1-12
Connecting cellular phone ........................................... 1-13
Display adjustment ......................................................... 1-14
Volume settings ............................................................... 1-16
Clock settings .................................................................. 1-16
Language and unit settings.......................................... 1-17
Page 22 of 275
1-2Getting Started
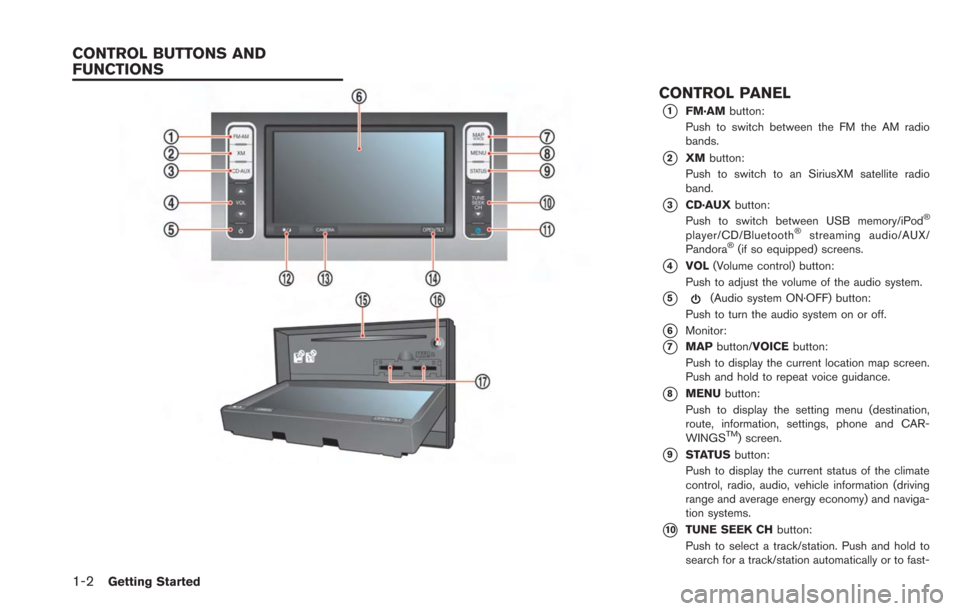
CONTROL PANEL
*1FM·AMbutton:
Push to switch between the FM the AM radio
bands.
*2XM button:
Push to switch to an SiriusXM satellite radio
band.
*3CD·AUX button:
Push to switch between USB memory/iPod®
player/CD/Bluetooth®streaming audio/AUX/
Pandora®(if so equipped) screens.
*4VOL (Volume control) button:
Push to adjust the volume of the audio system.
*5(Audio system ON·OFF) button:
Push to turn the audio system on or off.
*6Monitor:
*7MAP button/VOICE button:
Push to display the current location map screen.
Push and hold to repeat voice guidance.
*8MENU button:
Push to display the setting menu (destination,
route, information, settings, phone and CAR-
WINGS
TM) screen.
*9STATUS button:
Push to display the current status of the climate
control, radio, audio, vehicle information (driving
range and average energy economy) and naviga-
tion systems.
*10TUNE SEEK CH button:
Push to select a track/station. Push and hold to
search for a track/station automatically or to fast-
CONTROL BUTTONS AND
FUNCTIONS
Page 23 of 275
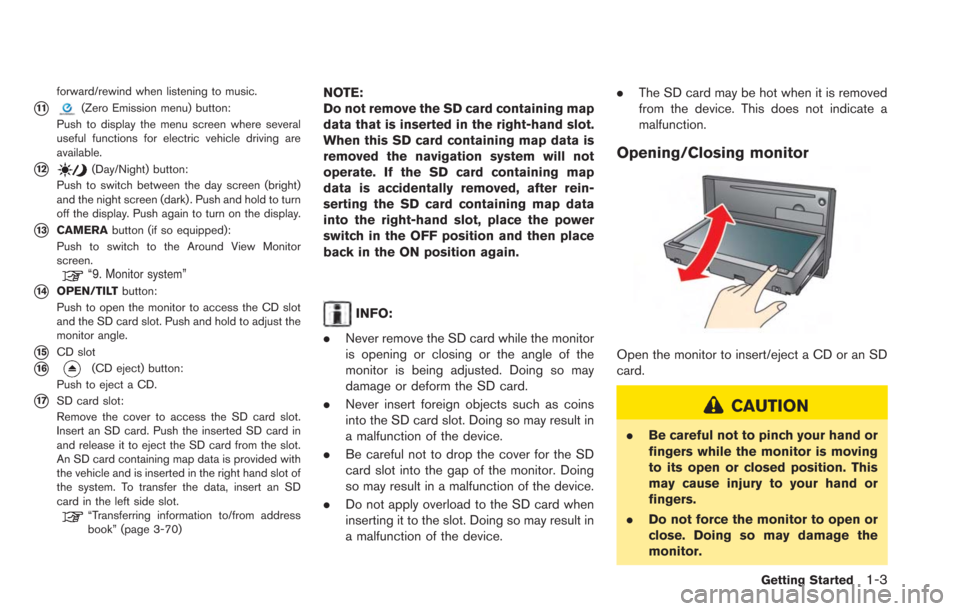
forward/rewind when listening to music.
*11(Zero Emission menu) button:
Push to display the menu screen where several
useful functions for electric vehicle driving are
available.
*12(Day/Night) button:
Push to switch between the day screen (bright)
and the night screen (dark) . Push and hold to turn
off the display. Push again to turn on the display.
*13CAMERA button (if so equipped):
Push to switch to the Around View Monitor
screen.
“9. Monitor system”
*14OPEN/TILT button:
Push to open the monitor to access the CD slot
and the SD card slot. Push and hold to adjust the
monitor angle.
*15CD slot
*16(CD eject) button:
Push to eject a CD.
*17SD card slot:
Remove the cover to access the SD card slot.
Insert an SD card. Push the inserted SD card in
and release it to eject the SD card from the slot.
An SD card containing map data is provided with
the vehicle and is inserted in the right hand slot of
the system. To transfer the data, insert an SD
card in the left side slot.
“Transferring information to/from address
book” (page 3-70)
NOTE:
Do not remove the SD card containing map
data that is inserted in the right-hand slot.
When this SD card containing map data is
removed the navigation system will not
operate. If the SD card containing map
data is accidentally removed, after rein-
serting the SD card containing map data
into the right-hand slot, place the power
switch in the OFF position and then place
back in the ON position again.
INFO:
. Never remove the SD card while the monitor
is opening or closing or the angle of the
monitor is being adjusted. Doing so may
damage or deform the SD card.
. Never insert foreign objects such as coins
into the SD card slot. Doing so may result in
a malfunction of the device.
. Be careful not to drop the cover for the SD
card slot into the gap of the monitor. Doing
so may result in a malfunction of the device.
. Do not apply overload to the SD card when
inserting it to the slot. Doing so may result in
a malfunction of the device. .
The SD card may be hot when it is removed
from the device. This does not indicate a
malfunction.
Opening/Closing monitor
Open the monitor to insert/eject a CD or an SD
card.
CAUTION
.Be careful not to pinch your hand or
fingers while the monitor is moving
to its open or closed position. This
may cause injury to your hand or
fingers.
. Do not force the monitor to open or
close. Doing so may damage the
monitor.
Getting Started1-3
Page 24 of 275
1-4Getting Started
When theOPEN/TILT button is pushed while
the monitor is closed, the monitor will open.
When the OPEN/TILT button is pushed while
the monitor is open, the monitor will close.
Adjusting monitor angle
The angle of the monitor can be adjusted to
select from 3 different preset angles. Once the
angle of the monitor is selected and stored in the
system, the selected angle is always set after
performing the open/close operation of the
monitor.
Push and hold the OPEN/TILTbutton until a
chime sounds. When the button is released, the
next preset angle will be selected. Continue this
procedure until the preferred angle is obtained.
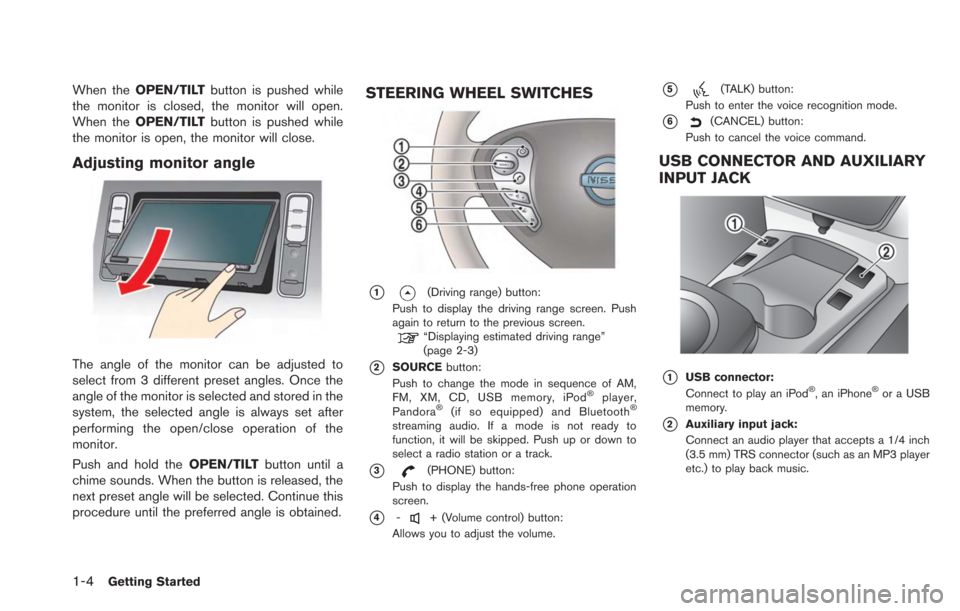
STEERING WHEEL SWITCHES
*1(Driving range) button:
Push to display the driving range screen. Push
again to return to the previous screen.
“Displaying estimated driving range”
(page 2-3)
*2SOURCE button:
Push to change the mode in sequence of AM,
FM, XM, CD, USB memory, iPod
®player,
Pandora®(if so equipped) and Bluetooth®
streaming audio. If a mode is not ready to
function, it will be skipped. Push up or down to
select a radio station or a track.
*3(PHONE) button:
Push to display the hands-free phone operation
screen.
*4-+ (Volume control) button:
Allows you to adjust the volume.
*5(TALK) button:
Push to enter the voice recognition mode.
*6(CANCEL) button:
Push to cancel the voice command.
USB CONNECTOR AND AUXILIARY
INPUT JACK
*1USB connector:
Connect to play an iPod®, an iPhone®or a USB
memory.
*2Auxiliary input jack:
Connect an audio player that accepts a 1/4 inch
(3.5 mm) TRS connector (such as an MP3 player
etc.) to play back music.
Page 25 of 275
![NISSAN LEAF 2013 1.G Navigation Manual 1. The system starts when the power switch ispushed to the "ACC" or "ON" position. The
start-up screen is displayed.
2. Check the message that is displayed on the
screen and touch [OK].
Subject to the NISSAN LEAF 2013 1.G Navigation Manual 1. The system starts when the power switch ispushed to the "ACC" or "ON" position. The
start-up screen is displayed.
2. Check the message that is displayed on the
screen and touch [OK].
Subject to the](/manual-img/5/324/w960_324-24.png)
1. The system starts when the power switch ispushed to the "ACC" or "ON" position. The
start-up screen is displayed.
2. Check the message that is displayed on the
screen and touch [OK].
Subject to the selected items, a different
indication may be displayed at subsequent
times. The set-up screen will be displayed
again after a given period of time.
INFO:
. The setting can be changed from [Vehicle
Data Transmission Setting] in CAR-
WINGS
TMsetting.“CARWINGSTMsettings” (page 5-12)
. If you do not select [OK], vehicle data will
not be stored in the NISSAN CARWINGS
Data Center and you will not be able to
check it via the NISSAN Owner’s Portal
Website.
Also, if [Share Vehicle Information] is set to
OFF, vehicle data will not be uploaded.
Make sure that this setting is ON.
When [Service Reminder] is set to ON,
communication with the NISSAN CARW-
INGS Data Center will be performed once
daily. NISSAN recommends that you set
[Service Reminder] to ON.
“CARWINGSTMsettings” (page 5-12)
NOTE:
. Navigation functions, audio, hands-free
phone, vehicle information display, etc.
can still be operated even if [Decline] is
touched. However, if the CARWINGS
TM
function is selected, the start-up screen
will be displayed again. .
If other buttons such as the MAP
button or MENU button etc., are
pressed without [OK] or [Decline] being
touched, the corresponding screen will
be displayed and operations can be
performed. However, if the CAR-
WINGS
TMfunction is selected, the
start-up screen will be displayed again.
Getting Started1-5
START-UP SCREEN