Page 9 of 275
Introduction0
LEAF Navigation System overviewIT
Getting Started
Unique EV functions
Navigation
Audio system
CARWINGSTM
Viewing technical information
Bluetooth®Hands-Free Phone System
Voice recognition
Monitor system (if so equipped)
1
2
3
4
5
6
7
8
9
Table of
Contents
Troubleshooting guide/General system information10
Index11
Page 14 of 275
0-4Introduction
.CARWINGSTMcommunications may be
received at a verified e-mail address or
by SMS/text messaging-enabled cellu-
lar phone.
. Standard text rates and/or data usage
may apply depending on your carrier.This navigation system is certified as a Class 1
laser product.
The navigation system complies with DHHS
Rules 21 CFR Chapter 1, Subchapter J.
WARNING
.Do not disassemble or modify this
system. There are no user service-
able parts in this navigation system.
. If maintenance, adjustments and
operations other than those speci-
fied in this manual are attempted,
injury due to laser radiation and
exposure could occur.
Required SiriusXM Satellite
Radio and NavTraffic monthly
subscriptions are sold sepa-
rately. NavTraffic are only avail-
able in select markets. For more
information,
see www.siriusxm.com/navtraffic.
SiriusXM Satellite Radio requires
subscription, sold separately.
Not available in Alaska, Hawaii or
Guam. For more information, visit
www.siriusxm.com.
Bluetooth®is a trademark owned
by Bluetooth SIG, Inc., and
licensed to Clarion.
LASER PRODUCT
Page 22 of 275
1-2Getting Started
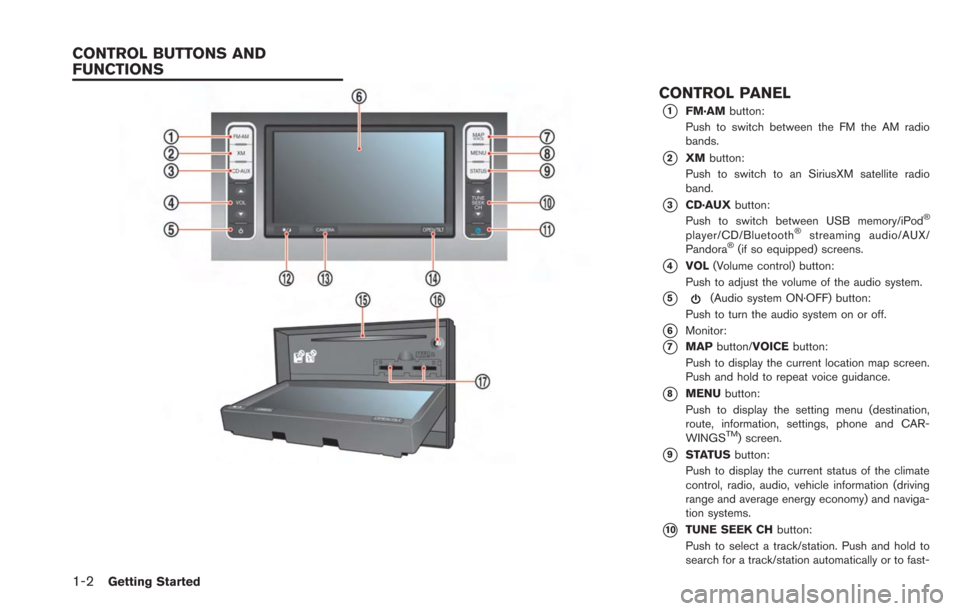
CONTROL PANEL
*1FM·AMbutton:
Push to switch between the FM the AM radio
bands.
*2XM button:
Push to switch to an SiriusXM satellite radio
band.
*3CD·AUX button:
Push to switch between USB memory/iPod®
player/CD/Bluetooth®streaming audio/AUX/
Pandora®(if so equipped) screens.
*4VOL (Volume control) button:
Push to adjust the volume of the audio system.
*5(Audio system ON·OFF) button:
Push to turn the audio system on or off.
*6Monitor:
*7MAP button/VOICE button:
Push to display the current location map screen.
Push and hold to repeat voice guidance.
*8MENU button:
Push to display the setting menu (destination,
route, information, settings, phone and CAR-
WINGS
TM) screen.
*9STATUS button:
Push to display the current status of the climate
control, radio, audio, vehicle information (driving
range and average energy economy) and naviga-
tion systems.
*10TUNE SEEK CH button:
Push to select a track/station. Push and hold to
search for a track/station automatically or to fast-
CONTROL BUTTONS AND
FUNCTIONS
Page 24 of 275
1-4Getting Started
When theOPEN/TILT button is pushed while
the monitor is closed, the monitor will open.
When the OPEN/TILT button is pushed while
the monitor is open, the monitor will close.
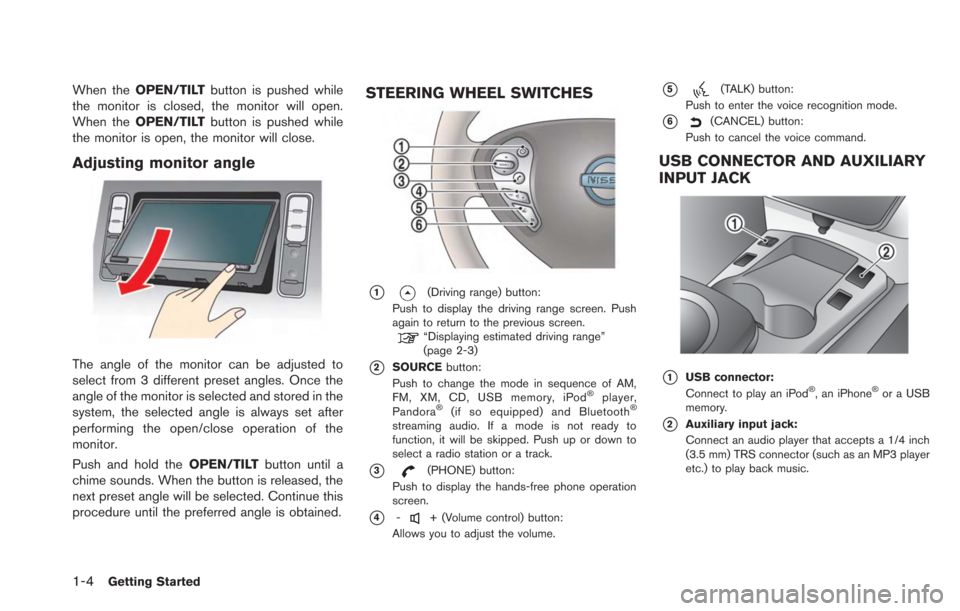
Adjusting monitor angle
The angle of the monitor can be adjusted to
select from 3 different preset angles. Once the
angle of the monitor is selected and stored in the
system, the selected angle is always set after
performing the open/close operation of the
monitor.
Push and hold the OPEN/TILTbutton until a
chime sounds. When the button is released, the
next preset angle will be selected. Continue this
procedure until the preferred angle is obtained.
STEERING WHEEL SWITCHES
*1(Driving range) button:
Push to display the driving range screen. Push
again to return to the previous screen.
“Displaying estimated driving range”
(page 2-3)
*2SOURCE button:
Push to change the mode in sequence of AM,
FM, XM, CD, USB memory, iPod
®player,
Pandora®(if so equipped) and Bluetooth®
streaming audio. If a mode is not ready to
function, it will be skipped. Push up or down to
select a radio station or a track.
*3(PHONE) button:
Push to display the hands-free phone operation
screen.
*4-+ (Volume control) button:
Allows you to adjust the volume.
*5(TALK) button:
Push to enter the voice recognition mode.
*6(CANCEL) button:
Push to cancel the voice command.
USB CONNECTOR AND AUXILIARY
INPUT JACK
*1USB connector:
Connect to play an iPod®, an iPhone®or a USB
memory.
*2Auxiliary input jack:
Connect an audio player that accepts a 1/4 inch
(3.5 mm) TRS connector (such as an MP3 player
etc.) to play back music.
Page 29 of 275
This system allows you to set various functions
and check information on the screen that is
displayed by pushing each button located on the
control panel.
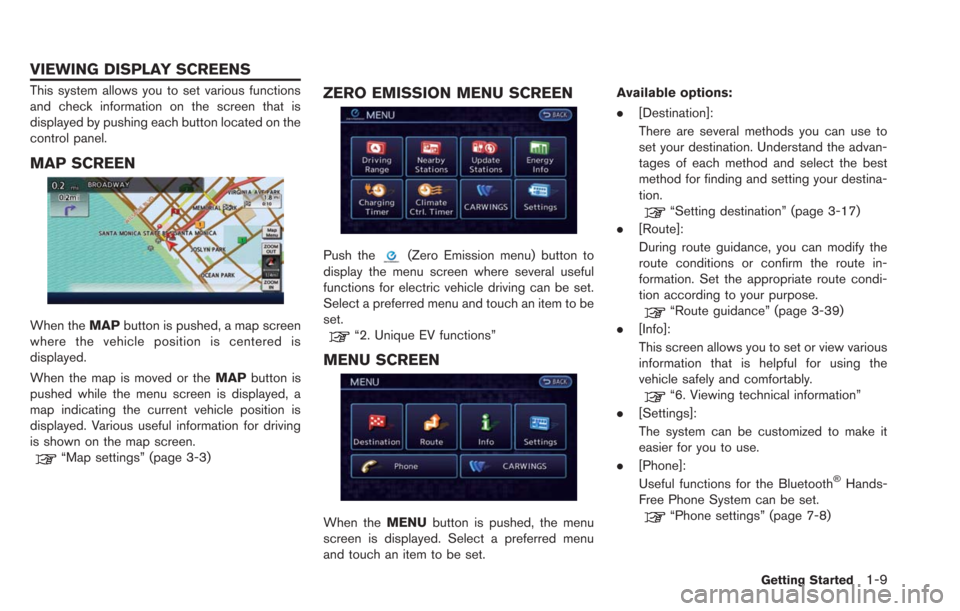
MAP SCREEN
When theMAPbutton is pushed, a map screen
where the vehicle position is centered is
displayed.
When the map is moved or the MAPbutton is
pushed while the menu screen is displayed, a
map indicating the current vehicle position is
displayed. Various useful information for driving
is shown on the map screen.
“Map settings” (page 3-3)
ZERO EMISSION MENU SCREEN
Push the(Zero Emission menu) button to
display the menu screen where several useful
functions for electric vehicle driving can be set.
Select a preferred menu and touch an item to be
set.
“2. Unique EV functions”
MENU SCREEN
When the MENUbutton is pushed, the menu
screen is displayed. Select a preferred menu
and touch an item to be set. Available options:
.
[Destination]:
There are several methods you can use to
set your destination. Understand the advan-
tages of each method and select the best
method for finding and setting your destina-
tion.
“Setting destination” (page 3-17)
. [Route]:
During route guidance, you can modify the
route conditions or confirm the route in-
formation. Set the appropriate route condi-
tion according to your purpose.
“Route guidance” (page 3-39)
. [Info]:
This screen allows you to set or view various
information that is helpful for using the
vehicle safely and comfortably.
“6. Viewing technical information”
. [Settings]:
The system can be customized to make it
easier for you to use.
. [Phone]:
Useful functions for the Bluetooth
®Hands-
Free Phone System can be set.
“Phone settings” (page 7-8)
Getting Started1-9
VIEWING DISPLAY SCREENS
Page 30 of 275
![NISSAN LEAF 2013 1.G Navigation Manual 1-10Getting Started
.[CARWINGS]:
Information feeds are displayed and settings
for CARWINGS
TMcan be performed.“5. CARWINGSTM”
STATUS SCREEN
Push the STATUS button to display the current
status of NISSAN LEAF 2013 1.G Navigation Manual 1-10Getting Started
.[CARWINGS]:
Information feeds are displayed and settings
for CARWINGS
TMcan be performed.“5. CARWINGSTM”
STATUS SCREEN
Push the STATUS button to display the current
status of](/manual-img/5/324/w960_324-29.png)
1-10Getting Started
.[CARWINGS]:
Information feeds are displayed and settings
for CARWINGS
TMcan be performed.“5. CARWINGSTM”
STATUS SCREEN
Push the STATUS button to display the current
status of the navigation system.
Each time the STATUSbutton is pushed,
displayed information is switched in the order
of climate control, vehicle information and
navigation route information.
There are different status screens displayed
depending on various factors, such as the
currently active mode, whether a destination
has been set or not, etc.
FM·AM RADIO SCREEN
Push the FM·AMbutton to turn on the radio and
display the radio screen. Push the switch to
toggle the radio mode: AM?FM1?FM2.
“FM-AM-SAT radio operation” (page 4-12)
SIRIUSXM SATELLITE RADIO
SCREEN
Push the XMbutton to turn on the satellite radio
and display the SiriusXM Satellite Radio screen.
Push the switch to toggle the radio mode:
XM1?XM2?XM3.
“FM-AM-SAT radio operation” (page 4-12)
CD·AUX SCREEN
Push the CD·AUXbutton to turn on the audio
system and display the audio screen. Push the
CD·AUX button to toggle the mode: iPod
player
*1/USB memory/Pandora® *1*2? CD?
Bluetooth®streaming audio*1?AUX.
*1 Screen only displays when a device capable of
playback is connected.
*2 The Pandora
®is only available in U.S.
“Compact Disc (CD) player operation”
(page 4-14)
“iPod®player operation” (page 4-16)“USB memory operation” (page 4-19)“Bluetooth®streaming audio” (page 4-11)“Auxiliary input jack” (page 4-23)“Pandora®operation” (page 4-17)
Page 33 of 275
![NISSAN LEAF 2013 1.G Navigation Manual 3. Confirm the contents of the message, thentouch [Yes].
4. Touch [Map]. The current location mapscreen is displayed.
5. If necessary, adjust your home location bytouch panel operation.
6. After adjus NISSAN LEAF 2013 1.G Navigation Manual 3. Confirm the contents of the message, thentouch [Yes].
4. Touch [Map]. The current location mapscreen is displayed.
5. If necessary, adjust your home location bytouch panel operation.
6. After adjus](/manual-img/5/324/w960_324-32.png)
3. Confirm the contents of the message, thentouch [Yes].
4. Touch [Map]. The current location mapscreen is displayed.
5. If necessary, adjust your home location bytouch panel operation.
6. After adjusting the location, touch [OK]. A message is displayed and your home loca-
tion is stored in the Address Book.
7. Adjust the location of a stored item and editthe contents of a stored item as necessary.
8. Touch [OK] to return to the Destination screen.
INFO:
You can also perform the same setting by
pushing the MENUbutton and selecting [Set-
tings].
“Storing location” (page 3-38)
CONNECTING CELLULAR PHONE
Your vehicle is equipped with Bluetooth®
Hands-Free Phone System. If you are an owner
of a compatible Bluetooth®enabled cellular
phone, you can set up the wireless connection
between your cellular phone and the in-vehicle
phone module. With Bluetooth
®wireless tech-
nology, you can make or receive a telephone call
with your cellular phone in your pocket.
1. Push thebutton and touch [Connect
Phone].
Getting Started1-13
Page 34 of 275
1-14Getting Started
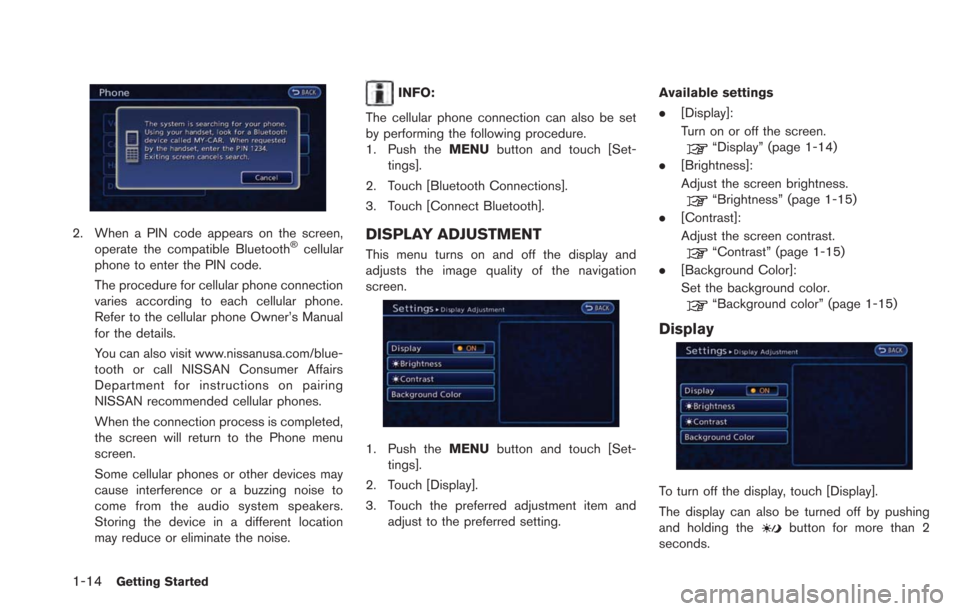
2. When a PIN code appears on the screen,operate the compatible Bluetooth®cellular
phone to enter the PIN code.
The procedure for cellular phone connection
varies according to each cellular phone.
Refer to the cellular phone Owner’s Manual
for the details.
You can also visit www.nissanusa.com/blue-
tooth or call NISSAN Consumer Affairs
Department for instructions on pairing
NISSAN recommended cellular phones.
When the connection process is completed,
the screen will return to the Phone menu
screen.
Some cellular phones or other devices may
cause interference or a buzzing noise to
come from the audio system speakers.
Storing the device in a different location
may reduce or eliminate the noise.
INFO:
The cellular phone connection can also be set
by performing the following procedure.
1. Push the MENUbutton and touch [Set-
tings].
2. Touch [Bluetooth Connections].
3. Touch [Connect Bluetooth].
DISPLAY ADJUSTMENT
This menu turns on and off the display and
adjusts the image quality of the navigation
screen.
1. Push the MENUbutton and touch [Set-
tings].
2. Touch [Display].
3. Touch the preferred adjustment item and adjust to the preferred setting. Available settings
.
[Display]:
Turn on or off the screen.
“Display” (page 1-14)
. [Brightness]:
Adjust the screen brightness.
“Brightness” (page 1-15)
. [Contrast]:
Adjust the screen contrast.
“Contrast” (page 1-15)
. [Background Color]:
Set the background color.
“Background color” (page 1-15)
Display
To turn off the display, touch [Display].
The display can also be turned off by pushing
and holding the
button for more than 2
seconds.