2013 NISSAN LEAF warning
[x] Cancel search: warningPage 12 of 275
0-2Introduction
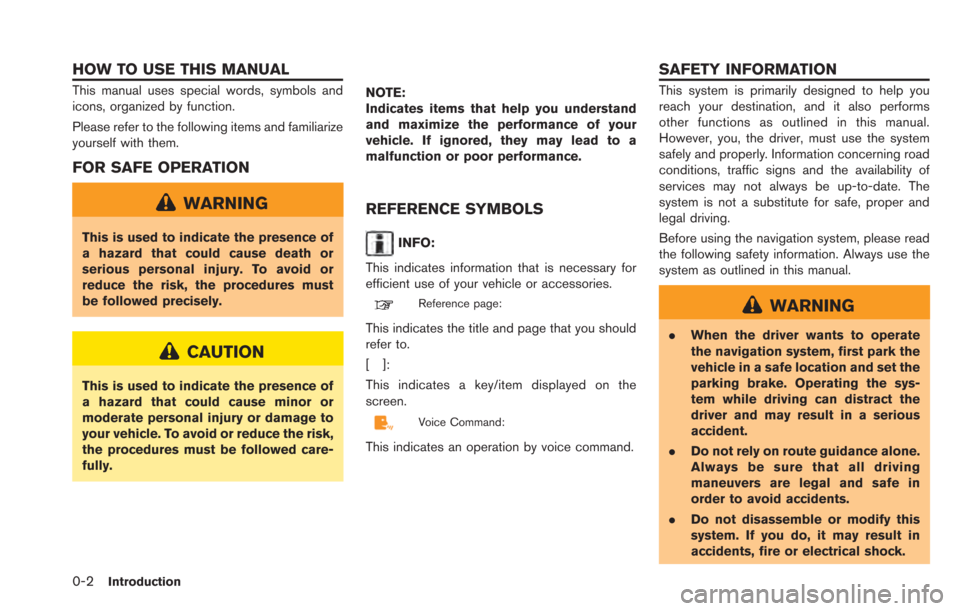
This manual uses special words, symbols and
icons, organized by function.
Please refer to the following items and familiarize
yourself with them.
FOR SAFE OPERATION
WARNING
This is used to indicate the presence of
a hazard that could cause death or
serious personal injury. To avoid or
reduce the risk, the procedures must
be followed precisely.
CAUTION
This is used to indicate the presence of
a hazard that could cause minor or
moderate personal injury or damage to
your vehicle. To avoid or reduce the risk,
the procedures must be followed care-
fully.NOTE:
Indicates items that help you understand
and maximize the performance of your
vehicle. If ignored, they may lead to a
malfunction or poor performance.
REFERENCE SYMBOLS
INFO:
This indicates information that is necessary for
efficient use of your vehicle or accessories.
Reference page:
This indicates the title and page that you should
refer to.
[]:
This indicates a key/item displayed on the
screen.
Voice Command:
This indicates an operation by voice command.
This system is primarily designed to help you
reach your destination, and it also performs
other functions as outlined in this manual.
However, you, the driver, must use the system
safely and properly. Information concerning road
conditions, traffic signs and the availability of
services may not always be up-to-date. The
system is not a substitute for safe, proper and
legal driving.
Before using the navigation system, please read
the following safety information. Always use the
system as outlined in this manual.
WARNING
. When the driver wants to operate
the navigation system, first park the
vehicle in a safe location and set the
parking brake. Operating the sys-
tem while driving can distract the
driver and may result in a serious
accident.
. Do not rely on route guidance alone.
Always be sure that all driving
maneuvers are legal and safe in
order to avoid accidents.
. Do not disassemble or modify this
system. If you do, it may result in
accidents, fire or electrical shock.
HOW TO USE THIS MANUAL SAFETY INFORMATION
Page 14 of 275
0-4Introduction
.CARWINGSTMcommunications may be
received at a verified e-mail address or
by SMS/text messaging-enabled cellu-
lar phone.
. Standard text rates and/or data usage
may apply depending on your carrier.This navigation system is certified as a Class 1
laser product.
The navigation system complies with DHHS
Rules 21 CFR Chapter 1, Subchapter J.
WARNING
.Do not disassemble or modify this
system. There are no user service-
able parts in this navigation system.
. If maintenance, adjustments and
operations other than those speci-
fied in this manual are attempted,
injury due to laser radiation and
exposure could occur.
Required SiriusXM Satellite
Radio and NavTraffic monthly
subscriptions are sold sepa-
rately. NavTraffic are only avail-
able in select markets. For more
information,
see www.siriusxm.com/navtraffic.
SiriusXM Satellite Radio requires
subscription, sold separately.
Not available in Alaska, Hawaii or
Guam. For more information, visit
www.siriusxm.com.
Bluetooth®is a trademark owned
by Bluetooth SIG, Inc., and
licensed to Clarion.
LASER PRODUCT
Page 50 of 275
2-12Unique EV functions
.When the climate control is set as the first
priority, the Climate Ctrl. Timer will not
operate until the remaining Li-ion battery
power displayed in the meter is 2 segments
(15%) or higher.
. The Li-ion battery will not charge when the
charge connector is connected to the
vehicle until the next scheduled charge start
time when the charge timer is active. If
necessary, use immediate charge or remote
charge to charge the Li-ion battery.
. Some charging stations used to perform
normal charge are equipped with timer
functions. If the charger timer function and
the vehicle timer are both set, and the two
timers are not set to operate at the same
time, it is possible that the charger will not
start or the battery will not be charged to the
level expected.
. The Li-ion battery may not charge to the
expected level when the Li-ion battery
warmer operates while charging using the
Charging Timer.
. Set only the Charging Timer End time when
charging in cold weather. The vehicle
automatically determines when to start
charging to fully charge the Li-ion battery,
even if the Li-ion battery warmer operates.
Charging ends before the set End time if the Li-ion battery is fully charged.
SETTING CLIMATE CTRL. TIMER
While the charger is connected to vehicle, this
function pre-heats or pre-cools the passenger
compartment of the vehicle to the set tempera-
ture before driving. This helps reduce power
consumption from the Li-ion battery.
“Temperature settings” (page 2-14)
The Climate Ctrl. Timer operates the air condi-
tioner using power from the charger. Electric
power from the Li-ion battery is not used.
The Climate Ctrl. Timer function allows two
different timer settings. Each timer charge
function can be set to activate on a different
day of the week.
Once the Climate Ctrl. Timer is set, it will
complete air conditioning by the time that is set.
It is not necessary to set the Climate Ctrl. Timer
everyday.
WARNING
Even if the Climate Ctrl. Timer is set, the
temperature in the passenger compart-
ment may become high if the system
automatically stops. Do not leave chil-
dren or adults who would normally
require the support of others alone in your vehicle. Pets should not be left
alone either. On hot, sunny days, tem-
peratures in a closed vehicle could
quickly become high enough to cause
severe or possibly fatal injuries to
people or animals.
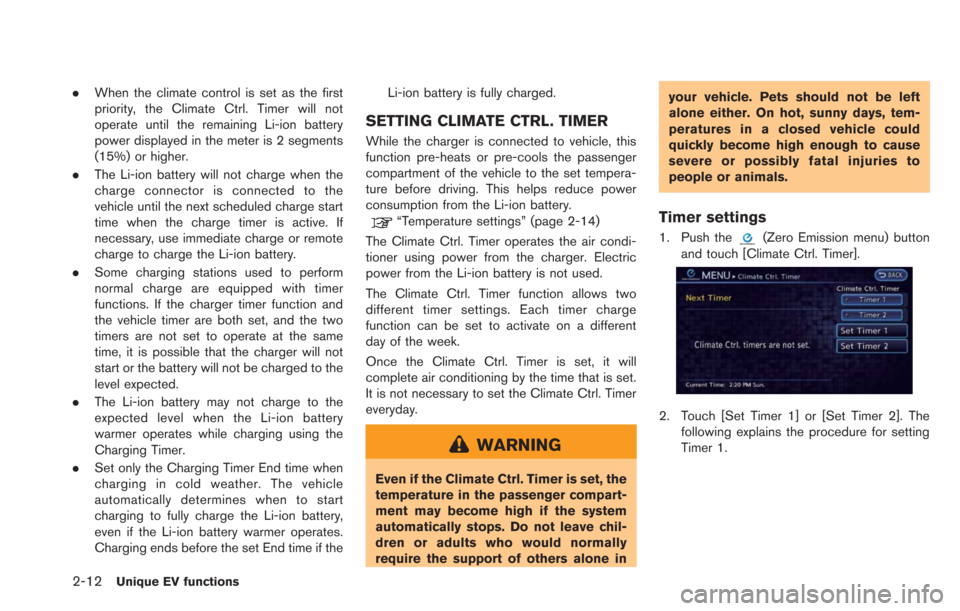
Timer settings
1. Push the(Zero Emission menu) button
and touch [Climate Ctrl. Timer].
2. Touch [Set Timer 1] or [Set Timer 2]. The following explains the procedure for setting
Timer 1.
Page 54 of 275
![NISSAN LEAF 2013 1.G Navigation Manual 2-16Unique EV functions
INFO:
For vehicles without the quick charge port,
NISSAN recommends turning off the quick
charging station icons by setting [Quick Charge]
to OFF.
SETTING MESSAGES THAT ARE
DIS NISSAN LEAF 2013 1.G Navigation Manual 2-16Unique EV functions
INFO:
For vehicles without the quick charge port,
NISSAN recommends turning off the quick
charging station icons by setting [Quick Charge]
to OFF.
SETTING MESSAGES THAT ARE
DIS](/manual-img/5/324/w960_324-53.png)
2-16Unique EV functions
INFO:
For vehicles without the quick charge port,
NISSAN recommends turning off the quick
charging station icons by setting [Quick Charge]
to OFF.
SETTING MESSAGES THAT ARE
DISPLAYED ON SCREEN
When an indicator light located in the meter
illuminates, messages are displayed and actions
are provided on the navigation screen.
1. Touch [Battery & Power Alerts].
2. Touch the item you want to set. The indicator of the selected item is illuminated.
Available settings
. [Use All Battery & Power Alerts]:
Displays all information on the navigation
screen. .
[Limited Power]:
Displays a message on the navigation
screen when the power limitation indicator
light illuminates in the meter.“Limited Power Notice” (page 2-17)
. [Low Battery]:
Displays the Low Battery message when the
low battery charge warning light
illumi-
nates in the meter.
“Low Battery” (page 2-17)
. [Dest. out of Range]:
Displays a message on the navigation
screen to inform the driver that the battery
should be charged soon. This will be
indicated if the estimated driving range is
less than the remaining distance to the
destination when a route to the destination
is set.
“Charge recommendation guidance”
(page 2-16)
BATTERY AND POWER INFORMA-
TION
For detail information about the warning/indica-
tor lights, see the LEAF Owner’s Manual.
Charge recommendation guidance
If the remaining driving range is less than the
distance to the destination that is entered while
setting the route, the system displays a message
on the navigation screen that recommends
battery charging.
1. The notification is displayed on the upper left
side of the screen. Touch [Show] to display
the detailed information screen.
Page 55 of 275
![NISSAN LEAF 2013 1.G Navigation Manual 2. The system displays a message screen andannounces the contents of the message to
recommend battery charging. Check the
message displayed on the screen.
Touch [Nearby Charging Station] to search
all NISSAN LEAF 2013 1.G Navigation Manual 2. The system displays a message screen andannounces the contents of the message to
recommend battery charging. Check the
message displayed on the screen.
Touch [Nearby Charging Station] to search
all](/manual-img/5/324/w960_324-54.png)
2. The system displays a message screen andannounces the contents of the message to
recommend battery charging. Check the
message displayed on the screen.
Touch [Nearby Charging Station] to search
all charging stations that are located near
the current vehicle position.
“Finding charging station” (page 3-25)
3. Touch [BACK] or push the MAPbutton to
return to the current location map screen.
INFO:
. The charge recommendation guidance can
be set to off.
“Setting messages that are displayed
on screen” (page 2-16)
. When the route is changed to avoid a traffic
jam or the possible driving distance indi-
cated in the meter is changed, the charge
recommendation guidance is displayed again.
Low Battery
When the Low battery charge warning lightand the master warning light (yellow)illuminate, the system displays a message on
the navigation screen that notices the driver that
the Li-ion battery charge is low.
1. The notification is displayed on the upper left
side of the screen. Touch [Show] to display
the detailed information screen.
2. The system displays a message screen andannounces the contents of the message to
warn that the Li-ion battery charge is low.
Check the message displayed on the
screen.
Touch [Nearby Charging Station] to search
all charging stations that are located near
the current vehicle position.
“Finding charging station” (page 3-25)
3. Touch [BACK] or push the MAPbutton to
return to the vehicle location screen.
INFO:
. The Low Battery message display can be
set to off.
“Setting messages that are displayed
on screen” (page 2-16)
. When the Li-ion battery charge is low, the
system automatically obtains charging sta-
tion information.
Limited Power Notice
When the power limitation indicatorand the
master warning light (yellow)illuminate, the
system displays a message on the navigation
screen that notices the driver that power output
is restricted for various reasons. See LEAF
Owner’s Manual for details of the indicator/
Unique EV functions2-17
Page 56 of 275
![NISSAN LEAF 2013 1.G Navigation Manual 2-18Unique EV functions
warning lights.
1. The notification is displayed on the upper leftside of the screen. Touch [Show] to display
the detailed information screen.
2. The system displays a message NISSAN LEAF 2013 1.G Navigation Manual 2-18Unique EV functions
warning lights.
1. The notification is displayed on the upper leftside of the screen. Touch [Show] to display
the detailed information screen.
2. The system displays a message](/manual-img/5/324/w960_324-55.png)
2-18Unique EV functions
warning lights.
1. The notification is displayed on the upper leftside of the screen. Touch [Show] to display
the detailed information screen.
2. The system displays a message screen and
announces the contents of the message to
warn that power output is restricted and
inform the driver of the reason for this
occurrence and what action is to be taken.
INFO:
The Limited Power Notice display can be set to
off.
“Setting messages that are displayed on
screen” (page 2-16)
Page 102 of 275
3-46Navigation
INFO:
The facility categories that are not shown
with an icon cannot be selected.
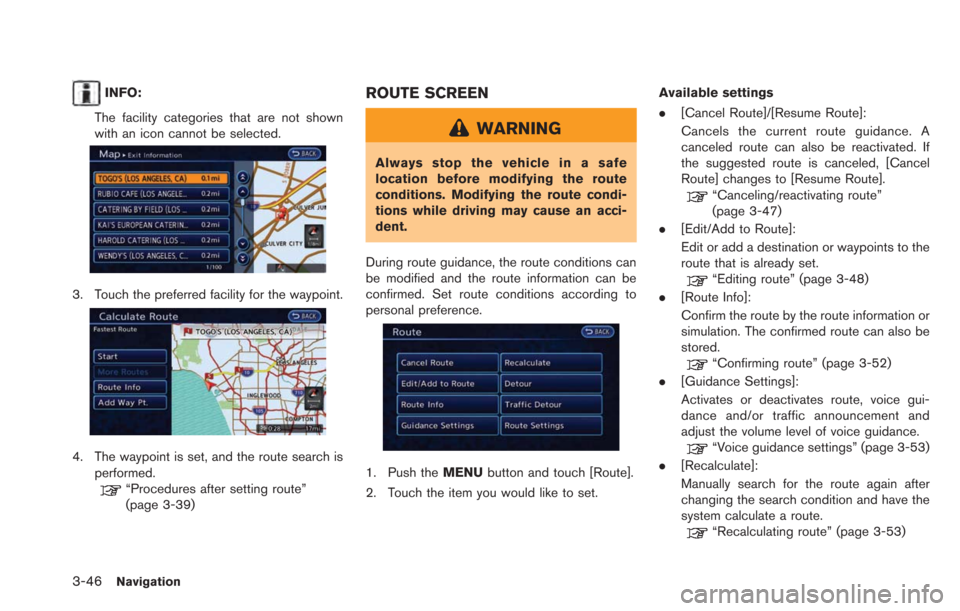
3. Touch the preferred facility for the waypoint.
4. The waypoint is set, and the route search is performed.
“Procedures after setting route”
(page 3-39)
ROUTE SCREEN
WARNING
Always stop the vehicle in a safe
location before modifying the route
conditions. Modifying the route condi-
tions while driving may cause an acci-
dent.
During route guidance, the route conditions can
be modified and the route information can be
confirmed. Set route conditions according to
personal preference.
1. Push the MENUbutton and touch [Route].
2. Touch the item you would like to set. Available settings
.
[Cancel Route]/[Resume Route]:
Cancels the current route guidance. A
canceled route can also be reactivated. If
the suggested route is canceled, [Cancel
Route] changes to [Resume Route].
“Canceling/reactivating route”
(page 3-47)
. [Edit/Add to Route]:
Edit or add a destination or waypoints to the
route that is already set.
“Editing route” (page 3-48)
. [Route Info]:
Confirm the route by the route information or
simulation. The confirmed route can also be
stored.
“Confirming route” (page 3-52)
. [Guidance Settings]:
Activates or deactivates route, voice gui-
dance and/or traffic announcement and
adjust the volume level of voice guidance.
“Voice guidance settings” (page 3-53)
. [Recalculate]:
Manually search for the route again after
changing the search condition and have the
system calculate a route.
“Recalculating route” (page 3-53)
Page 138 of 275
4-4Audio system
.During cold weather or rainy days, the player
may malfunction due to the humidity. If this
occurs, remove the CD and dehumidify or
ventilate the player completely.
. The player may skip while driving on rough
roads.
. The CD player sometimes cannot function
when the passenger compartment tempera-
ture is extremely high. Decrease the tem-
perature before use.
. Only use high quality 4.7 in (12 cm) round
discs that have the "COMPACT disc DIGI-
TAL AUDIO" logo on the disc or packaging.
. Do not expose the CD to direct sunlight.
. CDs that are of poor quality, dirty, scratched,
covered with fingerprints, or that have pin
holes may not work properly.
. The following CDs may not work properly:
— Copy control compact discs (CCCD)
— Recordable compact discs (CD-R)
— Rewritable compact discs (CD-RW)
. Do not use the following CDs as they may
cause the CD player to malfunction.
— 3.1 in (8 cm) discs
— CDs that are not round
— CDs with a paper label — CDs that are warped, scratched, or have
abnormal edges
. This audio system can only play prerecorded
CDs. It has no capabilities to record or burn
CDs.
. If the CD cannot be played, one of the
following messages will be displayed.
CHECK DISC:
— Confirm that the CD is inserted correctly
(the label side is facing up, etc.).
— Confirm that the CD is not bent or warped and it is free of scratches.
PUSH EJECT:
This is an error due to the temperature inside
the player being too high. Remove the CD
by pushing the
button, and after a short
time reinsert the CD. The CD can be played
when the temperature of the player returns
to normal.
UNPLAYABLE:
The file is unplayable in this audio system
(the system only supports CDs containing
MP3 or WMA files) .
USB (Universal Serial Bus)
WARNING
Do not connect or disconnect the USB
device while driving. Doing so can be a
distraction. If distracted you could lose
control of your vehicle and cause an
accident or serious injury.
CAUTION
. Do not force the USB device into the
USB port. Inserting the USB device
tilted or up-side-down into the port
may damage the USB device and
the port. Make sure that the USB
device is connected correctly into
the USB port.
. Do not grab the USB port cover (if
so equipped) when pulling the USB
device out of the port. This could
damage the port and the cover.
. Do not leave the USB cable in a
place where it can be pulled unin-
tentionally. Pulling the cable may
break the wire, USB device or the
port.