2013 NISSAN LEAF steering
[x] Cancel search: steeringPage 16 of 275
IT-2LEAF Navigation System overview
UNIQUE EV FUNCTIONS
In addition to the conventional navigation func-
tions, the LEAF navigation system also offers
specific support for driving an EV.
CAUTION
Charging station information may not
be detailed in all areas or reflect current
charging station locations. For up to
date information about charging sta-
tions, such as business hours or char-
ging equipment, NISSAN recommends
that you directly access the information
on your own. Additionally, always check
the remaining amount of battery charge
and set a reasonable driving schedule.
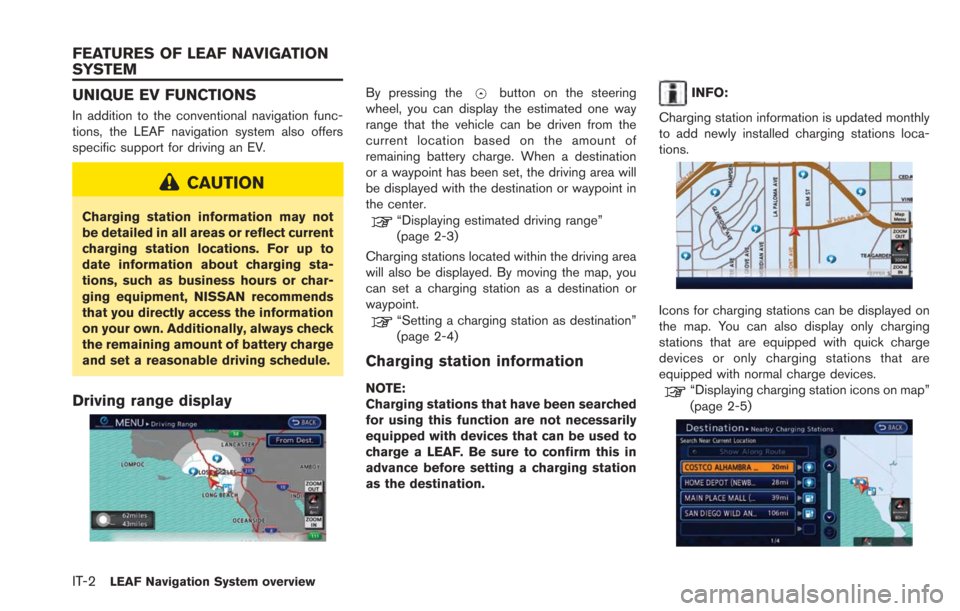
Driving range display
By pressing thebutton on the steering
wheel, you can display the estimated one way
range that the vehicle can be driven from the
current location based on the amount of
remaining battery charge. When a destination
or a waypoint has been set, the driving area will
be displayed with the destination or waypoint in
the center.
“Displaying estimated driving range”
(page 2-3)
Charging stations located within the driving area
will also be displayed. By moving the map, you
can set a charging station as a destination or
waypoint.
“Setting a charging station as destination”
(page 2-4)
Charging station information
NOTE:
Charging stations that have been searched
for using this function are not necessarily
equipped with devices that can be used to
charge a LEAF. Be sure to confirm this in
advance before setting a charging station
as the destination.
INFO:
Charging station information is updated monthly
to add newly installed charging stations loca-
tions.
Icons for charging stations can be displayed on
the map. You can also display only charging
stations that are equipped with quick charge
devices or only charging stations that are
equipped with normal charge devices.
“Displaying charging station icons on map”
(page 2-5)
FEATURES OF LEAF NAVIGATION
SYSTEM
Page 21 of 275
1 Getting Started
Control buttons and functions ................................................ 1-2Control panel ........................................................................\
1-2
Steering wheel switches .................................................... 1-4
USB connector and Auxiliary input jack ........................ 1-4
Start-up screen ........................................................................\
.. 1-5
Functions disabled while driving ............................................ 1-6
Basic operation ........................................................................\
.. 1-7 Selecting item ....................................................................... 1-7
Adjusting volume and others ............................................ 1-7
Scrolling message or list ................................................... 1-7
How to input letters and numbers .................................. 1-7
Viewing display screens........................................................... 1-9
Map screen........................................................................\
.... 1-9
Zero Emission menu screen ............................................. 1-9 Menu screen ....................................................................... 1-9
Status screen................................................................... 1-10
FM·AM radio screen ....................................................... 1-10
SiriusXM Satellite Radio screen ................................. 1-10
CD·AUX screen ............................................................... 1-10
Items to be set initially .......................................................... 1-11
Subscription to CARWINGS
TMservice.................... 1-11
Inputting user ID and password ................................. 1-11
Storing home location ................................................... 1-12
Connecting cellular phone ........................................... 1-13
Display adjustment ......................................................... 1-14
Volume settings ............................................................... 1-16
Clock settings .................................................................. 1-16
Language and unit settings.......................................... 1-17
Page 24 of 275
1-4Getting Started
When theOPEN/TILT button is pushed while
the monitor is closed, the monitor will open.
When the OPEN/TILT button is pushed while
the monitor is open, the monitor will close.
Adjusting monitor angle
The angle of the monitor can be adjusted to
select from 3 different preset angles. Once the
angle of the monitor is selected and stored in the
system, the selected angle is always set after
performing the open/close operation of the
monitor.
Push and hold the OPEN/TILTbutton until a
chime sounds. When the button is released, the
next preset angle will be selected. Continue this
procedure until the preferred angle is obtained.
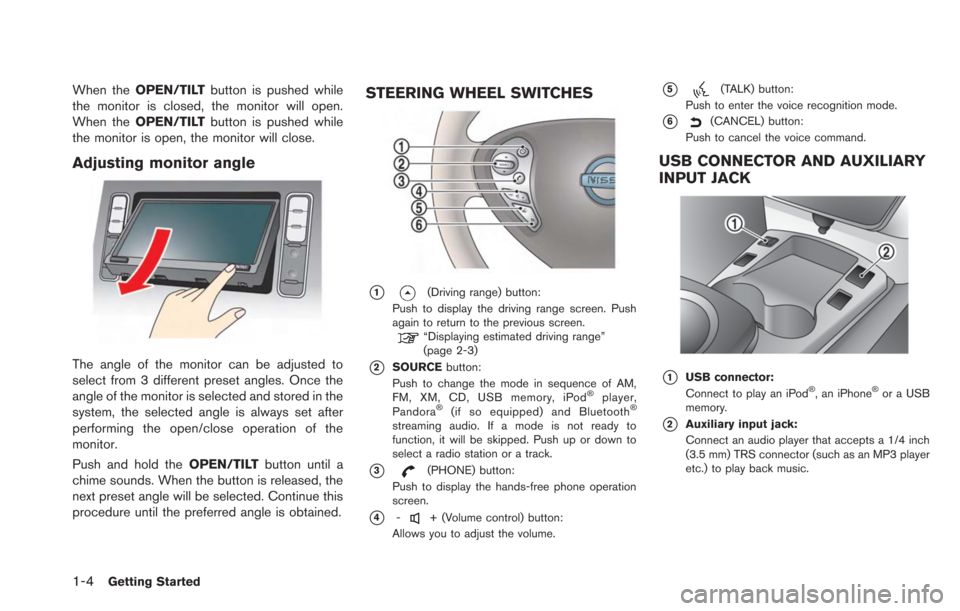
STEERING WHEEL SWITCHES
*1(Driving range) button:
Push to display the driving range screen. Push
again to return to the previous screen.
“Displaying estimated driving range”
(page 2-3)
*2SOURCE button:
Push to change the mode in sequence of AM,
FM, XM, CD, USB memory, iPod
®player,
Pandora®(if so equipped) and Bluetooth®
streaming audio. If a mode is not ready to
function, it will be skipped. Push up or down to
select a radio station or a track.
*3(PHONE) button:
Push to display the hands-free phone operation
screen.
*4-+ (Volume control) button:
Allows you to adjust the volume.
*5(TALK) button:
Push to enter the voice recognition mode.
*6(CANCEL) button:
Push to cancel the voice command.
USB CONNECTOR AND AUXILIARY
INPUT JACK
*1USB connector:
Connect to play an iPod®, an iPhone®or a USB
memory.
*2Auxiliary input jack:
Connect an audio player that accepts a 1/4 inch
(3.5 mm) TRS connector (such as an MP3 player
etc.) to play back music.
Page 41 of 275
.When the charge connector is discon-
nected from the vehicle, the heater and
air conditioner operates using vehicle
Li-ion battery electric power.
. If the remote heater and air conditioner
function and Li-ion battery charging are
performed at the same time, Li-ion
battery charging will take longer than
usual due to the power used to heat or
cool the vehicle.
. Certain remote functions require a
compatible smart phone, which is not
included with vehicle.
. CARWINGS
TMinformation system fea-
tures are included through a subscrip-
tion service which requires owner
consent to activate. The subscription
must be active to use these features.
. CARWINGS
TMcommunications may be
received at a verified e-mail address or
by SMS/text messaging-enabled cellu-
lar phone.
. Standard text rates and/or data usage
may apply depending on your carrier.
The estimated driving range and charging
station information are displayed on the map
screen.
CAUTION
Charging station information may not
be detailed in all areas or reflect current
charging station locations. For up to
date information about charging sta-
tions, such as business hours or char-
ging equipment, NISSAN recommends
that you directly access the information
on your own. Additionally, always check
the Li-ion battery available charge and
set a reasonable driving schedule.
DISPLAYING ESTIMATED DRIVING
RANGE
The estimated driving range including the
current position or the destination is displayed
on the map screen depending on the charging
status of the vehicle. A destination or a waypoint
can be set on this screen.
INFO:
The estimated driving range map shows the
predicted area the vehicle can reach on the
basis of the estimated driving range that is
indicated in the meter. Driving habits, the actual
road environment (hills, etc.), and traffic condi-
tions (traffic jams, etc.) will affect the actual
available range.
The Driving Range screen is displayed by
performing the following procedure.
. Push the
button on the steering wheel.
. Push the
(Zero Emission menu) button
and touch [Driving Range].
INFO:
Models with Li-ion battery warmer:
The estimated driving range will increase or
decrease when the air conditioner, heater or Li-
ion battery warmer is turned on or off, or the
vehicle is shifted between D (Drive) and ECO, or
when any other accessory is turned on or off
based on driving.
Unique EV functions2-3
DISPLAYING ESTIMATED DRIVING
RANGE AND CHARGING STATION
INFORMATION
Page 80 of 275
![NISSAN LEAF 2013 1.G Navigation Manual 3-24Navigation
9. The selected destination is displayed at thecenter of the map. Touch [Start] after
confirming the location of the displayed
destination. The system sets the destination
to the select NISSAN LEAF 2013 1.G Navigation Manual 3-24Navigation
9. The selected destination is displayed at thecenter of the map. Touch [Start] after
confirming the location of the displayed
destination. The system sets the destination
to the select](/manual-img/5/324/w960_324-79.png)
3-24Navigation
9. The selected destination is displayed at thecenter of the map. Touch [Start] after
confirming the location of the displayed
destination. The system sets the destination
to the selected location and starts calculat-
ing a route.
INFO:
After setting a destination, the location of the
destination can be adjusted and the location can
be stored in the Address Book, etc.
“Operations after setting destination”
(page 3-36)
SETTING HOME AS DESTINATION
The home location can be set as the destination
to which the system calculates a route. This
function is especially useful when searching for
a route to return to the home location. 1. Puch the
MENUbutton and touch [Destina-
tion].
2. Touch [Home].
3. The home location is displayed, and the system sets the home location as the
destination.
INFO:
If the home location is not stored yet, the
system will automatically display a screen for
storing it.
“Storing home location” (page 1-12)
4. The entire route to the home location is shown on the map. Touch [Start] after
confirming the displayed route. The system
starts route guidance to the home location.
INFO:
Before starting route guidance, the route con-
dition can be changed and the route can be
stored in the Address Book, etc.
“Procedures after setting route”
(page 3-39)
Setting by voice command
1. Push the
button located on the steering
wheel.
2. After the tone sounds, speak a command.
To set the home location as the destination:
"Navigation" "Home"
Page 84 of 275
3-28Navigation
INFO:
As maintenance of data for charging station
information is carried out periodically, detailed
information for a charging station selected may
not always be displayed.
SEARCHING FROM ADDRESS
BOOK
Storing frequently used destinations in the
Address Book makes it easy for the system to
set and calculate a route. To utilize this function
more effectively, destinations that are often
traveled to should be stored in advance.
1. Push the MENUbutton and touch [Destina-
tion].
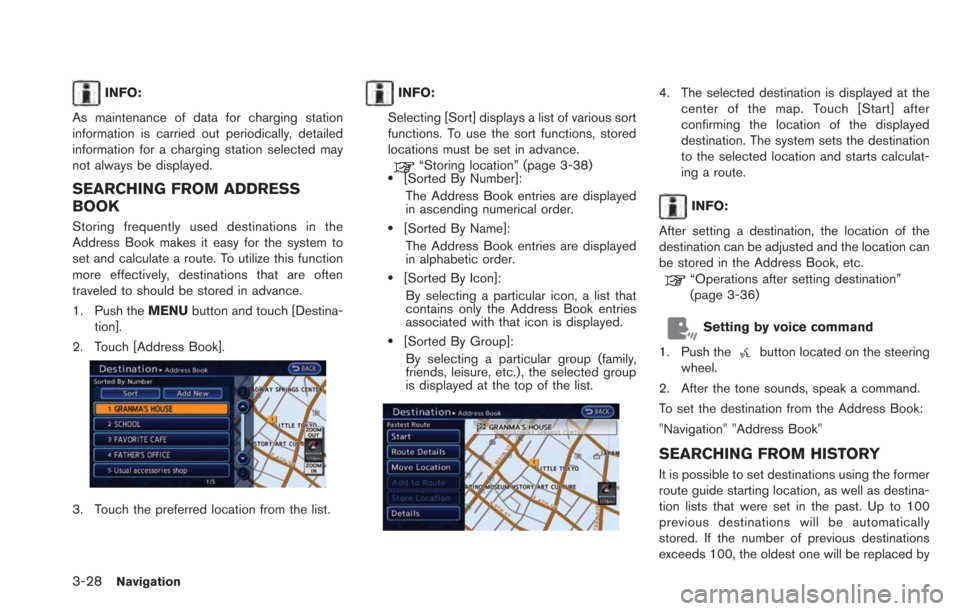
2. Touch [Address Book].
3. Touch the preferred location from the list.
INFO:
Selecting [Sort] displays a list of various sort
functions. To use the sort functions, stored
locations must be set in advance.
“Storing location” (page 3-38).[Sorted By Number]: The Address Book entries are displayed
in ascending numerical order.
.[Sorted By Name]:The Address Book entries are displayed
in alphabetic order.
.[Sorted By Icon]:
By selecting a particular icon, a list that
contains only the Address Book entries
associated with that icon is displayed.
.[Sorted By Group]:By selecting a particular group (family,
friends, leisure, etc.), the selected group
is displayed at the top of the list.
4. The selected destination is displayed at the center of the map. Touch [Start] after
confirming the location of the displayed
destination. The system sets the destination
to the selected location and starts calculat-
ing a route.
INFO:
After setting a destination, the location of the
destination can be adjusted and the location can
be stored in the Address Book, etc.
“Operations after setting destination”
(page 3-36)
Setting by voice command
1. Push the
button located on the steering
wheel.
2. After the tone sounds, speak a command.
To set the destination from the Address Book:
"Navigation" "Address Book"
SEARCHING FROM HISTORY
It is possible to set destinations using the former
route guide starting location, as well as destina-
tion lists that were set in the past. Up to 100
previous destinations will be automatically
stored. If the number of previous destinations
exceeds 100, the oldest one will be replaced by
Page 85 of 275
![NISSAN LEAF 2013 1.G Navigation Manual the newest one.
1. Push theMENUbutton and touch [Destina-
tion].
2. Touch [Previous Destinations]. A list screen is displayed.
3. Touch the previous start point or theprevious destination from the lis NISSAN LEAF 2013 1.G Navigation Manual the newest one.
1. Push theMENUbutton and touch [Destina-
tion].
2. Touch [Previous Destinations]. A list screen is displayed.
3. Touch the previous start point or theprevious destination from the lis](/manual-img/5/324/w960_324-84.png)
the newest one.
1. Push theMENUbutton and touch [Destina-
tion].
2. Touch [Previous Destinations]. A list screen is displayed.
3. Touch the previous start point or theprevious destination from the list.
4. The selected destination is displayed at thecenter of the map. Touch [Start] after
confirming the location of the displayed
destination. The system sets the destination to the selected location and starts calculat-
ing a route.
INFO:
After setting a destination, the location of the
destination can be adjusted and the location can
be stored in the Address Book, etc.
“Operations after setting destination”
(page 3-36)
Setting by voice command
1. Push the
button located on the steering
wheel.
2. After the tone sounds, speak a command.
To display the previous destinations list:
"Navigation" "Previous Destinations"
FINDING NEARBY POINTS OF IN-
TEREST
This allows you to set the destination to a facility
located near the current vehicle location or
another location that you move to by scrolling
the map, and then have the system calculate a
route.
If there is any particular Points of Interest type
that you intend to use frequently, you can store it
in the list of nearby Points of Interest.
“Customizing Nearby Places” (page 3-74) 1. Push the
MENUbutton and touch [Destina-
tion].
2. Touch [Nearby Points of Interest]. The category list is displayed.
3. Touch the preferred category. A facility list
screen is displayed.
4. Touch the preferred destination from the list.The position of the selected location is
displayed in the preview on the right side
of the screen.
Navigation3-29
Page 109 of 275
2. Touch the preferred key.
: Pauses the simulation.
: Resumes the simulation.
: Ends the simulation.
3. Push theMAPbutton to return to the
current location map screen.
INFO:
During simulation, the map scale can be
changed by touching [ZOOM IN] or [ZOOM
OUT]. While the map scale is being changed,
the simulation is temporarily stopped.
VOICE GUIDANCE SETTINGS
Various guidance settings can be set.
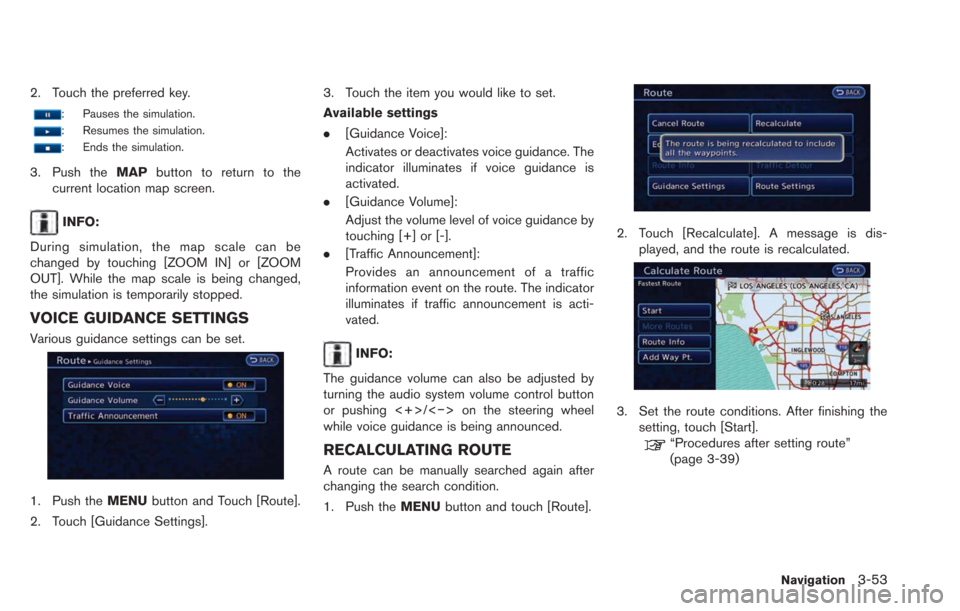
1. Push the MENUbutton and Touch [Route].
2. Touch [Guidance Settings]. 3. Touch the item you would like to set.
Available settings
.
[Guidance Voice]:
Activates or deactivates voice guidance. The
indicator illuminates if voice guidance is
activated.
. [Guidance Volume]:
Adjust the volume level of voice guidance by
touching [+] or [-].
. [Traffic Announcement]:
Provides an announcement of a traffic
information event on the route. The indicator
illuminates if traffic announcement is acti-
vated.
INFO:
The guidance volume can also be adjusted by
turning the audio system volume control button
or pushing <+>/<−> on the steering wheel
while voice guidance is being announced.
RECALCULATING ROUTE
A route can be manually searched again after
changing the search condition.
1. Push the MENUbutton and touch [Route].
2. Touch [Recalculate]. A message is dis-
played, and the route is recalculated.
3. Set the route conditions. After finishing thesetting, touch [Start].
“Procedures after setting route”
(page 3-39)
Navigation3-53