2013 NISSAN LEAF climate settings
[x] Cancel search: climate settingsPage 17 of 275
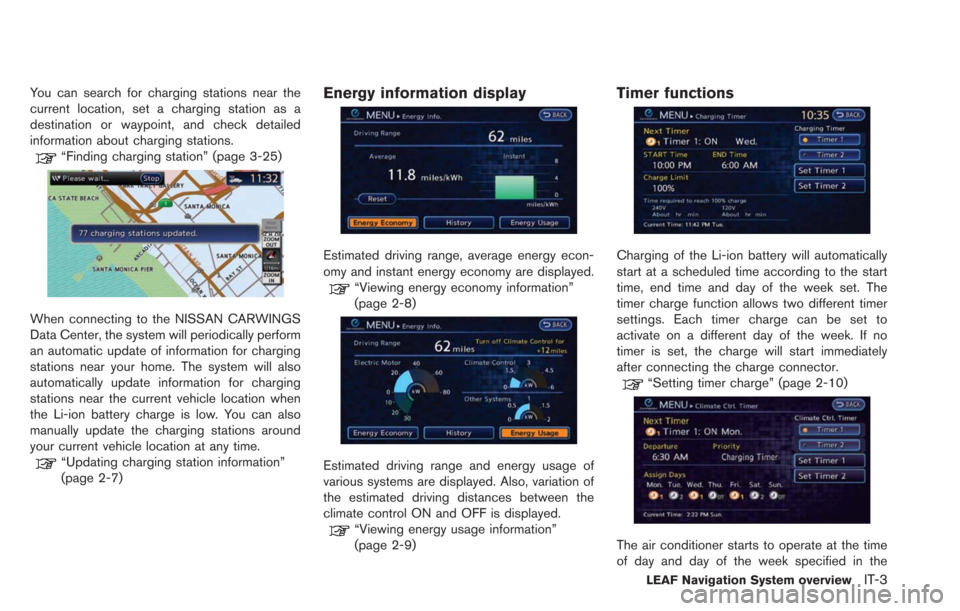
You can search for charging stations near the
current location, set a charging station as a
destination or waypoint, and check detailed
information about charging stations.
“Finding charging station” (page 3-25)
When connecting to the NISSAN CARWINGS
Data Center, the system will periodically perform
an automatic update of information for charging
stations near your home. The system will also
automatically update information for charging
stations near the current vehicle location when
the Li-ion battery charge is low. You can also
manually update the charging stations around
your current vehicle location at any time.
“Updating charging station information”
(page 2-7)
Energy information display
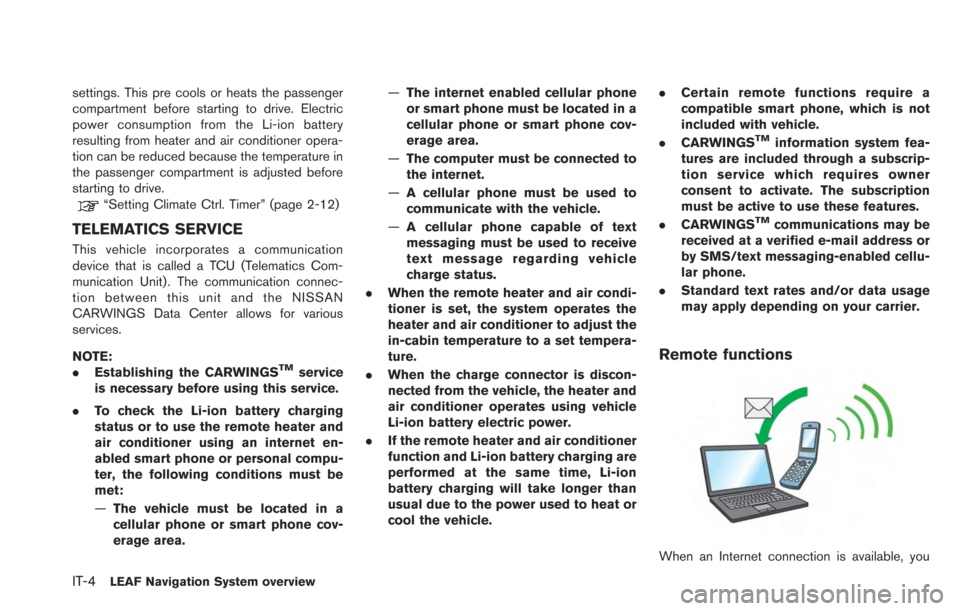
Estimated driving range, average energy econ-
omy and instant energy economy are displayed.
“Viewing energy economy information”
(page 2-8)
Estimated driving range and energy usage of
various systems are displayed. Also, variation of
the estimated driving distances between the
climate control ON and OFF is displayed.
“Viewing energy usage information”
(page 2-9)
Timer functions
Charging of the Li-ion battery will automatically
start at a scheduled time according to the start
time, end time and day of the week set. The
timer charge function allows two different timer
settings. Each timer charge can be set to
activate on a different day of the week. If no
timer is set, the charge will start immediately
after connecting the charge connector.
“Setting timer charge” (page 2-10)
The air conditioner starts to operate at the time
of day and day of the week specified in the
LEAF Navigation System overviewIT-3
Page 18 of 275
IT-4LEAF Navigation System overview
settings. This pre cools or heats the passenger
compartment before starting to drive. Electric
power consumption from the Li-ion battery
resulting from heater and air conditioner opera-
tion can be reduced because the temperature in
the passenger compartment is adjusted before
starting to drive.
“Setting Climate Ctrl. Timer” (page 2-12)
TELEMATICS SERVICE
This vehicle incorporates a communication
device that is called a TCU (Telematics Com-
munication Unit). The communication connec-
tion between this unit and the NISSAN
CARWINGS Data Center allows for various
services.
NOTE:
.Establishing the CARWINGS
TMservice
is necessary before using this service.
. To check the Li-ion battery charging
status or to use the remote heater and
air conditioner using an internet en-
abled smart phone or personal compu-
ter, the following conditions must be
met:
—The vehicle must be located in a
cellular phone or smart phone cov-
erage area. —
The internet enabled cellular phone
or smart phone must be located in a
cellular phone or smart phone cov-
erage area.
— The computer must be connected to
the internet.
— A cellular phone must be used to
communicate with the vehicle.
— A cellular phone capable of text
messaging must be used to receive
text message regarding vehicle
charge status.
. When the remote heater and air condi-
tioner is set, the system operates the
heater and air conditioner to adjust the
in-cabin temperature to a set tempera-
ture.
. When the charge connector is discon-
nected from the vehicle, the heater and
air conditioner operates using vehicle
Li-ion battery electric power.
. If the remote heater and air conditioner
function and Li-ion battery charging are
performed at the same time, Li-ion
battery charging will take longer than
usual due to the power used to heat or
cool the vehicle. .
Certain remote functions require a
compatible smart phone, which is not
included with vehicle.
. CARWINGS
TMinformation system fea-
tures are included through a subscrip-
tion service which requires owner
consent to activate. The subscription
must be active to use these features.
. CARWINGS
TMcommunications may be
received at a verified e-mail address or
by SMS/text messaging-enabled cellu-
lar phone.
. Standard text rates and/or data usage
may apply depending on your carrier.
Remote functions
When an Internet connection is available, you
Page 22 of 275
1-2Getting Started
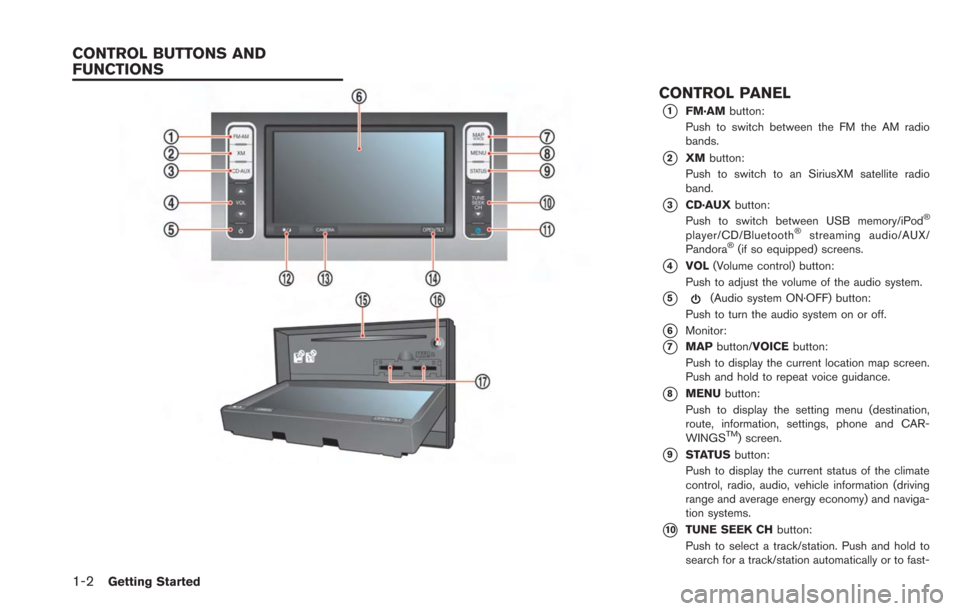
CONTROL PANEL
*1FM·AMbutton:
Push to switch between the FM the AM radio
bands.
*2XM button:
Push to switch to an SiriusXM satellite radio
band.
*3CD·AUX button:
Push to switch between USB memory/iPod®
player/CD/Bluetooth®streaming audio/AUX/
Pandora®(if so equipped) screens.
*4VOL (Volume control) button:
Push to adjust the volume of the audio system.
*5(Audio system ON·OFF) button:
Push to turn the audio system on or off.
*6Monitor:
*7MAP button/VOICE button:
Push to display the current location map screen.
Push and hold to repeat voice guidance.
*8MENU button:
Push to display the setting menu (destination,
route, information, settings, phone and CAR-
WINGS
TM) screen.
*9STATUS button:
Push to display the current status of the climate
control, radio, audio, vehicle information (driving
range and average energy economy) and naviga-
tion systems.
*10TUNE SEEK CH button:
Push to select a track/station. Push and hold to
search for a track/station automatically or to fast-
CONTROL BUTTONS AND
FUNCTIONS
Page 30 of 275
![NISSAN LEAF 2013 1.G Navigation Manual 1-10Getting Started
.[CARWINGS]:
Information feeds are displayed and settings
for CARWINGS
TMcan be performed.“5. CARWINGSTM”
STATUS SCREEN
Push the STATUS button to display the current
status of NISSAN LEAF 2013 1.G Navigation Manual 1-10Getting Started
.[CARWINGS]:
Information feeds are displayed and settings
for CARWINGS
TMcan be performed.“5. CARWINGSTM”
STATUS SCREEN
Push the STATUS button to display the current
status of](/manual-img/5/324/w960_324-29.png)
1-10Getting Started
.[CARWINGS]:
Information feeds are displayed and settings
for CARWINGS
TMcan be performed.“5. CARWINGSTM”
STATUS SCREEN
Push the STATUS button to display the current
status of the navigation system.
Each time the STATUSbutton is pushed,
displayed information is switched in the order
of climate control, vehicle information and
navigation route information.
There are different status screens displayed
depending on various factors, such as the
currently active mode, whether a destination
has been set or not, etc.
FM·AM RADIO SCREEN
Push the FM·AMbutton to turn on the radio and
display the radio screen. Push the switch to
toggle the radio mode: AM?FM1?FM2.
“FM-AM-SAT radio operation” (page 4-12)
SIRIUSXM SATELLITE RADIO
SCREEN
Push the XMbutton to turn on the satellite radio
and display the SiriusXM Satellite Radio screen.
Push the switch to toggle the radio mode:
XM1?XM2?XM3.
“FM-AM-SAT radio operation” (page 4-12)
CD·AUX SCREEN
Push the CD·AUXbutton to turn on the audio
system and display the audio screen. Push the
CD·AUX button to toggle the mode: iPod
player
*1/USB memory/Pandora® *1*2? CD?
Bluetooth®streaming audio*1?AUX.
*1 Screen only displays when a device capable of
playback is connected.
*2 The Pandora
®is only available in U.S.
“Compact Disc (CD) player operation”
(page 4-14)
“iPod®player operation” (page 4-16)“USB memory operation” (page 4-19)“Bluetooth®streaming audio” (page 4-11)“Auxiliary input jack” (page 4-23)“Pandora®operation” (page 4-17)
Page 39 of 275
2 Unique EV functions
Zero Emission menu screen ................................................... 2-2
Displaying estimated driving range and charging
station information ..................................................................... 2-3Displaying estimated driving range ................................. 2-3
Displaying charging station icons on map .................... 2-5
Confirming charging station availability .......................... 2-6
Updating charging station information ........................... 2-7
Energy information display....................................................... 2-8 Viewing energy economy information ............................. 2-8 Viewing energy economy history ................................... 2-9
Viewing energy usage information ................................ 2-9
Timer function operation ...................................................... 2-10 Setting timer charge ...................................................... 2-10
Setting Climate Ctrl. Timer........................................... 2-12
Unique EV function settings ................................................ 2-15
Setting messages that are displayed on screen .... 2-16
Battery and power information .................................... 2-16
Page 40 of 275
![NISSAN LEAF 2013 1.G Navigation Manual 2-2Unique EV functions
Push the(Zero Emission menu) button to
display the menu that includes useful functions
for electric vehicle driving.
Available settings
. [Driving Range]:
The estimated driving NISSAN LEAF 2013 1.G Navigation Manual 2-2Unique EV functions
Push the(Zero Emission menu) button to
display the menu that includes useful functions
for electric vehicle driving.
Available settings
. [Driving Range]:
The estimated driving](/manual-img/5/324/w960_324-39.png)
2-2Unique EV functions
Push the(Zero Emission menu) button to
display the menu that includes useful functions
for electric vehicle driving.
Available settings
. [Driving Range]:
The estimated driving area within range,
including the current position is displayed on
the map screen.
“Displaying estimated driving range”
(page 2-3)
. [Nearby Stations]:
Charging station information for the current
position area is displayed.
“Finding charging station” (page 3-25)
. [Update Stations]:
Charging station information is updated
through connection to the Nissan CARW-
INGS Data Center.
“Updating charging station informa-
tion” (page 2-7) .
[Energy Info]:
Energy information is displayed on the
screen.
“Energy information display”
(page 2-8)
. [Charging Timer]:
The timer charge function can be set.
“Setting timer charge” (page 2-10)
. [Climate Ctrl. Timer]:
The Climate Ctrl. Timer function can be set.
“Setting Climate Ctrl. Timer”
(page 2-12)
. [CARWINGS]:
Information feeds are displayed and settings
for CARWINGS
TMcan be performed.“5. CARWINGSTM”
. [Settings]:
Set messages that are displayed on the
screen and email messages that can by
received using a personal computer or
cellular phone.
“Unique EV function settings”
(page 2-15) NOTE:
.
Establishing the CARWINGS
TMservice
is necessary before using this service.
. To check the Li-ion battery charging
status or to use the remote heater and
air conditioner using an internet en-
abled smart phone or personal compu-
ter, the following conditions must be
met:
—The vehicle must be located in a
cellular phone or smart phone cov-
erage area.
— The internet enabled cellular phone
or smart phone must be located in a
cellular phone or smart phone cov-
erage area.
— The computer must be connected to
the internet.
— A cellular phone must be used to
communicate with the vehicle.
— A cellular phone capable of text
messaging must be used to receive
text message regarding vehicle
charge status.
. When the remote heater and air condi-
tioner is set, the system operates the
heater and air conditioner to adjust the
in-cabin temperature to a set tempera-
ture.
ZERO EMISSION MENU SCREEN
Page 48 of 275
2-10Unique EV functions
This function enables the batteries to be
charged and the climate control to be turned
on automatically at a regular time and day of the
week.
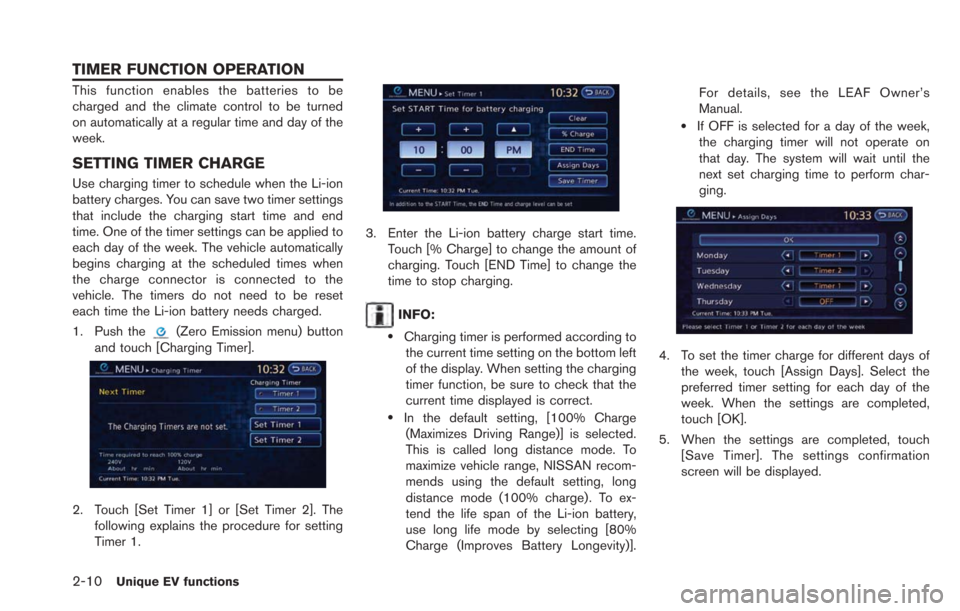
SETTING TIMER CHARGE
Use charging timer to schedule when the Li-ion
battery charges. You can save two timer settings
that include the charging start time and end
time. One of the timer settings can be applied to
each day of the week. The vehicle automatically
begins charging at the scheduled times when
the charge connector is connected to the
vehicle. The timers do not need to be reset
each time the Li-ion battery needs charged.
1. Push the
(Zero Emission menu) button
and touch [Charging Timer].
2. Touch [Set Timer 1] or [Set Timer 2]. The following explains the procedure for setting
Timer 1.
3. Enter the Li-ion battery charge start time.Touch [% Charge] to change the amount of
charging. Touch [END Time] to change the
time to stop charging.
INFO:
.Charging timer is performed according tothe current time setting on the bottom left
of the display. When setting the charging
timer function, be sure to check that the
current time displayed is correct.
.In the default setting, [100% Charge
(Maximizes Driving Range)] is selected.
This is called long distance mode. To
maximize vehicle range, NISSAN recom-
mends using the default setting, long
distance mode (100% charge). To ex-
tend the life span of the Li-ion battery,
use long life mode by selecting [80%
Charge (Improves Battery Longevity)]. For details, see the LEAF Owner’s
Manual.
.If OFF is selected for a day of the week,
the charging timer will not operate on
that day. The system will wait until the
next set charging time to perform char-
ging.
4. To set the timer charge for different days of
the week, touch [Assign Days]. Select the
preferred timer setting for each day of the
week. When the settings are completed,
touch [OK].
5. When the settings are completed, touch [Save Timer]. The settings confirmation
screen will be displayed.
TIMER FUNCTION OPERATION
Page 49 of 275
![NISSAN LEAF 2013 1.G Navigation Manual 6. If the settings shown on the screen arecorrect, touch [Yes].
7. The [Timer 1] indicator illuminates after thecharging timer is set. Use the same proce-
dure to set the Timer 2 setting.
8. Place the NISSAN LEAF 2013 1.G Navigation Manual 6. If the settings shown on the screen arecorrect, touch [Yes].
7. The [Timer 1] indicator illuminates after thecharging timer is set. Use the same proce-
dure to set the Timer 2 setting.
8. Place the](/manual-img/5/324/w960_324-48.png)
6. If the settings shown on the screen arecorrect, touch [Yes].
7. The [Timer 1] indicator illuminates after thecharging timer is set. Use the same proce-
dure to set the Timer 2 setting.
8. Place the power switch in the OFF position, and then connect the charge connector to
the vehicle.
INFO:
. Always place the power switch in the OFF
position after setting the charging timers.
When the power switch is in the ON
position, the Li-ion battery will not start
charging.
. The Li-ion battery may not be charged to the
expected level (80% or 100%) if the
charging timer start time and end time are
set so there is not enough time to charge the
Li-ion battery.
. When either the charge start time or charge
end time is set, the charging timer function is
activated.
. When only the charging timer end time is
set, the system automatically determines
when to begin charging based on the Li-
ion battery charge level. The Li-ion battery
may not be charged to the expected level
(80% or 100%) if the charging timer end
time is set so there is not enough time to
charge the Li-ion battery.
. When only the charging timer end time is
set, the system automatically stops charging
when the Li-ion battery charges to the
selected level (80% or 100%) . Charging
may stop before the scheduled end time. .
Touch [Timer 1] or [Timer 2] to turn off the
charging timer function. Touch [Yes] if the
settings shown on the screen are correct.
After this operation has been performed, the
indicator disappears and the charging timer
function is turned off. The start and stop time
settings are not deleted, even if the charging
timer function is turned off.
. If charging timer and the Climate Ctrl. Timer
are operating at the same time due to an
overlap of the timer settings, you can
prioritize which function receives electrical
power first.
“Unique EV function settings”
(page 2-15)
. The timer setting can be changed while
timer charge is in operation. When the
setting is changed while timer charge is in
operation, the new settings are applied
immediately and charge operation stops
once. After this, if the power position is
switched to OFF, charge operation starts or
enters waiting mode depending on the new
timer settings.
. When charging is set as the first priority, the
Climate Ctrl. Timer does not start until 10
segments (80%) of the Li-ion battery avail-
able charge gauge are illuminated.
Unique EV functions2-11