2013 NISSAN LEAF reset
[x] Cancel search: resetPage 24 of 275

1-4Getting Started
When theOPEN/TILT button is pushed while
the monitor is closed, the monitor will open.
When the OPEN/TILT button is pushed while
the monitor is open, the monitor will close.
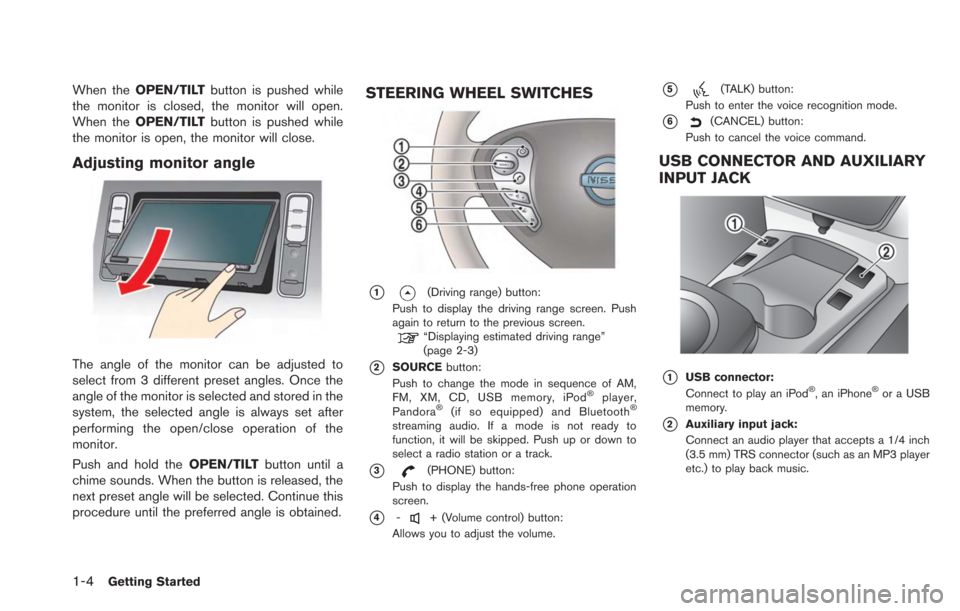
Adjusting monitor angle
The angle of the monitor can be adjusted to
select from 3 different preset angles. Once the
angle of the monitor is selected and stored in the
system, the selected angle is always set after
performing the open/close operation of the
monitor.
Push and hold the OPEN/TILTbutton until a
chime sounds. When the button is released, the
next preset angle will be selected. Continue this
procedure until the preferred angle is obtained.
STEERING WHEEL SWITCHES
*1(Driving range) button:
Push to display the driving range screen. Push
again to return to the previous screen.
“Displaying estimated driving range”
(page 2-3)
*2SOURCE button:
Push to change the mode in sequence of AM,
FM, XM, CD, USB memory, iPod
®player,
Pandora®(if so equipped) and Bluetooth®
streaming audio. If a mode is not ready to
function, it will be skipped. Push up or down to
select a radio station or a track.
*3(PHONE) button:
Push to display the hands-free phone operation
screen.
*4-+ (Volume control) button:
Allows you to adjust the volume.
*5(TALK) button:
Push to enter the voice recognition mode.
*6(CANCEL) button:
Push to cancel the voice command.
USB CONNECTOR AND AUXILIARY
INPUT JACK
*1USB connector:
Connect to play an iPod®, an iPhone®or a USB
memory.
*2Auxiliary input jack:
Connect an audio player that accepts a 1/4 inch
(3.5 mm) TRS connector (such as an MP3 player
etc.) to play back music.
Page 46 of 275
![NISSAN LEAF 2013 1.G Navigation Manual 2-8Unique EV functions
around the destination is updated.
.[Near Home]:Charging station information for the area
around your home is updated. Registra-
tion of your home in the Address Book is
necessa NISSAN LEAF 2013 1.G Navigation Manual 2-8Unique EV functions
around the destination is updated.
.[Near Home]:Charging station information for the area
around your home is updated. Registra-
tion of your home in the Address Book is
necessa](/manual-img/5/324/w960_324-45.png)
2-8Unique EV functions
around the destination is updated.
.[Near Home]:Charging station information for the area
around your home is updated. Registra-
tion of your home in the Address Book is
necessary before using this item.
“Storing home location”
(page 1-12)
.[Near a location on the Map]:Charging station information for the area
where the cross pointer is placed by
moving the map is updated.
3. When [Stop] is touched while updating information, connection to the NISSAN
CARWINGS Data Center is disconnected.
INFO:
If communication with the NISSAN CARW-
INGS Data Center is disconnected due to
poor signal reception, a message will be
displayed. Touch [Yes] to restart the down-
load.
4. When the update is completed, a message is displayed.Energy economy and energy usage information
are displayed.
VIEWING ENERGY ECONOMY IN-
FORMATION
Estimated driving range, average energy econ-
omy and instant energy economy are displayed.
1. Push the
(Zero Emission menu) button.
2. Touch [Energy Info].
3. Touch [Energy Economy].
*1Driving Range:
The possible driving distance based on the
current charging status is displayed.
*2Average:
The average energy economy from the previous
to the next resets is displayed.
*3Instant:
The system shows the distance that the vehicle
can travel using 1kWh.
ENERGY INFORMATION DISPLAY
Page 47 of 275
![NISSAN LEAF 2013 1.G Navigation Manual *4[Reset]:
Touch [Reset] to reset the average energy
economy. After resetting the average energy
economy, it is stored in the history.
INFO:
Battery power is generated and stored by the
cooperative re NISSAN LEAF 2013 1.G Navigation Manual *4[Reset]:
Touch [Reset] to reset the average energy
economy. After resetting the average energy
economy, it is stored in the history.
INFO:
Battery power is generated and stored by the
cooperative re](/manual-img/5/324/w960_324-46.png)
*4[Reset]:
Touch [Reset] to reset the average energy
economy. After resetting the average energy
economy, it is stored in the history.
INFO:
Battery power is generated and stored by the
cooperative regenerative brake while driving.
When this occurs, the instant value will be
displayed as the maximum. The maximum value
will be displayed until the generated power is
consumed.
VIEWING ENERGY ECONOMY HIS-
TORY
The previous 10 histories of the average energy
economy are displayed.
1. Push the
(Zero Emission menu) button.
2. Touch [Energy Info].
3. Touch [History].
*1Driving Range:
The possible driving distance based on the
current charging status is displayed.
*2Previous Reset Intervals:
The average energy economy history is displayed
from along with the average for previous Reset-
to-Reset period.
*3Current Period:
The average energy economy from the previous
to the next resets is displayed.
VIEWING ENERGY USAGE INFOR-
MATION
Estimated driving range and energy usage of
various systems are displayed.
1. Push the
(Zero Emission menu) button.
2. Touch [Energy Info].
*1Driving Range:
The possible driving distance based on the
current charging status is displayed.
*2Variation of the possible driving distances be-
tween the climate control ON and OFF is
displayed.
*3Electric Motor:
Energy usage by the motor and regenerated
energy are displayed.
*4Climate Control:
Energy usage by the climate control function is
displayed.
*5Other Systems:
Energy usage by other equipment (headlights,
windshield wiper, etc.) is displayed.
Unique EV functions2-9
Page 48 of 275

2-10Unique EV functions
This function enables the batteries to be
charged and the climate control to be turned
on automatically at a regular time and day of the
week.
SETTING TIMER CHARGE
Use charging timer to schedule when the Li-ion
battery charges. You can save two timer settings
that include the charging start time and end
time. One of the timer settings can be applied to
each day of the week. The vehicle automatically
begins charging at the scheduled times when
the charge connector is connected to the
vehicle. The timers do not need to be reset
each time the Li-ion battery needs charged.
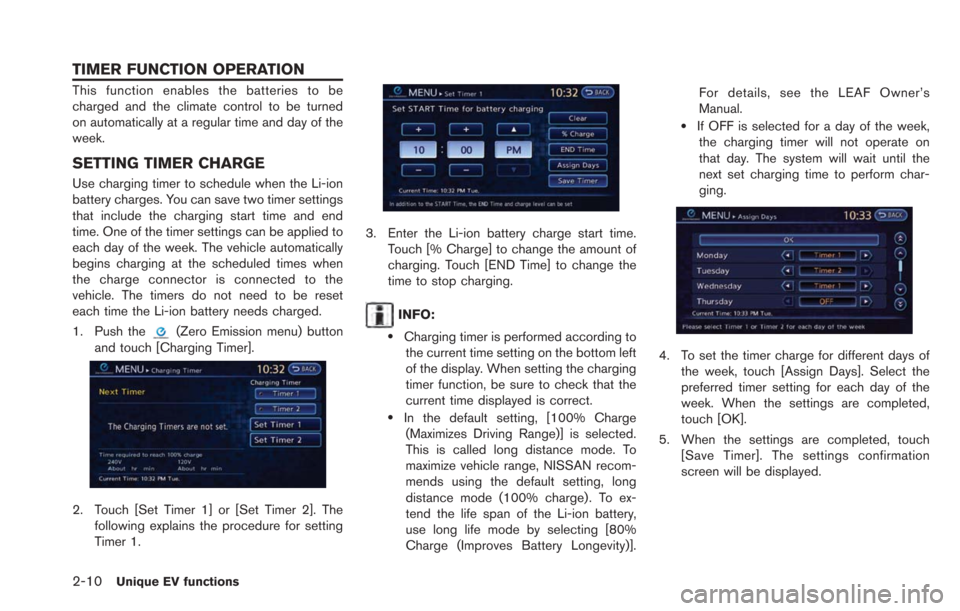
1. Push the
(Zero Emission menu) button
and touch [Charging Timer].
2. Touch [Set Timer 1] or [Set Timer 2]. The following explains the procedure for setting
Timer 1.
3. Enter the Li-ion battery charge start time.Touch [% Charge] to change the amount of
charging. Touch [END Time] to change the
time to stop charging.
INFO:
.Charging timer is performed according tothe current time setting on the bottom left
of the display. When setting the charging
timer function, be sure to check that the
current time displayed is correct.
.In the default setting, [100% Charge
(Maximizes Driving Range)] is selected.
This is called long distance mode. To
maximize vehicle range, NISSAN recom-
mends using the default setting, long
distance mode (100% charge). To ex-
tend the life span of the Li-ion battery,
use long life mode by selecting [80%
Charge (Improves Battery Longevity)]. For details, see the LEAF Owner’s
Manual.
.If OFF is selected for a day of the week,
the charging timer will not operate on
that day. The system will wait until the
next set charging time to perform char-
ging.
4. To set the timer charge for different days of
the week, touch [Assign Days]. Select the
preferred timer setting for each day of the
week. When the settings are completed,
touch [OK].
5. When the settings are completed, touch [Save Timer]. The settings confirmation
screen will be displayed.
TIMER FUNCTION OPERATION
Page 53 of 275

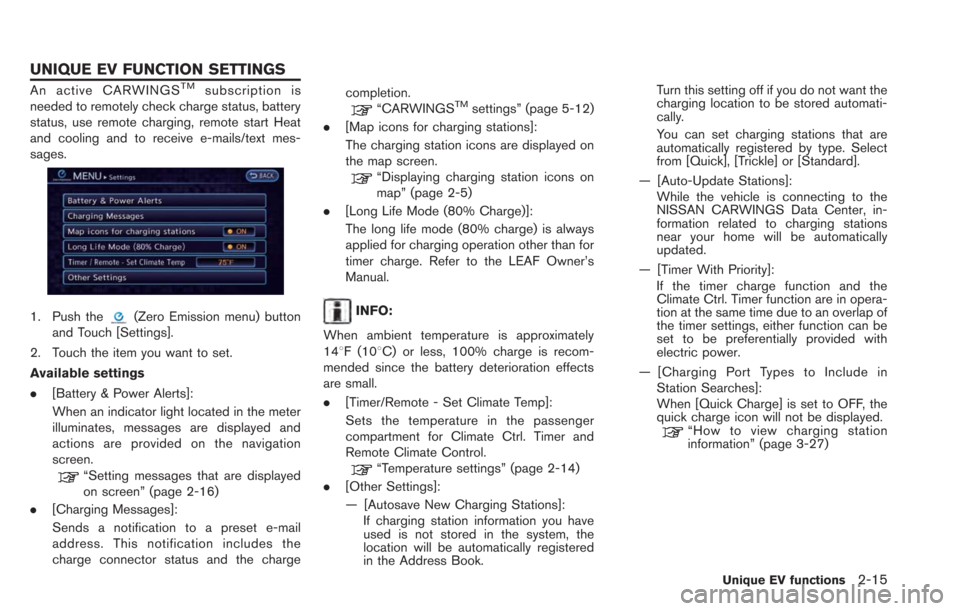
An active CARWINGSTMsubscription is
needed to remotely check charge status, battery
status, use remote charging, remote start Heat
and cooling and to receive e-mails/text mes-
sages.
1. Push the(Zero Emission menu) button
and Touch [Settings].
2. Touch the item you want to set.
Available settings
. [Battery & Power Alerts]:
When an indicator light located in the meter
illuminates, messages are displayed and
actions are provided on the navigation
screen.
“Setting messages that are displayed
on screen” (page 2-16)
. [Charging Messages]:
Sends a notification to a preset e-mail
address. This notification includes the
charge connector status and the charge completion.
“CARWINGSTMsettings” (page 5-12)
. [Map icons for charging stations]:
The charging station icons are displayed on
the map screen.
“Displaying charging station icons on
map” (page 2-5)
. [Long Life Mode (80% Charge)]:
The long life mode (80% charge) is always
applied for charging operation other than for
timer charge. Refer to the LEAF Owner’s
Manual.
INFO:
When ambient temperature is approximately
148F (108C) or less, 100% charge is recom-
mended since the battery deterioration effects
are small.
. [Timer/Remote - Set Climate Temp]:
Sets the temperature in the passenger
compartment for Climate Ctrl. Timer and
Remote Climate Control.
“Temperature settings” (page 2-14)
. [Other Settings]:
— [Autosave New Charging Stations]:
If charging station information you have
used is not stored in the system, the
location will be automatically registered
in the Address Book. Turn this setting off if you do not want the
charging location to be stored automati-
cally.
You can set charging stations that are
automatically registered by type. Select
from [Quick], [Trickle] or [Standard].
— [Auto-Update Stations]: While the vehicle is connecting to the
NISSAN CARWINGS Data Center, in-
formation related to charging stations
near your home will be automatically
updated.
— [Timer With Priority]: If the timer charge function and the
Climate Ctrl. Timer function are in opera-
tion at the same time due to an overlap of
the timer settings, either function can be
set to be preferentially provided with
electric power.
— [Charging Port Types to Include in Station Searches]:
When [Quick Charge] is set to OFF, the
quick charge icon will not be displayed.
“How to view charging station
information” (page 3-27)
Unique EV functions2-15
UNIQUE EV FUNCTION SETTINGS
Page 58 of 275

Storing route...................................................................... 3-60
Storing avoid area ............................................................ 3-61
Editing address book ....................................................... 3-62
Deleting stored item ......................................................... 3-68
Transferring information to/from address book ......... 3-70 Navigation settings ................................................................ 3-72
Speed limit indication on map..................................... 3-73
Other navigation settings.............................................. 3-73
Resetting all navigation settings to default .............. 3-76
Page 129 of 275
![NISSAN LEAF 2013 1.G Navigation Manual .[Reset All Navigation Settings to Default]:
Reset all of the settings to default.
“Resetting all navigation settings to
default” (page 3-76)
SPEED LIMIT INDICATION ON MAP
Turn the [Speed Limit In NISSAN LEAF 2013 1.G Navigation Manual .[Reset All Navigation Settings to Default]:
Reset all of the settings to default.
“Resetting all navigation settings to
default” (page 3-76)
SPEED LIMIT INDICATION ON MAP
Turn the [Speed Limit In](/manual-img/5/324/w960_324-128.png)
.[Reset All Navigation Settings to Default]:
Reset all of the settings to default.
“Resetting all navigation settings to
default” (page 3-76)
SPEED LIMIT INDICATION ON MAP
Turn the [Speed Limit Indication on Map] display
on or off. The indicator light illuminates when the
speed limit display function is set to on.
1. Touch [Speed Limit Indication on Map] to
toggle the function between on and off. The
indicator light illuminates when the speed
limit display function is set to on.
OTHER NAVIGATION SETTINGS
1. Push the MENUbutton and touch [Set-
tings].
2. Touch [Navigation].
3. Touch [Others].
4. Touch the item you would like to set.
Available settings
. [Audio Display on Map]:
Allows the audio information to be displayed
at all times.
“Displaying audio information on map
screen” (page 3-73)
. [Map Scrolling Information]:
Sets the system so that when the map
scrolls the information about the location
aligned at the center of the cross pointer is
displayed.
“Map scrolling information”
(page 3-13) .
[Customize Nearby Places]:
Set the category of frequently visited nearby
places.
“Customizing Nearby Places”
(page 3-74)
. [Keyboard Type]:
Switches the keyboard layout for the char-
acter input screen.
“Settings keyboard layout of character
input screen” (page 3-74)
. [North Up when Zoomed Out]:
When this setting is ON, the orientation of
the map is automatically changed to North
Up when the widest map scale is selected.
The orientation is changed to North Up even
when Heading Up is set.
. [Adjust Current Location]:
Corrects the position of the current location.
“Adjusting current vehicle location”
(page 3-75)
Displaying audio information on
map screen
The operating status of audio functions can be
displayed on the map screen.
1. Touch [Others].
Navigation3-73
Page 132 of 275
![NISSAN LEAF 2013 1.G Navigation Manual 3-76Navigation
5. After adjusting the direction of the vehicleicon, touch [OK]. A message is displayed,
and the adjusted vehicle location is stored.
RESETTING ALL NAVIGATION SET-
TINGS TO DEFAULT
This NISSAN LEAF 2013 1.G Navigation Manual 3-76Navigation
5. After adjusting the direction of the vehicleicon, touch [OK]. A message is displayed,
and the adjusted vehicle location is stored.
RESETTING ALL NAVIGATION SET-
TINGS TO DEFAULT
This](/manual-img/5/324/w960_324-131.png)
3-76Navigation
5. After adjusting the direction of the vehicleicon, touch [OK]. A message is displayed,
and the adjusted vehicle location is stored.
RESETTING ALL NAVIGATION SET-
TINGS TO DEFAULT
This restores various settings (display, volume
level, etc.) to the default settings.
INFO:
The memory contents, such as the stored
locations, will not be deleted.
1. Push the MENUbutton and touch [Set-
tings].
2. Touch [Navigation].
3. Touch [Reset All Navigation Settings to Default].
4. A confirmation message is displayed. Con-firm the contents of the message, then touch
[Yes].