2013 MITSUBISHI iMiEV service
[x] Cancel search: servicePage 192 of 258

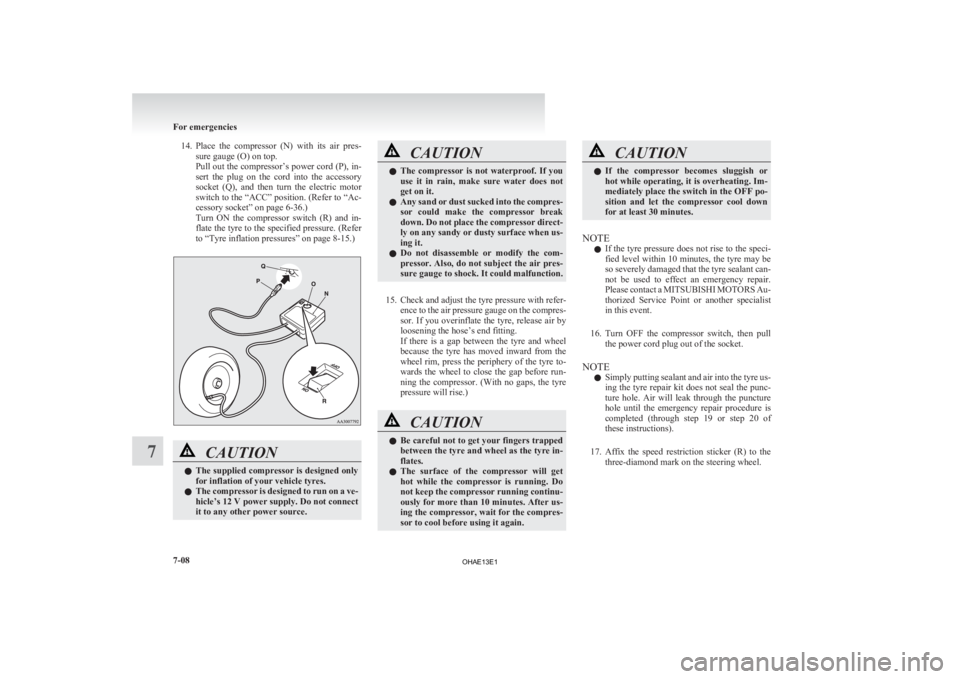
14. Place the compressor (N) with its air pres-
sure gauge (O) on top.
Pull out the compressor’s power cord (P), in-
sert the plug on the cord into the accessory
socket (Q), and then turn the electric motor
switch to the “ACC” position. (Refer to “Ac-
cessory socket” on page 6-36.)
Turn ON the compressor switch (R) and in-
flate the tyre to the specified pressure. (Refer
to “Tyre inflation pressures” on page 8-15.) CAUTION
l
The
supplied compressor is designed only
for inflation of your vehicle tyres.
l The compressor is designed to run on a ve-
hicle’s 12 V power supply. Do not connect
it to any other power source. CAUTION
l
The
compressor is not waterproof. If you
use it in rain, make sure water does not
get on it.
l Any sand or dust sucked into the compres-
sor could make the compressor break
down. Do not place the compressor direct-
ly on any sandy or dusty surface when us-
ing it.
l Do not disassemble or modify the com-
pressor. Also, do not subject the air pres-
sure gauge to shock. It could malfunction.
15. Check
and adjust the tyre pressure with refer- ence to the air pressure gauge on the compres-
sor. If you overinflate the tyre, release air by
loosening the hose’s end fitting.
If there is a gap between the tyre and wheel
because the tyre has moved inward from the
wheel rim, press the periphery of the tyre to-
wards the wheel to close the gap before run-
ning the compressor. (With no gaps, the tyre
pressure will rise.) CAUTION
l
Be
careful not to get your fingers trapped
between the tyre and wheel as the tyre in-
flates.
l The surface of the compressor will get
hot while the compressor is running. Do
not keep the compressor running continu-
ously for more than 10 minutes. After us-
ing the compressor, wait for the compres-
sor to cool before using it again. CAUTION
l
If
the compressor becomes sluggish or
hot while operating, it is overheating. Im-
mediately place the switch in the OFF po-
sition and let the compressor cool down
for at least 30 minutes.
NOTE l If
the tyre pressure does not rise to the speci-
fied level within 10 minutes, the tyre may be
so severely damaged that the tyre sealant can-
not be used to effect an emergency repair.
Please contact a MITSUBISHI MOTORS Au-
thorized Service Point or another specialist
in this event.
16. Turn OFF the compressor switch, then pull the power cord plug out of the socket.
NOTE l Simply putting sealant and air into the tyre us-
ing the tyre repair kit does not seal the punc-
ture hole. Air will leak through the puncture
hole until the emergency repair procedure is
completed (through step 19 or step 20 of
these instructions).
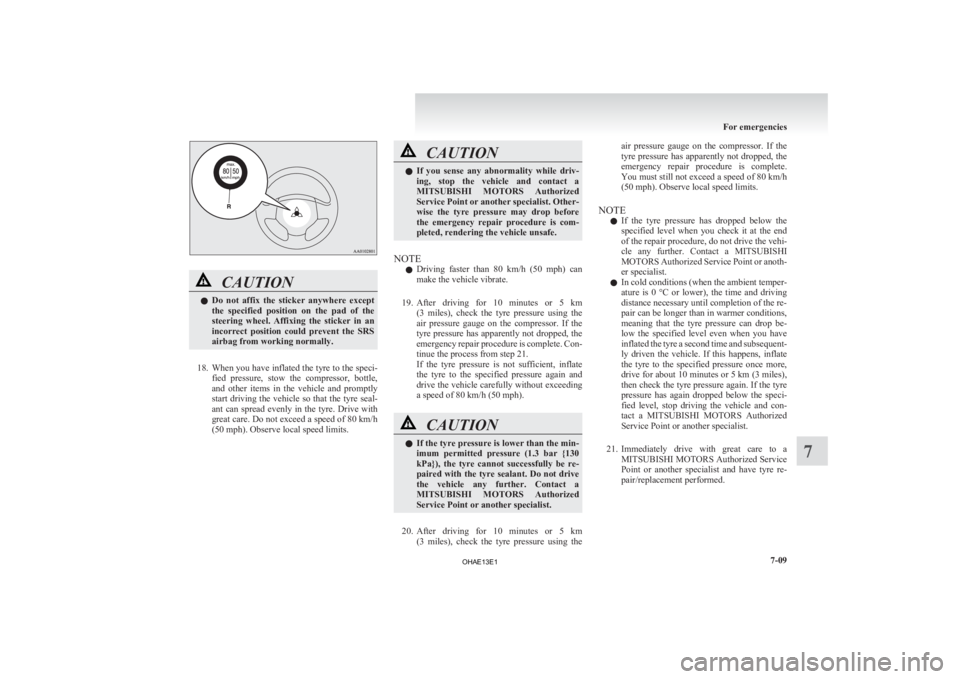
17. Affix the speed restriction sticker (R) to the three-diamond mark on the steering wheel. For emergencies
7-08
7
OHAE13E1
Page 193 of 258

CAUTION
l
Do not affix the sticker anywhere except
the specified position on the pad of the
steering wheel. Affixing the sticker in an
incorrect position could prevent the SRS
airbag from working normally.
18. When
you have inflated the tyre to the speci- fied pressure, stow the compressor, bottle,
and other items in the vehicle and promptly
start driving the vehicle so that the tyre seal-
ant can spread evenly in the tyre. Drive with
great care. Do not exceed a speed of 80 km/h
(50 mph). Observe local speed limits. CAUTION
l
If
you sense any abnormality while driv-
ing, stop the vehicle and contact a
MITSUBISHI MOTORS Authorized
Service Point or another specialist. Other-
wise the tyre pressure may drop before
the emergency repair procedure is com-
pleted, rendering the vehicle unsafe.
NOTE l Driving
faster than 80 km/h (50 mph) can
make the vehicle vibrate.
19. After driving for 10 minutes or 5 km (3 miles), check the tyre pressure using the
air pressure gauge on the compressor. If the
tyre pressure has apparently not dropped, the
emergency repair procedure is complete. Con-
tinue the process from step 21.
If the tyre pressure is not sufficient, inflate
the tyre to the specified pressure again and
drive the vehicle carefully without exceeding
a speed of 80 km/h (50 mph). CAUTION
l
If
the tyre pressure is lower than the min-
imum permitted pressure (1.3 bar {130
kPa}), the tyre cannot successfully be re-
paired with the tyre sealant. Do not drive
the vehicle any further. Contact a
MITSUBISHI MOTORS Authorized
Service Point or another specialist.
20. After
driving for 10 minutes or 5 km (3 miles), check the tyre pressure using the air pressure gauge on the compressor. If the
tyre
pressure has apparently not dropped, the
emergency repair procedure is complete.
You must still not exceed a speed of 80 km/h
(50 mph). Observe local speed limits.
NOTE l If the tyre pressure has dropped below the
specified level when you check it at the end
of the repair procedure, do not drive the vehi-
cle any further. Contact a MITSUBISHI
MOTORS Authorized Service Point or anoth-
er specialist.
l In cold conditions (when the ambient temper-
ature is 0 °C or lower), the time and driving
distance necessary until completion of the re-
pair can be longer than in warmer conditions,
meaning that the tyre pressure can drop be-
low the specified level even when you have
inflated the tyre a second time and subsequent-
ly driven the vehicle. If this happens, inflate
the tyre to the specified pressure once more,
drive for about 10 minutes or 5 km (3 miles),
then check the tyre pressure again. If the tyre
pressure has again dropped below the speci-
fied level, stop driving the vehicle and con-
tact a MITSUBISHI MOTORS Authorized
Service Point or another specialist.
21. Immediately drive with great care to a MITSUBISHI MOTORS Authorized Service
Point or another specialist and have tyre re-
pair/replacement performed. For emergencies
7-09 7
OHAE13E1
Page 194 of 258

CAUTION
l
Be sure to check the tyre pressure for con-
firmation that the emergency repair pro-
cedure is complete.
NOTE l Please
give the empty sealant bottle to your
MITSUBISHI MOTORS Authorized Service
Point when you purchase new sealant or dis-
pose of the sealant bottle according to nation-
al regulations for the disposal of chemical
waste.
l A tyre in which puncture sealant has been
used should ideally be replaced with a new
one. If you wish to have such a tyre properly
repaired for reuse, please contact a
MITSUBISHI MOTORS Authorized Service
Point or another specialist. Note that a proper
repair is impossible following an emergency
repair if the puncture hole cannot be located.
l The manufacturer is unable to guarantee that
all tyre punctures can be repaired with the
tyre repair kit, in particular cuts or perfora-
tions with a diameter of more than 4 mm or
away from the tyre’s tread. The manufacturer
is not liable for damage sustained through im-
proper use of the tyre repair kit.
l The manufacturer is not liable for damage sus-
tained through re-use of any tyre in which
tyre sealant has been used. Towing
E00801503754
If your vehicle needs to be towed
If
you need to tow your vehicle, we recommend
that you contact a MITSUBISHI MOTORS Author-
ized Service Point or a commercial tow truck service.
Transport the vehicle on a flatbed truck or tow the
vehicle either with all wheels or the rear wheels
(drive wheels) off the ground.
Flat bed type
Dolly type
Towing with rear wheels off the ground In the following cases, transport the vehicle with
all wheels on a carriage.
l The
ready indicator illuminates but the vehi-
cle does not move, or an abnormal noise is
produced.
l The electric motor unit warning lamp comes
on.
l Inspection of the vehicle’s underside reveals
that oil or some other fluid is leaking.
l Your vehicle body is severely damaged or de-
formed in the event of an accident. If a wheel gets stuck in a ditch, do not try to tow
the
vehicle. Please contact your MITSUBISHI
MOTORS Authorized Service Point or a commer-
cial tow truck service for assistance.
In an emergency your vehicle may be temporarily
towed with the rear wheels (drive wheels) on the
ground only when the traction battery is complete-
ly discharged.
If your vehicle is to be towed by another vehicle,
carefully tow your vehicle for the shortest distance
possible and in accordance with the instructions giv-
en in “Emergency towing” in this part.
The regulations concerning towing may differ from
country to country. It is recommended that you
obey the regulations of the area where you are driv-
ing your vehicle.
Towing the vehicle by a tow truck WARNING
l Never
get under your vehicle after it has
been lifted by a tow truck.
l Never ride in a vehicle that is being towed.
l Never tow the vehicle with rear wheels
(drive wheels) on the ground. This may
cause damage to the electric motor. This
may also cause a fire, if wiring in the elec-
tric motor unit room becomes damaged. For emergencies
7-10
7
OHAE13E1
Page 196 of 258

NOTE
l Using
any part other than the designated tow-
ing hook (A) could result in damage to the ve-
hicle body.
l Using a wire rope or metal chain can result
in damage to the vehicle body. It is best to
use a non-metallic rope. If you use a wire
rope or metal chain, wrap it with cloth at any
point where it touches the vehicle body.
l Take care that the tow rope is kept as horizon-
tal as possible. An angled tow rope can dam-
age the vehicle body.
2. Start the electric motor unit. CAUTION
l
If
the vehicle is towed with the electric mo-
tor switch in the “ON” position without
starting the electric motor unit, the auxili-
ary battery may be flat during towing. In
this case, the brake performance may be
very poor. Steering is also very heavy.
l Do not leave the electric motor switch in
the “LOCK” position. The steering wheel
will lock, causing loss of control.
3. Place
the selector lever in the “N” (NEU- TRAL) position.
4. Turn on the hazard warning lamps if required by law. (Follow the local driving laws and
regulations.)
5. During towing make sure that close contact is maintained between the drivers of both ve-
hicles, and that the vehicles travel at low
speed. CAUTION
l
The
person in the vehicle being towed
must pay attention to the brake lamps of
the towing vehicle and make sure the
rope never becomes slack.
l Avoid sudden braking, sudden accelera-
tion and sharp turning; such operation
could cause damage to the towing hooks
or the tow rope.
People in the vicinity could be injured as
a result.
l When towing or being towed down a long
slope, the brakes may overheat reducing
the effectiveness. In this situation, have
your vehicle transported by a tow truck.
l When the vehicle is to be towed by anoth-
er vehicle with all wheels on the ground,
make sure that the towing speed and dis-
tance given below are never exceeded,
causing damage to the transmission.
Towing speed: 30 km/h (19 mph)
Towing distance: 30 km (19 miles)
For the towing speed and the towing dis-
tance, follow the local driving laws and
regulations.
Towing another vehicle
Your
vehicle cannot be used to tow another vehicle. Operation under adverse driving
conditions E00801702717
On a flooded road l Do
not drive on a flooded road. If you drive
on a flooded road, not only the electric motor
unit stops but also a failure like electric leak-
age or short circuit may occur.
If you inevitably had to run on a flooded
road and the vehicle was exposed to water,
be sure to have your vehicle inspected by a
MITSUBISHI MOTORS Authorized Service
Point.
l If there is water on the brakes after driving
through puddles or washing the vehicle, re-
sulting in temporarily ineffective brakes. In
such cases, lightly depress the brake pedal to
see if the brakes operate properly. If they do
not, lightly depress the pedal several times
while driving in order to dry the brake pads.
l When driving in rain or on a road with many
puddles a layer of water may form between
the tyres and the road surface.
This reduces a tyre’s frictional resistance on
the road, resulting in loss of steering stability
and braking capability.
To cope with this, observe the following items:
(a) Drive your vehicle at slow speed.
(b) Do not drive on worn tyres.
(c) Always maintain the specified tyre inflation pressures.For emergencies
7-12
7
OHAE13E1
Page 199 of 258

Vehicle care precautions
............................................................... 8-02
Cleaning the interior of your vehicle ............................................8-02
Cleaning the exterior of your vehicle ...........................................8-03
Service precautions ....................................................................... 8-06
Bonnet...........................................................................................8-07
Coolant/Hot water heater fluid ..................................................... 8-09
Washer fluid ................................................................................. 8-11
Brake fluid .................................................................................... 8-11
Auxiliary battery ........................................................................... 8-12
Tyres............................................................................................. 8-14
Wiper blades ................................................................................. 8-17
General maintenance .................................................................... 8-19
For cold and snowy weather......................................................... 8-20
Fusible links.................................................................................. 8-20
Fuses............................................................................................. 8-20
Replacement of lamp bulbs .......................................................... 8-23Vehicle care and Maintenance
8
OHAE13E1
Page 204 of 258

Service precautions
E08401700050
Adequate
care of your vehicle at regular intervals
serves to preserve the value and appearance as long
as possible.
Maintenance items as described in this owner’s man-
ual can be performed by the owner.
We recommend you to have the periodic inspection
and maintenance performed by a MITSUBISHI
MOTORS Authorized Service Point or another spe-
cialist.
In the event a malfunction or a problem is discov-
ered, we recommend you to have it checked and re-
paired. Follow the instructions and cautions for
each of the various procedures. WARNING
l Do
not touch any components in the elec-
tric motor unit room other than the re-
serve tank. There are no components re-
quiring inspection other than the reserve
tank. Never remove or disassemble the
component which generates high voltage,
high voltage wire (orange), its connector,
EV charging cable, charge connector,
plug and an outlet. Doing so could result
in a serious injury that may risk your life.
These components are affixed with the la-
bel indicating precautions for handling.
Follow the instructions on the label. Take
your vehicle to a MITSUBISHI
MOTORS Authorized Service Point for
any necessary maintenance. High voltage components and wiring cables are lo-
cated as shown in the figure below.
1- Regular charge port
2-
Inverter
3- Traction battery
4- Heater
5- Air conditioner compressor
6- High voltage connector
7- Service plug
8- Electric motor (Electric motor unit)
9- On board charger/DC-DC converter
10- Quick charge port WARNING
l Never
touch the service plug (A) under
the front seat. Doing so could result in se-
rious injury that may risk your life, in-
cluding an electric shock. The service
plug (A) is used to shut off high voltage
from the traction battery for repair of the
vehicle at a MITSUBISHI MOTORS Au-
thorized Service Point or another special-
ist. WARNING
l When
the ready indicator is illuminated,
and the charging indicator is illuminated
or blinking, never perform maintenance
because the high voltage system is operat-
ing.
l When servicing the vehicle, make sure
that the electric motor switch is in the
“LOCK” position and the charging cable
is disconnected. Failure to do so could re-
sult in an electric shock.
l When checking or servicing the inside of
the bonnet room and coolant reserve
tank, make sure the electric motor unit is
switched off and has had a chance to cool
down. Vehicle care and Maintenance
8-06
8
OHAE13E1
Page 205 of 258

WARNING
l If it is necessary to do work in the bonnet
room with the electric motor running, be
especially careful that your clothing, hair,
etc., does not become caught by the fan,
or other moving parts.
l The fan can turn on automatically even if
the electric motor is not running. Turn
the electric motor switch to the “LOCK”
position to be safe while you work in the
bonnet room.
l Do not smoke, cause sparks or allow open
flames around the auxiliary battery.
l Be extremely cautious when working
around the auxiliary battery. It contains
poisonous and corrosive sulphuric acid.
l Improper handling of components and
materials used in the vehicle can endan-
ger your personal safety. We recommend
you to consult a specialist for necessary in-
formation. CAUTION
l
The
components inside the electric motor
unit room might be very hot to touch.
To avoid being burnt, make sure all com-
ponents have sufficiently cooled before be-
ginning an inspection.
These components are affixed with the la-
bel indicating precautions for handling.
Follow the instructions on the label. CAUTION
l
When
replacing the auxiliary battery, re-
move the connected positive (+) and nega-
tive (-) terminals after turning the electric
motor switch to the “LOCK” position
and waiting at least 2 minutes. If the aux-
iliary battery terminal is removed just af-
ter the electric motor switch is turned to
the “LOCK” position, this may cause dam-
age to components of the electric motor
unit. If the electric motor unit warning
lamp illuminates, do not replace the auxil-
iary battery. Contact a MITSUBISHI
MOTORS Authorized Service Point. Bonnet
E08402000018
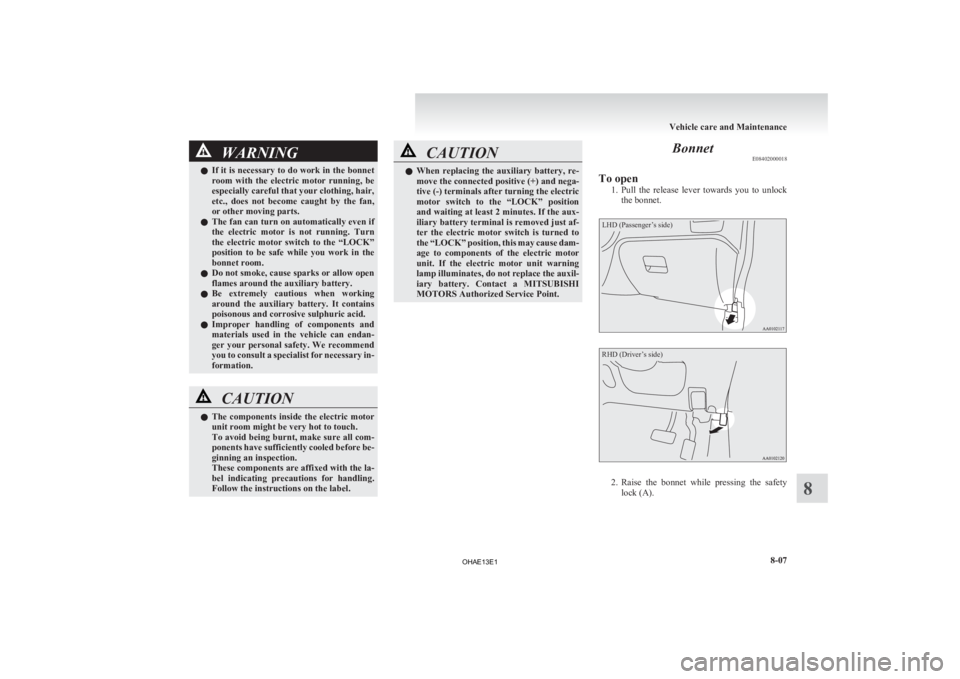
To open 1. Pull
the release lever towards you to unlock
the bonnet.
LHD (Passenger’s side)
RHD (Driver’s side) 2. Raise
the bonnet while pressing the safety
lock (A). Vehicle care and Maintenance
8-07 8
OHAE13E1
Page 212 of 258

CAUTION
l
Keep it out of reach of children.
l When
replacing the auxiliary battery, re-
move the connected positive (+) and nega-
tive (-) terminals after turning the electric
motor switch to the “LOCK” position
and waiting at least 1 minute. If the auxil-
iary battery terminal is removed just af-
ter the electric motor switch is turned to
the “LOCK” position, this may cause dam-
age to components of the electric motor
unit.
l Never short-circuit the auxiliary battery.
This could cause it to overheat and be dam-
aged.
l If the auxiliary battery is to be quick-
charged, first disconnect the battery ca-
bles.
l In order to prevent a short circuit, be
sure to disconnect the negative (-) termi-
nal first.
l Always wear protective eye goggles when
working near the auxiliary battery.
l Do not bring the nearby parts, the plastic
parts and so on into contact with sulphu-
ric acid (battery electrolyte) which may
crack, stain or discolour them.
If they are in contact, wipe off with soft
cloth, chamois or the like and an aqueous
solution of neutral detergent then imme-
diately rinse the affected parts with plen-
ty of water. NOTE
l Keep
the terminals clean. After the auxiliary
battery is connected, apply terminal protec-
tion grease. To clean the terminals, use luke-
warm water.
l Check to see if the auxiliary battery is secure-
ly installed and cannot be moved during trav-
el. Also check each terminal for tightness.
l When the vehicle is to be left unused for a
long period of time, remove the auxiliary bat-
tery and store it in a place where the battery
fluid will not freeze. The auxiliary battery
should be stored only in a fully charged con-
dition.
l It is necessary to adjust the electronic control-
led unit when the auxiliary battery is re-
moved for a long period of time.
Consult a MITSUBISHI MOTORS Author-
ized Service Point. Tyres
E08402800016 WARNING
l Driving
with tyres that are worn, dam-
aged or improperly inflated can lead to
loss of control or blowout of the tyres
which can result in a collision with seri-
ous or fatal injury. Vehicle care and Maintenance
8-14
8
OHAE13E1