2013 MITSUBISHI iMiEV service
[x] Cancel search: servicePage 215 of 258

CAUTION
l
Observe permissible maximum speed for
your snow tyres and the legal speed limit.
NOTE l The
laws and regulations concerning snow
tyres (driving speed, required use, type, etc.)
vary. Find out and follow the laws and regu-
lations in the area you intend to drive.
l If flange nuts are used on your vehicle,
change to tapered nuts when steel wheels are
used.
Tyre chains E08403400035
If tyre chains have to be used, ensure that they are
fitted
only on the drive wheels (rear) in accordance
with the manufacturer’s instructions.
Use only tyre chains which are designed for use
with the tyres mounted on the vehicle: use of the in-
correct size or type of chain could result in damage
to the vehicle body.
Contact a MITSUBISHI MOTORS Authorized
Service Point before putting on tyre chains. The
max. chain height is as follows. Tyre size Wheel size Max chain
height[mm]
175/55R15 15 x 5 J 14 mm When driving with tyre chains on the tyres, do not
drive
faster than 50 km/h (30 mph). When you
reach roads that are not covered in snow, immedi-
ately remove the tyre chains. CAUTION
l
Practice
fitting the chains before you
need them. Don’t expect help from other
people in the cold.
l Choose a clear straight stretch of road
where you can pull over and still be seen
while you are fitting the chains.
l Do not fit chains before you need them.
This will wear out your tyres and the
road surface.
l After driving around 100-300 metres,
stop and retighten the chains.
l Drive carefully and do not exceed
50 km/h (30 mph). Remember that pre-
venting accidents is not the purpose of
tyre chains.
l An aluminium wheel can be damaged by
a tyre chain while driving. When fitting a
tyre chain on an aluminium wheel, take
care that no part of the chain and fitting
can be brought into contact with the wheel.
l When installing or removing the tyre
chains, take care that hands and other
parts of your body are not injured by the
sharp edges of the vehicle body.
NOTE l The
laws and regulations concerning the use
of tyre chains vary. Always follow local laws
and regulations.
In most countries, it is prohibited by law to
use tyre chains on roads without snow. Wiper blades
E08403500010
If
the blades are frozen to the windscreen or rear
window, do not operate the wipers until the ice has
melted and the blades are freed, otherwise the wip-
er motor may be damaged.
NOTE
l When replacing the front wiper with a wiper
for use in cold regions, it is necessary to ad-
just the washer nozzle spray positions. Al-
ways contact your MITSUBISHI MOTORS
Authorized Service Point when replacing the
front wiper with a wiper for use in cold re-
gions.
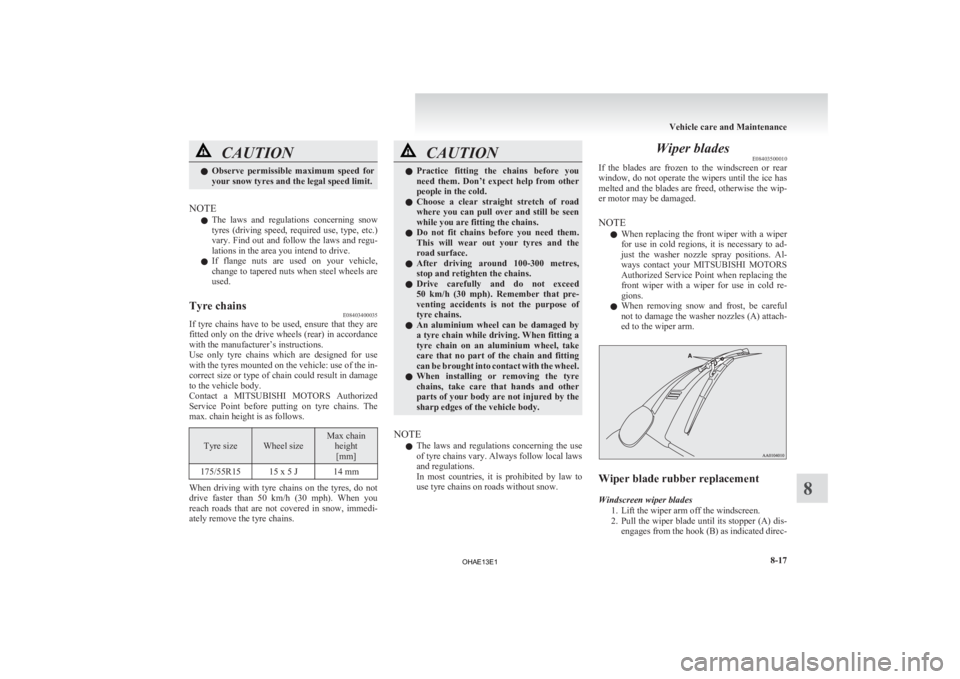
l When removing snow and frost, be careful
not to damage the washer nozzles (A) attach-
ed to the wiper arm. Wiper blade rubber replacement
Windscreen wiper blades
1.
Lift the wiper arm off the windscreen.
2. Pull the wiper blade until its stopper (A) dis- engages from the hook (B) as indicated direc- Vehicle care and Maintenance
8-17 8
OHAE13E1
Page 218 of 258

For cold and snowy weather
E08403700012
Ventilation slots
The
ventilation slots in front of the windscreen
should be kept clear of leaves or brushed clear after
heavy snowfall, so that the operation of the heating
and ventilation systems will not be impaired.
Weatherstripping
To prevent freezing of the weatherstripping on the
doors, bonnet, etc., they should be treated with sili-
cone grease.
Additional equipment
It is a good idea to carry a shovel or a short-han-
dled spade in the vehicle during the winter so that
you can clear away snow if you get stranded. A
small hand-brush for sweeping snow off the vehi-
cle and a plastic scraper for the windscreen and
rear window are also useful. Fusible links
E08403800013
The
fusible links will melt to prevent a fire if a
large current attempts to flow through certain elec-
trical systems.
In case of a melted fusible link, we recommend
you to have your vehicle inspected.
For the fusible links, please refer to “Passenger com-
partment fuse location table” on page 8-21 and
“Bonnet room fuse location table” on page 8-22. WARNING
l Fusible
links must not be replaced by any
other device. Failing to fit the correct fusi-
ble link may result in fire in the vehicle,
property destruction and serious or fatal
injuries at any time. Fuses
E08403900014
Fuse block location E08404000012
To prevent damage to the electrical system due to
shortcircuiting
or overloading, each individual cir-
cuit is provided with a fuse.
There are fuse blocks in the passenger compart-
ment and in the bonnet room.
NOTE
l Spare fuses are not provided. Please pur-
chase it from a MITSUBISHI MOTORS Au-
thorized Service Point or other locations.
Passenger compartment
The fuse block in the passenger compartment is lo-
cated in front of the driver’s seat at the position
shown in the illustration.
Press the tab (A) and remove the fuse cover (B). Vehicle care and Maintenance
8-20
8
OHAE13E1
Page 222 of 258

Outside
E08404800010Front1- Headlamps, low beam: 55 W (H11)
2-
Headlamps, high-beam: 60 W (HB3)
3- Front fog lamps*: 35 W (H8) Daytime running lamps*: 13 W (P13W)
4- Front turn-signal lamps: 21 W (W21W)
5- Position lamps: 5 W (W5W)
6- Side turn-signal lamps: 5 W (WY5W) *: if so equipped
Codes in parentheses indicate bulb types.
Rear 7- High-mounted stop lamp: 5 W (W5W)
8-
Stop and tail lamps
9- Rear turn-signal lamps: 21 W (WY21W)
10- Licence plate lamps: 5 W (W5W)
11- Rear fog lamp: 21 W (W21W)
12- Reversing lamps: 21 W (W21W) Codes in parentheses indicate bulb types.
NOTE l The stop and tail lamps use LEDs rather than
bulbs.
For repair and replacement, we recommend
you to contact a MITSUBISHI MOTORS Au-
thorized Service Point.
Inside E08404900011 1- Room lamp (rear): 8 W
2-
Room lamp (front) & map lamps: 8 W Removing and installing the headlamp
unit
E08405000022
Bulbs
for headlamps, position lamps or front turn-
signal lamps are replaced by removing the entire
headlamp unit from the vehicle.
Back side of the headlamp A- Headlamp (low beam)
B-
Headlamp (high-beam)
C- Position lamp
D- Front turn-signal lamp
Refer to the following section for replacement.
Headlamps (low beam) ® p. 8-28
Headlamps (high-beam) ® p. 8-29
Position lamps ® p. 8-30
Front turn-signal lamps ® p. 8-30
Use the following steps to remove the headlamp unit.
To remove
1. Open the bonnet. Refer to “Bonnet” on page8-07.
2. Press the tab (A) to remove the connector (B). Vehicle care and Maintenance
8-24
8
OHAE13E1
Page 231 of 258

l
When installing the lamp unit, first insert the
tab (D) into the groove (E) on the body, and
then push on the lamp unit to fit it into place. Rear combination lamps
E08405800017
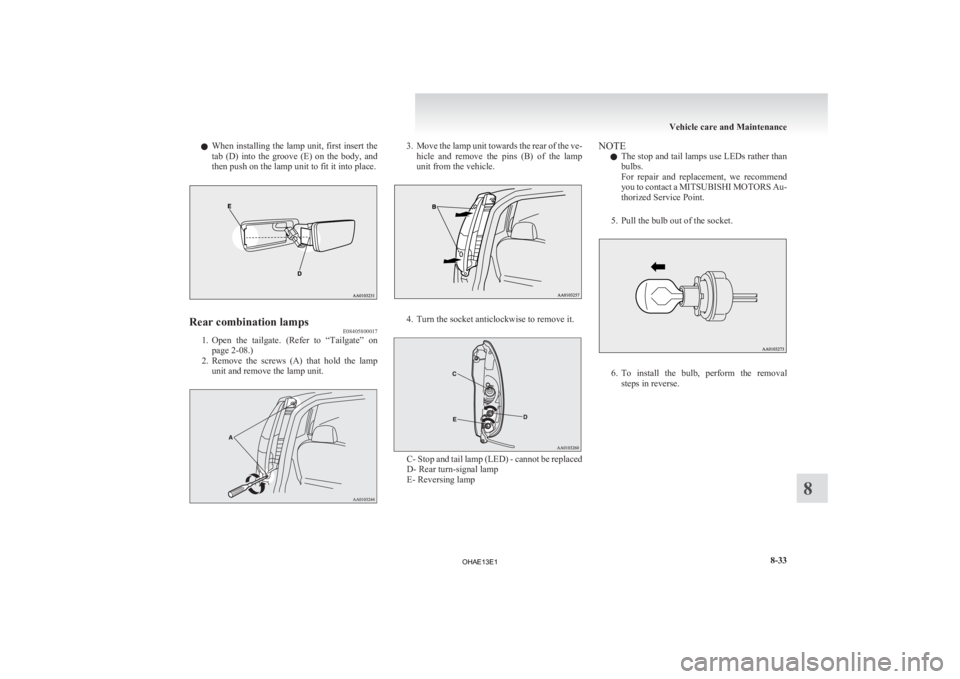
1. Open
the tailgate. (Refer to “Tailgate” on
page 2-08.)
2. Remove the screws (A) that hold the lamp unit and remove the lamp unit. 3. Move
the lamp unit towards the rear of the ve-
hicle and remove the pins (B) of the lamp
unit from the vehicle. 4. Turn the socket anticlockwise to remove it.
C- Stop and tail lamp (LED) - cannot be replaced
D- Rear turn-signal lamp
E- Reversing lampNOTE
l The
stop and tail lamps use LEDs rather than
bulbs.
For repair and replacement, we recommend
you to contact a MITSUBISHI MOTORS Au-
thorized Service Point.
5. Pull the bulb out of the socket. 6. To
install the bulb, perform the removal
steps in reverse. Vehicle care and Maintenance
8-33 8
OHAE13E1
Page 240 of 258

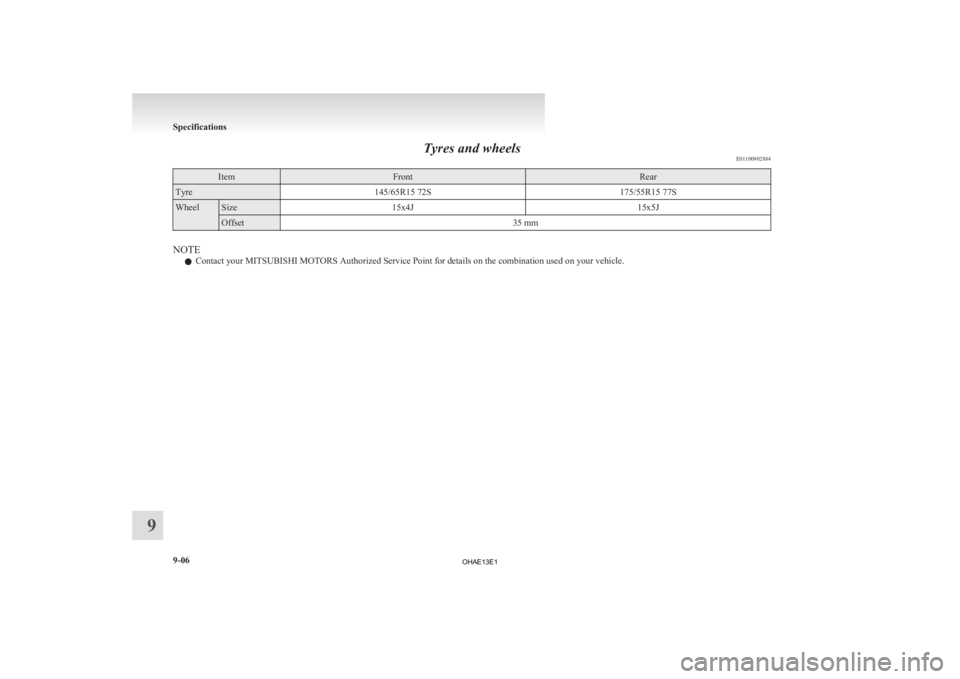
Tyres and wheels
E01100902884Item Front Rear
Tyre
145/65R15 72S 175/55R15 77SWheel Size
15x4J 15x5JOffset
35 mmNOTE
l Contact your MITSUBISHI MOTORS Authorized Service Point for details on the combination used on your vehicle. Specifications
9-06
9
OHAE13E1
Page 247 of 258

P
Parking 5-04
Parking brake 5-03
Position lamps Bulb capacity
8-24
Indication lamp 4-09
Replacement 8-30
Power down warning lamp 4-11
Precautions to observe when using wipers and wash-
ers 4-18
Pregnant women restraint 3-10
Puncture Tyre repair kit 7-04
QQuick charging 1-12
RRadio
LW/MW/FM electronic tuning radio with CD
player 6-10
Ready indicator
4-09
Rear combination lamps Bulb capacity 8-24
Replacement 8-33
Rear fog lamp Bulb capacity 8-24
Indication lamp 4-09
Replacement 8-32
Switch 4-16
Rear room lamp Bulb capacity 8-24
Rear seat 3-05
Rear turn-signal lamps Bulb capacity 8-24 Replacement 8-30,8-33
Rear window demister switch 4-18
Rear-view mirror Inside 5-05
Outside 5-05
Refill capacities
9-08
Regenerative braking 02
Regular charging 1-08
Replacement of lamp bulbs 8-23
Reversing lamps Bulb capacity 8-24
Replacement 8-33
Roof carrier precaution 5-20
Room lamp (front) 6-37
Room lamp (rear) 6-38
S Safe driving techniques 5-03
Seat belt 3-08
Child restraint 3-11
Force limiter
3-11
Inspection 3-20
Pregnant women restraint 3-10
Pretensioner 3-11
Seat belt reminder/warning lamp (for driver and
front passenger) 3-09
Warning lamp (for rear passenger) 3-10
Seats Adjustment 3-03
Front seat 3-03
Head restraints 3-07
Heated seats 3-04
Rear seat 3-05
Secret box 6-39
Selector lever 5-09
Service precaution 8-06
Service reminder 4-03,4-04
Side turn-signal lamps Bulb capacity 8-24
Replacement
8-30,8-33
Snow tyres 8-16
Specifications 9-02
Speedometer 4-02
Starting the electric motor unit 5-08
Steering wheel lock 5-08
Stop lamps Bulb capacity 8-24
Replacement 8-33
Storage spaces 6-39 Glove box 6-39
Secret box 6-39
Sun visors 6-35
Supplemental restraint system 3-20 Servicing 3-30
Warning lamp 3-29
T Tail lamps
Bulb capacity
8-24
Replacement 8-33
Tailgate 2-08
Towing 7-10
Traction battery 02
Transmission 5-09 Driving the vehicle 5-11
Selector lever 5-09
Selector lever position indicator 5-10
Tripmeter 4-03,4-04
Turn-signal indication lamps 4-09
Turn-signal lever 4-14
Tyre repair kit 7-04
Tyres 8-14 Inflation pressures 8-15
Size (tyre and wheel) 9-06
Snow tyres 8-16
Tread wear indicators 8-16 Alphabetical index
3
OHAE13E1