2013 MITSUBISHI iMiEV service
[x] Cancel search: servicePage 169 of 258
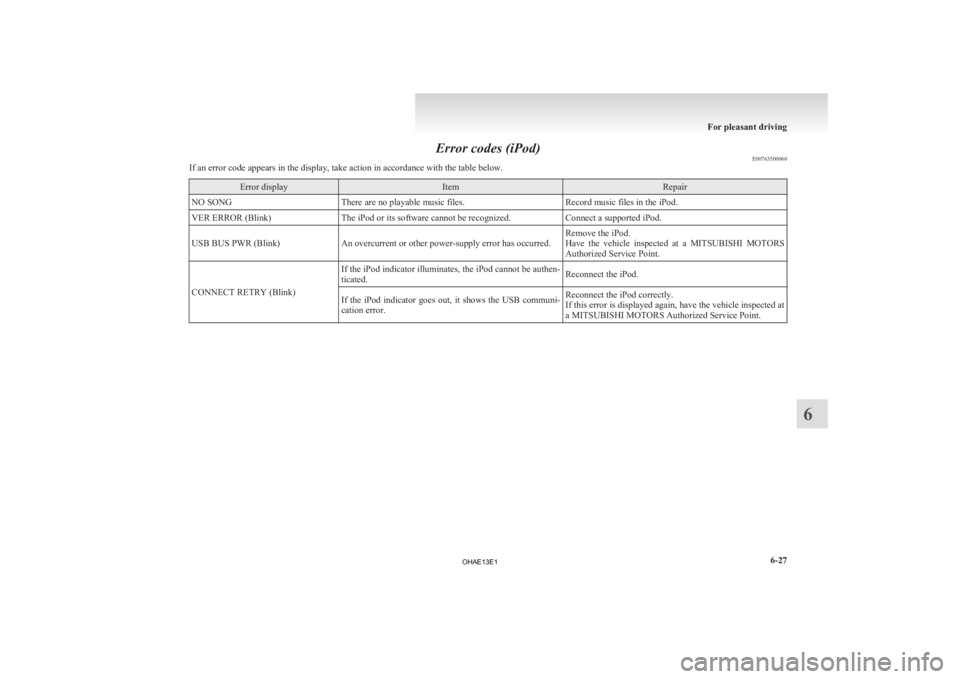
Error codes (iPod)
E00763500060
If an error code appears in the display, take action in accordance with the table below. Error display Item Repair
NO SONG There are no playable music files. Record music files in the iPod.
VER ERROR (Blink) The iPod or its software cannot be recognized. Connect a supported iPod.
USB BUS PWR (Blink) An overcurrent or other power-supply error has occurred. Remove the iPod.
Have
the vehicle inspected at a MITSUBISHI MOTORS
Authorized Service Point.
CONNECT RETRY (Blink) If the iPod indicator illuminates, the iPod cannot be authen-
ticated.
Reconnect the iPod.
If the iPod indicator goes out, it shows the USB communi-
cation error. Reconnect the iPod correctly.
If
this error is displayed again, have the vehicle inspected at
a MITSUBISHI MOTORS Authorized Service Point. For pleasant driving
6-27 6
OHAE13E1
Page 170 of 258
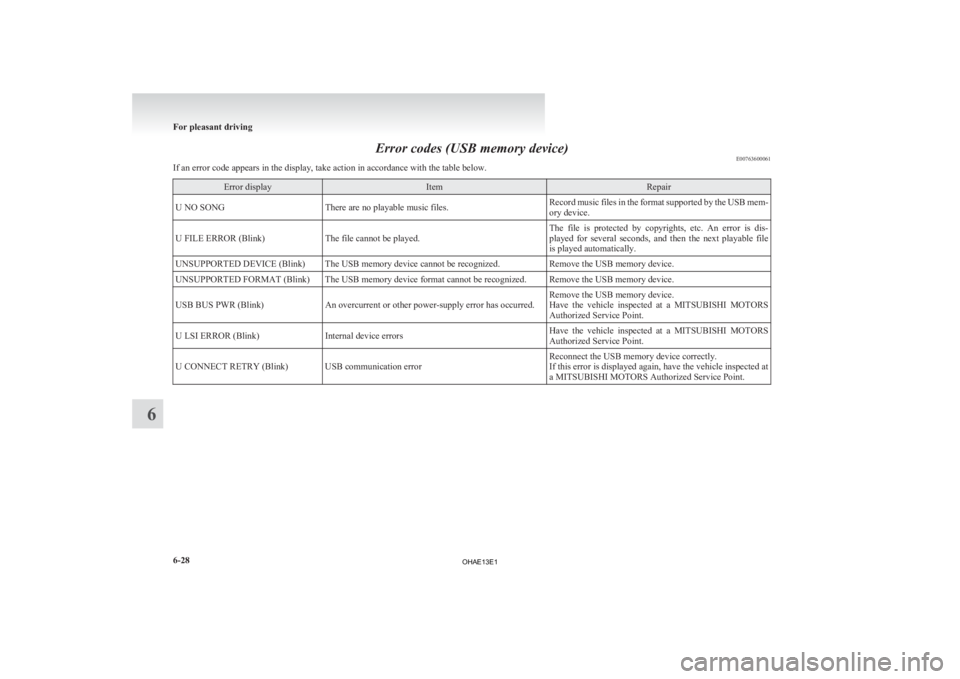
Error codes (USB memory device)
E00763600061
If an error code appears in the display, take action in accordance with the table below. Error display Item Repair
U NO SONG There are no playable music files. Record music files in the format supported by the USB mem-
ory device.
U FILE ERROR (Blink) The file cannot be played. The file is protected by copyrights, etc. An error is dis-
played
for several seconds, and then the next playable file
is played automatically.
UNSUPPORTED DEVICE (Blink) The USB memory device cannot be recognized. Remove the USB memory device.
UNSUPPORTED FORMAT (Blink) The USB memory device format cannot be recognized. Remove the USB memory device.
USB BUS PWR (Blink) An overcurrent or other power-supply error has occurred. Remove the USB memory device.
Have
the vehicle inspected at a MITSUBISHI MOTORS
Authorized Service Point.
U LSI ERROR (Blink) Internal device errors Have the vehicle inspected at a MITSUBISHI MOTORS
Authorized Service Point.
U CONNECT RETRY (Blink) USB communication error Reconnect the USB memory device correctly.
If
this error is displayed again, have the vehicle inspected at
a MITSUBISHI MOTORS Authorized Service Point. For pleasant driving
6-28
6
OHAE13E1
Page 172 of 258
l
The unit may not successfully play back a
CD-R/RW that was made by the combina-
tion of writing software, a CD recorder
(CD-R/RW drive) and a disc if they are in-
compatible with one another.
l This player cannot play the CD-R/RW discs
if the session is not closed.
l This player cannot play CD-R/RW discs
which contain other than CD-DA or MP3 da-
ta (Video CD, etc.).
l Be sure to observe the handling instructions
for the CD-R/RW disc. WARNING
l Operating
the CD player in a manner oth-
er than specifically instructed herein may
result in hazardous radiation exposure.
Do not remove the cover and attempt to
repair the CD player by yourself. There
are no user serviceable parts inside. In
case of malfunction, we recommend you
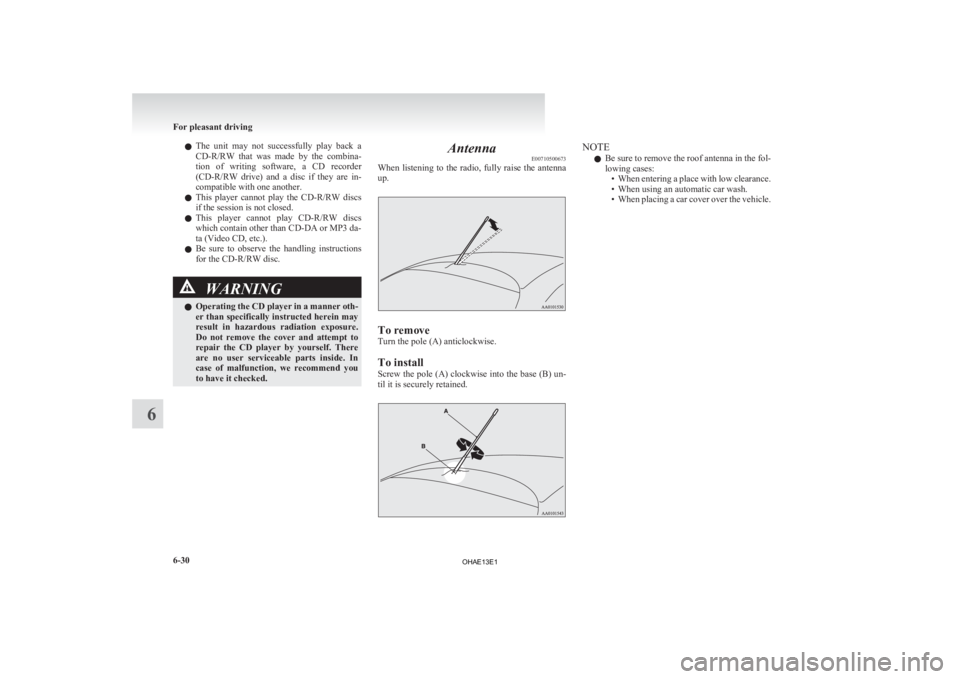
to have it checked. Antenna
E00710500673
When
listening to the radio, fully raise the antenna
up. To remove
Turn the pole (A) anticlockwise.
To install
Screw
the pole (A) clockwise into the base (B) un-
til it is securely retained. NOTE
l Be
sure to remove the roof antenna in the fol-
lowing cases: • When entering a place with low clearance.
• When using an automatic car wash.
• When placing a car cover over the vehicle. For pleasant driving
6-30
6
OHAE13E1
Page 179 of 258

Interior lamps
E007120012201- Room lamp (rear)
2-
Map & room lamps (front)
NOTE l If you leave the lamps on when the ready in-
dicator is not illuminated, you will run down
the auxiliary battery.
Before you leave the vehicle, make sure that
the lamps are turned off. Map & room lamps (front)
E00717300609
Room lamp 1- (DOOR)
lThe
lamp illuminates when a door or the
tailgate is opened. It goes off about 15 sec-
onds after the door or tailgate is closed
(delayed off function).
However, the lamp goes off immediately
in the following cases: • When the electric motor switch isturned to the “ON” position.
• When the central door lock function is used to lock the vehicle.
• When the remote control switch of the keyless entry system is used to
lock the vehicle.
l If the lamp is left switched on with the
electric motor switch in the “LOCK” or
“ACC” position and a door or the tailgate
is opened, it goes off automatically after
approximately 30 minutes.
The lamp will illuminate again after it au-
tomatically goes off in the following cases: • When
the electric motor switch is
turned to the “ON” position.
• When the remote control switch of the keyless entry system is operated.
• When any of the doors or the tailgate is opened after all doors and the tail-
gate are closed.
NOTE l When the key is removed while the doors
and tailgate are closed, the lamp is illumina-
ted and after about 15 seconds it goes off.
l The time until the lamp goes off (delayed
off) can be adjusted. For details, please con-
sult a MITSUBISHI MOTORS Authorized
Service Point.
l The auto cut-out function can be deactivated.
For details, please consult a MITSUBISHI
MOTORS Authorized Service Point.
2- The lamp stays off regardless of whether the
doors and tailgate are open or closed. For pleasant driving
6-37 6
OHAE13E1
Page 180 of 258

Map lamps
E00765200058
Regardless
of the position of the room lamp
switch, when the lens is pressed, the lamp on the
side that was pressed will illuminate. Press the lens
again to turn off the lamp. Room lamp (rear)
E007123003851- (ON)
The
lamp illuminates regardless of whether
the doors and tailgate are open or closed.
2- (•)
lThe
lamp illuminates when a door or the
tailgate is opened. It goes off about 15 sec-
onds after the door or tailgate is closed
(delayed off function).
However, the lamp goes off immediately
in the following cases: • When the electric motor switch isturned to the “ON” position.
• When the central door lock function is used to lock the vehicle.
• When the remote control switch of the keyless entry system is used to
lock the vehicle.
l If the lamp is left switched on with the
electric motor switch in the “LOCK” or
“ACC” position and a door or the tailgate
is opened, it goes off automatically after
approximately 30 minutes.
The lamp will illuminate again after it au-
tomatically goes off in the following cases:
• When the electric motor switch isturned to the “ON” position.
• When the remote control switch of the keyless entry system is operated.
• When any of the doors or the tailgate is opened after all doors and the tail-
gate are closed.
NOTE l When the key is removed while the doors
and tailgate are closed, the lamp is illumina-
ted and after about 15 seconds it goes off.
l The time until the lamp goes off (delayed
off) can be adjusted. For details, please con-
sult a MITSUBISHI MOTORS Authorized
Service Point. l
The auto cut-out function cannot be operated
when the room lamp switch is in the “ON”
position.
Also, this function can be deactivated. For de-
tails, please consult a MITSUBISHI
MOTORS Authorized Service Point.
3- (OFF) The lamp goes off regardless of whether the
doors and tailgate are open or closed. For pleasant driving
6-38
6
OHAE13E1
Page 186 of 258
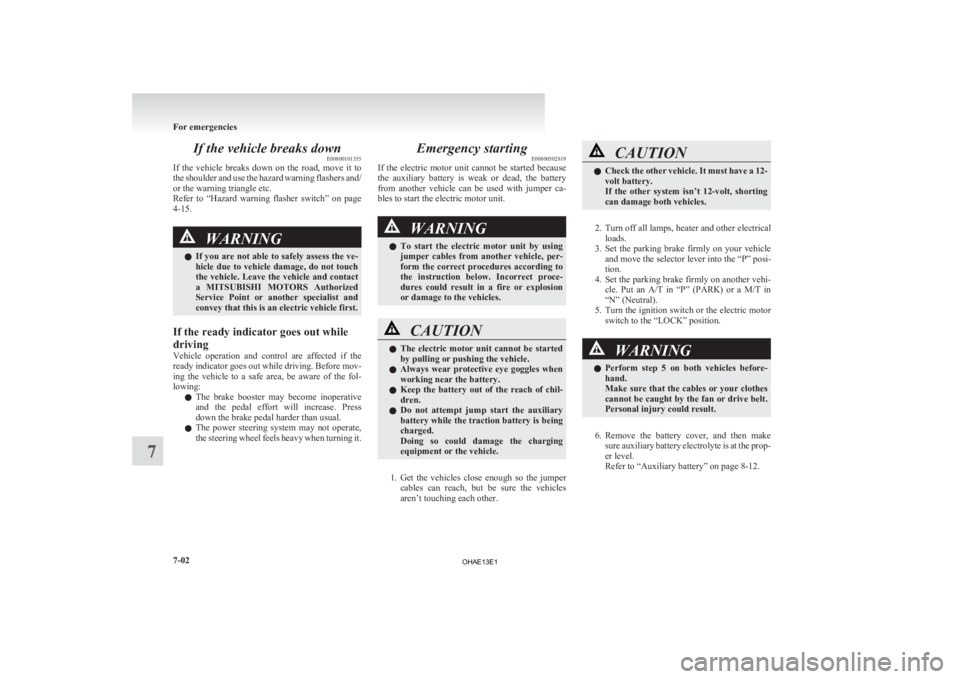
If the vehicle breaks down
E00800101355
If
the vehicle breaks down on the road, move it to
the shoulder and use the hazard warning flashers and/
or the warning triangle etc.
Refer to “Hazard warning flasher switch” on page
4-15. WARNING
l If
you are not able to safely assess the ve-
hicle due to vehicle damage, do not touch
the vehicle. Leave the vehicle and contact
a MITSUBISHI MOTORS Authorized
Service Point or another specialist and
convey that this is an electric vehicle first.
If the ready indicator goes out while
driving
Vehicle
operation and control are affected if the
ready indicator goes out while driving. Before mov-
ing the vehicle to a safe area, be aware of the fol-
lowing:
l The brake booster may become inoperative
and the pedal effort will increase. Press
down the brake pedal harder than usual.
l The power steering system may not operate,
the steering wheel feels heavy when turning it. Emergency starting
E00800502819
If
the electric motor unit cannot be started because
the auxiliary battery is weak or dead, the battery
from another vehicle can be used with jumper ca-
bles to start the electric motor unit. WARNING
l To
start the electric motor unit by using
jumper cables from another vehicle, per-
form the correct procedures according to
the instruction below. Incorrect proce-
dures could result in a fire or explosion
or damage to the vehicles. CAUTION
l
The
electric motor unit cannot be started
by pulling or pushing the vehicle.
l Always wear protective eye goggles when
working near the battery.
l Keep the battery out of the reach of chil-
dren.
l Do not attempt jump start the auxiliary
battery while the traction battery is being
charged.
Doing so could damage the charging
equipment or the vehicle.
1. Get
the vehicles close enough so the jumper cables can reach, but be sure the vehicles
aren’t touching each other. CAUTION
l
Check
the other vehicle. It must have a 12-
volt battery.
If the other system isn’t 12-volt, shorting
can damage both vehicles.
2. Turn
off all lamps, heater and other electrical loads.
3. Set the parking brake firmly on your vehicle and move the selector lever into the “P” posi-
tion.
4. Set the parking brake firmly on another vehi- cle. Put an A/T in “P” (PARK) or a M/T in
“N” (Neutral).
5. Turn the ignition switch or the electric motor switch to the “LOCK” position. WARNING
l Perform
step 5 on both vehicles before-
hand.
Make sure that the cables or your clothes
cannot be caught by the fan or drive belt.
Personal injury could result.
6. Remove
the battery cover, and then make sure auxiliary battery electrolyte is at the prop-
er level.
Refer to “Auxiliary battery” on page 8-12. For emergencies
7-02
7
OHAE13E1
Page 188 of 258

NOTE
l When
the regular charge connector is connec-
ted to the charge port, the charging indicator
is blinking. When charging is started, the
charging indicator is illuminated.
l The auxiliary battery is automatically charg-
ed while charging the traction battery.
13. Charge the traction battery for more than 1 hour.
14. Disconnect the charging cable. (Refer to “Regular charging” on page 1-08.)
15. Turn the electric motor switch to the “START” position, make sure that the ready
indicator on the instrument cluster is illumi-
nated.
If the ready indicator does not illuminate, per-
form the procedure again from step 7.
If charging cannot be performed, consult a
MITSUBISHI MOTORS Authorized Service
Point.
16. Refit the battery cover. (Refer to “Auxiliary battery” on page 8-12.) WARNING
l Do
not charge the auxiliary battery using
an external battery charger while the aux-
iliary battery is mounted in the vehicle.
Doing so could cause the auxiliary bat-
tery to catch fire and explode and could
result in damage to the vehicle.
l Keep sparks, cigarettes, and flames away
from the auxiliary battery because the bat-
tery may produce an explosion.
l Use adequate ventilation when charging
or using the auxiliary battery in an en-
closed space.
l Remove all the caps before charging the
auxiliary battery.
l Electrolyte is corrosive diluted sulphuric
acid.
If electrolyte (battery acid) comes into con-
tact with your hands, eyes, clothes and
the painted surface of your vehicle, it
should be thoroughly flushed with water.
If electrolyte gets in your eyes, flush them
with water immediately and thoroughly,
and get prompt medical attention.
NOTE l If
the electric motor unit is started without
fully charging the auxiliary battery, it might
cause the anti-lock brake warning lamp to il-
luminate. Refer to “Anti-lock brake system
(ABS)” on page 5-15. Tyre repair kit
E00800901311
This
kit enables emergency repair of a small punc-
ture in the tread area of a tyre that has run over a
nail, screw, or similar object.
Storage
The tyre repair kit is stowed under the rear seat cush-
ion. The storage location of the tyre repair kit
should be remembered in case of an emergency. 1- Tyre compressor
2-
Tyre repair set
3- Tyre sealant bottle
4- Filler hose
5- Extension hose (This hose is used for removal of sealant. It
is not used in emergency puncture repair.)
6- Valve insert (spare)
7- Valve remover
8- Speed restriction sticker For emergencies
7-04
7
OHAE13E1
Page 189 of 258
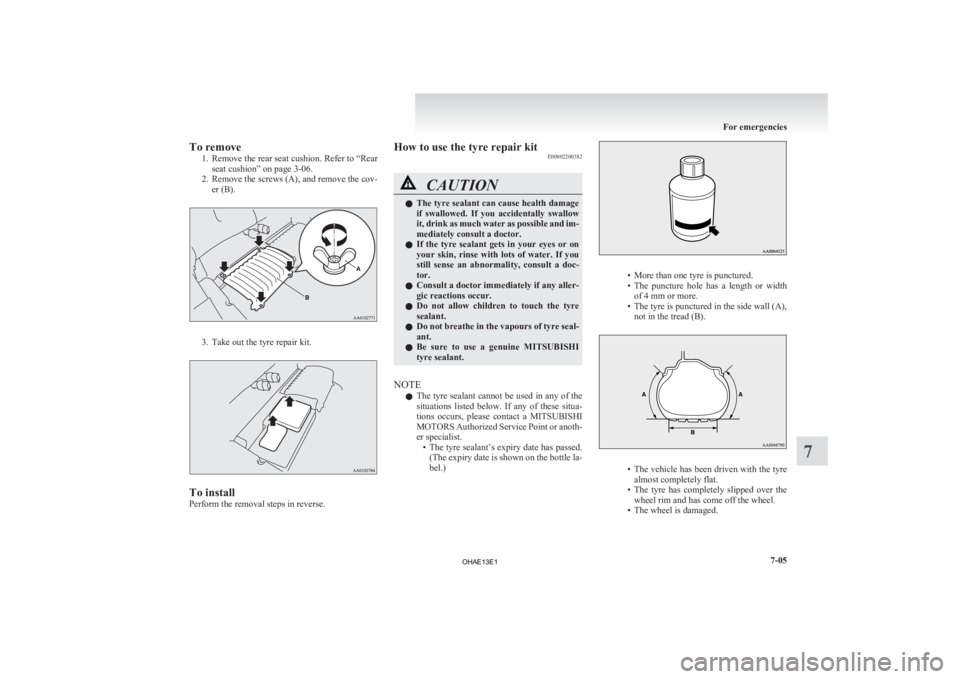
To remove
1. Remove the rear seat cushion. Refer to “Rear
seat cushion” on page 3-06.
2. Remove the screws (A), and remove the cov- er (B). 3. Take out the tyre repair kit.
To install
Perform the removal steps in reverse. How to use the tyre repair kit
E00802200382 CAUTION
l
The
tyre sealant can cause health damage
if swallowed. If you accidentally swallow
it, drink as much water as possible and im-
mediately consult a doctor.
l If the tyre sealant gets in your eyes or on
your skin, rinse with lots of water. If you
still sense an abnormality, consult a doc-
tor.
l Consult a doctor immediately if any aller-
gic reactions occur.
l Do not allow children to touch the tyre
sealant.
l Do not breathe in the vapours of tyre seal-
ant.
l Be sure to use a genuine MITSUBISHI
tyre sealant.
NOTE l The
tyre sealant cannot be used in any of the
situations listed below. If any of these situa-
tions occurs, please contact a MITSUBISHI
MOTORS Authorized Service Point or anoth-
er specialist. • The tyre sealant’s expiry date has passed.(The expiry date is shown on the bottle la-
bel.) • More than one tyre is punctured.
• The
puncture hole has a length or width
of 4 mm or more.
• The tyre is punctured in the side wall (A), not in the tread (B). • The
vehicle has been driven with the tyre
almost completely flat.
• The tyre has completely slipped over the wheel rim and has come off the wheel.
• The wheel is damaged. For emergencies
7-05 7
OHAE13E1