2013 MERCEDES-BENZ B-CLASS SPORTS wipers
[x] Cancel search: wipersPage 104 of 336
X
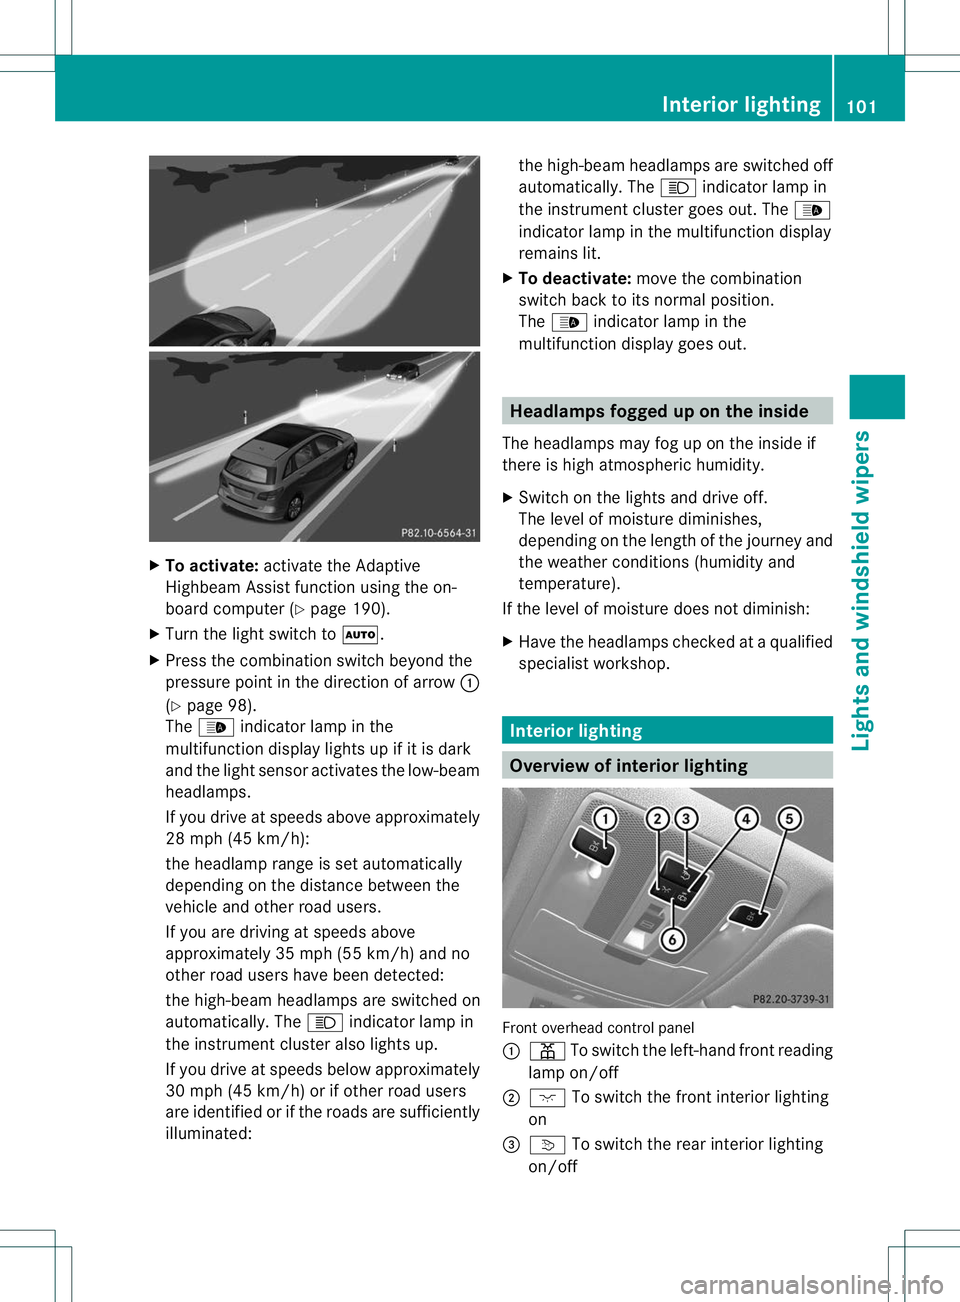
To activate: activate the Adaptive
Highbea mAssist function using the on-
board computer (Y page 190).
X Turn the light switch to Ã.
X Press the combination switch beyond the
pressure point in the direction of arrow :
(Y page 98).
The _ indicator lamp in the
multifunction display lights up if it is dark
and the light sensor activates the low-beam
headlamps.
If you drive at speeds above approximately
28 mph (45 km/h):
the headlamp range is set automatically
depending on the distance between the
vehicle and other road users.
If you are driving at speeds above
approximately 35 mph (55 km/h) and no
other road users have been detected:
the high-beam headlamps are switched on
automatically. The Kindicator lamp in
the instrument cluster also lights up.
If you drive at speeds below approximately
30 mph (45 km/h) or if other road users
are identified or if the roads are sufficiently
illuminated: the high-beam headlamps are switched off
automatically. The
Kindicator lamp in
the instrument cluster goes out. The _
indicator lamp in the multifunction display
remains lit.
X To deactivate: move the combination
switch back to its normal position.
The _ indicator lamp in the
multifunction display goes out. Headlamps fogged up on the inside
The headlamps may fog up on the inside if
there is high atmospheric humidity.
X Switch on the lights and drive off.
The level of moisture diminishes,
depending on the length of the journey and
the weather conditions (humidity and
temperature).
If the level of moisture does not diminish:
X Have the headlamps checked at a qualified
specialist workshop. Interior lighting
Overview of interior lighting
Front overhead control panel
:
p To switch the left-hand front reading
lamp on/off
; c To switch the front interior lighting
on
= v To switch the rear interior lighting
on/off Interior lighting
101Lights and windshield wipers Z
Page 105 of 336
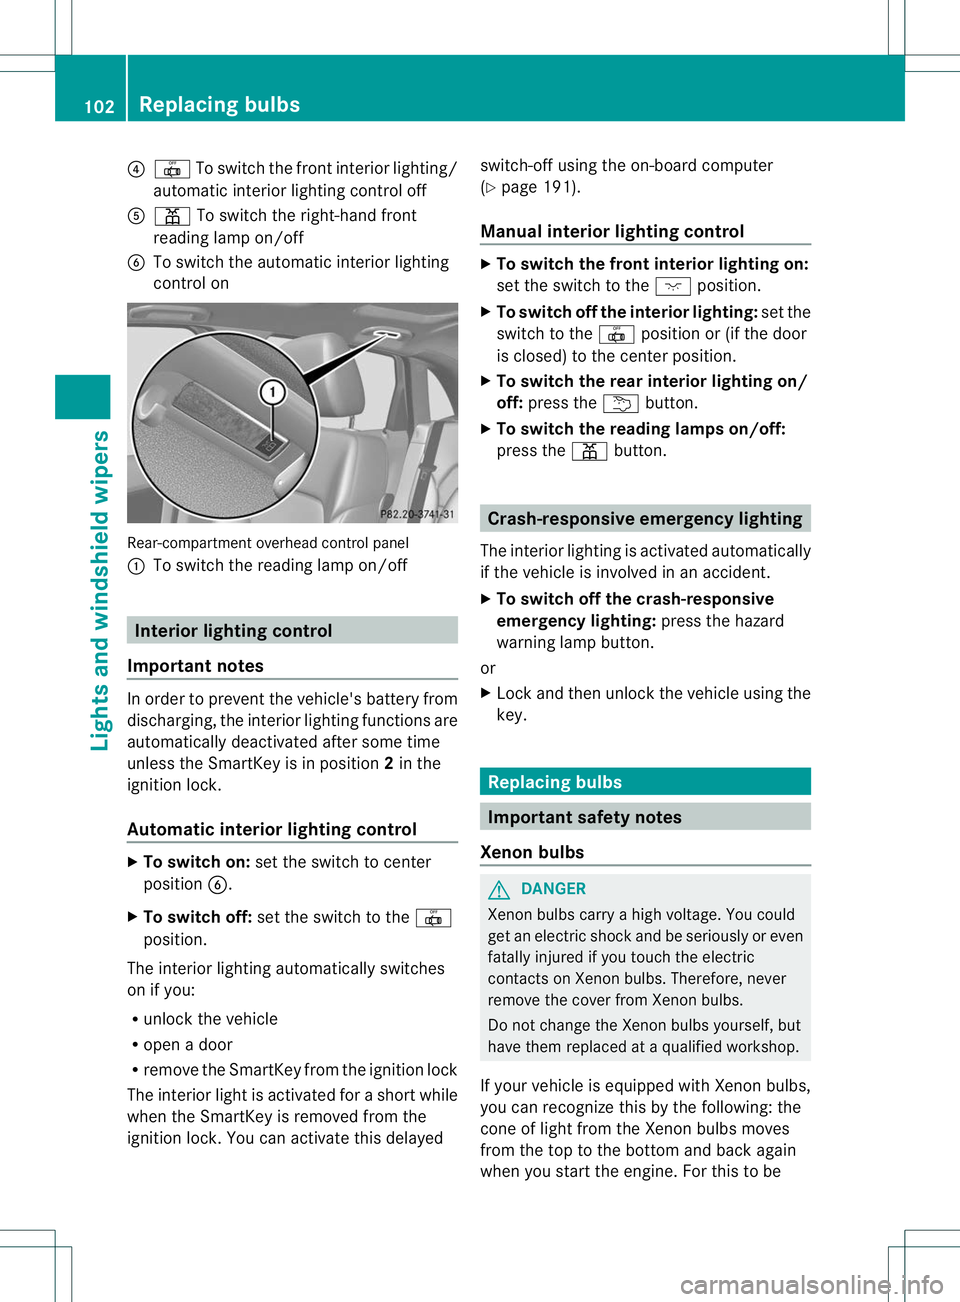
?
| To switch the fronti nterior lighting/
automatic interio rlighting control off
A p To switch the right-han dfront
reading lamp on/off
B To switch the automatic interior lighting
control on Rear-compartment overhead control panel
:
To switch the reading lamp on/off Interior lighting control
Important notes In order to prevent the vehicle's battery from
discharging, the interior lighting functions are
automatically deactivated after some time
unless the SmartKey is in position
2in the
ignitio nlock.
Automatic interior lighting control X
To switch on: set the switch to center
position B.
X To switch off: set the switch to the |
position.
The interior lighting automatically switches
on if you:
R unlock the vehicle
R open a door
R remove the SmartKey from the ignition lock
The interior light is activated for a short while
when the SmartKey is removed from the
ignition lock. You can activate this delayed switch-off using the on-board computer
(Y
page 191).
Manual interior lighting control X
To switch the front interior lighting on:
set the switch to the cposition.
X To switch off the interior lighting: set the
switch to the |position or (if the door
is closed) to the center position.
X To switch the rear interior lighting on/
off: press the ubutton.
X To switch the reading lamps on/off:
press the pbutton. Crash-responsive emergency lighting
The interior lighting is activated automatically
if the vehicle is involved in an accident.
X To switch off the crash-responsive
emergency lighting: press the hazard
warning lamp button.
or
X Lock and then unlock the vehicle using the
key. Replacing bulbs
Important safety notes
Xenon bulbs G
DANGER
Xenon bulbs carry a high voltage. You could
get an electric shock and be seriously or even
fatally injured if you touch the electric
contacts on Xenon bulbs. Therefore, never
remove the cover from Xenon bulbs.
Do not change the Xenon bulbs yourself, but
have them replaced at a qualified workshop.
If your vehicle is equipped with Xenon bulbs,
you can recognize this by the following: the
cone of light from the Xenon bulbs moves
from the top to the bottom and back again
when you start the engine. For this to be 102
Replacing bulbsLights and windshiel
dwipers
Page 106 of 336
observed, the lights must be switched on
before starting the engine.
Bulbs and lamps are an important aspect of
vehicle safety. You must therefore make sure
that these function correctly at all times.
Have the headlamp setting checked regularly.
Other bulbs
G
WARNING
Bulbs and lamps can become very hot. For
this reason, allow them to cool down before
changing them. Otherwise, you could burn
yourself when you touch them.
Keep bulbs out of the reach of children.
Otherwise, they could, for example, damage
the bulbs and injure themselves.
Never use a bulb which has been dropped.
Such a bulb may explode and injure you.
Halogen bulbs are pressurized and could
explode when you change them, especially if
they are very hot. You should therefore wear
eye protection and gloves when you are
changing them.
There are bulbs other than the Xenon bulbs
that you cannot replace. Replace only the
bulbs listed (Y page 103). Have the bulbs that
you cannot replace yourself changed at a
qualified specialist workshop.
If you require assistance changing bulbs,
consult a qualified specialist workshop.
Do not touch the glass tube of new bulbs with
your bare hands. Even minor contamination
can burn into the glass surface and reduce
the service life of the bulbs. Always use a lint-
free cloth or only touch the base of the bulb
when installing.
Only use bulbs of the correc ttype.
If the new bulb still does no tlight up, consult
a qualified specialist workshop.
Bulbs and lamps are an importan taspect of
vehicle safety. You must therefore make sure
that these function correctly at all times.
Have the headlamp setting checked regularly. Overview:c
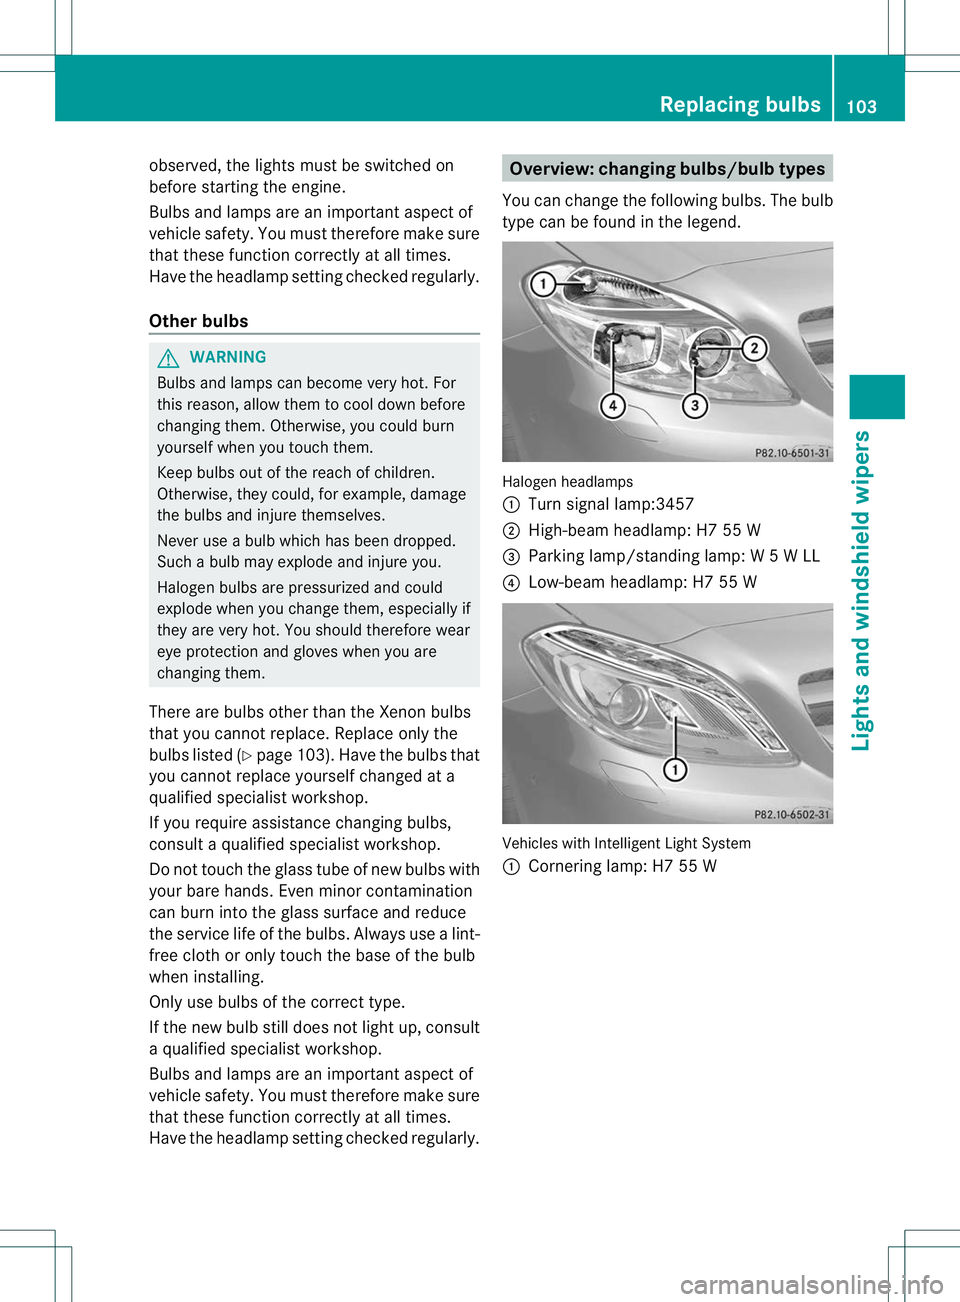
hanging bulbs/bulb types
You can change the following bulbs. The bulb
type can be found in the legend. Halogen headlamps
:
Turn signal lamp:3457
; High-beam headlamp: H7 55 W
= Parking lamp/standing lamp: W 5 W LL
? Low-beam headlamp: H7 55 W Vehicles with Intelligent Light System
:
Cornering lamp: H7 55 W Replacing bulbs
103Lights and windshield wipers Z
Page 107 of 336
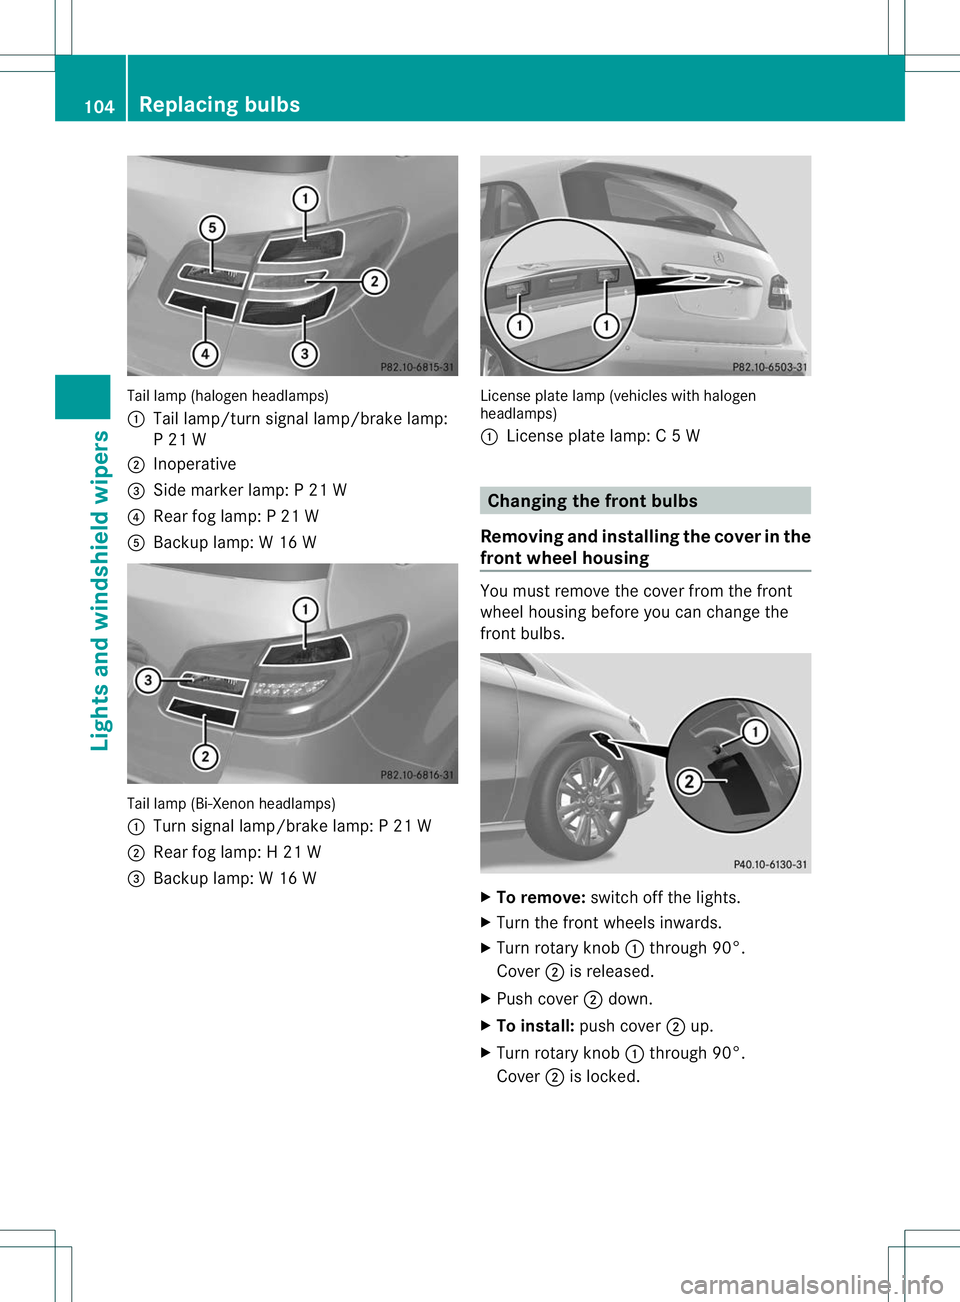
Tail lamp (halogen headlamps)
:
Tail lamp/turn signal lamp/brake lamp:
P 21 W
; Inoperative
= Side marker lamp: P 21 W
? Rear fog lamp: P 21 W
A Backup lamp: W 16 W Tail lamp (Bi-Xenon headlamps)
:
Turn signal lamp/brake lamp: P 21 W
; Rear fog lamp: H 21 W
= Backup lamp: W 16 W License plate lamp (vehicles with halogen
headlamps)
:
License plate lamp: C 5W Changing the front bulbs
Removing and installing th ecover in the
front wheel housing You must remove the cover from the front
wheel housing before you can change the
frontb
ulbs. X
To remove: switch off the lights.
X Turn the fron twheels inwards.
X Turn rotary knob :through 90°.
Cover ;is released.
X Push cover ;down.
X To install: push cover ;up.
X Turn rotary knob :through 90°.
Cover ;is locked. 104
Replacing bulbsLights and windshield wipers
Page 108 of 336
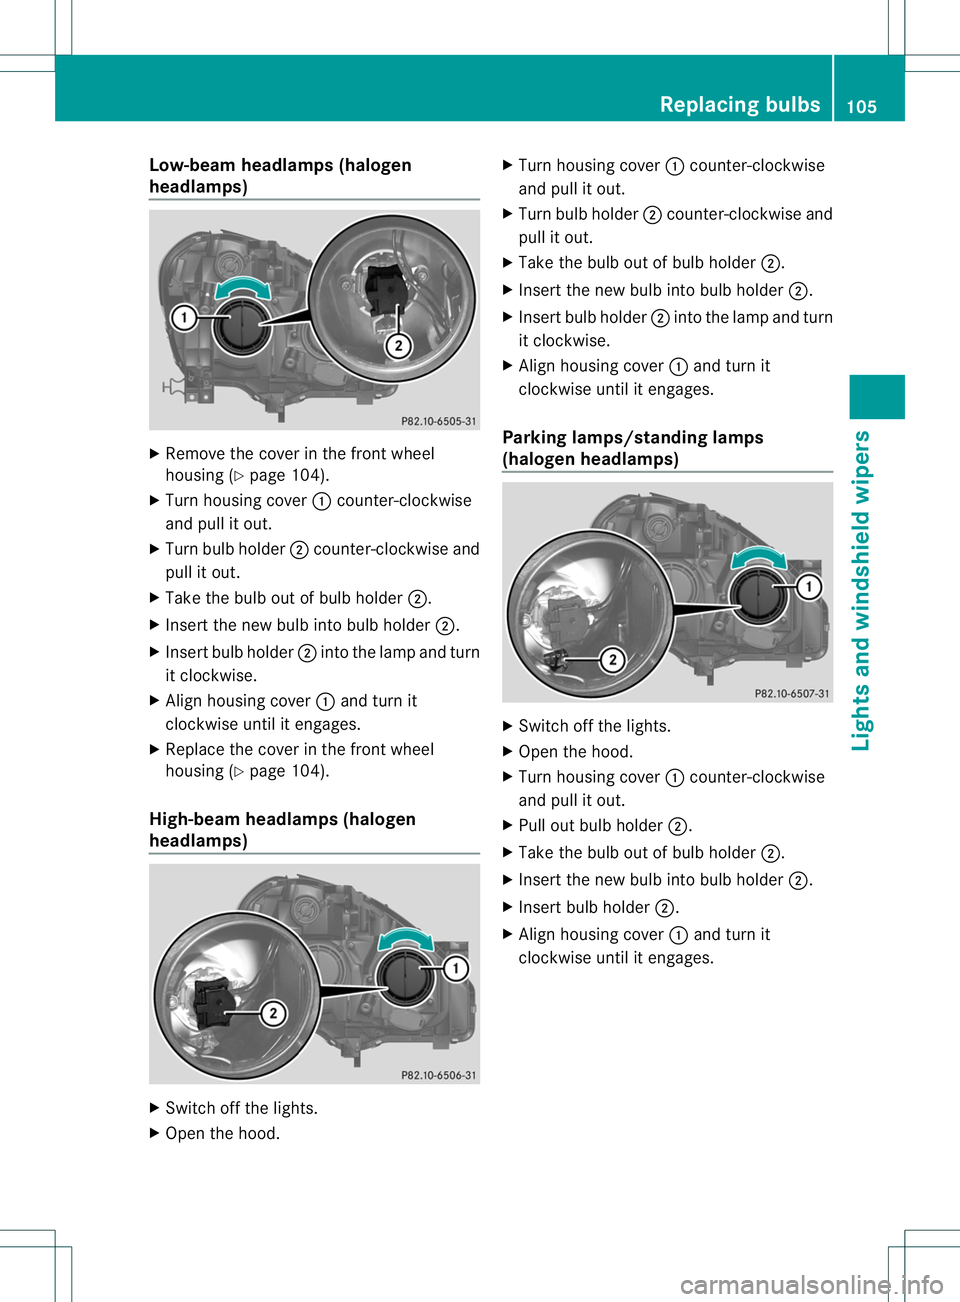
Low-bea
mheadlamps (halogen
headlamps) X
Remove the cover in the front wheel
housing (Y page 104).
X Turn housing cover :counter-clockwise
and pull it out.
X Turn bulb holder ;counter-clockwise and
pull it out.
X Take the bulb out of bulb holder ;.
X Inser tthe new bulb into bulb holder ;.
X Insert bulb holder ;into the lamp and turn
it clockwise.
X Align housing cover :and turn it
clockwise until it engages.
X Replace the cover in the front wheel
housing (Y page 104).
High-beam headlamps (halogen
headlamps) X
Switch off the lights.
X Open the hood. X
Turn housing cover :counter-clockwise
and pull it out.
X Turn bulb holder ;counter-clockwise and
pull it out.
X Take the bulb out of bulb holder ;.
X Insert the new bulb into bulb holder ;.
X Insert bulb holder ;into the lamp and turn
it clockwise.
X Align housing cover :and turn it
clockwise until it engages.
Parking lamps/standing lamps
(halogen headlamps) X
Switch off the lights.
X Open the hood.
X Turn housing cover :counter-clockwise
and pull it out.
X Pull out bulb holder ;.
X Take the bulb out of bulb holder ;.
X Insert the new bulb into bulb holder ;.
X Insert bulb holder ;.
X Align housing cover :and turn it
clockwise until it engages. Replacing bulbs
105Lights and windshield wipers Z
Page 109 of 336
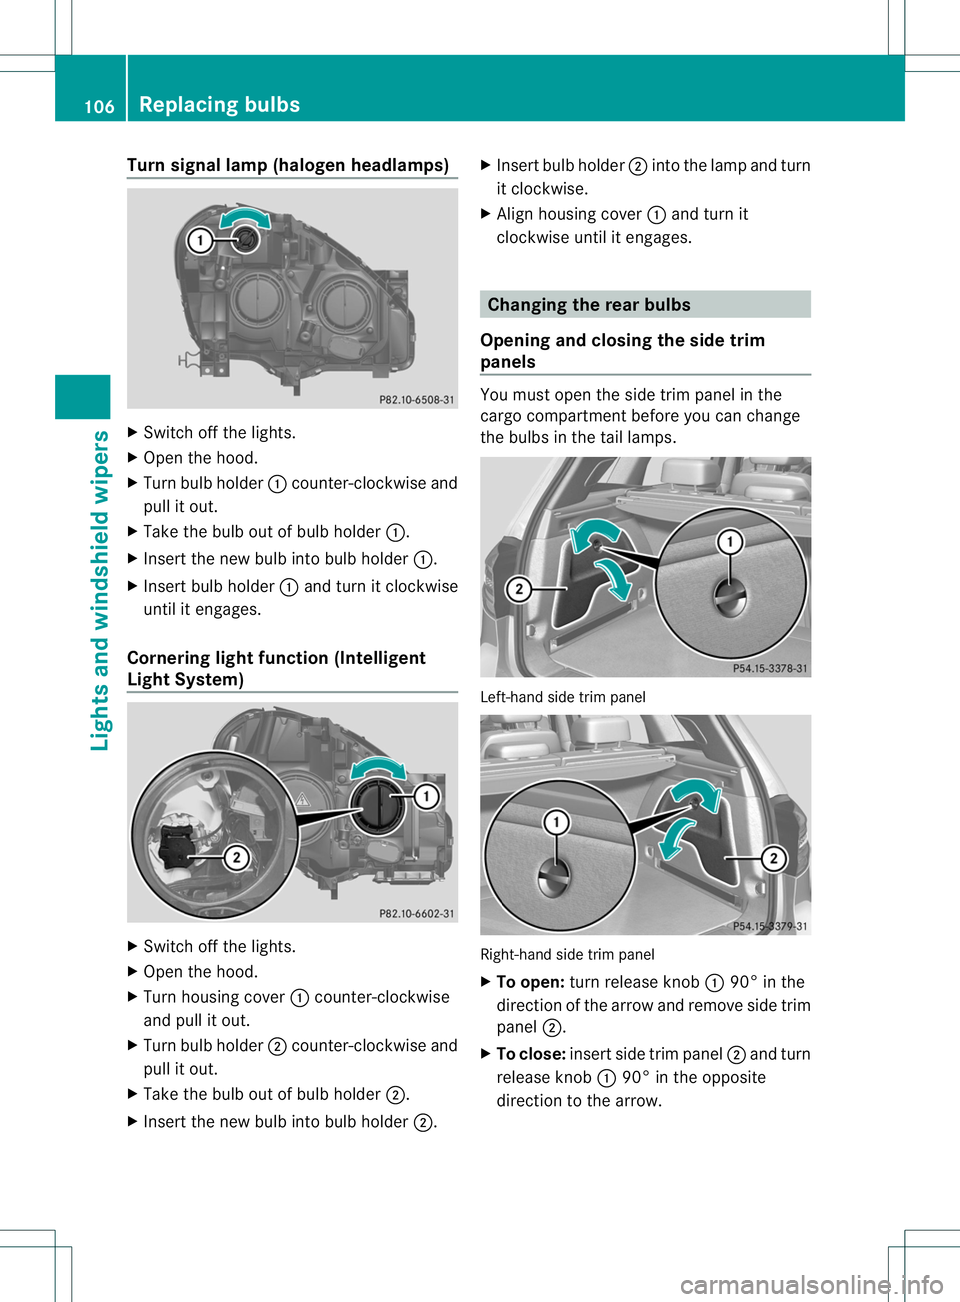
Turn signal lamp (halogen headlamps)
X
Switch off the lights.
X Open the hood.
X Turn bulb holder :counter-clockwise and
pull it out.
X Take the bulb ou tofbulb holder :.
X Inser tthe new bulb into bulb holder :.
X Insert bulb holder :and turn it clockwise
until it engages.
Cornering light function (Intelligent
Light System) X
Switch off the lights.
X Open the hood.
X Turn housing cover :counter-clockwise
and pull it out.
X Turn bulb holder ;counter-clockwise and
pull it out.
X Take the bulb out of bulb holder ;.
X Insert the new bulb into bulb holder ;.X
Insert bulb holder ;into the lamp and turn
it clockwise.
X Align housing cover :and turn it
clockwise until it engages. Changing the rear bulbs
Opening and closing the side trim
panels You must open the side trim panel in the
cargo compartment before you can change
the bulbs in the tail lamps.
Left-hand side trim panel
Right-hand side trim panel
X
To open: turn release knob :90° in the
direction of the arrow and remove side trim
panel ;.
X To close: insert side trim panel ;and turn
release knob :90° in the opposite
direction to the arrow. 106
Replacing bulbsLights and windshield wipers
Page 110 of 336
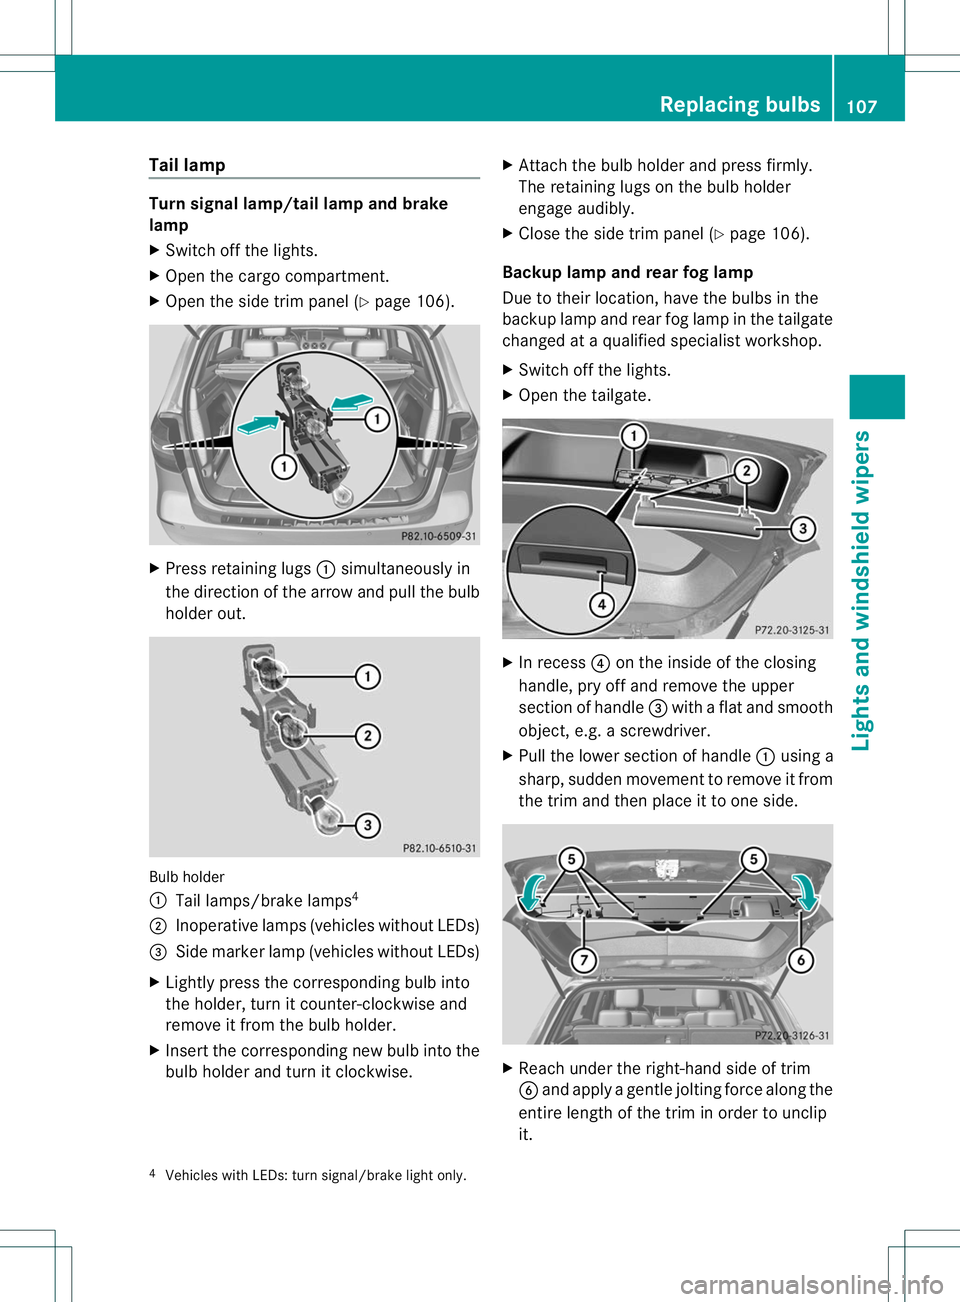
Tail lamp
Turn signal lamp/tail lamp and brake
lamp
X
Switch off the lights.
X Open the cargo compartment.
X Open the side trim panel (Y page 106).X
Press retaining lugs :simultaneously in
the direction of the arrow and pull the bulb
holde rout. Bulb holder
:
Tail lamps/brake lamps 4
; Inoperative lamps (vehicles without LEDs)
= Side marke rlamp (vehicle swithout LEDs)
X Lightly press the corresponding bulb into
the holder, tur nitcounter-clockwise and
remove it from the bulb holder.
X Insert the corresponding new bulb into the
bulb holder and turn it clockwise. X
Attach the bulb holder and press firmly.
The retaining lugs on the bulb holder
engage audibly.
X Close the side trim panel (Y page 106).
Backup lamp and rear fog lamp
Due to their location, have the bulbs in the
backup lamp and rear fog lamp in the tailgate
changed at a qualified specialist workshop.
X Switch off the lights.
X Open the tailgate. X
In recess ?on the inside of the closing
handle, pry off and remove the upper
section of handle =with a flat and smooth
object, e.g. a screwdriver.
X Pull the lower section of handle :using a
sharp, sudden movementtor emove it from
the trim and then place it to one side. X
Reach under the right-hand side of trim
B and apply a gentle jolting force along the
entire length of the trim in order to unclip
it.
4 Vehicles with LEDs: turn signal/brake light only. Replacing bulbs
107Lights and windshield wipers Z
Page 111 of 336
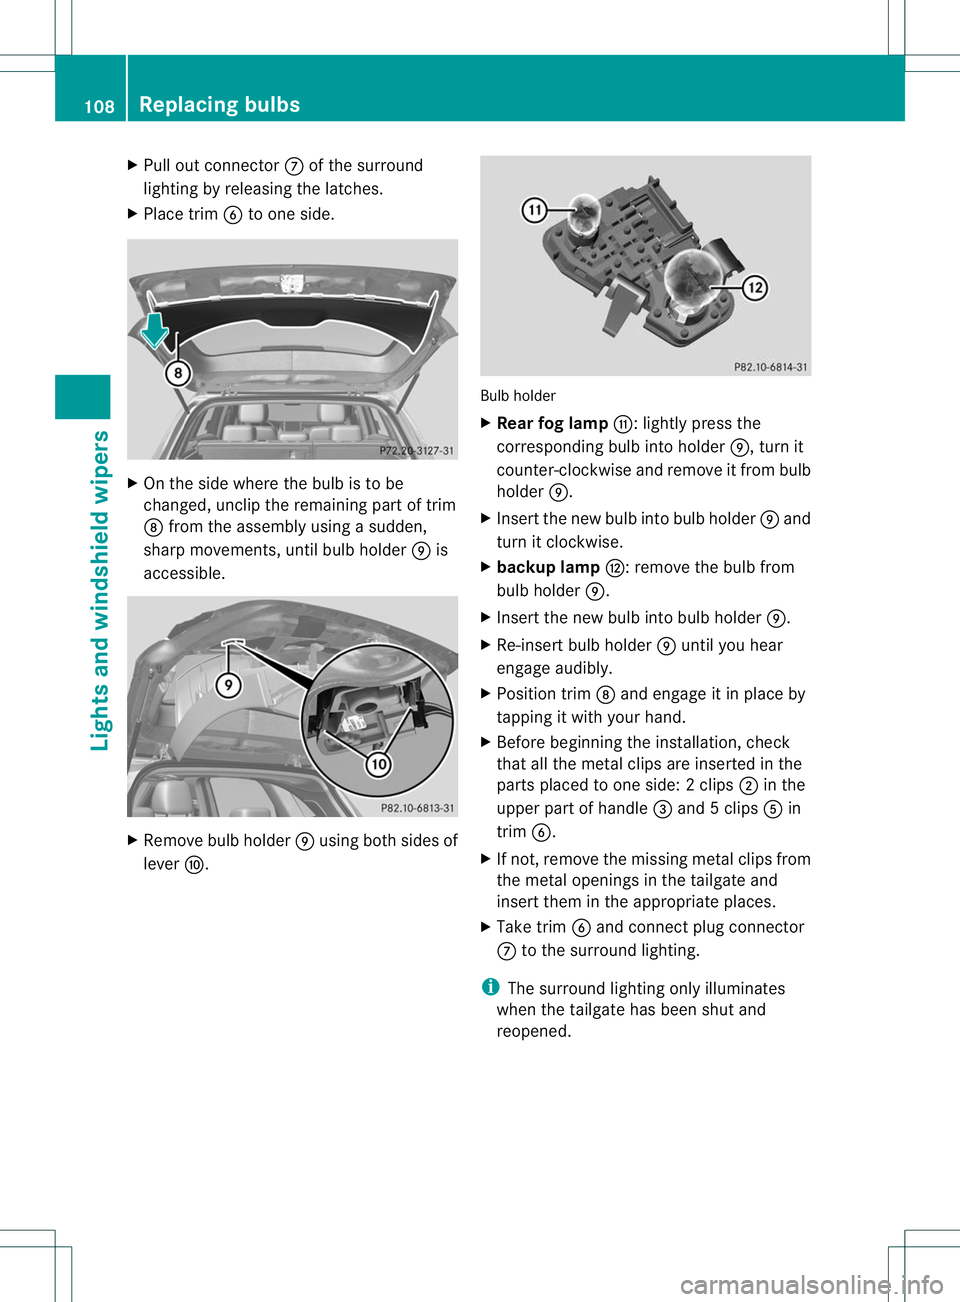
X
Pull out connector Cof the surround
lighting by releasing the latches.
X Place trim Bto one side. X
On the side where the bulb is to be
changed, unclip the remaining part of trim
D from the assembly using a sudden,
sharp movements, until bulb holder Eis
accessible. X
Remove bulb holder Eusing both sides of
lever F. Bulb holder
X
Rear fog lamp G:lightly press the
corresponding bulb into holder E, turn it
counter-clockwise and remove it fromb ulb
holder E.
X Inser tthe new bulb into bulb holder Eand
turn it clockwise.
X backup lamp H: remove the bulb from
bulb holder E.
X Insert the new bulb into bulb holder E.
X Re-insert bulb holder Euntil you hear
engage audibly.
X Position trim Dand engage it in place by
tapping it with your hand.
X Before beginning the installation, check
that all the metal clips are inserted in the
parts placed to one side: 2clips ;in the
upper part of handle =and 5clips Ain
trim B.
X If not, remove the missing metal clips from
the metal openings in the tailgate and
insert the minthe appropriate places.
X Take trim Band connect plug connector
C to the surround lighting.
i The surround lighting only illuminates
when the tailgate has been shut and
reopened. 108
Replacing bulbsLights and windshield wipers