2013 MERCEDES-BENZ B-CLASS SPORTS reset
[x] Cancel search: resetPage 7 of 336

1, 2, 3 ...
12 Vsocket
see Sockets A
ABS (Anti-lock Braking System) Display message ............................ 194
Function/notes ................................ 59
Important safety notes ....................59
Warning lamp ................................. 220
Activating/deactivating cooling
with air dehumidification .................118
Active Parking Assist Display message ............................ 211
Function/notes ............................. 165
Important safety notes ..................164
Active Service System
see ASSYST PLUS
ADAPTIVE BRAKE ................................. 64
Adaptive Brake Assist Display message ............................ 201
Function/notes ................................ 61
Adaptive brake lamps .........................63
Adaptive Highbeam Assist Display message ............................ 206
Function/notes ............................. 100
Switching on/off (on-board
computer) ...................................... 190
Additional speedometer ...................189
Additives (engine oil) ........................327
Airb ags
Deployment ..................................... 37
Front air bag (driver, front
passenger )....................................... 41
Important safety notes ....................39
Knee bag .......................................... 42
Safety guidelines ............................. 38
Side impact airb ag.......................... 42
Windo wcurtain air bag .................... 42
Air-conditioning system
see Climate control
Airv ents
Important safet ynotes .................. 123
Rea r............................................... 124
Setting ........................................... 123Setting the center air vents
...........123
Setting the side air vents ...............124
Alarm system
see ATA (Anti-Theft Alarm system)
Anti-loc kbraking system
see ABS (Anti-lock Braking System)
Anti-theft alarm system
see ATA (Anti-Theft Alarm system)
Anti-theft system
Interio rmotion sensor ..................... 66
Ashtray ............................................... 242
Assistance menu (on-board
computer) .......................................... 187
ASSYST PLUS Displaying a service message ........264
Hiding a service message ..............264
Notes ............................................. 264
Resetting the service interval
display. .......................................... 264
Service message ............................ 264
Special service requirements ......... 265
ATA (Anti-Theft Alarm system)
Activating/deactivating ...................65
Function .......................................... .65
Switching off the alarm ....................65
ATTENTIO NASSIST
Activating/deactivating .................188
Display message ............................ 209
Function/notes ............................. 171
Audio menu (on-board computer) ....185
Audio system see separate operating instructions
Authorized Centers
see Qualified specialist workshop
Authorized Mercedes-Benz Center
see Qualified specialist workshop
Authorized workshops
see Qualified specialist workshop
AUTO lights
Display message ............................ 205
see Lights
Automatic engine start (ECO start/
stop function) .................................... 129
Automatic engine switch-off (ECO
start/stop function) ..........................129
Automatic headlamp mode ................97 4
Index
Page 16 of 336

On-board computer
Assistance menu ........................... 187
Audi omenu ................................... 185
Convenience submenu ..................192
Displaying a service message ........264
Display messages ..........................193
Factory settings submenu .............192
Important safety notes ..................178
Lighting submenu .......................... 190
Menu overview .............................. 182
Message memory .......................... 193
Navigation menu ............................ 184
Operation ....................................... 180
Service menu ................................. 189
Settings menu ............................... 189
Standard display. ........................... 182
Telephone menu ............................ 186
Trip menu ...................................... 182
Vehicle submenu ........................... 191
Video DVD operation. ....................186
Opening and closing the side trim
panels ................................................. 106
Operating system see On-board computer
Outside temperature display ...........179
Overhead control panel ......................32
Override feature Rea rside windows ........................... 58 P
Pain tcode number ............................ 323
Paintwork (cleaning instructions) ...267
Panic alarm .......................................... 36
Panorama roof with power tilt/
sliding panel
Opening/closing the roller
sunblind ........................................... 81
Problem (malfunction) .....................82
Resetting ......................................... 81
Panorama sliding sunroof
Important safety notes ....................80
Parcel net ........................................... 233
Parking ............................................... 141
Important safety notes ..................141
Parking brake ................................ 142Position of exterior mirror, front-
passenger side ................................. 92
Rea
rview camera .......................... 168
see PARKTRONIC
Parking aid
Active Parking Assist .....................164
see Exterior mirrors
see PARKTRONIC
Parking brake
Display message ............................ 197
Electric parking brake ....................142
Warning lamp ................................. 225
Parking lamps
Switching on/off .............................. 98
Parking lamps (changing bulbs) ......105
PARKTRONIC Deactivating/activating .................163
Driving system ............................... 161
Function/notes ............................. 161
Important safety notes ..................161
Problem (malfunction) ...................164
Range of the sensors .....................162
Warning displa y............................. 162
PASSENGE RAIRBAG OFF indicator
lamp ...................................................... 50
Plastic trim (cleaning instructions) .269
Power washers .................................. 266
Power windows see Side windows
Product information ............................20
Program selector button ..................135
Protection of the environment General notes .................................. 20
Pulling away
Automatic transmission .................127 Q
Qualifie dspecialis tworkshop ...........23 R
Radar sensor system Activating/deactivating .................192
Display message ............................ 209
Radio
Selecting astation ......................... 185
see separate operating instructions Index
13
Page 18 of 336

Adjusting the 4-way lumbar
support
............................................ 88
Adjusting the head restraint ............87
Cleaning the cover .........................270
Correct driver's seat position ........... 84
Important safety notes ....................85
Seat heating problem ......................89
Storing settings (memory
function) .......................................... 93
Switching sea theating on/off .........89
Sensors (cleaning instructions) .......269
Service see ASSYST PLUS
Service menu (on-board computer) .189
Service products Brake fluid ..................................... 327
Coolant (engine) ............................ 327
Engine oil ....................................... 326
Fuel ................................................ 324
Important safety notes ..................324
Washer fluid .................................. .328
Service work
see ASSYST PLUS
Settings
Factory (on-board computer) .........192
On-board computer .......................189
Setting the air distribution ...............120
Setting the airflow ............................120
Side impact air bag .............................42
Side marker lamp (display
message) ............................................ 205
Side windows Cleaning ......................................... 268
Convenience closing feature ............78
Convenience opening feature ..........78
Important safety information ...........77
Opening/closing .............................. 78
Problem (malfunction) .....................79
Resetting ......................................... 79
Sliding sunroof
see Panorama roof with power
tilt/sliding panel
SmartKey
Changing the battery .......................70
Changing the programming .............69
Checking the battery .......................70
Convenience closing feature ............78
Convenience opening feature ..........78 Display message
............................ 218
Door central locking/unlocking .......68
Important safety notes ....................68
Loss ................................................. 72
Mechanical key ................................ 69
Positions (ignition lock) .................127
Problem (malfunction) .....................72
Starting the engine ........................127
SmartKey positions (ignition lock) ..127
Snow chains ...................................... 295
Sockets Center console .............................. 244
Luggage compartment ...................245
Points to observe before use .........244
Rea rcompartmen t......................... 245
Specialist workshop ............................ 23
Speed, controlling see Cruise control
Speedometer
Activating/deactivating the
additional speedometer .................189
Digita l............................................ 183
In the Instrument cluster .................27
Segments ...................................... 179
Selecting the unit of
measurement ................................ 189
see Instrument cluster
SRS (Supplemental Restraint
System)
Display message ............................ 201
Introduction ..................................... 37
Warning lamp ................................. 225
Warning lamp (function) ................... 37
Standing lamps
Changing bulbs .............................. 105
Display message ............................ 204
Switching on/off .............................. 98
Starting (engine) ................................ 127
STEE RCONTROL .................................. 64
Steering (display message) ..............217
Steering wheel Adjusting (manually). .......................89
Button overview ............................... 29
Buttons (on-board computer) ......... 180
Cleaning ......................................... 270
Important safety notes ....................89
Paddle shifters ............................... 136
Steering wheel paddle shifters ........136 Index
15
Page 21 of 336
Trip odometer
Calling up ....................................... 182
Resetting (on-board computer) ......183
Trunk
see Tailgate
Turn signals
Changing bulbs (front) ...................106
Changing bulbs (rear) ....................107
Display message ............................ 203
Switching on/off .............................. 98
Type identification plate
see Vehicle identification plate U
Unlocking Emergency unlocking .......................75
From inside the vehicle (central
unlocking button) ............................. 74V
Vanity mirror (in the sun visor) ........242
Vehicle Correct use ...................................... 24
Data acquisition ............................... 24
Equipment ....................................... 21
Individua lsettings .......................... 189
Limited Warranty ............................. 24
Loading .......................................... 300
Locking (in an emergency) ...............75
Locking (SmartKey) .......................... 68
Lowering ........................................ 315
Maintenance .................................... 21
Parking for a long period ................ 144
Pulling away ................................... 127
Raising ........................................... 313
Reporting problems .........................24
Securing from rolling away ............313
Towing away .................................. 285
Tow-starting ................................... 285
Transporting .................................. 287
Unlocking (in an emergency) ...........75
Unlocking (SmartKey) ......................68
Vehicle data ................................... 329
Vehicle data ....................................... 329
Vehicle dimensions ...........................329
Vehicle emergency locking ................75Vehicle identification number
see VIN
Vehicle identification plate ..............323
Vehicle tool kit .................................. 274
Video (DVD) ........................................ 186
VIN ...................................................... 323 W
Warning and indicator lamps ABS ................................................ 220
Brakes ........................................... 220
Check Engine ................................. 226
Coolant .......................................... 226
Distance warning ........................... 228
DISTRONI CPLUS ........................... 228
ESP ®
.............................................. 222
ESP ®
OFF ....................................... 223
Fuel tank ........................................ 226
Overview .......................................... 28
PASSENGER AIRBAG OFF ................50
Reserve fuel ................................... 226
Seat belt. ....................................... 218
SRS ................................................ 225
Warranty ............................................ 323
Washer fluid Display message ............................ 217
Wheel bol ttightening torque ...........315
Wheel chock ...................................... 313
Wheels Changing awheel .......................... 312
Checking ........................................ 293
Cleaning ......................................... 267
Cleaning (warning) .........................312
Emergency spare wheel .................318
Important safety notes ..................292
Interchanging/changing ................312
Mounting anew wheel ................... 315
Mounting awheel .......................... 312
Removing awheel .......................... 315
Storing ........................................... 312
Tightening torque ........................... 315
Whee lsize/tir esize ....................... 316
Window curtain air bag
Display message ............................ 202
Operation ........................................ .42
Windows
see Side windows 18
Index
Page 26 of 336
If you feel a sudden significant vibratio
nor
ride disturbance, or you suspect that damage
to yourv ehicle has occurred:
R turn on your hazard warning flashers.
R slow down carefully.
R drive with caution to an area which is a safe
distance from the road.
Inspec tthe vehicle underbody and tires/
wheels for possible damage. If the vehicle
appears unsafe, have it towed to the nearest
authorized Mercedes-Ben zCenter or other
qualified maintenance or repair facility for
further inspection or repairs. Declarations of conformity
Vehicle components which receive
and/or transmit radio waves USA:
"The wireless devices of this vehicle
comply with Part 15 of the FCC Rules.
Operation is subject to the following two
conditions :1) These devices may not cause
harmful interference, and 2) These devices
must accept any interference received,
including interference that may cause
undesired operation. Changes or
modifications not expressly approved by the
party responsible for compliance could void
the user’s authority to operate the
equipment."
Canada: "The wireless devices of this vehicle
comply with Industry Canada license-exempt
RSS standard(s). Operation is subjec tto the
following two conditions: (1) These devices
may not cause interference, and (2) These
devices must accept any interference,
including interference that may cause
undesired operation of the device." Diagnostics connection
G
WARNING
If you connect equipment to the on-board
diagnostics connection, it can affect the operation of the vehicle systems. This can
impair the operating safety of your vehicle
while driving. There is a risk of an accident.
Do not connect any equipment to the on-
board diagnostics connection.
G
WARNING
Loose equipment or equipment cables which
are connected to the on-board diagnostics
connection can obstruct the area around the
pedals. The equipment or the cables could
come between the pedals in the event of
sudden braking or acceleration. This may
affect the function of the pedals. There is a
risk of an accident.
Do not attach any equipment or cables in the
driver's footwell.
! If the engine is switched off and
equipment on the diagnostics connection
is used, the starter battery may discharge.
The diagnostics connection is only intended
for the connection of diagnostic equipment at
a qualified specialist workshop.
Connecting equipment to the diagnostics
connection can, for example, lead to
emissions monitoring information being
reset. This may lead to the vehicle failing to
meet the requirements of the next emissions
test during the main inspection. Qualified specialist workshop
An authorized Mercedes-Benz Center is a
qualified specialist workshop. It has the
necessary specialist knowledge, tools and
qualifications to correctly carry out the work
required on your vehicle. This is especially the
case for work relevant to safety.
Observe the notes in the Maintenance
Booklet.
Always have the following work carried out at
an authorized Mercedes-Benz Center:
R work relevant to safety
R service and maintenance work Introduction
23 Z
Page 47 of 336
Columbia, the U.S. territories and all
Canadian provinces.
Even where this is nott
he case, all vehicle
occupants should have their seat belts
fastened when the vehicle is in motion.
i See "Children in the vehicle"
(Y page 47) for further information on
infants and children traveling in the vehicle
as well as on child restraint systems.
Proper use of the seat belts G
WARNING
USE SEAT BELTS PROPERLY
R Seat belts can only work when used
properly. Never wear seat belts in any other
way than as described in this section, as
that could result in serious injuries in the
event of an accident.
R Each occupant should wear their seat belt
at all times, because seat belts help reduce
the likelihood of and potential severity of
injuries in accidents, including rollovers.
The integrated restraint system includes
SRS (driver front air bag, driver's side knee
bag, front-passenger front air bag, side
impact air bags, window curtain air bags for
the side windows), Emergency Tensioning
Devices, seat belt force limiters, and front
seat knee bolsters.
The system is designed to enhance the
protection offered to properly belted
occupants in certain frontal (front air bags,
driver's side knee bag and ETDs) and side
(side impact air bags, window curtain air
bags, and ETDs) impacts which exceed
preset deployment thresholds and in
certain rollovers (window curtain air bags
and ETDs).
R Never wear the shoulder belt under your
arm, across your neck or off your shoulder.
In a frontal crash, your body would move
too far forward. That would increase the
chance of head and neck injuries. The seat
belt would also apply too much force to the
ribs or abdomen, which could severely injure internal organs such as your liver or
spleen.
Adjust the seat belt so that the shoulder
section is located as close as possible to
the middle of the shoulder. It should not
touch the neck.N
ever pass the shoulder
portion of the seat belt under your arm. For
this purpose, you can adjust the height of
the seat belt outlet.
R Position the lap belt as low as possible on
your hips and not across the abdomen. If
the lap belt is positioned across your
abdomen, it could cause serious injuries in
a crash.
R Never wear seat belts over rigid or
breakable objects in or on your clothing,
such as eyeglasses, pens, keys etc., as
these might cause injuries.
R Make sure the seat belt is always fitted
snugly. Take special care of this when
wearing loose clothing.
R Never use a seat belt for more than one
person at a time. Do not fasten a seat belt
around a person and another person or
other objects at the same time.
R Seat belts should not be worn twisted. In a
crash, you would not have the full width of
the seat belt to distribut eimpact forces.
The twisted seat belt against yourb ody
could cause injuries.
R Pregnant women should also always use a
lap-shoulder belt. The lap belt portion
should be positioned as low as possible on
the hips to avoid any possible pressure on
the abdomen.
R Place the seat backrest in a position that is
as upright as possible.
R Check your seat belt during travel to make
sure it is properly positioned.
R Never place your feet on the instrument
panel, dashboard, or on the seat. Always
keep both feet on the floor in front of the
seat.
R When using a seat belt to secure infant
restraints, toddler restraints, or children in 44
Occupant safetySafety
Page 82 of 336
On vehicles with a panorama roof with power
tilt/sliding panel, you can then close the
roller sunblinds.
i
The SmartKey must be close to the
driver's door handle.
X Point the tip of the SmartKey at the driver's
door handle.
X Press and hold the &button until the
side windows and the panorama roof with
power tilt/sliding panel are fully closed.
X Make sure that all the side windows and the
panorama roof with power tilt/sliding
panel are closed.
On vehicles with a panorama roof with power
tilt/sliding panel:
X Press and hold the &button againu ntil
the rolle rsunblinds of th epanorama roof
with power tilt/sliding panel close.
X To interrup tconvenience closing:
release the &button. Resetting the side windows
You must rese teach side window if:
R the side window opens again slightly after
being closed fully.
R the side window can no longer be fully
opened or closed.
X Close all the doors.
X Turn the SmartKey to position 1or 2in the
ignition lock.
X Pull the corresponding switch on the door
control panel until the side window is
completely closed (Y page 78).
X Hold the switch for an additional second.
If the side window opens again slightly:
X Immediately pull the corresponding switch
on the door control panel until the side
window is completely closed (Y page 78).
X Hold the switch for an additional second.
X If the corresponding side window remains
closed after the butto nhas been released, the side window has been reset correctly.
If this is nott
he case, repeat the steps
above again. Problems with the side windows
G
WARNING
Closing the side windows with increased force
or without the anti-entrapment feature could
lead to serious or even fatal injury. Make sure
that nobody can become trapped when
closing the side windows. G
WARNING
Pulling and holding the switch to close the
door window immediately after it had been
blocked two times will cause the door window
to close without the anti-entrapment feature
for as long as you hold the switch.
Problem: aside window cannot be closed
because it is blocked by objects, e.g.
leaves in the window guide.
X Remove the objects.
X Close the side window.
Problem :aside window cannot be closed
and you cannot see the cause. If a side
window is obstructed during closing and
reopens again slightly:
X Immediately afte rthe window blocks, pull
the corresponding switch again until the
side window has closed.
The side window is closed with increased
force.
If a side window is obstructed again during
closing and reopens again slightly:
X Immediately after the window blocks, pull
the corresponding switch again until the
side window has closed.
The side window is closed without the anti-
entrapment feature. Side windows
79Opening/closing Z
Page 84 of 336
The automatic raising feature is available
only when the panorama roof with power
tilt/sliding panel is closed.
i You can continue to operate the
panorama roof with power tilt/sliding
panel after switching off the engine or
removing the SmartKey. This function
remains active for five minutes or until you
open a front door. Operating the roller sunblinds for the
panorama roof with power tilt/sliding
panel
Important safety notes G
WARNING
When opening or closing the roller sunblinds,
make sure that no one can be injured.
The roller sunblinds have automatic operation
and an anti-entrapment feature. If the roller
sunblinds are blocked during the closing
procedure, the anti-entrapment feature stops
the roller sunblinds and they open again
slightly.
The opening and closing of the roller
sunblinds can be terminated immediately by
releasing the button .Inautomatic operation,
press the butto nbriefly in any directio nto
stop the roller sunblinds.
The roller sunblinds shield the vehicle interior
from sunlight. The two roller sunblinds can
only be opened and closed together when the
panorama roof with power tilt/sliding panel
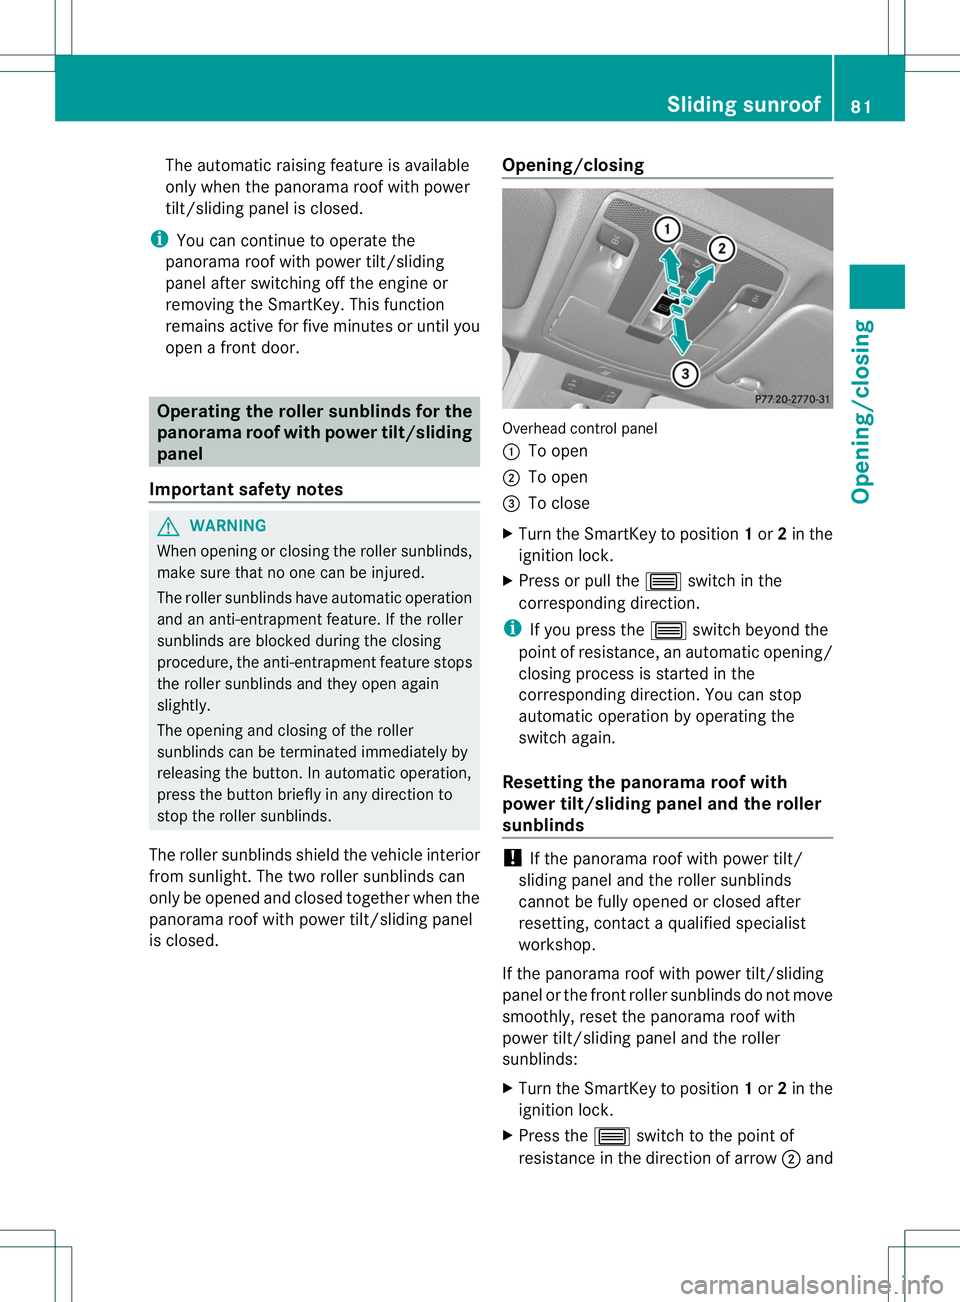
is closed. Opening/closing Overhead control panel
:
To open
; To open
= To close
X Turn the SmartKey to position 1or 2in the
ignition lock.
X Press or pull the 3switch in the
corresponding direction.
i If you press the 3switch beyond the
point of resistance, an automatic opening/
closing process is started in the
corresponding direction. You can stop
automatic operation by operating the
switch again.
Resetting the panorama roof with
power tilt/sliding panel and the roller
sunblinds !
If the panorama roof with power tilt/
sliding panel and the roller sunblinds
cannot be fully opened or closed after
resetting, contact a qualified specialist
workshop.
If the panorama roof with power tilt/sliding
panel or the front roller sunblinds do not move
smoothly, reset the panorama roof with
power tilt/sliding panel and the roller
sunblinds:
X Turn the SmartKey to position 1or 2in the
ignition lock.
X Press the 3switch to the point of
resistance in the direction of arrow ;and Sliding sunroof
81Opening/closing Z