2013 MERCEDES-BENZ B-CLASS SPORTS turn signal
[x] Cancel search: turn signalPage 106 of 336
observed, the lights must be switched on
before starting the engine.
Bulbs and lamps are an important aspect of
vehicle safety. You must therefore make sure
that these function correctly at all times.
Have the headlamp setting checked regularly.
Other bulbs
G
WARNING
Bulbs and lamps can become very hot. For
this reason, allow them to cool down before
changing them. Otherwise, you could burn
yourself when you touch them.
Keep bulbs out of the reach of children.
Otherwise, they could, for example, damage
the bulbs and injure themselves.
Never use a bulb which has been dropped.
Such a bulb may explode and injure you.
Halogen bulbs are pressurized and could
explode when you change them, especially if
they are very hot. You should therefore wear
eye protection and gloves when you are
changing them.
There are bulbs other than the Xenon bulbs
that you cannot replace. Replace only the
bulbs listed (Y page 103). Have the bulbs that
you cannot replace yourself changed at a
qualified specialist workshop.
If you require assistance changing bulbs,
consult a qualified specialist workshop.
Do not touch the glass tube of new bulbs with
your bare hands. Even minor contamination
can burn into the glass surface and reduce
the service life of the bulbs. Always use a lint-
free cloth or only touch the base of the bulb
when installing.
Only use bulbs of the correc ttype.
If the new bulb still does no tlight up, consult
a qualified specialist workshop.
Bulbs and lamps are an importan taspect of
vehicle safety. You must therefore make sure
that these function correctly at all times.
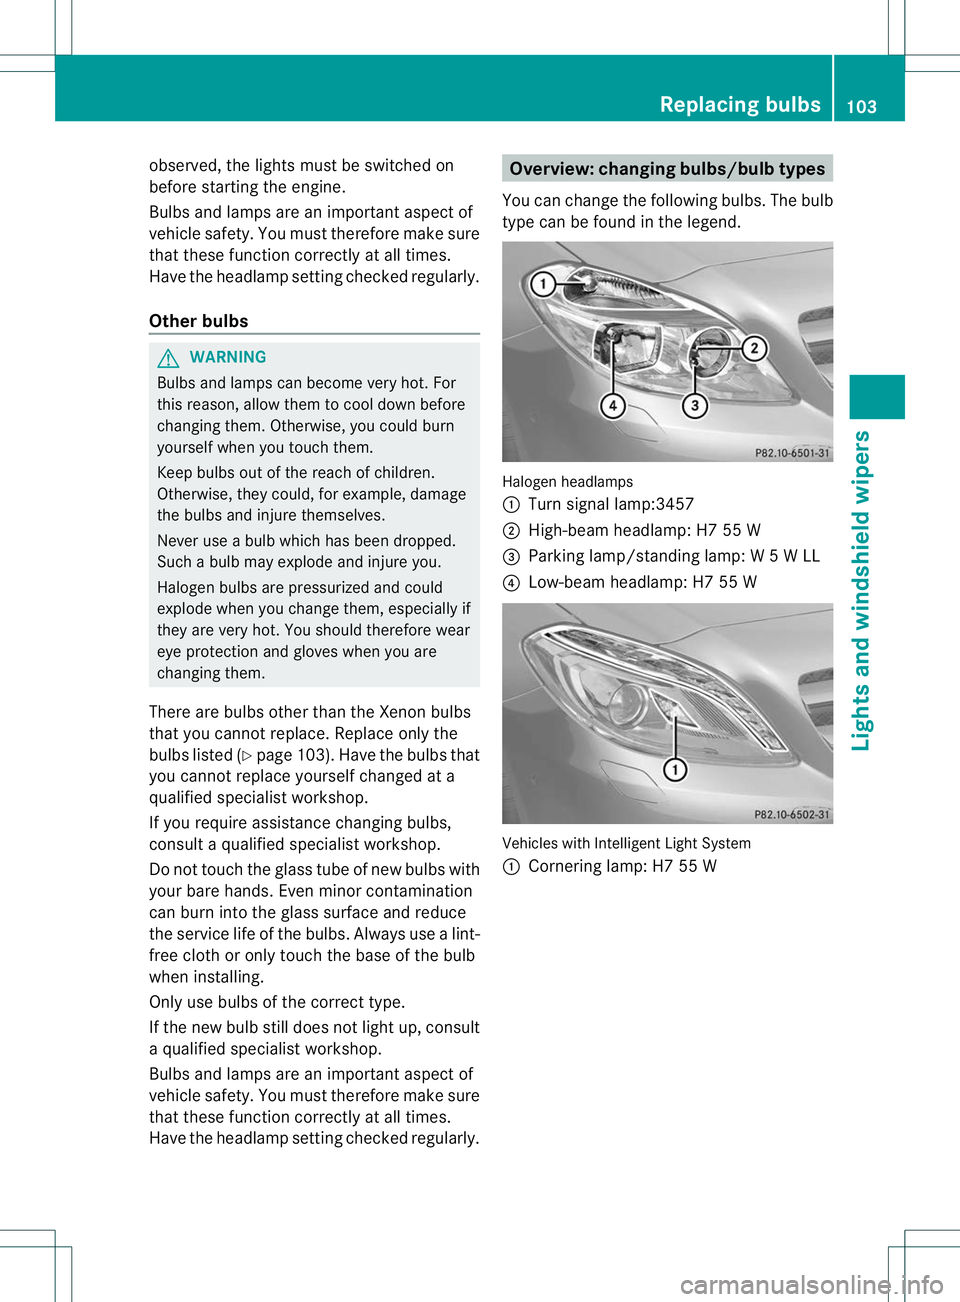
Have the headlamp setting checked regularly. Overview:c
hanging bulbs/bulb types
You can change the following bulbs. The bulb
type can be found in the legend. Halogen headlamps
:
Turn signal lamp:3457
; High-beam headlamp: H7 55 W
= Parking lamp/standing lamp: W 5 W LL
? Low-beam headlamp: H7 55 W Vehicles with Intelligent Light System
:
Cornering lamp: H7 55 W Replacing bulbs
103Lights and windshield wipers Z
Page 107 of 336
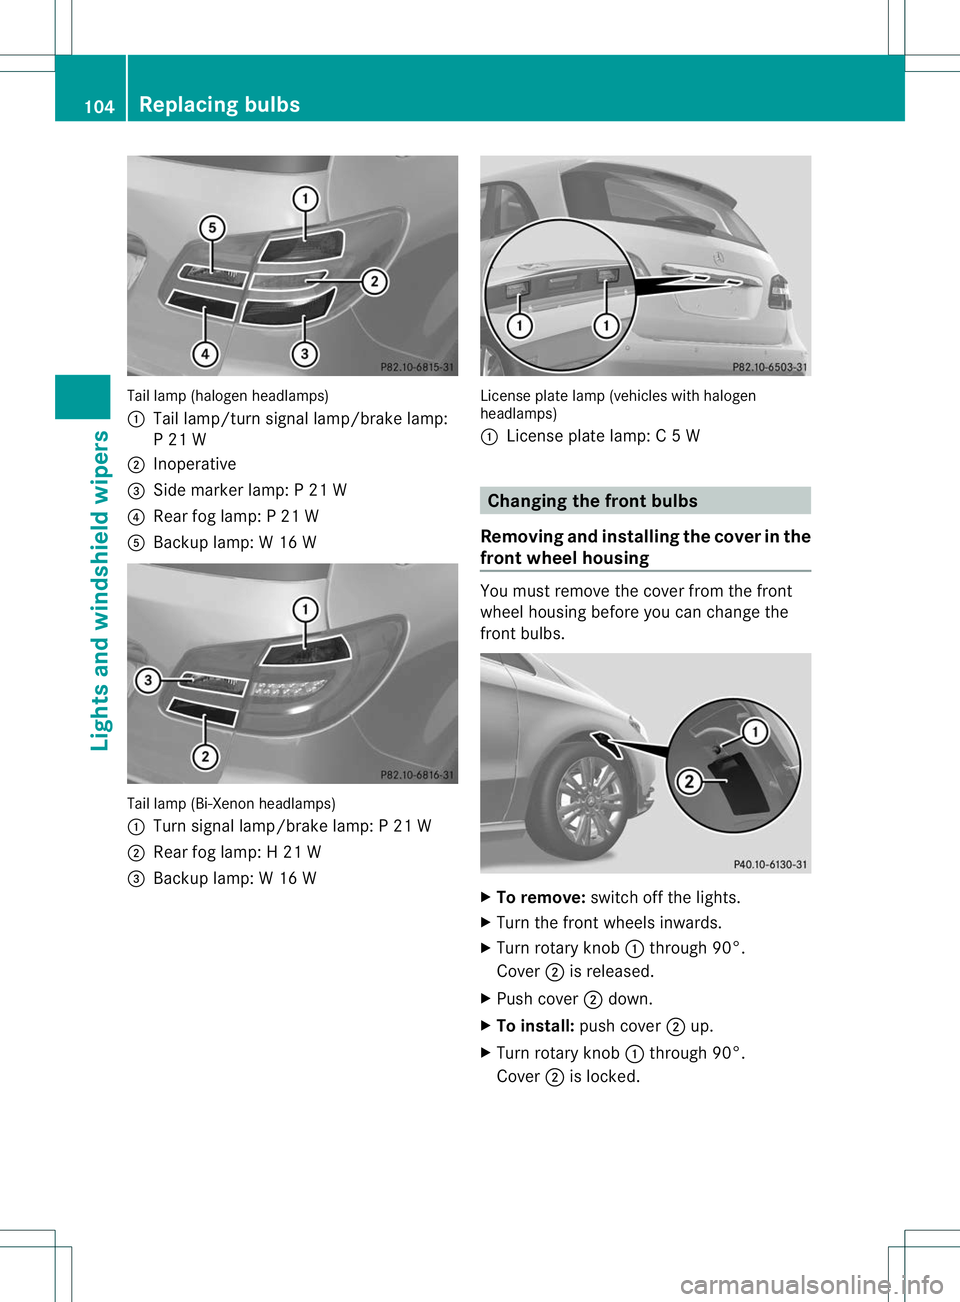
Tail lamp (halogen headlamps)
:
Tail lamp/turn signal lamp/brake lamp:
P 21 W
; Inoperative
= Side marker lamp: P 21 W
? Rear fog lamp: P 21 W
A Backup lamp: W 16 W Tail lamp (Bi-Xenon headlamps)
:
Turn signal lamp/brake lamp: P 21 W
; Rear fog lamp: H 21 W
= Backup lamp: W 16 W License plate lamp (vehicles with halogen
headlamps)
:
License plate lamp: C 5W Changing the front bulbs
Removing and installing th ecover in the
front wheel housing You must remove the cover from the front
wheel housing before you can change the
frontb
ulbs. X
To remove: switch off the lights.
X Turn the fron twheels inwards.
X Turn rotary knob :through 90°.
Cover ;is released.
X Push cover ;down.
X To install: push cover ;up.
X Turn rotary knob :through 90°.
Cover ;is locked. 104
Replacing bulbsLights and windshield wipers
Page 109 of 336
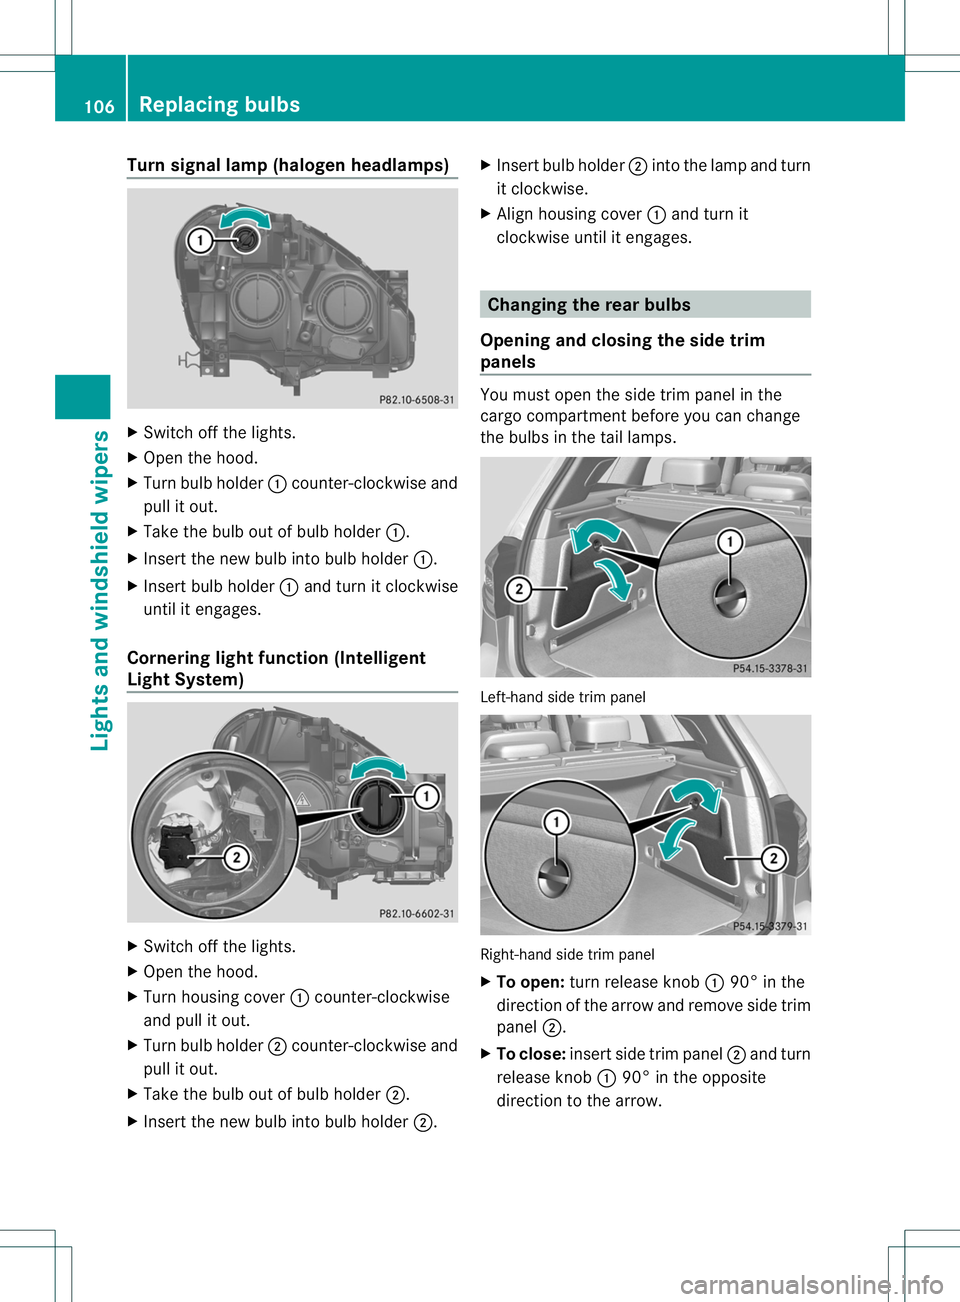
Turn signal lamp (halogen headlamps)
X
Switch off the lights.
X Open the hood.
X Turn bulb holder :counter-clockwise and
pull it out.
X Take the bulb ou tofbulb holder :.
X Inser tthe new bulb into bulb holder :.
X Insert bulb holder :and turn it clockwise
until it engages.
Cornering light function (Intelligent
Light System) X
Switch off the lights.
X Open the hood.
X Turn housing cover :counter-clockwise
and pull it out.
X Turn bulb holder ;counter-clockwise and
pull it out.
X Take the bulb out of bulb holder ;.
X Insert the new bulb into bulb holder ;.X
Insert bulb holder ;into the lamp and turn
it clockwise.
X Align housing cover :and turn it
clockwise until it engages. Changing the rear bulbs
Opening and closing the side trim
panels You must open the side trim panel in the
cargo compartment before you can change
the bulbs in the tail lamps.
Left-hand side trim panel
Right-hand side trim panel
X
To open: turn release knob :90° in the
direction of the arrow and remove side trim
panel ;.
X To close: insert side trim panel ;and turn
release knob :90° in the opposite
direction to the arrow. 106
Replacing bulbsLights and windshield wipers
Page 110 of 336
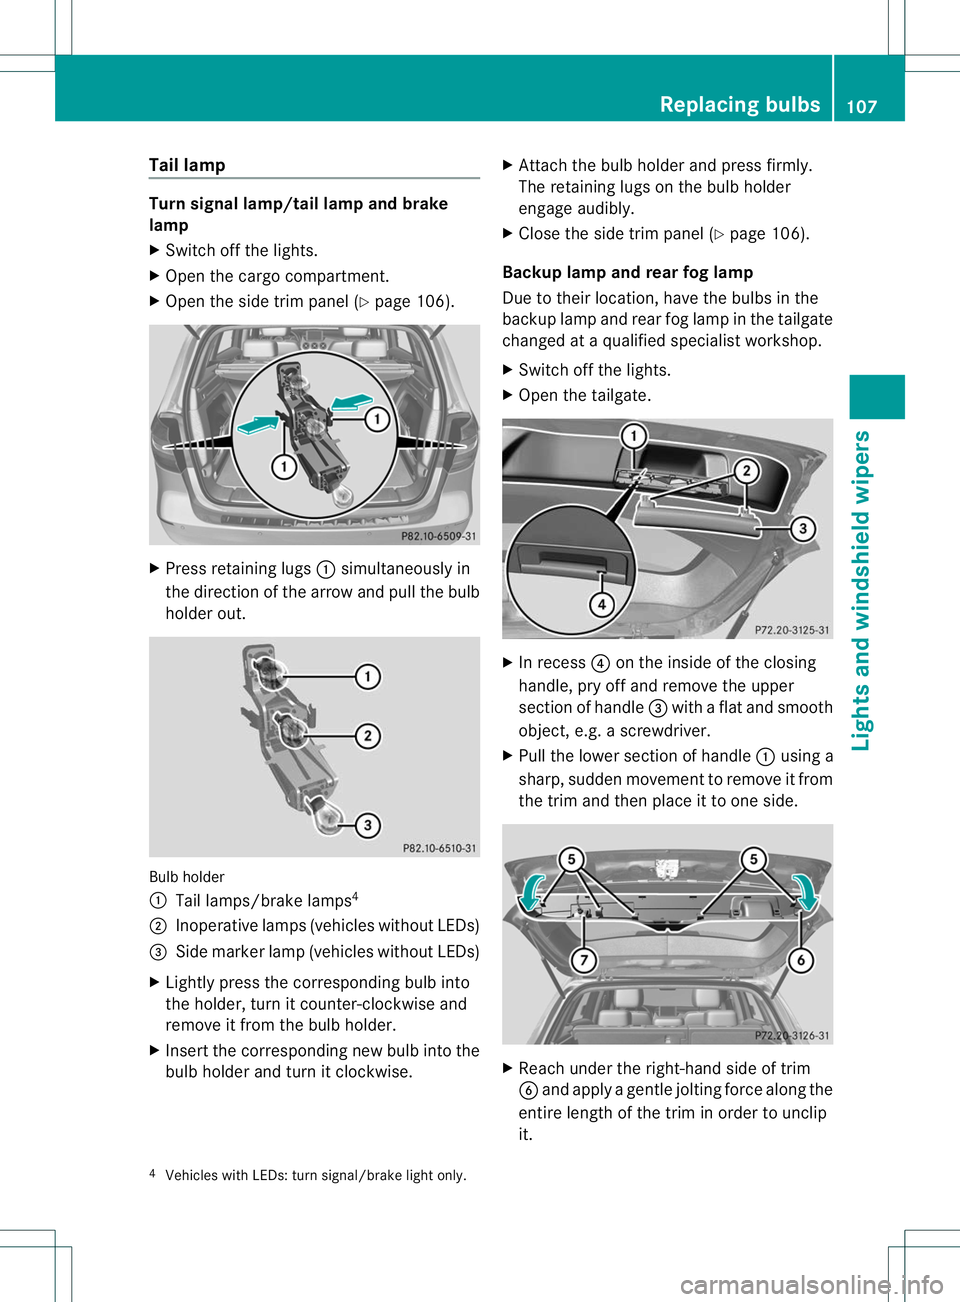
Tail lamp
Turn signal lamp/tail lamp and brake
lamp
X
Switch off the lights.
X Open the cargo compartment.
X Open the side trim panel (Y page 106).X
Press retaining lugs :simultaneously in
the direction of the arrow and pull the bulb
holde rout. Bulb holder
:
Tail lamps/brake lamps 4
; Inoperative lamps (vehicles without LEDs)
= Side marke rlamp (vehicle swithout LEDs)
X Lightly press the corresponding bulb into
the holder, tur nitcounter-clockwise and
remove it from the bulb holder.
X Insert the corresponding new bulb into the
bulb holder and turn it clockwise. X
Attach the bulb holder and press firmly.
The retaining lugs on the bulb holder
engage audibly.
X Close the side trim panel (Y page 106).
Backup lamp and rear fog lamp
Due to their location, have the bulbs in the
backup lamp and rear fog lamp in the tailgate
changed at a qualified specialist workshop.
X Switch off the lights.
X Open the tailgate. X
In recess ?on the inside of the closing
handle, pry off and remove the upper
section of handle =with a flat and smooth
object, e.g. a screwdriver.
X Pull the lower section of handle :using a
sharp, sudden movementtor emove it from
the trim and then place it to one side. X
Reach under the right-hand side of trim
B and apply a gentle jolting force along the
entire length of the trim in order to unclip
it.
4 Vehicles with LEDs: turn signal/brake light only. Replacing bulbs
107Lights and windshield wipers Z
Page 145 of 336
To ensure that the vehicle is secured against
rolling away unintentionally:
R
the electric parking brake must be applied.
R the transmission must be in position Pand
the transmission position display must
show P.
R the SmartKey must be removed from the
ignition lock.
R on uphill or downhill gradients, the front
wheels must be turned towards the curb. Switching off the engine
Important safety notes G
WARNING
The automatic transmission switches to
neutral position Nwhen you switch off the
engine. The vehicle may roll away.T here is a
risk of an accident.
After switching off the engine, always switch
to parking position P. Prevent the parked
vehicle from rolling away by applying the
parking brake.
Vehicles with automatic transmission X
Apply the electric parking brake.
X Shift the transmission to position P.
X Turn the SmartKey to position 0in the
ignition lock and remove it.
The immobilizer is activated.
i If you switch the engine off with the
transmission in position Ror D, the
automatic transmission shifts to N
automatically.
If you then open one of the front doors or
remove the SmartKey from the ignition, the
automatic transmission shifts to P.
If you shift the automatic transmission to
N before switching off the engine, the
automatic transmission remains in Neven
if a door is opened. i
The automatic transmission shifts to P
automatically if you:
R switch off the engine using the SmartKey
and remove the SmartKey from the
ignition lock or
R switch off the engine using the SmartKey
and open a front door.
If you attempt to turn off the engine when the
selector lever is not in position P:
R a message appears in the multifunction
display
R a warning signal sounds Electric parking brake
General notes G
WARNING
If you leave children unsupervised in the
vehicle, they could set it in motion by, for
example:
R releasing the parking brake
R shifting the automatic transmission out of
the parking position P
R starting the engine.
They could also operate the vehicle's
equipment. There is a risk of an accident and
injury.
When leaving the vehicle, always take the
SmartKey with you and lock the vehicle. Never
leave children unsupervised in the vehicle. i
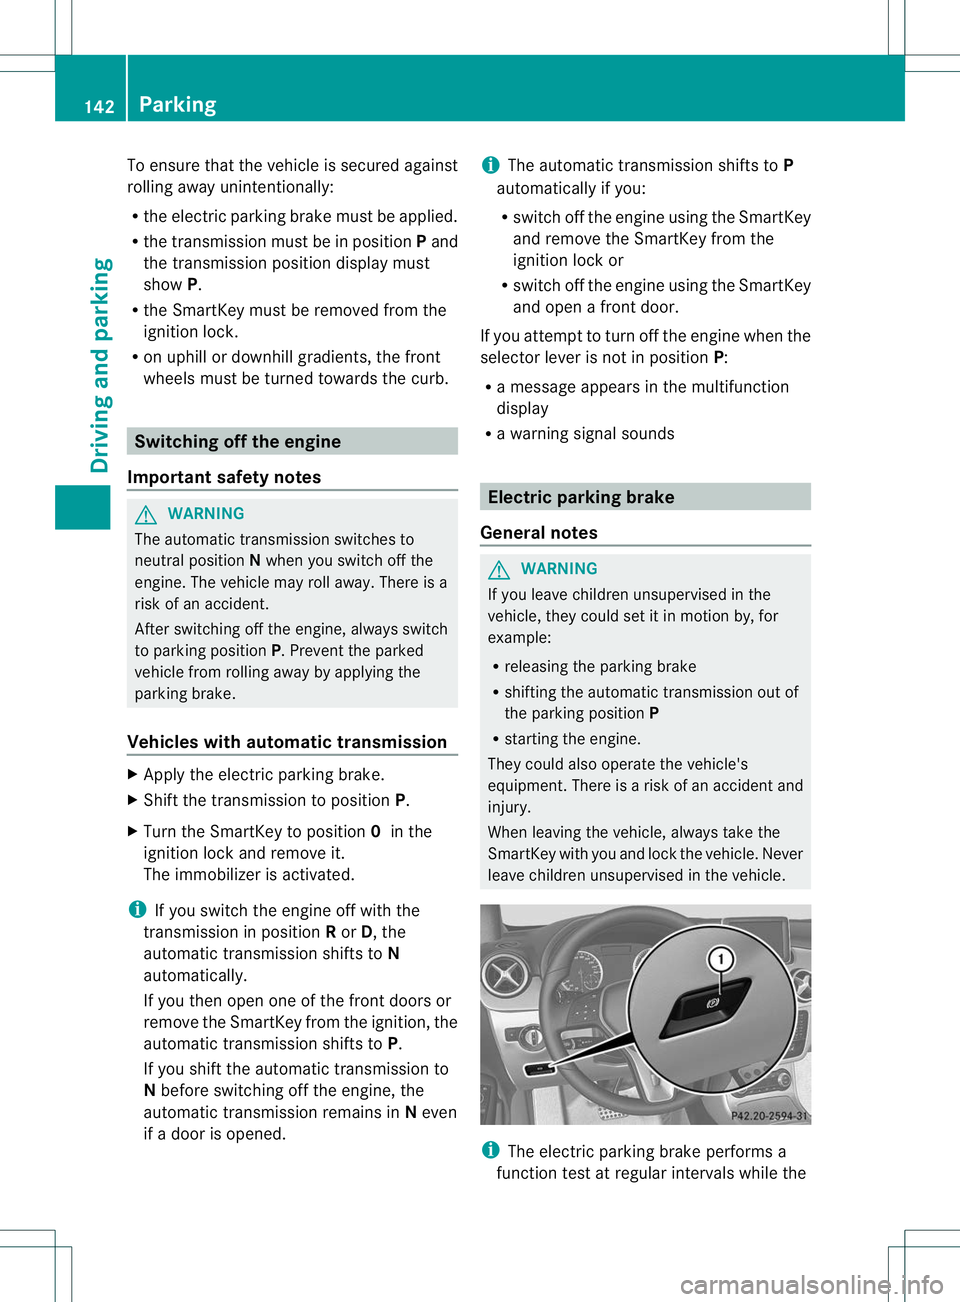
The electric parking brake performs a
function test at regular intervals while the 142
ParkingDriving and parking
Page 158 of 336
i
You can use the cruise control lever to set
the stored speed and the control on the
cruise control lever to set the specified
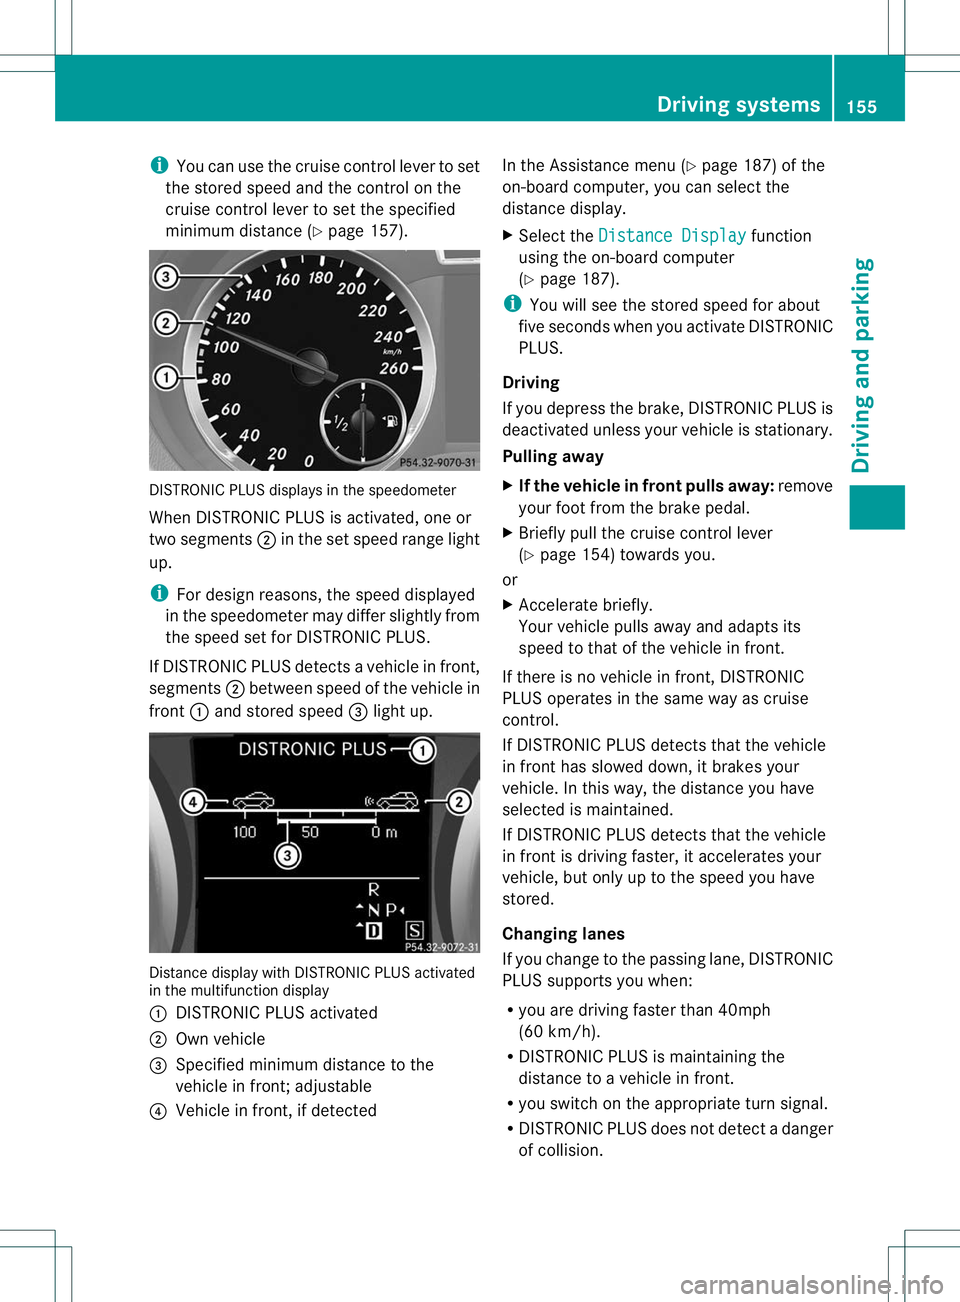
minimum distance (Y page 157).DISTRONIC PLUS displays in the speedometer
When DISTRONIC PLUS is activated, one or
two segments
;in the set speed rang elight
up.
i For design reasons, the speed displayed
in the speedometer may differ slightly from
the speed set for DISTRONIC PLUS.
If DISTRONIC PLUS detectsav ehicle in front,
segments ;between speed of the vehicle in
front :and stored speed =light up. Distance display with DISTRONIC PLUS activated
in the multifunction display
:
DISTRONIC PLUS activated
; Own vehicle
= Specified minimum distance to the
vehicle in front; adjustable
? Vehicle in front, if detected In the Assistance menu (Y
page 187) of the
on-board computer, you can select the
distance display.
X Select the Distance Display function
using the on-board computer
(Y page 187).
i You will see the stored speed for about
five seconds when you activate DISTRONIC
PLUS.
Driving
If you depress the brake, DISTRONIC PLUS is
deactivated unless your vehicle is stationary.
Pulling away
X If the vehicle in front pulls away: remove
your foot from the brake pedal.
X Briefly pull the cruise control lever
(Y page 154) towards you.
or
X Accelerate briefly.
Your vehicle pulls away and adapts its
speed to that of the vehicle in front.
If there is no vehicle in front, DISTRONIC
PLUS operates in the same way as cruise
control.
If DISTRONIC PLUS detects that the vehicle
in fron thas slowed down, it brakes your
vehicle .Inthis way, the distance you have
selected is maintained.
If DISTRONIC PLUS detects that the vehicle
in front is driving faster, it accelerates your
vehicle, but only up to the speed you have
stored.
Changing lanes
If you change to the passing lane, DISTRONIC
PLUS supports you when:
R you are driving faster than 40mph
(60 km/h).
R DISTRONIC PLUS is maintaining the
distance to a vehicle in front.
R you switch on the appropriate turn signal.
R DISTRONIC PLUS does not detect a danger
of collision. Driving systems
155Driving and parking Z
Page 169 of 336
passenger side. Parking spaces on the
driver's side are displayed as soon as the turn
signal on the driver's side is activated. To park
on the driver's side, you must leave the
driver's side turn signal switched on. This
must remain switched on until you
acknowledge the use of Active Parking Assist
by pressing the
abutton on the
multifunction steering wheel.
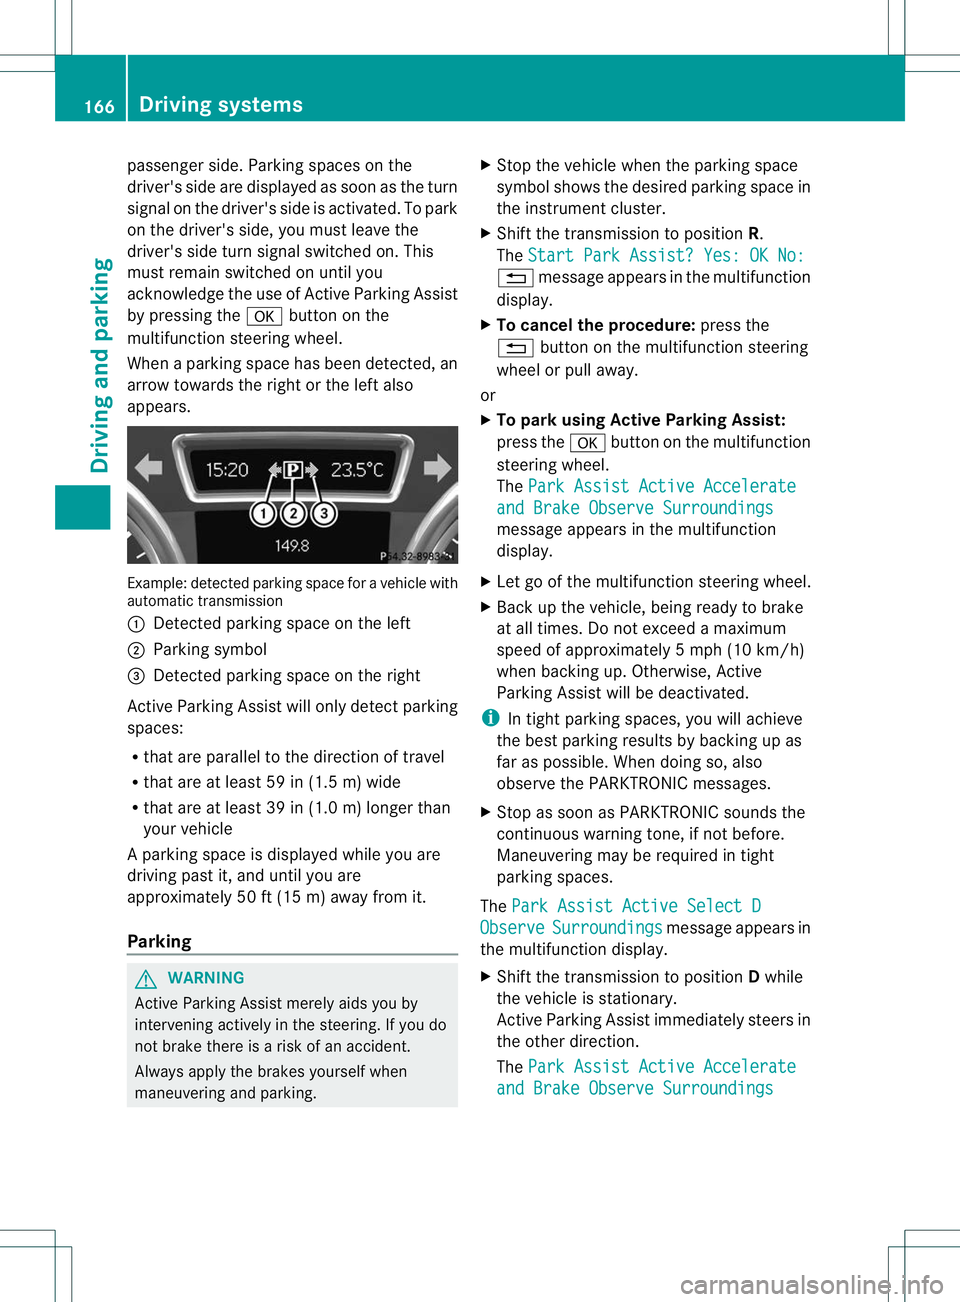
When a parking space has been detected, an
arrow towards the right or the left also
appears. Example: detected parkin
gspace for a vehicle with
automatic transmission
: Detected parking space on the left
; Parking symbol
= Detected parking space on the right
Active Parking Assist will only detectp arking
spaces:
R that are parallel to the direction of travel
R that are at least 59 in (1.5 m) wide
R that are at least 39 in (1.0 m) longer than
your vehicle
Ap arking space is displayed while you are
driving past it, and until you are
approximately 50 ft (15 m) away from it.
Parking G
WARNING
Active Parking Assist merely aids you by
intervening actively in the steering. If you do
not brake there is a risk of an accident.
Always apply the brakes yourself when
maneuvering and parking. X
Stop the vehicle when the parking space
symbol shows the desired parking space in
the instrument cluster.
X Shift the transmission to position R.
The Start Park Assist? Yes: OK No: %
message appears in the multifunction
display.
X To cancel the procedure: press the
% button on the multifunction steering
wheel or pull away.
or
X To park using Active Parking Assist:
press the abuttonont he multifunction
steering wheel.
The Park Assist Active Accelerate and Brake Observe Surroundings
message appears in the multifunction
display.
X Let go of the multifunction steering wheel.
X Back up the vehicle, being ready to brake
at all times. Do not exceed a maximum
speed of approximately 5mph (10 km/h)
when backing up. Otherwise, Active
Parking Assist will be deactivated.
i In tight parking spaces, you will achieve
the best parking results by backing up as
far as possible. When doing so, also
observe the PARKTRONIC messages.
X Stop as soon as PARKTRONIC sounds the
continuous warning tone, if not before.
Maneuvering may be required in tight
parking spaces.
The Park Assist Active Select D Observe Surroundings message appears in
the multifunction display.
X Shift the transmission to position Dwhile
the vehicle is stationary.
Active Parking Assist immediately steers in
the other direction.
The Park Assist Active Accelerate and Brake Observe Surroundings166
Driving systemsDriving and parking
Page 170 of 336
message appears in the multifunction
display.
i You will achieve the best results by
waiting for the steering procedure to
complete before pulling away.
X Drive forwards and be ready to brake at all
times.
X Stop as soon as PARKTRONIC sounds the
continuous warning tone, if not before.
The Park Assist Active Select R Observe Surroundings message appears in
the multifunction display.
X Further transmission shifts may be
necessary.
As soon as the parking procedure is
complete, the Park Assist Finished message appears in the multifunction
display.A
ctive Parking Assist is now
deactivated. PARKTRONIC is still available.
X Maneuver if necessary.
X Always observe the warning messages
displayed by PARKTRONIC (Y page 162).
Exiting aparking space G
WARNING
Active Parking Assist doe snot monitor street
traffic .Insome cases, the vehicle will also
take you onto sections of the oncoming lane
when exiting a parking space.
You are responsible for safety at all times and
must pay attention to any road users
approaching or passing. Stop the vehicle if
necessary or cancel Active Parking Assist.
Active Parking Assist can only assist you with
exiting a parking space if you have parked the
vehicle using Active Parking Assist.
X Start the engine.
X Switch on the turn signal on the side facing
the street.
X Shift the transmission to position Dor R.
The Start Park Assist? Yes: OK No: %
message appears in the multifunction
display. X
To cancel the procedure: press the
% button on the multifunction steering
wheel or pull away.
or
X To exit aparking space using Active
Parking Assist: press theabutton on
the multifunctio nsteering wheel.
The Park Assist Active Accelerate and Brake Observe Surroundings
message appears in the multifunction
display.
X Let go of the multifunctio nsteering wheel.
X Reverse the vehicle or drive forwards, being
ready to brake at all times. Do not exceed
a maximum speed of approximately
6 mph (10 km/h) when exiting a parking
space .Otherwise, Active Parking Assist will
be deactivated.
X Stop as soon as PARKTRONIC sounds the
continuous warning tone, if not before.
X Shift the transmission to position Dor Ras
required while the vehicle is stationary.
Active Parking Assist immediately steers in
the other direction.
i You will achieve the best results by
waiting for the steering procedure to
complete before pulling away.
If you back up after activation, the steering
wheel is moved to the straight-ahead
position.
X Drive forwards or back up the vehicle, being
ready to brake at all times.
X Stop as soon as PARKTRONIC sounds the
continuous warning tone, if not before.
X Drive forwards and back up as instructed
by the PARKTRONIC warning displays.
Once you have exited the parking space
completely, the steering whee lis moved to
the straight-ahead position. You hear a tone
and the message Park Assist Finished appears in the multifunction display. You will
then have to steer and merge into traffic on
your own. PARKTRONIC is still available. Driving systems
167Driving and parking Z