2013 MERCEDES-BENZ B-CLASS SPORTS trunk
[x] Cancel search: trunkPage 21 of 336
Trip odometer
Calling up ....................................... 182
Resetting (on-board computer) ......183
Trunk
see Tailgate
Turn signals
Changing bulbs (front) ...................106
Changing bulbs (rear) ....................107
Display message ............................ 203
Switching on/off .............................. 98
Type identification plate
see Vehicle identification plate U
Unlocking Emergency unlocking .......................75
From inside the vehicle (central
unlocking button) ............................. 74V
Vanity mirror (in the sun visor) ........242
Vehicle Correct use ...................................... 24
Data acquisition ............................... 24
Equipment ....................................... 21
Individua lsettings .......................... 189
Limited Warranty ............................. 24
Loading .......................................... 300
Locking (in an emergency) ...............75
Locking (SmartKey) .......................... 68
Lowering ........................................ 315
Maintenance .................................... 21
Parking for a long period ................ 144
Pulling away ................................... 127
Raising ........................................... 313
Reporting problems .........................24
Securing from rolling away ............313
Towing away .................................. 285
Tow-starting ................................... 285
Transporting .................................. 287
Unlocking (in an emergency) ...........75
Unlocking (SmartKey) ......................68
Vehicle data ................................... 329
Vehicle data ....................................... 329
Vehicle dimensions ...........................329
Vehicle emergency locking ................75Vehicle identification number
see VIN
Vehicle identification plate ..............323
Vehicle tool kit .................................. 274
Video (DVD) ........................................ 186
VIN ...................................................... 323 W
Warning and indicator lamps ABS ................................................ 220
Brakes ........................................... 220
Check Engine ................................. 226
Coolant .......................................... 226
Distance warning ........................... 228
DISTRONI CPLUS ........................... 228
ESP ®
.............................................. 222
ESP ®
OFF ....................................... 223
Fuel tank ........................................ 226
Overview .......................................... 28
PASSENGER AIRBAG OFF ................50
Reserve fuel ................................... 226
Seat belt. ....................................... 218
SRS ................................................ 225
Warranty ............................................ 323
Washer fluid Display message ............................ 217
Wheel bol ttightening torque ...........315
Wheel chock ...................................... 313
Wheels Changing awheel .......................... 312
Checking ........................................ 293
Cleaning ......................................... 267
Cleaning (warning) .........................312
Emergency spare wheel .................318
Important safety notes ..................292
Interchanging/changing ................312
Mounting anew wheel ................... 315
Mounting awheel .......................... 312
Removing awheel .......................... 315
Storing ........................................... 312
Tightening torque ........................... 315
Whee lsize/tir esize ....................... 316
Window curtain air bag
Display message ............................ 202
Operation ........................................ .42
Windows
see Side windows 18
Index
Page 171 of 336
Canceling Active Parking Assist
You can cancel Active Parking Assist at any
time.
X
Stop the movement of the multifunction
steering wheel or steer yourself.
Active Parking Assist will be canceled at
once. The Park Assist Canceled message appears in the multifunction
display.
or
X Press the PARKTRONIC butto nonthe
center console (Y page 163).
PARKTRONIC is switched off and Active
Parking Assist is immediately canceled.
The Park Assist Canceled message
appears in the multifunction display.
Active Parking Assist is canceled
automatically if:
R the transmission is shifted too early.
R parking using Active Parking Assist is no
longer possible.
R you are driving faster than 6 mph
(10 km/h).
R a wheel spins, ESP ®
intervenes or fails. The
÷ warning lamp lights up in the
instrument cluster.
Aw arning tone sounds. The parking symbol
disappears and the multifunction display
shows the Park Assist Canceled message.
When Active Parking Assist is canceled, you
must steer again yourself.
Rear view camera
Important safety notes The rear view camera is only an aid. It is not
a replacement for your attention to your
immediate surroundings. You are always
responsible for safe maneuvering and
parking
.When maneuvering or parking, make
sure that there are no persons, animals or objects in the area in which you are
maneuvering.
Under the following circumstances, the rear
view camera will not function, or will function
in a limited manner:
R
the tailgate is open
R in heavy rain, snow or fog
R at night or in very dark places
R if the camera is exposed to very bright light
R if the area is lit by fluorescent light or LED
lighting (the display may flicker)
R if there is a sudden change in temperature,
e.g. when driving into a heated garage in
winter
R if the camera lens is dirty or obstructed
R if the rear of your vehicle is damaged. In
this event, have the camera position and
setting checked at a qualified specialist
workshop.
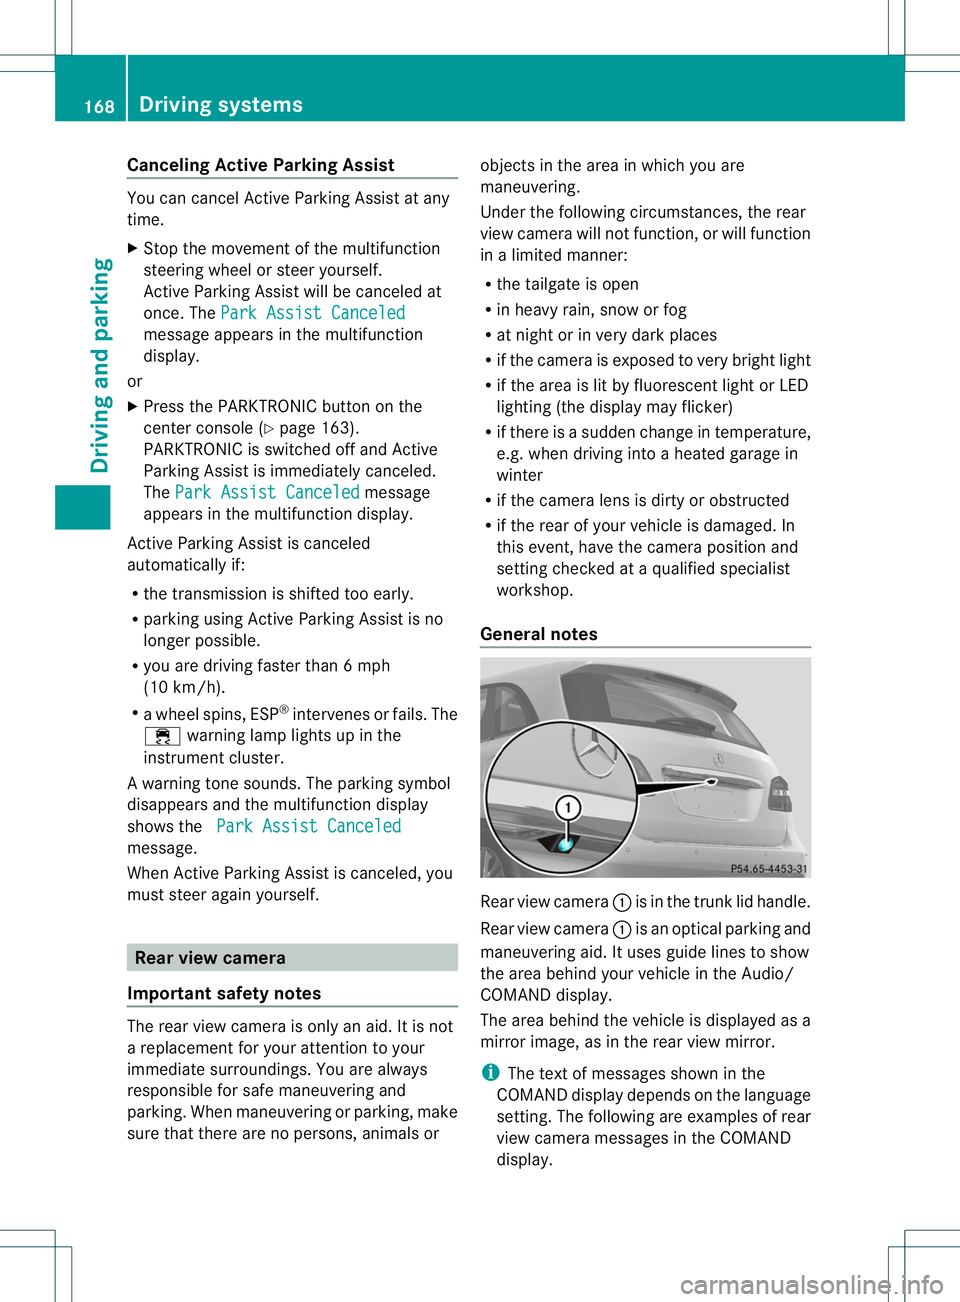
General notes Rear view camera
:is in the trunk lid handle.
Rear view camera :is an optical parking and
maneuvering aid. It uses guide lines to show
the area behind your vehicle in the Audio/
COMAND display.
The area behind the vehicle is displayed as a
mirror image, as in the rear view mirror.
i The text of messages shown in the
COMAND display depends on the language
setting. The following are examples of rear
view camera messages in the COMAND
display. 168
Driving systemsDriving and parking
Page 239 of 336
X
Move the driver's or front-passenger seat
forward if necessary.
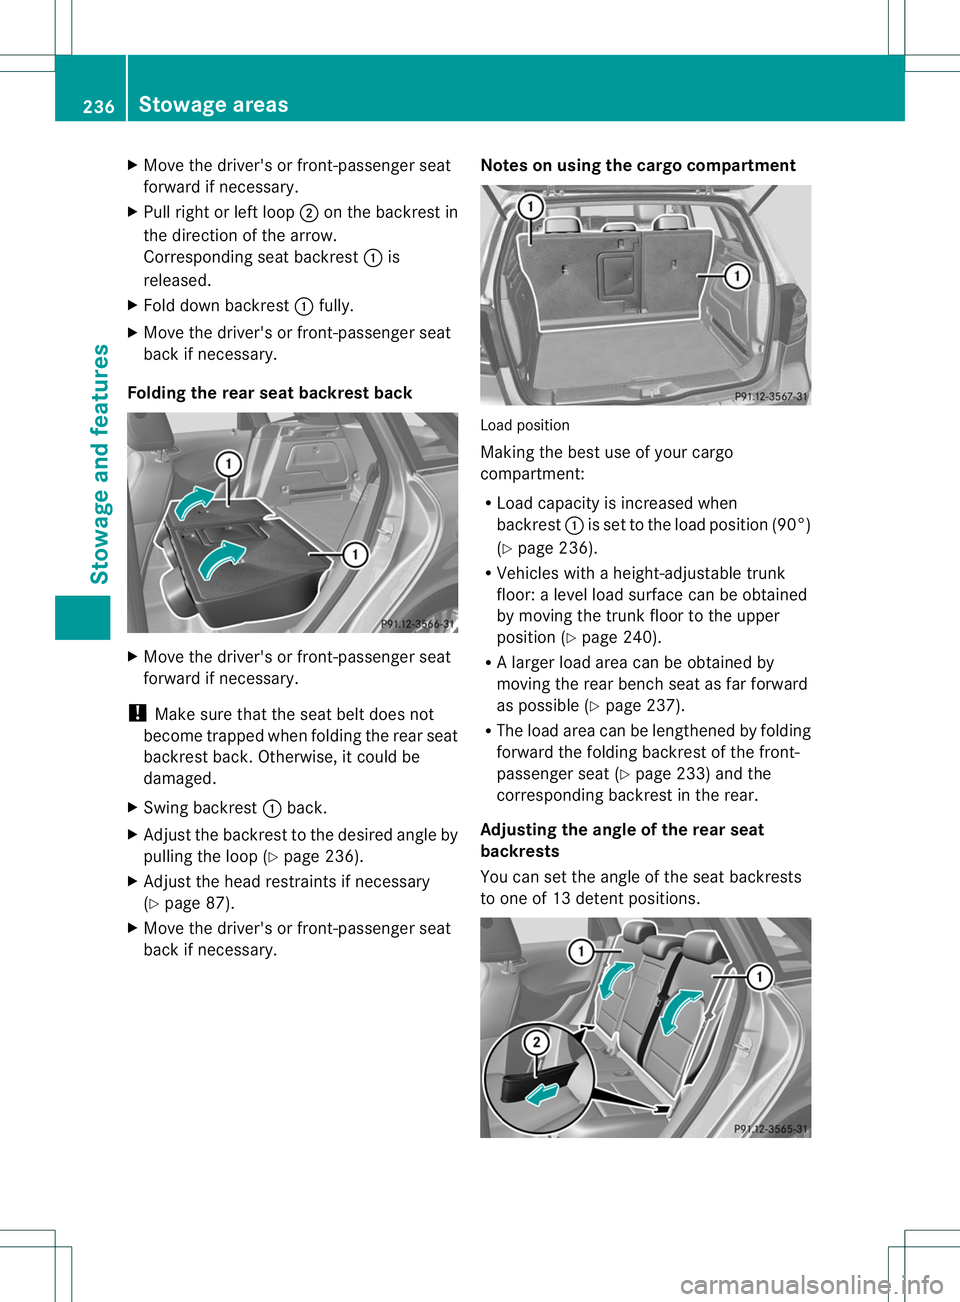
X Pull right or left loop ;on the backrest in
the direction of the arrow.
Corresponding seat backrest :is
released.
X Fold down backrest :fully.
X Move the driver's or front-passenger seat
back if necessary.
Folding the rear seat backrest back X
Move the driver's or front-passenger seat
forward if necessary.
! Make sure that the seat belt does not
become trapped when folding the rear seat
backrest back. Otherwise, it could be
damaged.
X Swing backrest :back.
X Adjust the backrest to the desired angle by
pulling the loop (Y page 236).
X Adjust the head restraints if necessary
(Y page 87).
X Move the driver's or front-passenger seat
back if necessary. Notes on using the cargo compartment Load position
Making the best use of your cargo
compartment:
R
Load capacity is increased when
backrest :is set to the load position (90°)
(Y page 236).
R Vehicles with a height-adjustable trunk
floor: a level load surface can be obtained
by moving the trunk floor to the upper
position (Y page 240).
R Al arge rload area can be obtained by
moving the rear bench seat as far forward
as possible (Y page 237).
R The load area can be lengthened by folding
forward the folding backrest of the front-
passenger seat (Y page 233) and the
corresponding backrest in the rear.
Adjusting the angle of the rear seat
backrests
You can set the angle of the seat backrests
to one of 13 detent positions. 236
Stowage areasStowage and features
Page 242 of 336
Attaching and tightening the cargo net
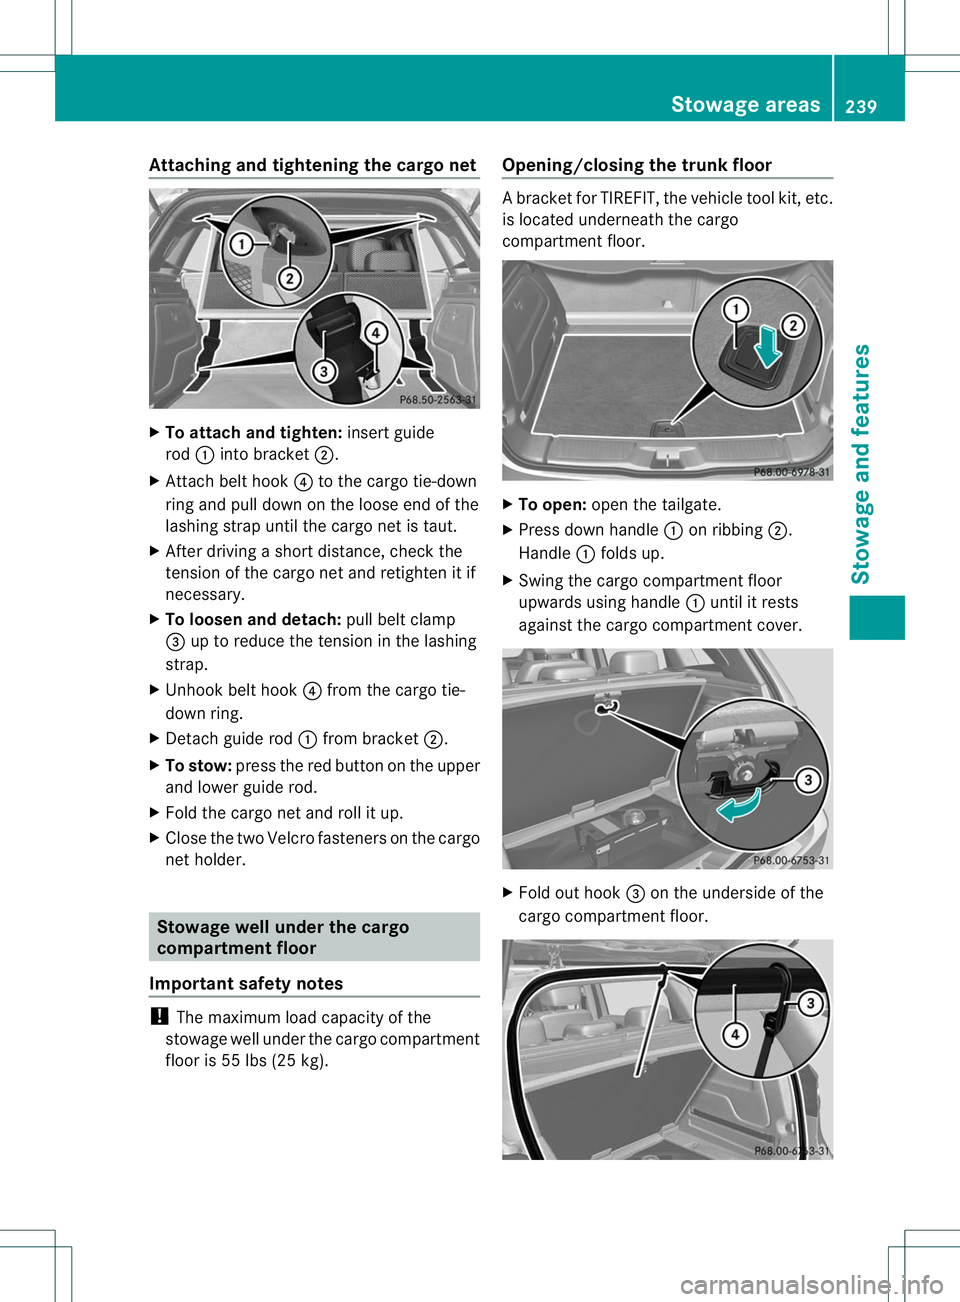
X
To attach and tighten: insert guide
rod :into bracket ;.
X Attach belt hook ?to the cargo tie-down
ring and pull down on th eloose end of the
lashing strap until the cargo net is taut.
X After driving a short distance, check the
tension of the cargo net and retighten it if
necessary.
X To loosen and detach: pull belt clamp
= up to reduce the tension in the lashing
strap.
X Unhook belt hook ?from the cargo tie-
down ring.
X Detach guide rod :from bracket ;.
X To stow: press the red button on the upper
and lower guide rod.
X Fold the cargo net and roll it up.
X Close the two Velcro fasteners on the cargo
net holder. Stowage well under the cargo
compartment floor
Important safety notes !
The maximum load capacity of the
stowage well under the cargo compartment
floor is 55 lbs (25 kg). Opening/closing the trunk floor Ab
racket for TIREFIT, the vehicle tool kit, etc.
is located underneath the cargo
compartment floor. X
To open: open the tailgate.
X Press downh andle:on ribbing ;.
Handle :folds up.
X Swing the cargo compartment floor
upwards using handle :until it rests
against the cargo compartment cover. X
Fold out hook =on the underside of the
cargo compartment floor. Stowage areas
239Stowage and features Z
Page 243 of 336
X
Attach hook =to the cargo
compartment's uppers eal?.
X To close: detach hook =from seal ?.
X Fasten hook =to the bracket on the
underside of the cargo compartment floor.
X Fold the trunk floor down.
X Press the trun kfloor down until it engages.
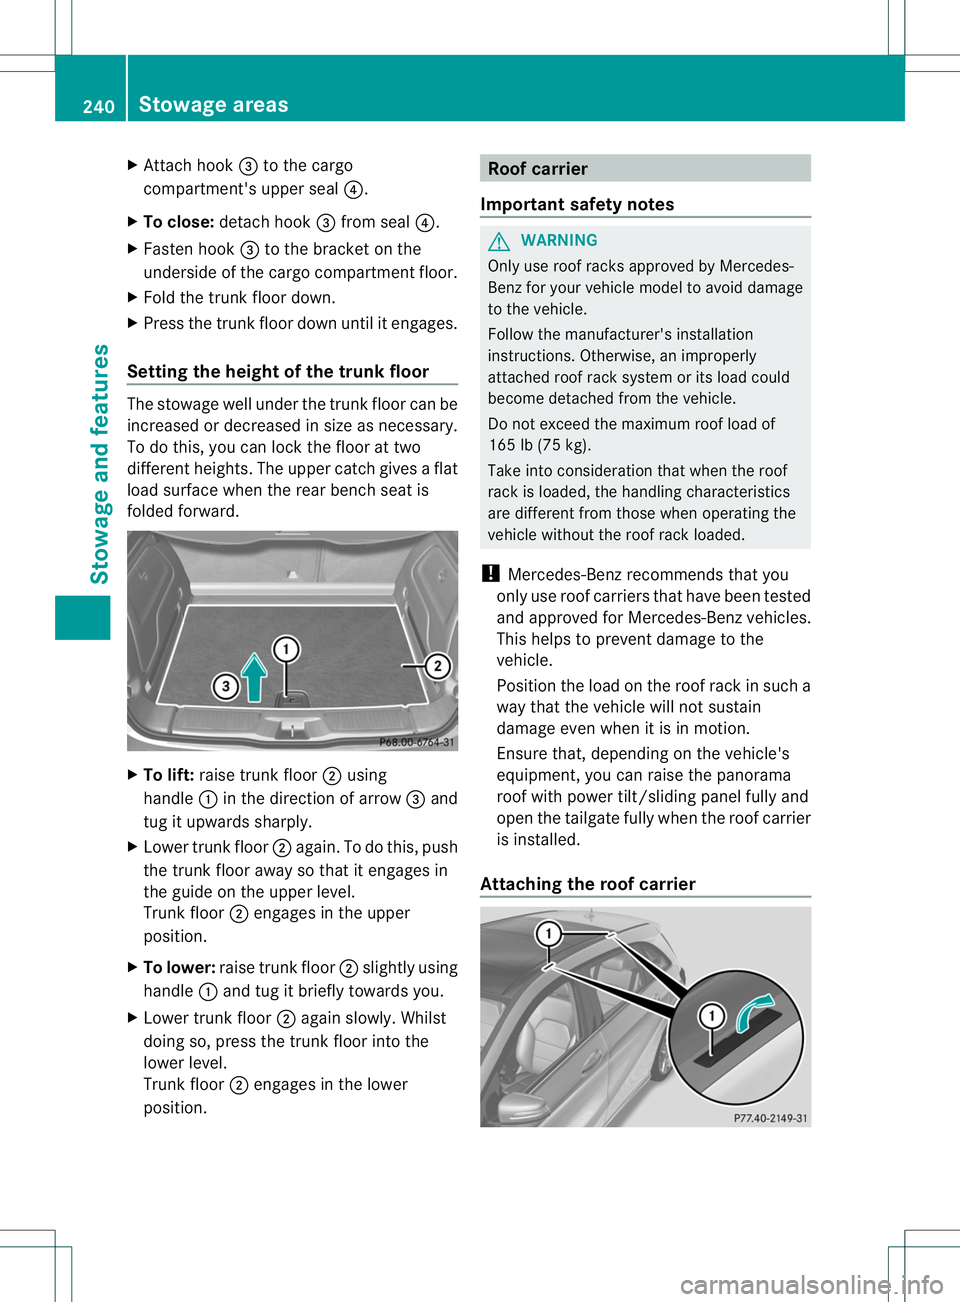
Setting the height of the trunk floor The stowage well under the trunk floor can be
increased or decreased in size as necessary.
To do this, you can lock the floor at two
differen
theights. The upper catch gives a flat
load surface when the rear bench seat is
folded forward. X
To lift: raise trunk floor ;using
handle :in the direction of arrow =and
tug it upwards sharply.
X Lower trunk floor ;again. To do this, push
the trun kfloor away so that it engages in
the guide on the upper level.
Trunk floor ;engages in the upper
position.
X To lower: raise trunk floor ;slightly using
handle :and tug it briefly towards you.
X Lower trunk floor ;again slowly. Whilst
doing so, press the trunk floor into the
lower level.
Trunk floor ;engages in the lower
position. Roof carrier
Important safety notes G
WARNING
Only use roof racks approved by Mercedes-
Ben zfor your vehicle model to avoid damage
to the vehicle.
Follow the manufacturer' sinstallation
instructions. Otherwise, an improperly
attached roo frack system or its load could
become detached from the vehicle.
Do not exceed the maximum roof load of
165 lb (75 kg).
Take into consideratio nthat when the roof
rack is loaded, the handling characteristics
are different from those when operating the
vehicle without the roof rack loaded.
! Mercedes-Benzr ecommends that you
only use roof carriers that have been tested
and approved for Mercedes-Benzv ehicles.
This helps to preven tdamage to the
vehicle.
Positio nthe load on the roof rack in such a
way that the vehicle will not sustain
damage even when it is in motion.
Ensure that, depending on the vehicle's
equipment, you can raise the panorama
roof with power tilt/sliding panel fully and
open the tailgate fully when the roof carrier
is installed.
Attaching the roof carrier 240
Stowage areasStowage and features