Page 25 of 222
 Owners Manual ›Average speed
› Driving time
Since start
The memory collates the driving information from the moment the ignition is
switched on until it is switched off. New data will also flow into the calcula")
›Average speed
› Driving time
Since start
The memory collates the driving information from the moment the ignition is
switched on until it is switched off. New data will also flow into the calculation of
the current driving information if the trip is continued within 2 hours after
switching off the ignition. If the trip is interrupted for more than 2 hours, the
memory is automatically erased.
Long-term
The memory gathers driving information from any number of individual journeys
up to a total of 99 hours and 59 minutes driving or 9 999 kilometres driven. The
memory is deleted when either of these limits is reached and the calculation
starts all over again.
Since refuel
The memory gathers driving information since the last refuelling. The memory is erased automatically the next time you fill up.
Note
Disconnecting the vehicle battery will delete all memory data.
Multifunction display details
First read and observe the introductory information and safety warn-
ings
on page 22.
Range
The range indicates the distance you can still drive with your vehicle based on the
level of fuel in the tank and the same style of driving as before.
The display is shown in steps of 10 km. After lighting up of the indicator light
the display is shown in steps of 5 km.
The fuel consumption over the last 50 km is used to calculate the range. Therange can increase if you drive in a more fuel-efficient manner.
Average fuel consumption
The average fuel consumption 1)
is calculated since the last time the memory was
erased » page 22 .
If you wish to determine the average fuel consumption over a certain period of
time, you must set the memory at the start of the new measurement to zero » Fig. 3 on page 22. After erasing the memory, no fuel consumption data will
appear for the first 100 m driven.
The fuel consumption data is updated regularly while you are driving.
Current fuel consumption
You can use this information to adapt your driving style to the desired fuel con-
sumption 1)
.
The display appears in litres/hour if the vehicle is stationary or driving at a low
speed 2)
.
Oil temperature
If the engine oil temperature is in the range 80-110 °C, the engine operating tem-
perature is reached.
If the temperature lies below 80 °C or above 110 °C, avoid high engine revs, full
throttle and high engine loads.
If the oil temperature is lower than 50 °C or if a fault in the system for checking
the oil temperature is present,
are displayed instead of the oil temperature.
Warning against excessive speeds
Setting the speed limit, e.g. for the intra-urban top speed » page 24.
Traffic sign recognition
In the display, up to three detected traffic signs can be displayed, which provide
information about the following:
› Maximum speed (including additional sign);
› Overtaking prohibited.
Further information » page 25, Traffic sign recognition .
Current driving speed
The current speed is identical to the display on the speedometer 3
» Fig. 2 on
page 9.
1)
To set the units for the fuel consumption display
» Bedienungsanleitung Infotainment, chapter Unit
setup .
2)
On some models in certain countries, the display appears in --,- kilometres/litres if the vehicle is sta-
tionary.
23Information system
Page 26 of 222
 Owners Manual Average speed
The average speed since the memory was last erased is shown in the display
in km/hour » page 22. To determine the average speed over a certain period of
time, set the memory to zero at")
Average speed
The average speed since the memory was last erased is shown in the display
in km/hour » page 22. To determine the average speed over a certain period of
time, set the memory to zero at the start of the measurement » page 22.
After erasing the memory, no average speed data will appear for approx. the first
300 m driven.
The display is updated regularly while you are driving. The average speed data is updated regularly while you are driving.
Distance travelled
The distance driven since the memory was last erased appears in the display.
If you want to measure the distance travelled from a particular moment in time on, at this moment, reset the memory by setting the button to zero » page 22.
The maximum distance indicated in both memories is 9 999 km. The indicator is
automatically set back to zero if this period is exceeded.
Driving time
The driving time which has elapsed since the memory was last erased, appears in
the display. If you want to measure the time travelled from a particular moment intime on, at this moment, reset the memory by setting the button tozero » page 22 .
The maximum distance indicated in both memories is 99 hours and 59 minutes. The indicator is set back to zero if this period is exceeded.
Convenience consumers
The consumption display for the convenience consumers in l/h.
Together with the consumption display, a list of three convenience consumers with the highest consumption is also displayed.
Warning against excessive speedsFig. 4
Buttons (adjustment wheel) on the operating lever/multifunction
steering wheel
First read and observe the introductory information and safety warn-ings
on page 22.
Adjust the speed limit while the vehicle is stationary
›
With the button
A
» Fig. 4 or, if applicable, the adjustment wheel
D
, select the
menu item Warning against excessive speeds .
›
Pressing the button
B
or the adjustment wheel
D
activates the setup mode
for the speed limit.
›
Set the desired speed limit, e.g. 50 km/h, with the button
A
or, if applicable,
the adjustment wheel
D
.
›
Confirm the speed limit by pressing button
B
, or adjustment wheel
D
or wait
around 5 seconds. Your settings are saved automatically.
This allows you to set the speed in 5 km/h intervals.
Adjusting the speed limit while the vehicle is moving
›
With the button
A
» Fig. 4 or, if applicable, the adjustment wheel
D
, select the
menu item Warning against excessive speeds .
›
Drive at the desired speed, e.g. 50 km/h.
›
Press the button
B
or the adjustment wheel
D
to accept the current speed as
the speed limit (the value flashes).
If you wish to change the set speed limit, it is changed in 5 km/h intervals (e.g. the
accepted speed of 47 km/h increases to 50 km/h or decreases to 45 km/h).
›
Press again the button
B
or the adjustment wheel
D
to confirm the speed lim-
it, or wait approx. 5 seconds and the setting is saved automatically (the value stops flashing).
24Using the system
Page 27 of 222
 Owners Manual Change or delete speed limit›With the button A » Fig. 4 or, if applicable, the adjustment wheel D, select the
menu item Warning against excessive speeds .›
Pressing the button
B
or the adjust")
Change or delete speed limit›With the button A » Fig. 4 or, if applicable, the adjustment wheel D, select the
menu item Warning against excessive speeds .›
Pressing the button
B
or the adjustment wheel
D
deletes the speed limit.
›
Pressing the button
B
or the adjustment wheel
D
again activates change
mode for the speed limit.
If the pre-set speed is exceeded, an acoustic signal appears as a warning tone
and a warning message appears in the instrument cluster display, e.g.:
Speed 50 exceeded.
or SPEED TOO HIGH
The set speed limit value remains stored even after switching off the ignition. Af-
ter a gap between driving exceeding 2 hours, the pre-set speed limit is deleted.
Information display
Fig. 5
Buttons (adjustment wheel) on the operating lever/multifunction
steering wheel
The information display provides you with information on the current operating
state of your vehicle . The information display also provides you with data (de-
pending on the equipment installed in the vehicle) relating to the Infotainment,
multi-functional indicator, etc.
Operating with the buttons on the operating lever
Activate the Main menu by pressing the rocker switch
A
» Fig. 5 for longer.
Individual menu items can be selected by means of the rocker switch A. When
the pushbutton B is briefly pressed, the information you have selected is dis-
played.
Operating the button/adjustment wheel on the multifunction steering wheel
Activate the Main menu by pressing the rocker switch C
» Fig. 5 for longer.
The individual menus can be selected by pressing the adjustment wheel
D
. The
selected menu is displayed after briefly pressing the adjustment wheel
D
.
By briefly pressing the
C
button you will reach one level higher.
Main menu points
The following information can be selected (depending on the equipment installed on the vehicle):
■ Driving data » page 22
■ Assist systems » page 126
■ Navigation » operating instructions for Infotainment , chapter Navigation sys-
tem (NAV button)
■ Audio » operating instructions for Infotainment , chapter Media (MEDIA button)
■ Telephone » operating instructions for Infotainment , chapter Telephone
(PHONE button)
■ Vehicle » operating instructions for Infotainment , chapter Setting vehicle sys-
tems (CAR button)
The menu items Audio and Navigation are only displayed when the factory-fitted
Infotainment radio or navigation system is switched on.
Note
If warning messages are shown in the information display, these messages must
be confirmed with the button B on the operating lever or with the adjustment
wheel D
on the multifunction steering wheel » Fig. 5 to call up the main menu.
Traffic sign recognition
Introduction
This chapter contains information on the following subjects:
Operating principle
26
Information for the driver
27
25Information system
Page 28 of 222
 Owners Manual The detected traffic signs appear in the instrument cluster display in the follow-
ing menu:
■ Driving data
■ Traffic sign
Additional display
If the menu item is not currently displayed with traff")
The detected traffic signs appear in the instrument cluster display in the follow-
ing menu:
■ Driving data
■ Traffic sign
Additional display
If the menu item is not currently displayed with traffic sign detection, the traffic
sign is displayed with the speed limit in the upper area of the instrument cluster display » Fig. 7 on page 26 - .
The additional display traffic sign detection can be activated/deactivated in the Infotainment » operating instructions for Infotainment , chapter Setting vehicle
systems (CAR button) .
Traffic sign display when towing a trailer
When towing a trailer, displaying the traffic signs which apply when towing a
trailer can be activated.
The traffic sign detection display when towing a trailer can be activated/deactiva-
ted in the Infotainment » operating instructions for Infotainment , chapter Setting
vehicle systems (CAR button) .WARNING■
Traffic sign detection only operates as a support. Real traffic signs always
have priority over electronic displays. The driver is always responsible for cor-
rectly assessing the traffic situation.■
Traffic signs may not be recognised at all by the system, or may be recog-
nised incorrectly. As a result, the traffic signs may not be displayed at all, or
the wrong one may appear.
■
Traffic sign recognition does not warn about exceeding the maximum per-
mitted speed nor does it adjust the driving speed to the maximum speed!
■
The display is based on standard national speed units. The display in the
instrument cluster display can therefore be in km/h or mph depending on the country concerned.
Note
Traffic sign recognition is not available in all countries.
Operating principleFig. 6
Windscreen: Camera viewing
range for traffic sign recognition
Fig. 7
Instrument cluster display: Ex-
ample of traffic sign recognition
display/additional display
First read and observe the introductory information and safety warn-
ings on page 25.
Traffic sign recognition allows traffic signs with maximum speeds/no overtaking
recognised by the system to be shown in the instrument cluster display.
Additional signs, such as 'when wet' or signs which only apply for a limited time
can also be displayed.
Traffic sign recognition works on the basis of the data captured by the camera
and is only able to show traffic signs which are in the camera's viewing range » Fig. 6 .
Data from the camera can be supplemented by information from the Infotainment Navigation. This is the reason why traffic signs with maximum speeds can also be shown on sections of roads which do not have any traffic signs.
26Using the system
Page 29 of 222
 Owners Manual Traffic sign recognition may not be available or may only be available to a limited
extent in the following situation:
› in poor visibility conditions, e.g. fog, heavy rain, thick snowfall;
› when")
Traffic sign recognition may not be available or may only be available to a limited
extent in the following situation:
› in poor visibility conditions, e.g. fog, heavy rain, thick snowfall;
› when dazzled by the sun;
› when dazzled by oncoming traffic;
› when the camera viewing range is obstructed by an obstacle;
› at high speeds;
› when the traffic signs are fully or partially obscured (e.g. by trees, snow, dirt or
other vehicles);
› when the traffic signs are not standard (round with a red border);
› when the traffic signs are damaged or bent;
› when the traffic signs are fixed to signs with flashing lights;
› when the traffic signs were changed and the navigation data are out of date.
Information for the driver
First read and observe the introductory information and safety warn-ings
on page 25.
The information for the driver appears in the instrument cluster display.
No traffic signs detected.
No maximum speeds were recognised (e.g. on German motorways where there is
no speed limit).
Error: traffic sign recognition
A system error is present. Seek help from a ŠKODA specialist garage.
Traffic sign recognition: clean windscreen!
The windscreen is dirty, iced over or misted up in the camera viewing range. Clean
the windscreen or remove the obstacles.
Traffic sign recognition: restricted.
Infotainment Navigation is not currently providing any data. Check whether the
maps are up-to-date or the whether the vehicle is currently in a location for which
no navigation data are available.
Fatigue detection (break recommendation)
The fatigue detection system advises the driver on the basis of information about
the steering behaviour, to take a break from driving. The system recommends a
break at speeds of 65-200 km/h.
After the ignition has been switched on, the system evaluates the steering be-
haviour for 15 minutes. This baseline analysis is constantly compared with the
current steering behaviour. If the system detects deviations from normal steering
behaviour due to possible fatigue of the driver, it recommends to take a break
from driving.
The symbol appears in the instrument cluster display, with the following mes-
sage:
Driver alert. Take a break.
or DRIVER ALERT TAKE A BREAK
An audible signal is also emitted.
The system deletes the stored baseline analysis if one of the following condi-
tions is met:
› the vehicle is stopped and the ignition is turned off,
› the vehicle is stopped, the seat belt is taken off and the driver's door is opened;
› the vehicle is stopped for more than 15 minutes.
If none of these conditions is met, the system will recommend another break
from driving.
The system can be activated/deactivated in the Infotainment » operating instruc-
tions for Infotainment , chapter Setting vehicle systems (CAR button) .WARNING■
For the driving ability is always the driver's responsibility. Never drive if you
feel tired.■
The system may not detect all cases where a break is needed.
■
Therefore, take regular, sufficient breaks during long trips.
■
There will be no warning during the so-called micro-sleep.
Note
■ In some situations, the system may evaluate the driving incorrectly and thus
mistakenly recommend a break (e.g. sporty driving, in adverse weather conditions,
or in bad road conditions).■
The fatigue detection system is designed primarily for motorway driving.
27Information system
Page 30 of 222
 Owners Manual Unlocking and locking
Vehicle key
Introductory information
Fig. 8
Key: without/with remote control
Two keys are provided with the vehicle. Depending on the equipment, your vehi- cle can be equipped w")
Unlocking and locking
Vehicle key
Introductory information
Fig. 8
Key: without/with remote control
Two keys are provided with the vehicle. Depending on the equipment, your vehi- cle can be equipped with keys without radio remote control » Fig. 8 –
or with
radio remote control » Fig. 8 –
.
WARNING■
Always withdraw the key whenever you leave the vehicle – even if it is only
for a short time. This is particularly important if children are left in the vehicle.
The children might otherwise start the engine or operate electrical equipment
(e.g. electrical power windows) – risk of injury!■
Do not withdraw the ignition key from the ignition lock until the vehicle has
come to a stop! The steering lock might otherwise engage unintentionally – risk of accident!
CAUTION
■ Each key contains electronic components; therefore it must be protected
against moisture and severe shocks.■
Keep the groove of the keys absolutely clean. Impurities (textile fibres, dust,
etc.) have a negative effect on the functionality of the locking cylinder and igni-
tion lock.
NotePlease contact a ŠKODA Partner if you lose a key as they can obtain a new one for you.
Replacing the battery in the remote control key
Fig. 9
Remote control key: Remove cover/remove battery
Each remote control key contains a battery that is located under the cover
A
» Fig. 9 . If the battery is discharged, the red indicator light
B
does not flash
after you press a button on the remote control key » Fig. 14 on page 32.
We recommend that you ask a ŠKODA Partner to replace the key battery. Howev- er, if you would like to replace the discharged battery yourself proceed as follows.
›
Flip out the key.
›
Press off the battery cover with your thumb or using a flat screwdriver in theregion of arrows
1
» Fig. 9 .
›
Remove the discharged battery from the key by pressing the battery down-
wards in the region of arrow
2
.
›
Insert the new battery.
Ensure that the “+” symbol on the battery is facing upwards. The correct polarity
is shown on the battery cover.
›
Place the battery cover on the key and press it down until it clicks into place.
CAUTION
The replacement battery must have the same specification as the original battery. 28Using the system
Page 31 of 222
 Owners Manual For the sake of the environmentDispose of the used battery in accordance with national legal provisions.
Note
The key has to be synchronised if the vehicle cannot be unlocked or locked with
the remote")
For the sake of the environmentDispose of the used battery in accordance with national legal provisions.
Note
The key has to be synchronised if the vehicle cannot be unlocked or locked with
the remote control key after replacing the battery » page 33.
Child safety lock
Fig. 10
Child safety locks on the rear
doors
The child safety lock prevents the rear door from being opened from the inside.
The door can only be opened from the outside.
You can switch the child safety lock on and off using the vehicle key.
Switching on
›
Turn the slot of the safety lock in the direction of the arrow » Fig. 10 (mirror-
inverted on the right doors).
Switching off
›
Turn the slot of the safety lock in the opposite direction to the arrow (mirror- inverted on the right doors).
Open door and closeFig. 11
Door handle/door opening lever: outside/inside
Opening from the outside
›
Unlock the vehicle and pull the handle on the door handle
A
» Fig. 11 .
Opening from the inside
›
Pull the handle on the door opening lever
B
.
Closing from the inside
›
Grab the pull handle
C
and close the door.
WARNING■ Make sure that the door has closed correctly as it can open suddenly while
driving - danger of death!■
Only open and close the door when there is no one in the opening/closing
range - risk of injury!
■
An opened door can close automatically if there is a strong wind or the vehi-
cle is on an incline - risk of injury!
Central locking system
Introduction
This chapter contains information on the following subjects:
Individual settings
30
Safe securing system
30
29Unlocking and locking
Page 32 of 222
 Owners Manual The central locking system allows you to lock and unlock all doors, the fuel filler
flap and boot lid at the same time based on the current setting.
Display of the locking
After locking the vehicle, t")
The central locking system allows you to lock and unlock all doors, the fuel filler
flap and boot lid at the same time based on the current setting.
Display of the locking
After locking the vehicle, the warning light in the driver's door flashes for around
2 seconds in quick succession, afterwards it begins to flash evenly at longer inter-
vals.
Displaying an error
If the indicator light in the driver's door initially flashes quickly for around 2 sec-
onds, and then lights up for 30 seconds without interruption before flashing
again slowly, you will need to seek the assistance of a ŠKODA specialist garage.WARNING■ Locked doors prevent unwanted entry into the vehicle from outside, for ex-
ample at road crossings. Locked doors do, however, make it more difficult for rescuers to get into the vehicle in an emergency – danger to life!■
If the car is locked and the safe securing system is activated, there must not
be any person in the car as it is then not possible to open either a door or a window from the inside. The locked doors make it more difficult for rescuers
to get into the vehicle in an emergency – hazard!
Note
■ The anti-theft alarm system is activated when the vehicle is locked even if the
safe securing system is deactivated. The interior monitor is however not activa- ted.■
Convenience opening/closing of the windows can be operated when locking/
unlocking the vehicle.
■
In the event of an accident in which the airbags are deployed, the locked doors
are automatically unlocked in order to enable rescuers to gain access to the vehi-
cle.
■
Only the driver's door can be unlocked or locked using the key if the central
locking system fails » page 31. The other doors and the boot lid can be emer-
gency locked or unlocked. ■Emergency locking of the door » page 36.
■ Emergency unlocking of the luggage compartment lid » page 38.
Individual settings
First read and observe the introductory information and safety warn-
ings
on page 29.
Set the following functions » operating instructions for Infotainment , chap-
ter Setting vehicle systems (CAR button) .
Opening a single door
This function makes it possible to only unlock the driver's door. The other doors,
the fuel filler flap and the boot lid remain locked and are only unlocked after be- ing opened again.
Unlocking a vehicle side door
This function enables you to unlock both doors on the driver's side. The other doors, the fuel filler flap and the boot lid remain locked and are only unlocked af-
ter being opened again.
Unlocking the vehicle with the KESSY system
This function enables you to unlock all the doors, individual doors, both doors on the left and right vehicle side or to unlock the driver and front passenger door at
the same time. The other doors, the fuel filler flap and the boot lid remain locked
and are only unlocked after being opened again.
Automatic locking and unlocking
All doors are locked from a speed of around 15 km/h. The button in the handle of
the boot lid is deactivated.
If the ignition key is withdrawn, the car is then automatically unlocked again. In addition, it is possible for the driver or front passenger to unlock the car by press-
ing the central locking button
.
The vehicle doors can be unlocked and opened at any time by pulling once on the
door opening lever.
Safe securing system
First read and observe the introductory information and safety warn-
ings
on page 29.
The door locks are blocked automatically if the vehicle is locked from the outside.
Afterwards, it is not possible to open the doors with the door handle either from
the inside or from the outside.
30Using the system
 1
1 2
2 3
3 4
4 5
5 6
6 7
7 8
8 9
9 10
10 11
11 12
12 13
13 14
14 15
15 16
16 17
17 18
18 19
19 20
20 21
21 22
22 23
23 24
24 25
25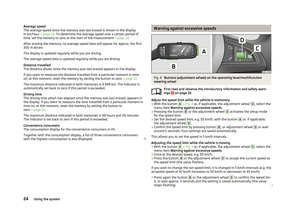 26
26 27
27 28
28 29
29 30
30 31
31 32
32 33
33 34
34 35
35 36
36 37
37 38
38 39
39 40
40 41
41 42
42 43
43 44
44 45
45 46
46 47
47 48
48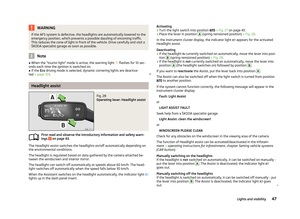 49
49 50
50 51
51 52
52 53
53 54
54 55
55 56
56 57
57 58
58 59
59 60
60 61
61 62
62 63
63 64
64 65
65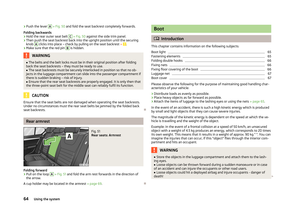 66
66 67
67 68
68 69
69 70
70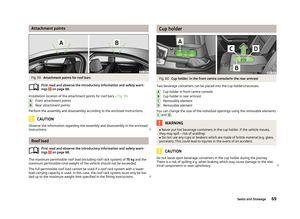 71
71 72
72 73
73 74
74 75
75 76
76 77
77 78
78 79
79 80
80 81
81 82
82 83
83 84
84 85
85 86
86 87
87 88
88 89
89 90
90 91
91 92
92 93
93 94
94 95
95 96
96 97
97 98
98 99
99 100
100 101
101 102
102 103
103 104
104 105
105 106
106 107
107 108
108 109
109 110
110 111
111 112
112 113
113 114
114 115
115 116
116 117
117 118
118 119
119 120
120 121
121 122
122 123
123 124
124 125
125 126
126 127
127 128
128 129
129 130
130 131
131 132
132 133
133 134
134 135
135 136
136 137
137 138
138 139
139 140
140 141
141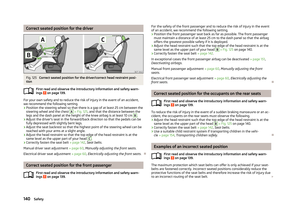 142
142 143
143 144
144 145
145 146
146 147
147 148
148 149
149 150
150 151
151 152
152 153
153 154
154 155
155 156
156 157
157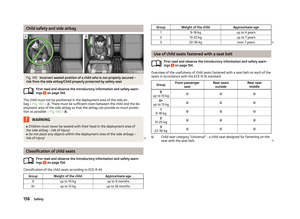 158
158 159
159 160
160 161
161 162
162 163
163 164
164 165
165 166
166 167
167 168
168 169
169 170
170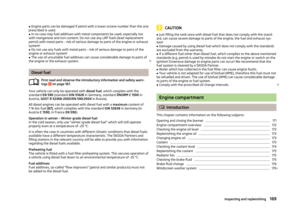 171
171 172
172 173
173 174
174 175
175 176
176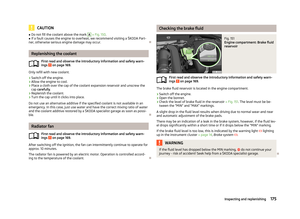 177
177 178
178 179
179 180
180 181
181 182
182 183
183 184
184 185
185 186
186 187
187 188
188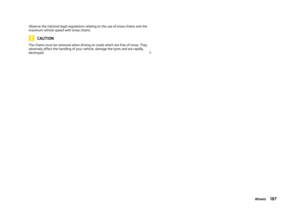 189
189 190
190 191
191 192
192 193
193 194
194 195
195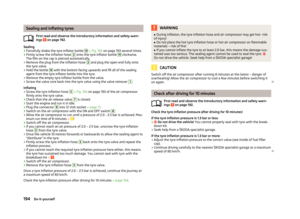 196
196 197
197 198
198 199
199 200
200 201
201 202
202 203
203 204
204 205
205 206
206 207
207 208
208 209
209 210
210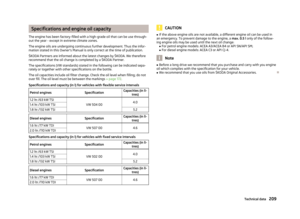 211
211 212
212 213
213 214
214 215
215 216
216 217
217 218
218 219
219 220
220 221
221