Page 193 of 222

Loosening/tightening wheel boltsFig. 162
Changing a wheel: Loosening
the wheel bolts
First read and observe the introductory information and safety warn-
ings on page 189.
Loosening
›
Push the wheel wrench onto the wheel bolt up to the stop 1)
.
›
Grasp the end of the wrench and turn the bolt about one turn in the direction of
the arrow » Fig. 162.
Tightening
›
Push the wheel wrench onto the wheel bolt up to the stop 1)
.
›
Grasp the end of the wrench and turn the bolt against the direction of the ar-
row » Fig. 162 until it is tight.
WARNINGUndo the wheel bolts only a little (about one turn) as long as the vehicle has
not yet been jacked up – risk of an accident!
Note
If it proves difficult to undo the bolts, carefully apply pressure to the end of the
wrench with your foot. Keep hold of the vehicle when doing so, and make sure
you keep your footing.
Raising the vehicleFig. 163
Changing a wheel: Jacking points
for positioning lifting jack
Fig. 164
Attach lifting jack
First read and observe the introductory information and safety warn-
ings
on page 189.
Position the lifting jack by selecting the jacking point that is closest to the faulty
wheel » Fig. 163 . The jacking point is located directly below the engraving in the
lower sill.
›
Insert the crank into the mount on the car jack » page 188, Vehicle tool kit .
›
Position the lifting jack below the jacking point with the crank and move it up
until its claw is positioned below the vertical web of the lower sill.
›
Align the lifting jack so that its claw grasps the web » Fig. 164 -
.
›
Support the base plate of the jack with its entire surface resting on level ground
and ensure that the lever is located in a vertical position to the area where the
claw grasps the web » Fig. 164 -
.
1)
Use the appropriate adapter for undoing and tightening the anti-theft wheel bolts
» page 192.
191Do-it-yourself
Page 194 of 222

›Continue turning up the jack until the wheel is just about lifted off the ground.WARNING■
Only raise the vehicle at the attachment points.■Choose a flat and firm surface for jacking the vehicle.
Securing wheels against theft
Fig. 165
Principle sketch: Anti-theft
wheel bolt with adapter
First read and observe the introductory information and safety warn-
ings on page 189.
The anti-theft wheel bolts can only be removed/tightended with the aid of the
adapter » page 188 , Vehicle tool kit .
›
Pull off the full wheel trim from the wheel rim or the cap from the anti-theft
wheel bolt.
›
Insert the adapter
B
» Fig. 165 with its toothed side fully into the inner tooth-
ing of the safety wheel bolt
A
until the stop so that only the outer hexagon is
jutting out.
›
Push the wheel wrench onto the adapter
B
up to the stop.
›
Loosen or tighten the wheel bolt » page 191.
›
After removing the adapter, reinstall the full wheel trim or place the cap onto
the anti-theft wheel bolt.
›
Have the tightening torque checked with a torque wrench as soon as possible.
Make a note of the code number hammered into the rear side of the adapter or
the rear side of the anti-theft wheel bolt. This number can be used to purchase a
replacement adapter from a ŠKODA Partner, if necessary.
We recommend that you always carry the adapter for the wheel bolts with you in
the vehicle. It should be stowed in the vehicle tool kit.
Tyre repair
Introduction
This chapter contains information on the following subjects:
Breakdown kit
193
Preparing to use the breakdown kit
193
Sealing and inflating tyres
194
Check after driving for 10 minutes
194
The repair can be undertaken on the vehicle immediately. Performing a repair with the breakdown kit not at all intended to replace a per-
manent repair on the tyre. Its purpose is to get to the nearest ŠKODA specialist
garage.
Use the breakdown kit to reliably repair tyre damage caused by foreign bodies or
a puncture with diameters up to approx. 4 mm.
Do not remove foreign bodies , e.g. screws or nails, from the tyre!
The breakdown kit must not be used under the following circumstances: › if there is damage to the wheels;
› in outside temperatures of less than -20 °C;
› with tears or punctures greater than 4 mm in size;
› if there is damage to the tyre wall;
› when driving with very low tyre pressure or with a completely flat tyre;
› if the use-by-date (see inflation bottle) has passed.
WARNING■
A tyre filled with sealant has the same driving characteristics as a standard
tyre.■
Do not travel faster than 80 km/h.
■
Avoid accelerating at full throttle, sharp braking and fast cornering.
■
Check the tyre inflation pressure after driving for 10 minutes!
■
The sealant is hazardous to heath. Remove immediately if it comes into con-
tact with the skin.
For the sake of the environment
Used sealant or sealant whose expiry date has passed must be disposed of in ac- cordance with environmental protection regulations. 192Do-it-yourself
Page 195 of 222

NoteImmediately replace the wheel that was repaired using the breakdown kit or con-
sult a ŠKODA specialist garage about repair possibilities.
Breakdown kit
Fig. 166
Components of the breakdown kit
First read and observe the introductory information and safety warn-
ings
on page 192.
The kit is located in a box under the floor covering in the luggage compartment.
Explanation of graphic Valve remover
Sticker with speed designation “max. 80 km/h”
Inflation hose with plug
Air compressor
Tyre inflation hose
Tyre inflation pressure indicator
Air release valve
ON and OFF switch
12 volt cable connector
Tyre inflator bottle with sealing agent
Replacement valve core
1234567891011The valve remover 1 has a slot at its lower end which fits into the valve core.
This is the only way in which you can remove and re-install the valve core from
the tyre valve. The same also applies to the replacement valve core 11
.
Note
■ Observe the manufacturer's usage instructions for the breakdown kit.■A new bottle of sealant can be purchased from ŠKODA Original Parts.
Preparing to use the breakdown kit
First read and observe the introductory information and safety warn-
ings
on page 192.
The following preparatory work must be carried out before using the breakdown
kit.
›
Park the vehicle as far away as possible from the flow of traffic. Park on as flat and firm a surface as possible.
›
If you are in flowing traffic, switch on the hazard warning light system and set
up the warning triangle at the prescribed distance! The national legal require-ments must be observed.
›
Let all of the occupants get out. While changing a tyre, the occupants of the
vehicle should not stand on the road (instead they should remain behind a crash
barrier).
›
Switch off the engine and move the gearshift lever into Neutral or move the se-
lector lever on the automatic gearbox into position P.
›
Firmly apply the handbrake.
›
Check that you can carry out the repairs with the breakdown kit » page 192.
›
If a trailer is connected, remove it.
›
Remove the breakdown kit from the luggage compartment.
›
Stick the sticker
2
» Fig. 166 on page 193 on the dash panel in view of the driv-
er.
›
Unscrew the valve cap.
›
Use the valve remover
1
to unscrew the valve core and place it on a clean sur-
face (rag, paper, etc.).
193Do-it-yourself
Page 196 of 222

Sealing and inflating tyresFirst read and observe the introductory information and safety warn-ings
on page 192.
Sealing
›
Forcefully shake the tyre inflator bottle
10
» Fig. 166 on page 193 several times.
›
Firmly screw the inflation hose
3
onto the tyre inflator bottle
10
clockwise.
The film on the cap is pierced automatically.
›
Remove the plug from the inflation hose
3
and plug the open end fully onto
the tyre valve.
›
Hold the bottle
10
with the bottom facing upwards and fill all of the sealing
agent from the tyre inflator bottle into the tyre.
›
Remove the empty tyre inflator bottle from the valve.
›
Screw the valve core back into the tyre valve using the valve remover
1
.
Inflating
›
Screw the tyre inflation hose
5
» Fig. 166 on page 193 of the air compressor
firmly onto the tyre valve.
›
Check that the air release valve
7
is closed.
›
Start the engine and run it in idle.
›
Plug the connector
9
into 12 Volt socket » page 71.
›
Switch on the air compressor with the ON and OFF switch
8
.
›
Allow the air compressor to run until a pressure of 2.0 - 2.5 bar is achieved. Max-
imum run time of 8 minutes » !
›
Switch off the air compressor.
›
If you cannot reach an air pressure of 2.0 – 2.5 bar, unscrew the tyre inflation
hose
5
from the tyre valve.
›
Drive the vehicle 10 metres forwards or backwards to allow the sealing agent to
“distribute” in the tyre.
›
Firmly screw the tyre inflation hose
5
back onto the tyre valve and repeat the
inflation process.
›
If you cannot reach the required tyre inflation pressure here either, this means
the tyre has sustained too much damage. You cannot seal with tyre with the breakdown kit »
.
›
Switch off the air compressor.
›
Remove the tyre inflation hose
5
from the tyre valve.
Once a tyre inflation pressure of 2.0 – 2.5 bar is achieved, continue the journey at
a maximum speed of 80 km/h.
Check the tyre inflation pressure after driving for 10 minutes » page 194.
WARNING■
During inflation, the tyre inflation hose and air compressor may get hot- risk
of injury!■
Do not place the hot tyre inflation hose or hot air compressor on flammable
materials – risk of fire!
■
If you cannot inflate the tyre to at least 2.0 bar, this means the damage sus-
tained was too serious. The sealing agent cannot be used to seal the tyre.
Do not drive the vehicle. Seek help from a ŠKODA specialist garage!
CAUTION
Switch off the air compressor after running 8 minutes at the latest – danger of
overheating! Allow the air compressor to cool a few minutes before switching it
on again.
Check after driving for 10 minutes
First read and observe the introductory information and safety warn-
ings
on page 192.
Check the tyre inflation pressure after driving for 10 minutes!
If the tyre inflation pressure is 1.3 bar or less:
›
Do not drive the vehicle! You cannot properly seal with tyre with the break-
down kit.
›
Seek help from a ŠKODA specialist garage.
If the tyre inflation pressure is 1.3 bar or more:
›
Adjust the tyre inflation pressure to the correct value (see inside of fuel filler cap).
›
Continue driving carefully to the nearest ŠKODA specialist garage at a maximum
speed of 80 km/h.
194Do-it-yourself
Page 197 of 222

Jump-starting
Introduction
This chapter contains information on the following subjects:
Jump-starting using the battery from another vehicle
195
Jump-starting in vehicles with the START-STOP system
196
The battery of another vehicle can be used to jump-start your vehicle if the en-
gine will not start because the battery is flat. Jump-start cables are required for
this purpose.
Both batteries must have a rated voltage of 12 V. The capacity (Ah) of the battery
supplying the power must not be significantly less than the capacity of the dis- charged battery in your vehicle.
Jump-start cables
Only use jump-start cables which have an adequately large cross-section and in-
sulated terminal clamps. Observe the manufacturer's instructions.
Positive cable – colour coding in the majority of cases is red.
Negative cable – colour coding in the majority of cases is black.
WARNING■
A discharged vehicle battery may already freeze at temperatures just below
0 °C. In case of frozen battery carry out no jump-starting – risk of explosion!■
Pay attention to the warning instructions relating to working in the engine
compartment » page 169, Engine compartment .
■
The non-insulated parts of the terminal clamps must never make contact
with each other. In addition, the jump-start cable connected to the positive
terminal of the battery must not come into contact with electrically conduct-
ing parts of the vehicle – risk of short circuit!
■
Do not clamp the jump-start cable to the negative terminal of the dis-
charged battery. There is the risk of detonating gas seeping out the battery
being ignited by the strong spark which results from the engine being started.
■
Route the jump-start cables so that they cannot be caught by any rotating
parts in the engine compartment.
■
Do not bend over the battery – risk of caustic burns!
■
The vent screws of the battery cells must be tightened firmly.
WARNING (Continued)■ Keep any sources of ignition (naked flame, smouldering cigarettes, etc.)
away from the battery – risk of an explosion!■
Never jump-start vehicle batteries with an electrolyte level that is too low –
risk of explosion and caustic burns.
Note
■ There must not be any contact between the two vehicles otherwise current
may flow as soon as the negative terminals are connected.■
The discharged battery must be properly connected to the system of the vehi-
cle.
■
We recommend you buy jump-start cables from a car battery specialist.
Jump-starting using the battery from another vehicle
Fig. 167
Jump-starting: A – flat battery, B
– battery providing current
First read and observe the introductory information and safety warn-
ings on page 195.
The jump-start cables must be attached in the following sequence.
›
Attach one end
1
on the positive terminal
A
» Fig. 167 .
›
Attach the other end
2
to the positive terminal
B
.
›
Attach one end
3
on the minus terminal
B
.
›
Attach the other end
4
to a solid metal part which is connected firmly to the
engine block, or to the engine block itself.
Starting engine
›
Start the engine on the vehicle providing the power and allow it to idle.
›
Now start the engine of the vehicle with the discharged battery.
195Do-it-yourself
Page 198 of 222

›If the engine does not start, terminate the attempt to start the engine after
10 seconds and wait for about 30 seconds before repeating the process.›
Disconnect the cables in exactly the reverse order to the one described above.
Jump-starting in vehicles with the START-STOP system
Fig. 168
Engine compartment: Earth
First read and observe the introductory information and safety warn-
ings on page 195.
On vehicles with the START-STOP system, the jump-start cable of the charger
must never be connected directly to the negative pole of the vehicle battery, but
only to the engine earth » Fig. 168.
Towing the vehicle
Introduction
This chapter contains information on the following subjects:
Front towing eye
197
Rear towing eye
197
Vehicles a towing device
198
Vehicles with manual transmission may be towed in with a tow bar or a tow rope
or with the front or rear wheels raised.
Vehicles with automatic transmission may be towed in with a tow bar or a tow
rope or with the front wheels raised. If the vehicle is raised at rear, the automatic
gearbox is damaged!
A tow bar is the safest way of towing a vehicle and also minimises any shocks.
Only use a tow rope if a suitable tow bar is not available.
The following guidelines must be observed.
Driver of the tow vehicle›
Release the clutch particularly gently when starting off or depress the accelera-
tor particularly gently if the vehicle is fitted with an automatic gearbox.
›
On vehicles with a manual transmission, only push down on the accelerator pedal once the rope is taught.
The maximum towing speed is 50 km/h.
Driver of the towed vehicle
›
Switch on the ignition so that the steering wheel is not blocked and so that the
turn signal lights, horn, windscreen wipers and windscreen washer system can be switched on.
›
Take the vehicle out of gear or move the selector lever into position N if the ve-
hicle is fitted with an automatic gearbox.
Please note that the brake servo unit and power steering only operate if the en-
gine is running. If the engine is not running, significantly more physical force is re- quired to depress the brake pedal and steer the vehicle.
If using a tow rope, ensure that it is always kept taught.
CAUTION
■ Do not tow start the engine - danger of damaging the engine! On vehicles with
a catalytic converter, unburnt fuel may get into the catalytic converter where it
may ignite. This in turn may damage or destroy the catalytic converter. The bat-
tery from another vehicle can be used as a jump-start aid » page 195, Jump-start-
ing .■
If the gearbox of your vehicle no longer contains any oil because of a defect,
your vehicle must only be towed in with the driven wheels raised clear of the
ground, or on a special vehicle transporter or trailer.
■
The vehicle must be transported on a special vehicle or trailer if it is not possible
to tow in the vehicle in the way described or if the towing distance is greater than
50 km.
■
To protect both vehicles when tow-starting or towing, the tow rope should be
elastic. Thus one should only use plastic fibre rope or a rope made out of a simi-
larly elastic material.
196Do-it-yourself
Page 199 of 222
■While towing, take care to avoid impermissibly high tensile forces or jerky loads.
There is always a risk of excessive stresses and damage resulting at the points to which you attach the tow rope or tow bar when you attempt to tow a vehicle
which is not standing on a paved road.■
Attach the tow rope or the tow bar to the towing eyes » page 197 , Front tow-
ing eye or » page 197 , Rear towing eye to the detachable ball head of the tow-
ing device » page 106 .
Note
■
We recommend using a tow rope from ŠKODA Original Accessories available
from a ŠKODA Partner.■
Towing another vehicle requires a certain amount of practice. Both drivers
should be familiar with the particular points about towing a vehicle. Unskilled
drivers should not attempt to tow in another vehicle or to be towed in.
■
When towing, respect the national legal provisions, especially those which re-
late to the identification of the towing vehicle and the vehicle being towed.
■
The tow rope must not be twisted as it may in certain circumstances result in
the front towing eye being unscrewed out of your vehicle.
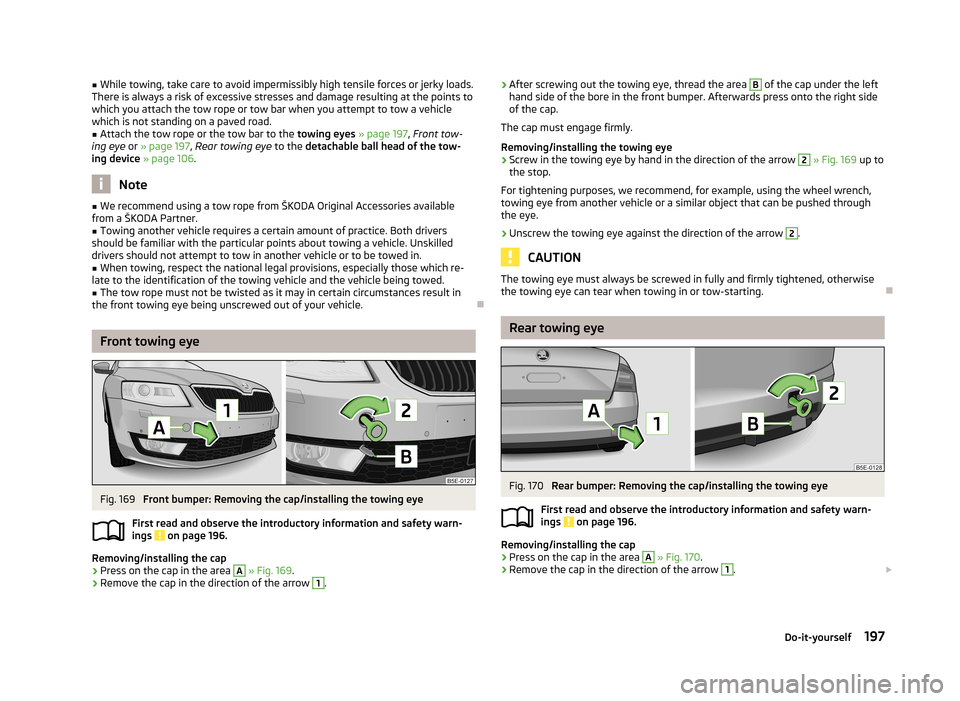
Front towing eye
Fig. 169
Front bumper: Removing the cap/installing the towing eye
First read and observe the introductory information and safety warn- ings
on page 196.
Removing/installing the cap
›
Press on the cap in the area
A
» Fig. 169 .
›
Remove the cap in the direction of the arrow
1
.
›After screwing out the towing eye, thread the area B of the cap under the left
hand side of the bore in the front bumper. Afterwards press onto the right side
of the cap.
The cap must engage firmly.
Removing/installing the towing eye›
Screw in the towing eye by hand in the direction of the arrow
2
» Fig. 169 up to
the stop.
For tightening purposes, we recommend, for example, using the wheel wrench,
towing eye from another vehicle or a similar object that can be pushed through
the eye.
›
Unscrew the towing eye against the direction of the arrow
2
.
CAUTION
The towing eye must always be screwed in fully and firmly tightened, otherwise
the towing eye can tear when towing in or tow-starting.
Rear towing eye
Fig. 170
Rear bumper: Removing the cap/installing the towing eye
First read and observe the introductory information and safety warn- ings
on page 196.
Removing/installing the cap
›
Press on the cap in the area
A
» Fig. 170 .
›
Remove the cap in the direction of the arrow
1
.
197Do-it-yourself
Page 200 of 222

›After screwing out the towing eye, thread the area B of the cap under the up-
per hand side of the bore in the rear bumper. Afterwards press onto the lower side of the cap.
The cap must engage firmly.
Removing/installing the towing eye›
Screw in the towing eye by hand in the direction of the arrow
2
» Fig. 170 up to
the stop.
For tightening purposes, we recommend, for example, using the wheel wrench,
towing eye from another vehicle or a similar object that can be pushed through
the eye.
›
Unscrew the towing eye against the direction of the arrow
2
.
On vehicles with a factory-fitted towing device, there is no mount for the screw-
in towing eye behind the cap » page 198, Vehicles a towing device .
CAUTION
The towing eye must always be screwed in fully and firmly tightened, otherwise
the towing eye can tear when towing in or tow-starting.
Vehicles a towing device
First read and observe the introductory information and safety warn-
ings
on page 196.
On vehicles with a factory-fitted towing device, there is no mount for the screw-
in towing eye behind the cap.
Use the detachable ball rod for towing » page 106, Towing device .
Towing the vehicle using the towing device is a viable alternative solution to us-
ing the towing eye.
If the towing device is removed completely, it must be replaced with the standard
reinforcement of the rear bumper which is part of the mount for the towing eye.
If this procedure is not observed, the vehicle may not meet the national legal pro- visions.
CAUTION
The detachable ball rod and the vehicle can be damaged if an unsuitable tow bar
is used.NoteThe detachable ball rod must always be in the vehicle so that it can be used for
towing, if necessary.
198Do-it-yourself
 1
1 2
2 3
3 4
4 5
5 6
6 7
7 8
8 9
9 10
10 11
11 12
12 13
13 14
14 15
15 16
16 17
17 18
18 19
19 20
20 21
21 22
22 23
23 24
24 25
25 26
26 27
27 28
28 29
29 30
30 31
31 32
32 33
33 34
34 35
35 36
36 37
37 38
38 39
39 40
40 41
41 42
42 43
43 44
44 45
45 46
46 47
47 48
48 49
49 50
50 51
51 52
52 53
53 54
54 55
55 56
56 57
57 58
58 59
59 60
60 61
61 62
62 63
63 64
64 65
65 66
66 67
67 68
68 69
69 70
70 71
71 72
72 73
73 74
74 75
75 76
76 77
77 78
78 79
79 80
80 81
81 82
82 83
83 84
84 85
85 86
86 87
87 88
88 89
89 90
90 91
91 92
92 93
93 94
94 95
95 96
96 97
97 98
98 99
99 100
100 101
101 102
102 103
103 104
104 105
105 106
106 107
107 108
108 109
109 110
110 111
111 112
112 113
113 114
114 115
115 116
116 117
117 118
118 119
119 120
120 121
121 122
122 123
123 124
124 125
125 126
126 127
127 128
128 129
129 130
130 131
131 132
132 133
133 134
134 135
135 136
136 137
137 138
138 139
139 140
140 141
141 142
142 143
143 144
144 145
145 146
146 147
147 148
148 149
149 150
150 151
151 152
152 153
153 154
154 155
155 156
156 157
157 158
158 159
159 160
160 161
161 162
162 163
163 164
164 165
165 166
166 167
167 168
168 169
169 170
170 171
171 172
172 173
173 174
174 175
175 176
176 177
177 178
178 179
179 180
180 181
181 182
182 183
183 184
184 185
185 186
186 187
187 188
188 189
189 190
190 191
191 192
192 193
193 194
194 195
195 196
196 197
197 198
198 199
199 200
200 201
201 202
202 203
203 204
204 205
205 206
206 207
207 208
208 209
209 210
210 211
211 212
212 213
213 214
214 215
215 216
216 217
217 218
218 219
219 220
220 221
221


