2012 MINI COUPE ROADSTER CONVERTIBLE height
[x] Cancel search: heightPage 37 of 283

CONTROLSOpening and closing
36
MINI Convertible, MINI Roadster
The passenger compartment is monitored up to
the height of the seat's surface. This way, the
anti-theft alarm system including the interior
motion sensor are armed, even if the convertible
top is open. Falling objects, e.g. tree leaves, may
trigger a false alarm, refer to Avoiding false
alarms.
Avoiding false alarms
The tilt alarm sensor and the interior movement
detector can be switched off together.
This prevents false alarms, e.g. in the following
situations:
>In duplex garages
> When being transported on car-carrying
trains, ferries or trailers
> If pets are to remain inside the car
Switching off the tilt alarm sensor and
interior movement detector
>Press the button on the remote
control twice in succession.
> Lock the vehicle twice with the integrated
key.
LEDs flash in short succession for approx.
2seconds.
The tilt alarm sensor and the interior movement
detector are switched off until the car is next
unlocked and locked.
Comfort Access
The concept
Access to the vehicle is possible without the use
of the remote control. All you need to do is wear
the remote control close to your body, e.g. in
your jacket pocket. The vehicle automatically
detects the remote control within the immedi-
ate vicinity or in the passenger compartment.
Comfort Access supports the following
functions:
> Unlocking/locking the vehicle
> Unlocking the tailgate separately
> Starting the engine
> MINI Convertible: convenient closing and
soft-top control with the remote control for
Comfort Access
> MINI Coupe, MINI Roadster: closing the side
windows
Functional requirements
>There are no external malfunction sources in
the vicinity.
> For locking, the remo te control must be
outside of the vehicle.
> The vehicle cannot be locked or unlocked
again until after approx. 2 seconds.
> The engine can only be started if the remote
control is in the vehicle.
> The doors and tailgate must be closed to
operate the windows.
Comparison to standard remote controls
The indicated function can be operated by
pressing the buttons or via Comfort Access.
Instructions on opening and closing are found
starting on page 28.
If you notice a brief delay while opening or
closing the windows or cover, the system
is checking whether a re mote control is inside
the vehicle. Repeat the opening or closing
procedure, if necessary. <
00320051004F004C00510048000300280047004C0057004C005200510003
Page 52 of 283

AdjustmentsCONTROLS
51
injure the abdomen. Avoid wearing bulky cloth-
ing and regularly pull the belt in the upper-body
area taut; otherwise, its restraining effect could
be impaired. <
Safety belts, refer to page 53.
Seats
Note before adjusting
Never attempt to adjust your seat while
the vehicle is moving. The seat could
respond with unexpected movement, and the
ensuing loss of vehicle control could lead to an
accident.
On the front passenger seat as well, do not
incline the backrest too far to the rear while the
vehicle is being driven; otherwise, there is a
danger in the event of an accident of sliding
under the safety belt, el iminating the protection
normally provided by the belt.<
Comply with the instruct ions on head restraint
height on page 52 and on damaged safety belts
on page 54.
Seat adjustment
Observe the instructions on page 51 to
ensure the best possible personal
protection.<
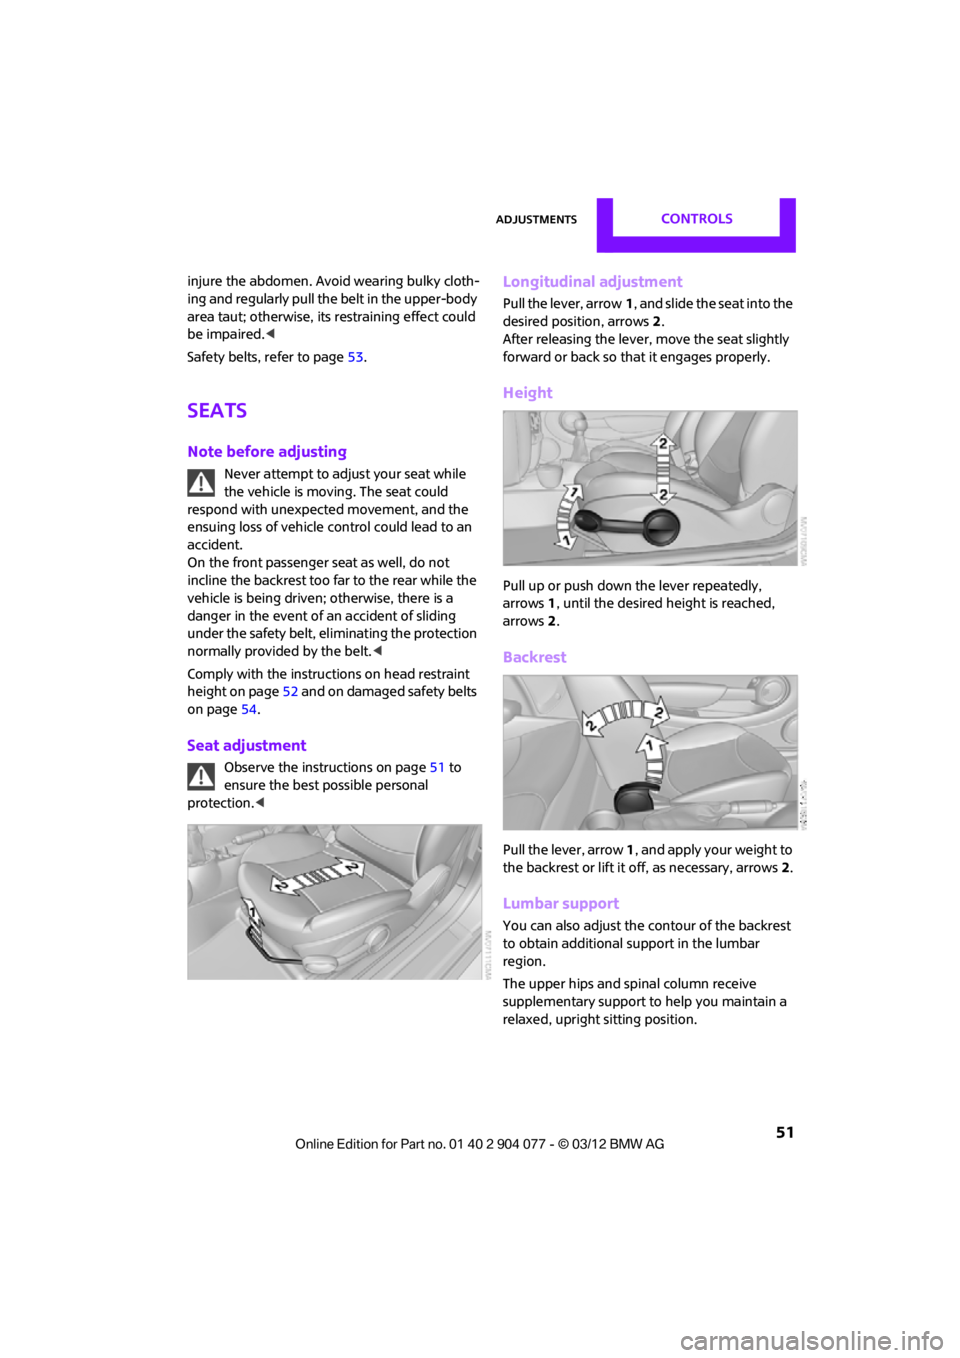
Longitudinal adjustment
Pull the lever, arrow 1, and slide the seat into the
desired position, arrows 2.
After releasing the lever, move the seat slightly
forward or back so that it engages properly.
Height
Pull up or push down the lever repeatedly,
arrows 1, until the desired height is reached,
arrows 2.
Backrest
Pull the lever, arrow 1, and apply your weight to
the backrest or lift it off, as necessary, arrows 2.
Lumbar support
You can also adjust the contour of the backrest
to obtain additional support in the lumbar
region.
The upper hips and spinal column receive
supplementary support to help you maintain a
relaxed, upright sitting position.
00320051004F004C00510048000300280047004C0057004C005200510003
Page 53 of 283

CONTROLSAdjustments
52
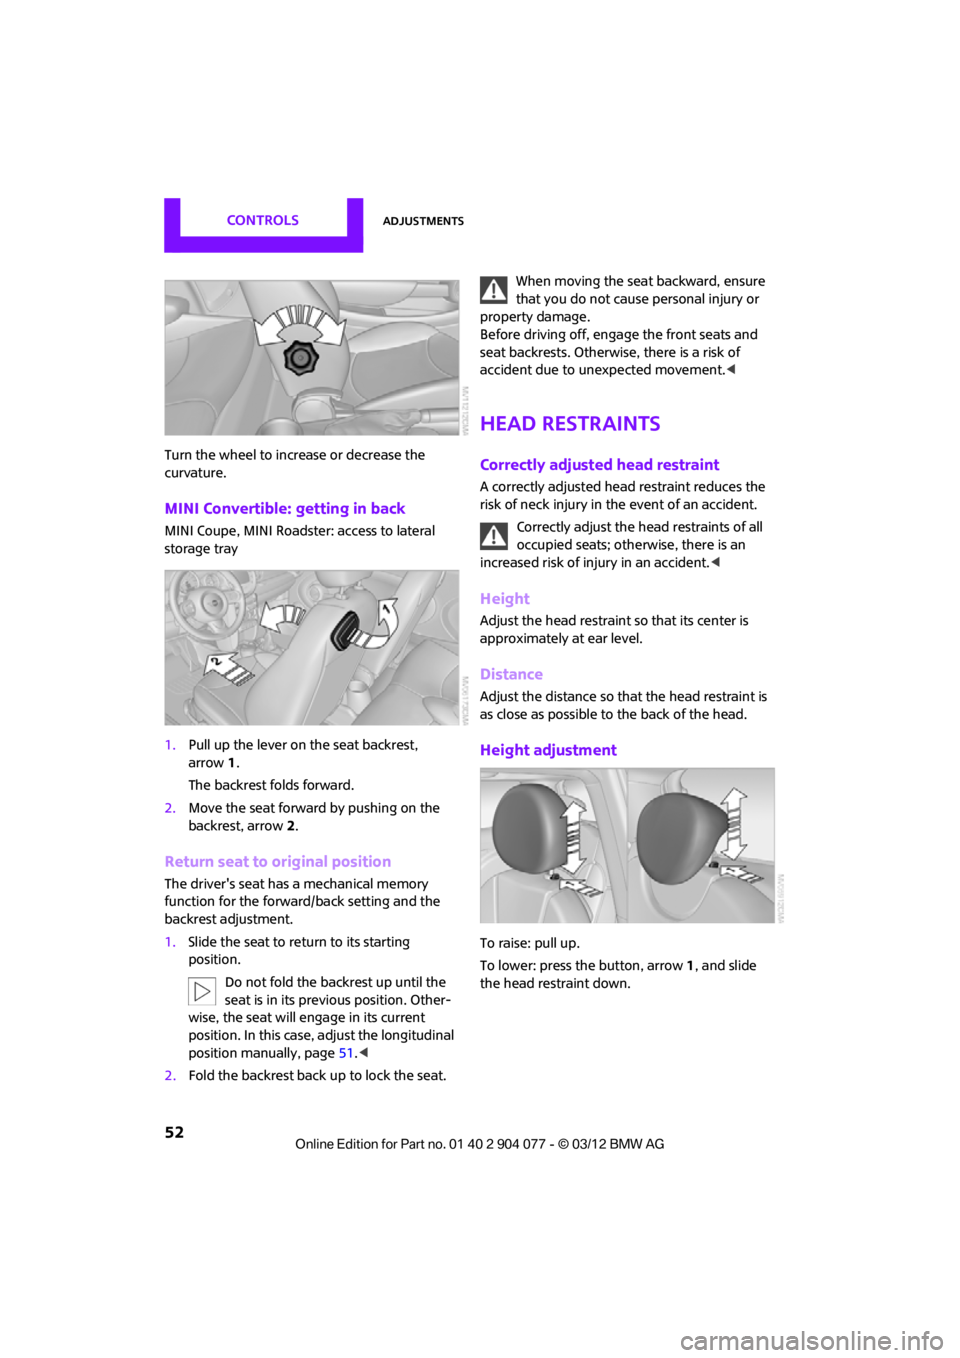
Turn the wheel to increase or decrease the
curvature.
MINI Convertible: getting in back
MINI Coupe, MINI Roadster: access to lateral
storage tray
1.Pull up the lever on the seat backrest,
arrow 1.
The backrest folds forward.
2. Move the seat forward by pushing on the
backrest, arrow 2.
Return seat to original position
The driver's seat has a mechanical memory
function for the forward/back setting and the
backrest adjustment.
1. Slide the seat to retu rn to its starting
position.
Do not fold the backrest up until the
seat is in its previous position. Other-
wise, the seat will engage in its current
position. In this case, adjust the longitudinal
position manually, page 51.<
2. Fold the backrest back up to lock the seat. When moving the seat backward, ensure
that you do not cause personal injury or
property damage.
Before driving off, enga ge the front seats and
seat backrests. Otherwise, there is a risk of
accident due to unexpected movement. <
Head restraints
Correctly adjusted head restraint
A correctly adjusted head restraint reduces the
risk of neck injury in the event of an accident.
Correctly adjust the head restraints of all
occupied seats; othe rwise, there is an
increased risk of injury in an accident. <
Height
Adjust the head restraint so that its center is
approximately at ear level.
Distance
Adjust the distance so th at the head restraint is
as close as possible to the back of the head.
Height adjustment
To raise: pull up.
To lower: press the button, arrow 1, and slide
the head restraint down.
00320051004F004C00510048000300280047004C0057004C005200510003
Page 223 of 283

MOBILITYEngine compartment
222
Hood
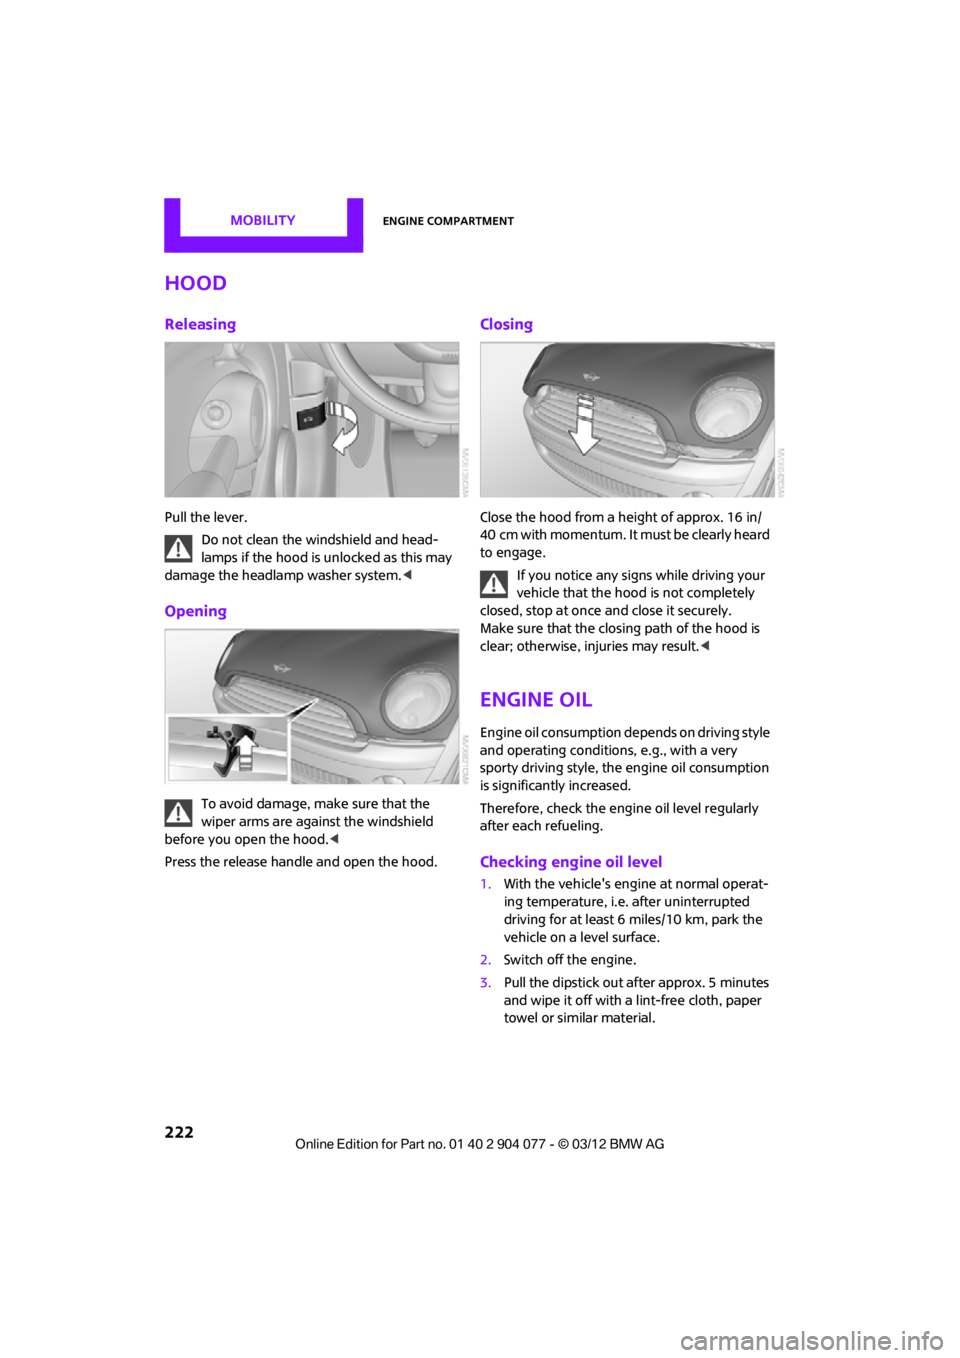
Releasing
Pull the lever.Do not clean the windshield and head-
lamps if the hood is unlocked as this may
damage the headlamp washer system. <
Opening
To avoid damage, make sure that the
wiper arms are against the windshield
before you open the hood. <
Press the release handle and open the hood.
Closing
Close the hood from a height of approx. 16 in/
40 cm with momentum. It must be clearly heard
to engage.
If you notice any signs while driving your
vehicle that the hood is not completely
closed, stop at once and close it securely.
Make sure that the closing path of the hood is
clear; otherwise, injuries may result. <
Engine oil
Engine oil consumption depends on driving style
and operating conditions, e.g., with a very
sporty driving style, the engine oil consumption
is significantly increased.
Therefore, check the engine oil level regularly
after each refueling.
Checking engine oil level
1. With the vehicle's engine at normal operat-
ing temperature, i.e. after uninterrupted
driving for at least 6 miles/10 km, park the
vehicle on a level surface.
2. Switch off the engine.
3. Pull the dipstick out after approx. 5 minutes
and wipe it off with a lint-free cloth, paper
towel or similar material.
00320051004F004C00510048000300280047004C0057004C005200510003
Page 241 of 283

MOBILITYReplacing components
240
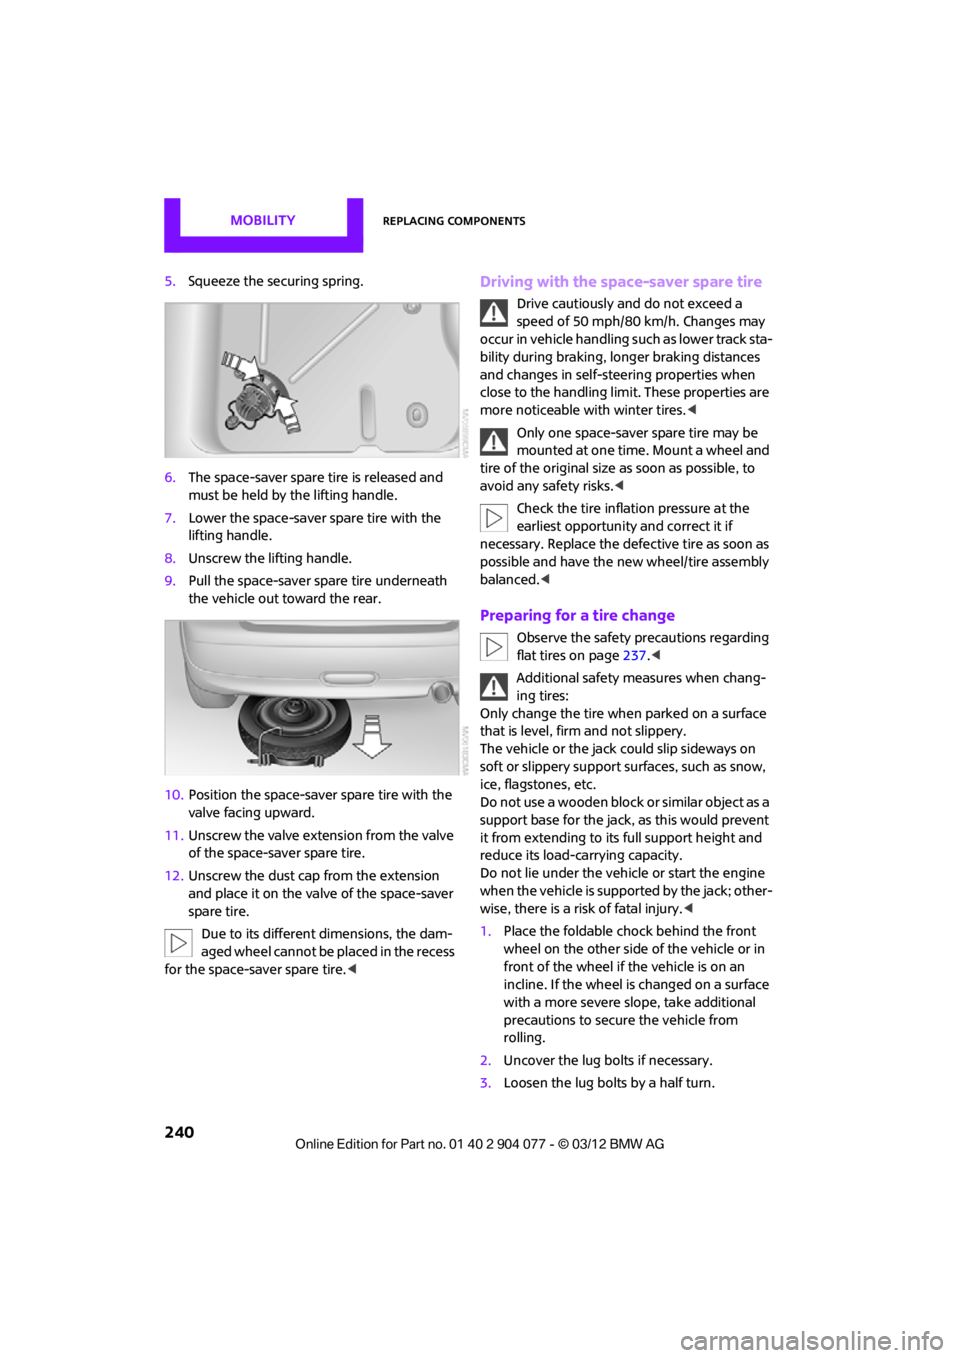
5.Squeeze the securing spring.
6. The space-saver spare tire is released and
must be held by the lifting handle.
7. Lower the space-saver spare tire with the
lifting handle.
8. Unscrew the lifting handle.
9. Pull the space-saver spare tire underneath
the vehicle out toward the rear.
10. Position the space-save r spare tire with the
valve facing upward.
11. Unscrew the valve extension from the valve
of the space-saver spare tire.
12. Unscrew the dust cap from the extension
and place it on the valve of the space-saver
spare tire.
Due to its different dimensions, the dam-
aged wheel cannot be placed in the recess
for the space-saver spare tire.
speed of 50 mph/80 km/h. Changes may
occur in vehicle handling such as lower track sta-
bility during braking, longer braking distances
and changes in self-steering properties when
close to the handling limit. These properties are
more noticeable with winter tires. <
Only one space-saver spare tire may be
mounted at one time. Mount a wheel and
tire of the original size as soon as possible, to
avoid any safety risks. <
Check the tire inflation pressure at the
earliest opportunity and correct it if
necessary. Replace the defe ctive tire as soon as
possible and have the ne w wheel/tire assembly
balanced. <
Preparing for a tire change
Observe the safety precautions regarding
flat tires on page 237.<
Additional safety measures when chang-
ing tires:
Only change the tire wh en parked on a surface
that is level, firm and not slippery.
The vehicle or the jack could slip sideways on
soft or slippery support surfaces, such as snow,
ice, flagstones, etc.
Do not use a wooden block or similar object as a
support base for the jack, as this would prevent
it from extending to its full support height and
reduce its load-carrying capacity.
Do not lie under the vehicle or start the engine
when the vehicle is supported by the jack; other-
wise, there is a risk of fatal injury. <
1. Place the foldable chock behind the front
wheel on the other side of the vehicle or in
front of the wheel if the vehicle is on an
incline. If the wheel is changed on a surface
with a more severe sl ope, take additional
precautions to secure the vehicle from
rolling.
2. Uncover the lug bolts if necessary.
3. Loosen the lug bolts by a half turn.
00320051004F004C00510048000300280047004C0057004C005200510003
Page 253 of 283

REFERENCETechnical data
252
CooperCooper SJohn Cooper Works
1Vehicle height without roof
antenna 54.3/1,378 54.5/1,384 54.5/1,384
2 Track, front 57.4/1,459 57.2/1,453 57.2/1,453
3 Vehicle width, with outside
mirror 74.5/1,892 74.5/1,892 74.5/1,892
4 Track, rear
57.8/1,467 57.5/1,461 57.5/1,461
5 Vehicle width, without outside
mirror 66.3/1,683 66.3/1,683 66.3/1,683
6 Wheelbase
97.1/2,467 97.1/2,467 97.1/2,467
7 Vehicle length
146.8/3,728 147/3,734 148/3,758
All dimensions in inches/mm. Minimum turning radius dia.: 35 ft 10 in/10.7 m.
00320051004F004C00510048000300280047004C0057004C005200510003
Page 255 of 283

REFERENCETechnical data
254
CooperCooper SJohn Cooper Works
1Vehicle height without roof
antenna 54.5/1,384 54.7/1,390 54.8/1,391
2 Track, front 57.4/1,459 57.2/1,453 57.2/1,453
3 Vehicle width, with outside
mirror 74.5/1,892 74.5/1,892 74.5/1,892
4 Track, rear
57.8/1,467 57.5/1,461 57.5/1,461
5 Vehicle width, without outside
mirror 66.3/1,683 66.3/1,683 66.3/1,683
6 Wheelbase
97.1/2,467 97.1/2,467 97.1/2,467
7 Vehicle length
146.8/3,728 147/3,734 148/3,758
All dimensions in inches/mm. Minimum turning radius dia.: 35 ft 10 in/10.7 m.
00320051004F004C00510048000300280047004C0057004C005200510003
Page 257 of 283

REFERENCETechnical data
256
CooperCooper SJohn Cooper Works
1Vehicle height without roof
antenna 55.7/1,414 55.7/1,414 55.7/1,414
2 Track, front 57.4/1,459 57.2/1,453 57.2/1,453
3 Vehicle width, with outside
mirror 75.3/1,913 75.3/1,913 75.3/1,913
4 Track, rear
57.8/1,467 57.5/1,461 57.5/1,461
5 Vehicle width, without outside
mirror 66.3/1,683 66.3/1,683 66.3/1,683
6 Wheelbase
97.1/2,467 97.1/2,467 97.1/2,467
7 Vehicle length
146.6/3,723 146.8/3,729 148/3,758
All dimensions in inches/mm. Minimum turning radius dia.: 35 ft 10 in/10.7 m.
00320051004F004C00510048000300280047004C0057004C005200510003