2012 MINI COUPE ROADSTER CONVERTIBLE check engine
[x] Cancel search: check enginePage 14 of 283

CockpitAT A GLANCE
13
Indicator and warning
lamps
The concept
Indicator and warning lamps can light up in
various combinations and colors in indicator
area 1 or 2.
Some lamps will be tested for proper functioning
when the engine is started or the ignition is
switched on and will therefore light up briefly.
Explanatory text messages
Text messages at the uppe r edge of the Control
Display explain the mean ing of the displayed
indicator and warning lamps. You can call up more information, e.g. on the
cause of a malfunction and on how to respond,
via Check Control, page
77.
In urgent cases, this information will be shown
as soon as the corresponding lamp lights up.
Indicator lamps without text messages
The following indicator lamps in display area 1
indicate certain functions:
High beams/headlamp flasher 98
Front fog lamps 99
Rear fog lamp 99
Lamp flashes:
DSC or DTC is regulating the drive
forces in order to maintain driving
stability 83
Parking brake applied 62
Engine malfunction with adverse effect
on exhaust emissions 226
Cruise control 68
Turn signals 65
00320051004F004C00510048000300280047004C0057004C005200510003
Page 37 of 283

CONTROLSOpening and closing
36
MINI Convertible, MINI Roadster
The passenger compartment is monitored up to
the height of the seat's surface. This way, the
anti-theft alarm system including the interior
motion sensor are armed, even if the convertible
top is open. Falling objects, e.g. tree leaves, may
trigger a false alarm, refer to Avoiding false
alarms.
Avoiding false alarms
The tilt alarm sensor and the interior movement
detector can be switched off together.
This prevents false alarms, e.g. in the following
situations:
>In duplex garages
> When being transported on car-carrying
trains, ferries or trailers
> If pets are to remain inside the car
Switching off the tilt alarm sensor and
interior movement detector
>Press the button on the remote
control twice in succession.
> Lock the vehicle twice with the integrated
key.
LEDs flash in short succession for approx.
2seconds.
The tilt alarm sensor and the interior movement
detector are switched off until the car is next
unlocked and locked.
Comfort Access
The concept
Access to the vehicle is possible without the use
of the remote control. All you need to do is wear
the remote control close to your body, e.g. in
your jacket pocket. The vehicle automatically
detects the remote control within the immedi-
ate vicinity or in the passenger compartment.
Comfort Access supports the following
functions:
> Unlocking/locking the vehicle
> Unlocking the tailgate separately
> Starting the engine
> MINI Convertible: convenient closing and
soft-top control with the remote control for
Comfort Access
> MINI Coupe, MINI Roadster: closing the side
windows
Functional requirements
>There are no external malfunction sources in
the vicinity.
> For locking, the remo te control must be
outside of the vehicle.
> The vehicle cannot be locked or unlocked
again until after approx. 2 seconds.
> The engine can only be started if the remote
control is in the vehicle.
> The doors and tailgate must be closed to
operate the windows.
Comparison to standard remote controls
The indicated function can be operated by
pressing the buttons or via Comfort Access.
Instructions on opening and closing are found
starting on page 28.
If you notice a brief delay while opening or
closing the windows or cover, the system
is checking whether a re mote control is inside
the vehicle. Repeat the opening or closing
procedure, if necessary. <
00320051004F004C00510048000300280047004C0057004C005200510003
Page 39 of 283

CONTROLSOpening and closing
38
Warning lamps
The warning lamp lights up when an
attempt is made to start the engine: the
engine cannot be started. The remote
control is not inside the vehicle or is malfunc-
tioning. Take the remote control with you inside
the vehicle or have it checked. If necessary,
insert another remote co ntrol into the ignition
lock.
The warning lamp lights up when the
engine is running: the remote control is
no longer inside the vehicle. After the
engine is switched off, the engine can only be
restarted within approx. 10 seconds.
The indicator lamp comes on and a
message appears on the Control
Display: replace the battery in the
remote control.
Replacing the battery
The remote control for Comfort Access contains
a b a t t e r y t h a t w i l l n e e d t o b e r e p l a c e d f r o m t i m e
to time.
1. Remove the cover.
2. Insert the new battery with the plus side
facing up.
3. Press the cover on to close.
Take the old battery to a recycling center
or to your MINI dealer. <
Windows
To prevent injuries, exercise care when
closing the windows.
Take the remote control with you when you
leave the car; otherwise, children could operate
the electric windows and possibly injure
themselves. <
If, after a window is opened and closed
several times in close succession, the
window can only be closed and not opened, the
system is overheated. Le t the system cool for
several minutes with the ignition switched on or
the engine running. <
Opening
>Press the swit ch downward.
The window opens until you release the
switch.
> Push the switch downward.
As of radio readiness, the windows will open
automatically. Push the switch again to stop
the opening movement.
To open the window a crack, press the switch
down twice in quick succession.
Closing
In order to close the window, press the switch
up. The window closes until you release the
switch.
00320051004F004C00510048000300280047004C0057004C005200510003
Page 40 of 283

Opening and closingCONTROLS
39
Initializing electric power windows
If the battery was disconnected, e.g. for
changing batteries or vehicle storage,
reinitialize the power wi ndows; otherwise, the
windows will not be lowered.
MINI Convertible: opening the convertible top is
not possible. <
1. Close the doors.
2. Open both windows.
3. Close both windows.
In the event of a system malfunction, please
contact your MINI dealer.
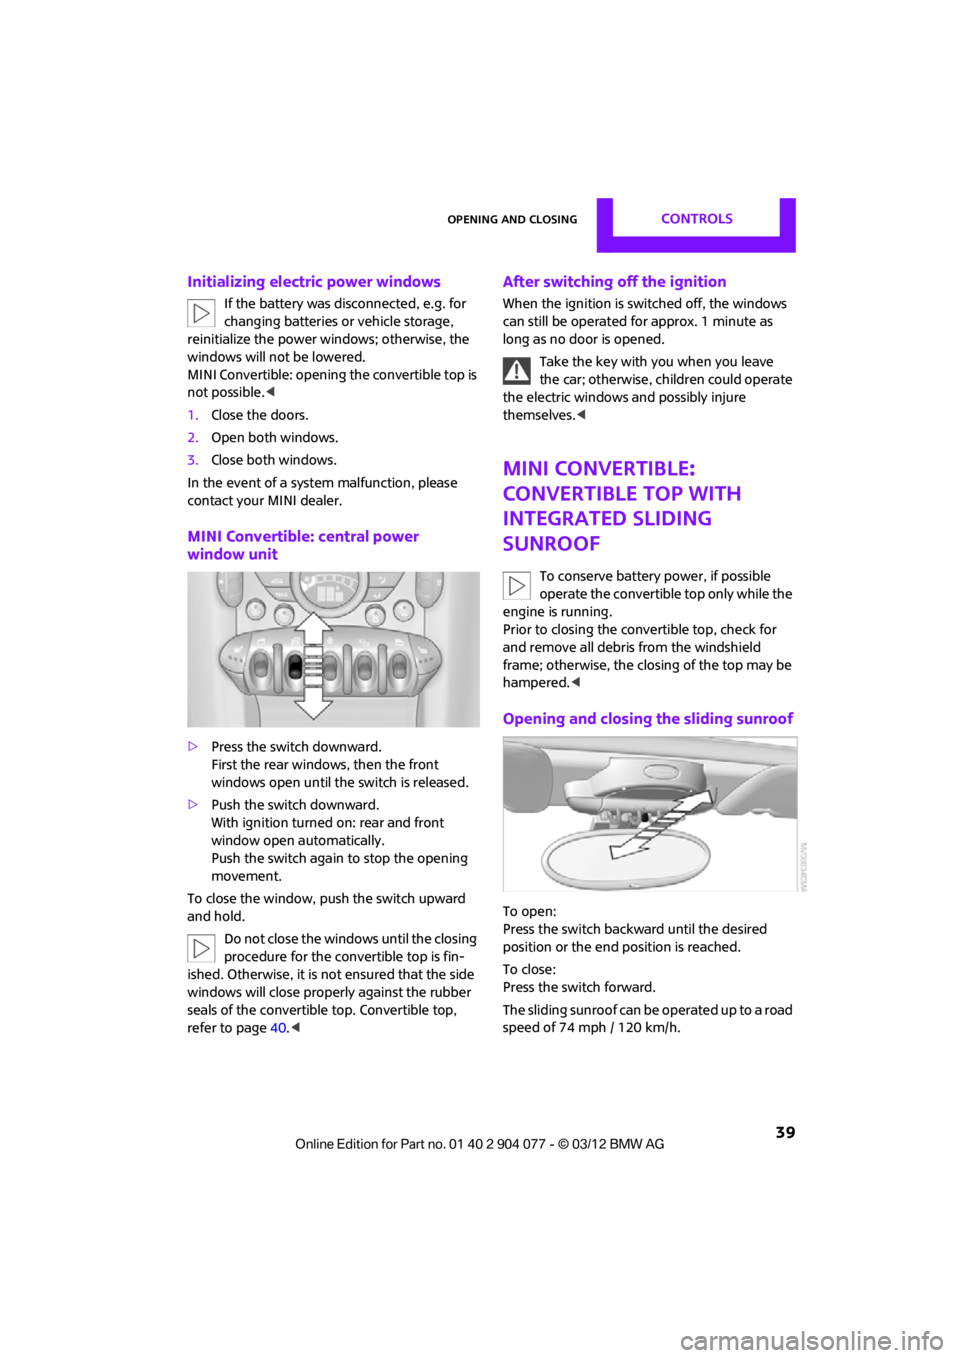
MINI Convertible: central power
window unit
> Press the switch downward.
First the rear windows, then the front
windows open until the switch is released.
> Push the switch downward.
With ignition turned on: rear and front
window open automatically.
Push the switch again to stop the opening
movement.
To close the window, push the switch upward
and hold. Do not close the windows until the closing
procedure for the convertible top is fin-
ished. Otherwise, it is not ensured that the side
windows will close properly against the rubber
seals of the convertible top. Convertible top,
refer to page 40.<
After switching off the ignition
When the ignition is sw itched off, the windows
can still be operated for approx. 1 minute as
long as no door is opened.
Take the key with you when you leave
the car; otherwise, children could operate
the electric windows and possibly injure
themselves. <
MINI Convertible:
Convertible top with
integrated sliding
sunroof
To conserve battery power, if possible
operate the convertible top only while the
engine is running.
Prior to closing the convertible top, check for
and remove all debris from the windshield
frame; otherwise, the closing of the top may be
hampered. <
Opening and closing the sliding sunroof
To open:
Press the switch backwa rd until the desired
position or the end position is reached.
To close:
Press the switch forward.
The sliding sunroof can be operated up to a road
speed of 74 mph / 120 km/h.
00320051004F004C00510048000300280047004C0057004C005200510003
Page 55 of 283

CONTROLSAdjustments
54
MINI Convertible: rear belt guide
Please ensure that the belt guide loop,
arrow, is locked when putting on the rear
safety belts.<
Safety Belt Reminder
Front seats
The indicator lamps come on and an
acoustic signal sounds. In addition, a
message appears on the Control Dis-
play. Check whether the safety belt has
been fastened correctly. The Safety Belt
Reminder is issued when the driver's safety belt
has not been fastened. The Safety Belt Reminder
is also activated at ro ad speeds above approx.
5 mph or 8 km/h if the front passenger's safety
belt has not been fastened , if objects are placed
on the front passenger seat, or if driver or front
passenger unfasten their safety belts.
Damage to safety belts
If the safety belts ar e damaged or stressed
in an accident: have th e safety belt system
and its seat-belt tensioners replaced and the
belt anchors checked. Have this work carried out
only by a MINI dealer or by a workshop that has
specially trained personnel working in accor-
dance with the specifications of the MINI manu-
facturer; otherwise, correct operation of these
safety systems is not ensured.<
Mirrors
Exterior mirrors
The front passenger's mirror is more con-
vex than the driver's mirror. The objects
seen in the mirror are closer than they appear.
Do not gauge your distance from traffic behind
you on the basis of what you see in the mirror;
otherwise, there is an increased risk of an
accident. <
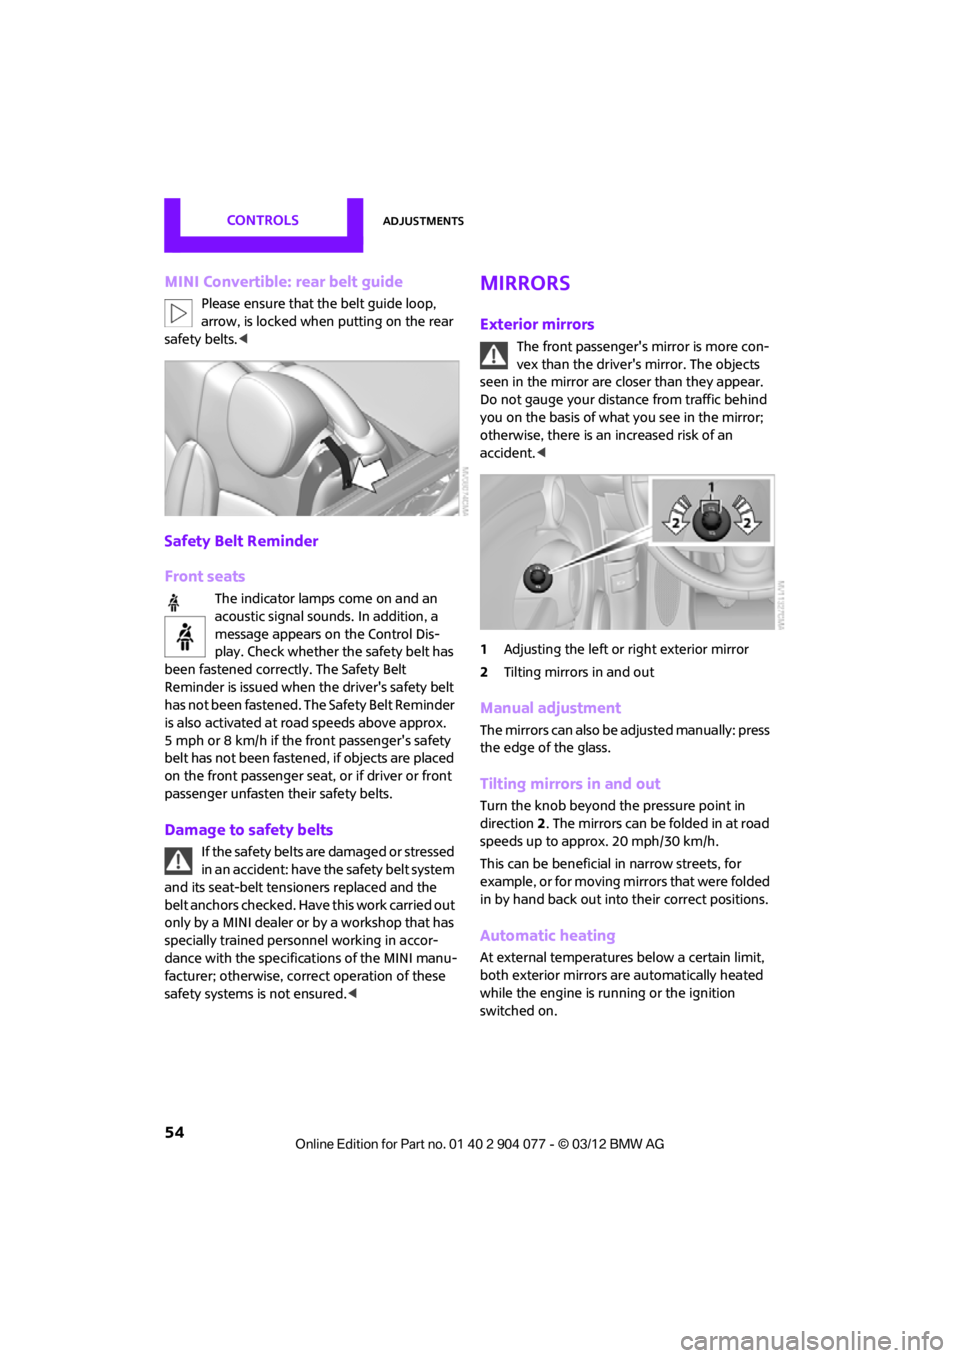
1 Adjusting the left or right exterior mirror
2 Tilting mirrors in and out
Manual adjustment
The mirrors can also be adjusted manually: press
the edge of the glass.
Tilting mirrors in and out
Turn the knob beyond the pressure point in
direction 2. The mirrors can be folded in at road
speeds up to approx. 20 mph/30 km/h.
This can be beneficial in narrow streets, for
example, or for moving mi rrors that were folded
in by hand back out into their correct positions.
Automatic heating
At external temperatures below a certain limit,
both exterior mirrors are automatically heated
while the engine is running or the ignition
switched on.
00320051004F004C00510048000300280047004C0057004C005200510003
Page 83 of 283

CONTROLSTechnology for driving comfort and safety
82
Technology for driving comfort
and safety
Vehicle equipment
In this chapter, all production, country, and
optional equipment that is offered in the model
range is described. Equipment is also described
that is not available because of, for example,
selected options or coun try version. This also
applies to safety relate d functions and systems.
Park Distance Control
PDC
The concept
PDC assists you with parking in reverse. Acoustic
signals and a visual indi cator warn you of the
presence of an object behind the vehicle. To
measure the distance, there are four ultrasonic
sensors in either bumper.
These sensors have a range of approx. 6.5 ft/
2m. However, an acoust ic warning does not
sound until an object is approx. 24 in/60 cm
from the rear corner sensors, or approx. 5 ft/
1.50 m from the rear center sensors.
PDC is a parking aid that can indicate
objects when they are approached slowly,
as is usually the case when parking. Avoid
approaching an object at high speed; otherwise,
physical circumstances ma y lead to the system
warning being issued too late. <
Automatic mode
With the engine running or the ignition switched
on, the system is activated automatically after
approx. 1 second when you engage reverse
gear or move the automatic transmission selec-
tor lever to position R. Wait this short period
before driving.
Acoustic signals
As the distance between vehicle and object
decreases, the intervals between the tones
become shorter. If the distance to the nearest
object falls to below roughly 1 ft/30 cm, then a
continuous tone sounds.
If the distance remains co nstant, e.g. when driv-
ing parallel to a wall, the acoustic signal stops
after approx. 3 seconds.
Malfunction
Indicator lamp lights up. PDC has failed.
A message appears on the Control
Display. Have the system checked.
To avoid this problem, keep the sensors clean
and free of ice or snow in order to ensure that
they will continue to operate effectively. When
using a high-pressure cleaner, do not direct the
jet toward the sensors for lengthy periods and
only spray from a distance of at least 4 in/10 cm.
PDC with visual warning
To have the system show distances to objects on
the Control Display. The contours of distant
objects are shown on the Control Display even
before the acoustic sign al sounds. The display
appears on the Control Display as soon as the
transmission is shifted into reverse or the
selector lever is moved into the R position.
System limitations
Even with PDC, final responsibility for esti-
mating the distance between the vehicle
and any obstructions always remains with the
driver. Sensors, too, have blind spots in which
objects cannot be dete cted. Moreover, ultra-
sonic detection can reach its physical limits with
objects such as trailer tow bars and couplings,
thin and wedge-shaped objects, etc. Low
objects already indicated, such as curbs, may
00320051004F004C00510048000300280047004C0057004C005200510003
Page 87 of 283

CONTROLSTechnology for driving comfort and safety
86
Do not push on the rear spoiler; otherwise, it
may be damaged.
For information on car washing facilities and
care, see page227 and following.
Automatic mode
When starting the engine, a retracted rear
spoiler is in the automatic mode. It is possible
that there will be some noise for a short time
when driving off because of the initialization of
the system.
Automatic extension:
When driving at speeds in excess of approx.
50 mph/80 km/h.
Automatic retraction:
When driving at speeds below 38 mph/60 km/h.
In the automatic mode, the rear spoiler
can not be retracted manually at speeds
greater than 37 mph/60 km/h.<
Manual mode
The manual mode can, for example, be used
when cleaning the rear spoiler while the ignition
is on or the engine is running. LED on switch is
on.
If the rear spoiler stops in an intermediate
position after repeat edly being extended
and retracted, then the system has become
overheated. After a short cooling down time, the
rear spoiler can again be operated.<
Extending rear spoiler
Press the switch toward the rear.
Retracting rear spoiler
If the rear spoiler was manually extended and a
speed of 50 mph/80 km/h not exceeded, then
the rear spoiler can agai n be retracted. Other-
wise, the rear spoiler cannot be retracted unless
the speed is below 37 mph/60 km/h.
> For speeds between 12 mph/20 km/h and
50 mph/80 km/h,
briefly press the switch forward or keep
pressed.
> For speeds less than 12 mph/20 km/h,
press switch forward and keep pressed.
Malfunctions
Indicator lamp goes on briefly when the
ignition is switched on and an acoustic
signal is produced.
A message appears on the Control Display.
Display in the following situations:
> Rear spoiler is extended.
Manually retract rear spoiler or it will auto-
matically retract at a speed of approx.
12 mph/20 km/h.
> Rear spoiler can not be extended from the
rear spoiler compartment.
Check if the rear spoiler is free of snow or ice,
for example. Free rear spoiler or clear of ice.
Warning lamp goes on and an acoustic
signal sounds several times.
A message appears on the Control
Display.
Display in the following situation:
If the rear spoiler ca n not be completely
extended, do not exceed a speed of 50 mph or
80 km/h.
Have the system checked.
When there is a malfunction at speeds greater
than 30 mph/50 km/h, the Dynamic Stability
Control DSC switches on.
00320051004F004C00510048000300280047004C0057004C005200510003
Page 88 of 283

Technology for driving comfort and safetyCONTROLS
87
Flat Tire Monitor FTM
The concept
The system does not measure the actual
inflation pressure in the tires.
The system detects a pressure loss in a tire by
comparing the rotational speeds of the individ-
ual wheels while moving.
In the event of a pressure loss, the diameter and
therefore the rotational speed of the corre-
sponding wheel change. This is detected and
reported as a flat tire.
Functional requirement
The system must have been initialized while the
tire inflation pressure was correct; otherwise,
reliable signaling of a fl at tire is not ensured.
Initialize the system afte r every correction of the
tire inflation pressure and after every tire or
wheel change.
System limitations
Sudden serious tire damage caused by
external influences ca nnot be indicated in
advance. <
A natural, even pressure loss in all four tires
cannot be detected. Therefore, check the tire
inflation pressure regularly.
In the following situations, the system could be
delayed or malfunction:
> System has not been initialized.
> Driving on snowy or slippery road surface.
> Performance-oriented styl e of driving: slip in
the drive wheels, high lateral acceleration.
> Snow chains are attached.
When the vehicle is driven with a space-saver
spare tire, page 240, the Flat Tire Monitor
cannot function.
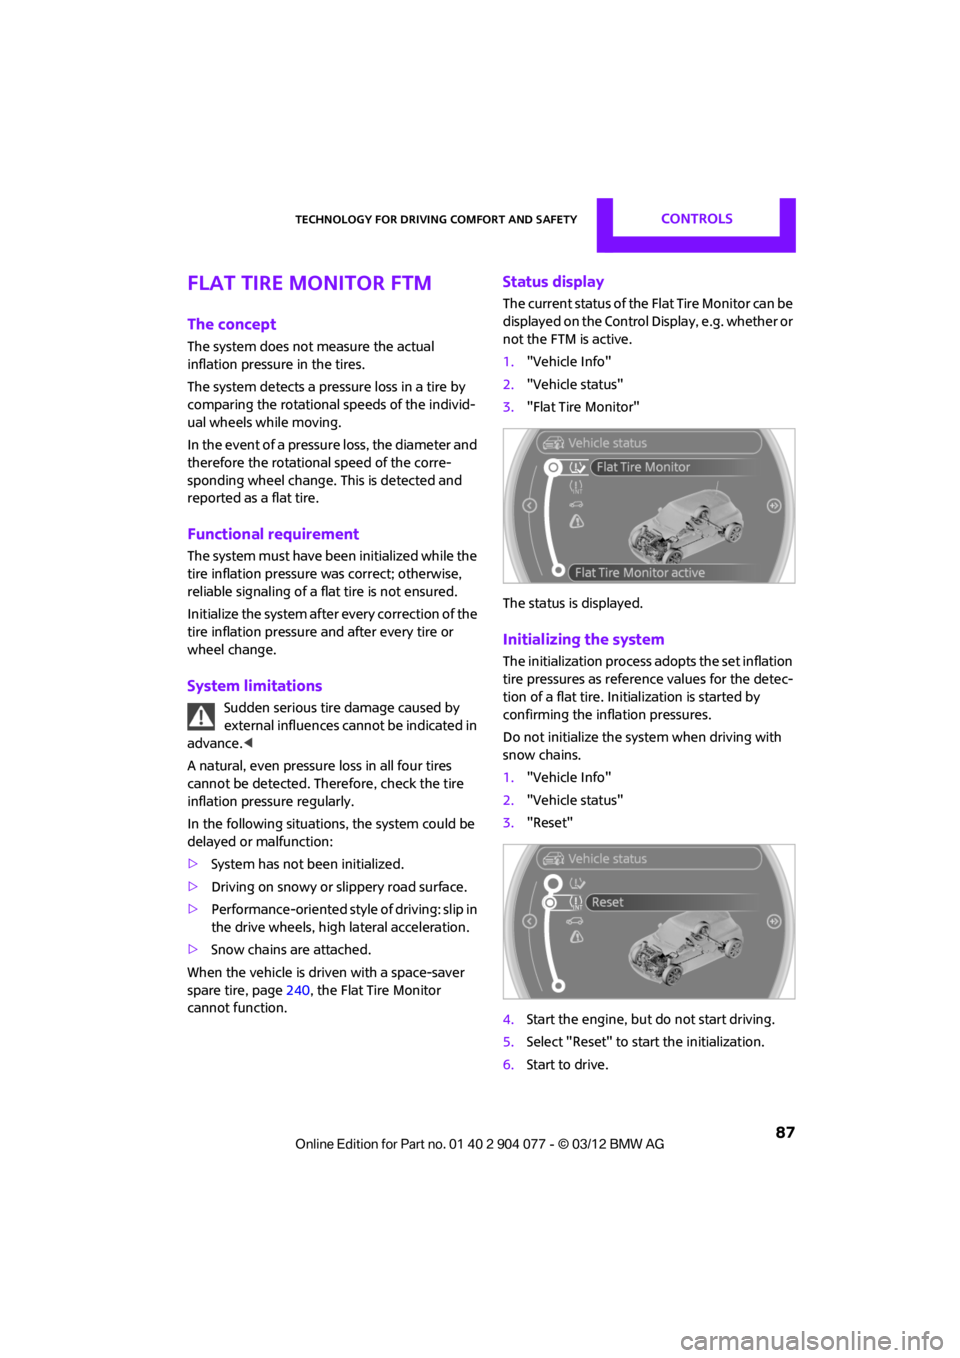
Status display
The current status of the Flat Tire Monitor can be
displayed on the Control Display, e.g. whether or
not the FTM is active.
1. "Vehicle Info"
2. "Vehicle status"
3. "Flat Tire Monitor"
The status is displayed.
Initializing the system
The initialization process adopts the set inflation
tire pressures as refere nce values for the detec-
tion of a flat tire. Initialization is started by
confirming the inflation pressures.
Do not initialize the system when driving with
snow chains.
1. "Vehicle Info"
2. "Vehicle status"
3. "Reset"
4. Start the engine, but do not start driving.
5. Select "Reset" to start the initialization.
6. Start to drive.
00320051004F004C00510048000300280047004C0057004C005200510003