2012 MINI COUPE ROADSTER CONVERTIBLE fog light bulb
[x] Cancel search: fog light bulbPage 234 of 283

Replacing componentsMOBILITY
233
Light-emitting diodes LEDs
Light-emitting diodes installed behind translu-
cent lenses serve as the light sources for many of
the controls and displays in your vehicle. These
light-emitting diodes are related to conven-
tional laser diodes, and legislation defines them
as Class 1 light-emitting diodes.
Do not remove the covers or expose the
eyes directly to the unfiltered light source
for several hours; otherw ise, this could cause
irritation of the retina. <
Headlamp glass lens
In cool or humid weather, condensation may
occur on the interiors of the headlamps. The
condensation disappears a short time after the
light is switched on. The headlamps do not need
to be changed.
Do not remove the condensation from head-
lamps, despite driving with lights on, and if
condensation increases, e.g., because of water
droplets, have this checked by your MINI dealer.
Xenon lamps
The service life of these bulbs is very long and
the probability of failure very low, provided that
they are not switched on and off an excessive
number of times. If a xenon lamp fails neverthe-
less, switch on the fog lamps and continue the
journey with great care, provided that local leg-
islation does not prohibit this.
Work on the xenon lighting system,
including lamp replacem ent, is only to be
carried out only by your MINI dealer. Due to high
voltage, there is a risk of fatal injury if work on
the xenon lamps is carried out improperly. <
Halogen low beams and high beams
H13 bulb, 60/5 watts
The H13 bulb is pressurized. Therefore,
wear safety glasses an d protective gloves.
Otherwise, there is a risk of injury if the bulb is
damaged. < Be careful when inst
alling the cover;
otherwise, leaks could occur and cause
damage to the headlamp system. <
Accessing the lamp from the engine
compartment
The low-beam/high-beam bulb can be changed
from the engine compartment.
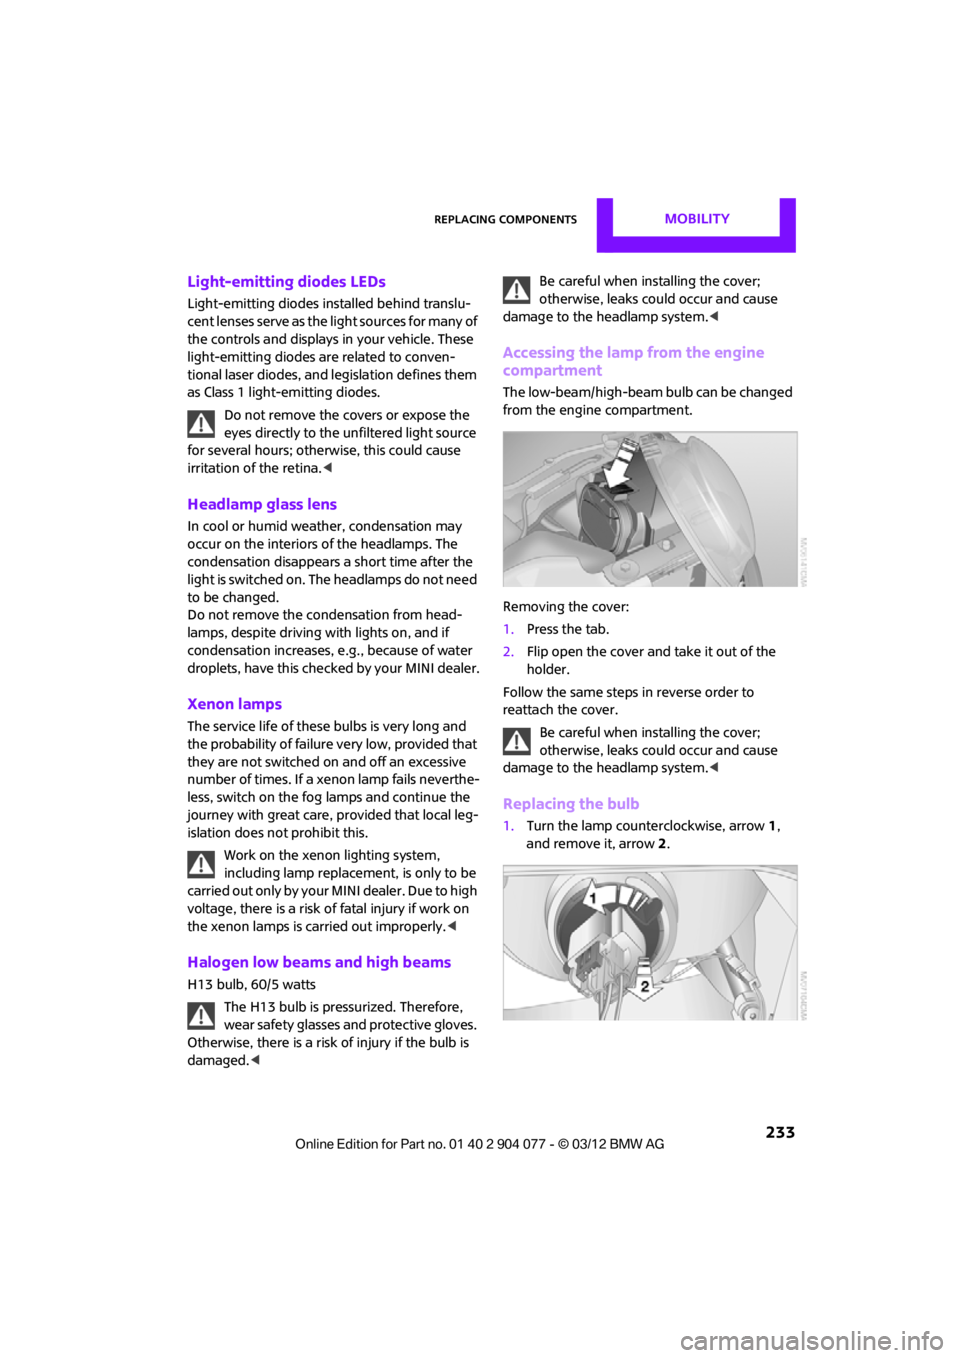
Removing the cover:
1.Press the tab.
2. Flip open the cover and take it out of the
holder.
Follow the same steps in reverse order to
reattach the cover.
Be careful when inst alling the cover;
otherwise, leaks could occur and cause
damage to the headlamp system. <
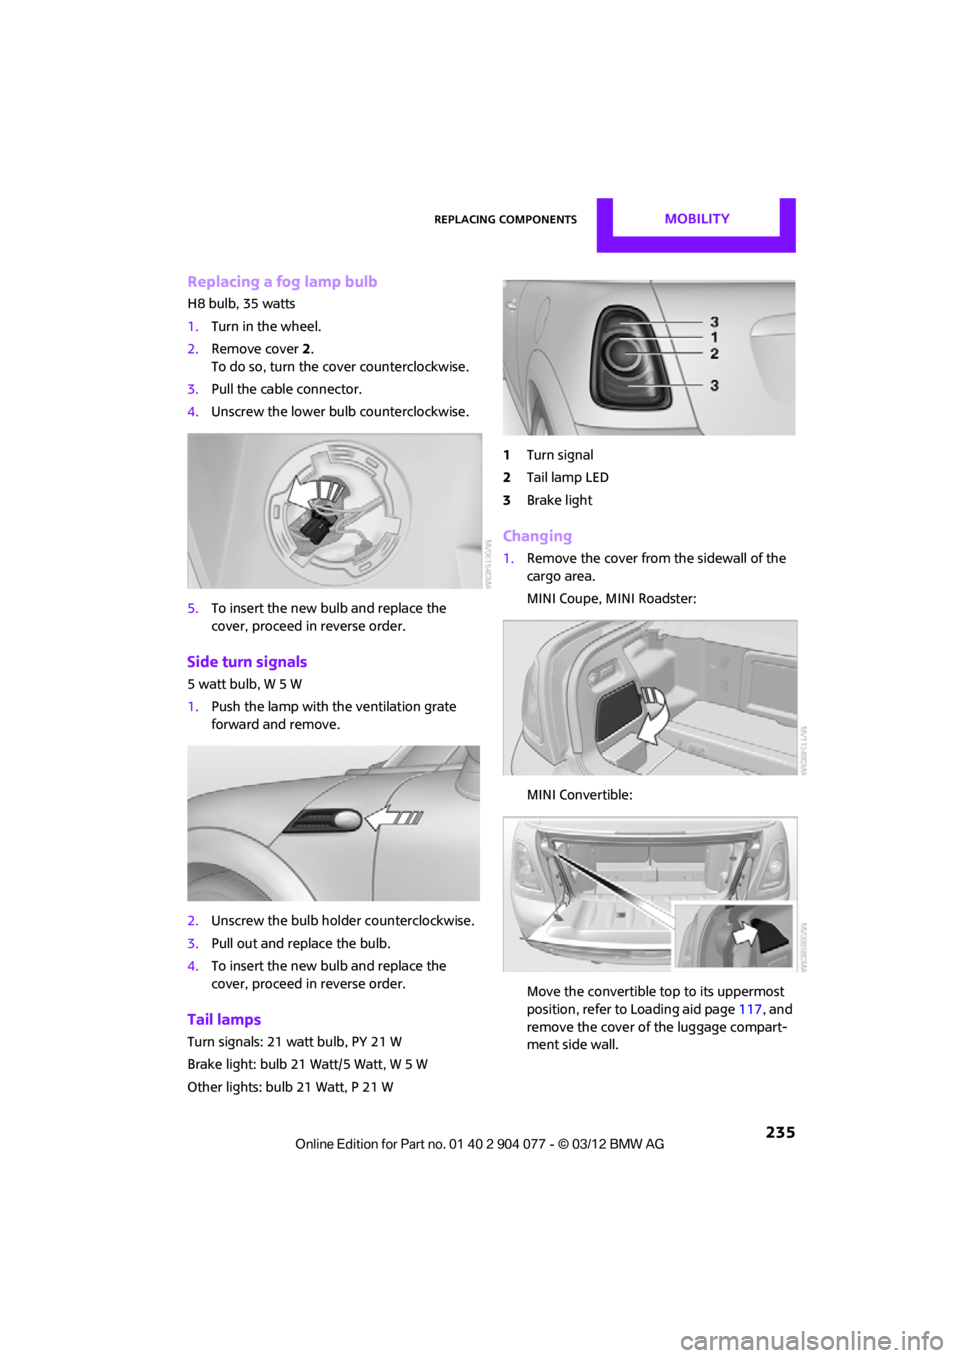
Replacing the bulb
1.Turn the lamp counterclockwise, arrow 1,
and remove it, arrow 2.
00320051004F004C00510048000300280047004C0057004C005200510003
Page 236 of 283

Replacing componentsMOBILITY
235
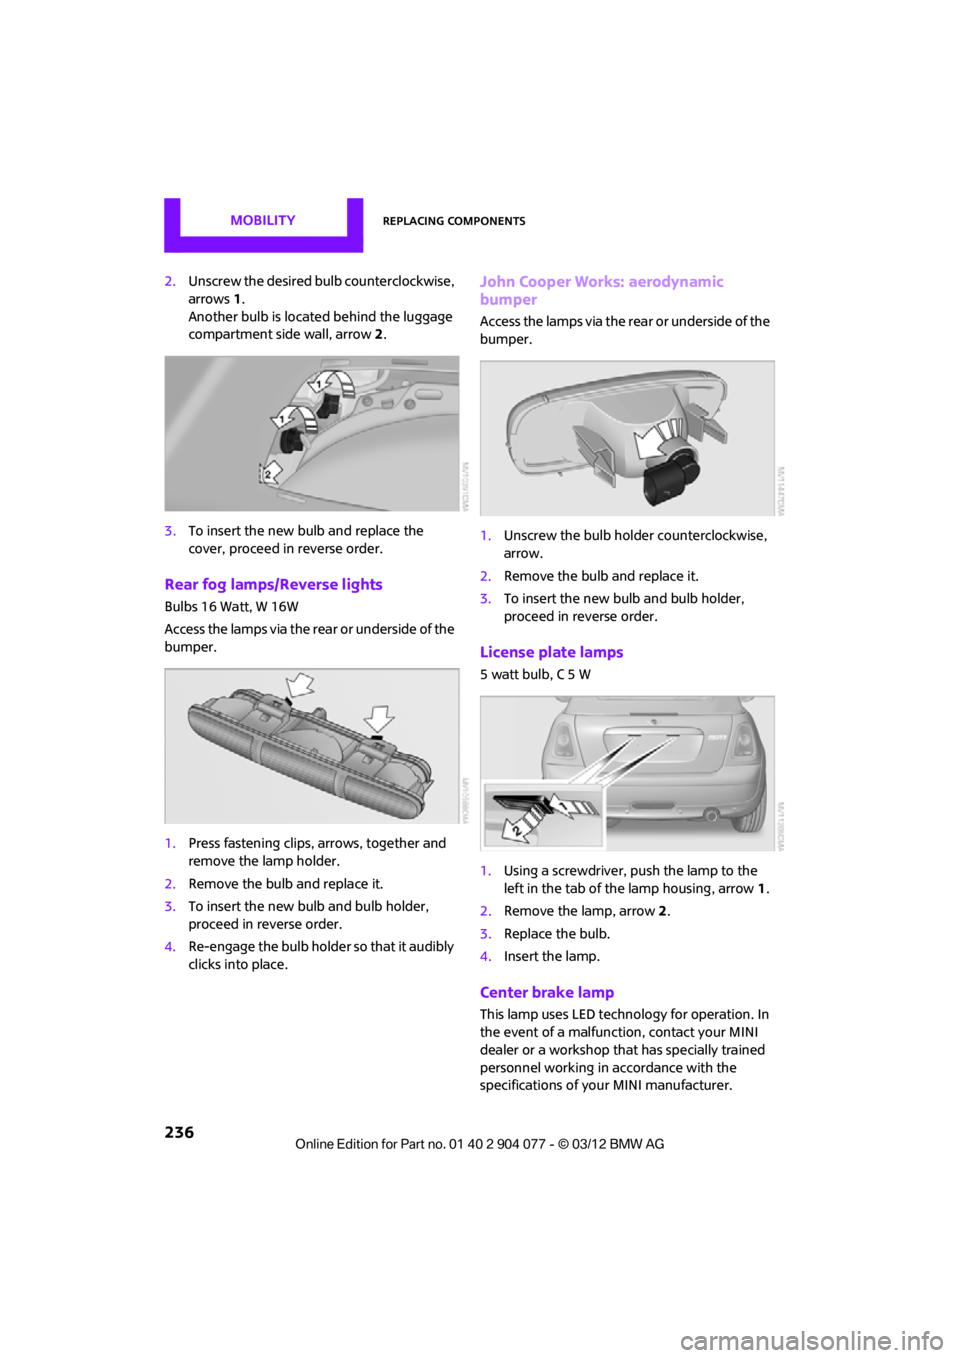
Replacing a fog lamp bulb
H8 bulb, 35 watts
1.Turn in the wheel.
2. Remove cover 2.
To do so, turn the cover counterclockwise.
3. Pull the cable connector.
4. Unscrew the lower bulb counterclockwise.
5. To insert the new bulb and replace the
cover, proceed in reverse order.
Side turn signals
5watt bulb, W5W
1.Push the lamp with the ventilation grate
forward and remove.
2. Unscrew the bulb holder counterclockwise.
3. Pull out and replace the bulb.
4. To insert the new bulb and replace the
cover, proceed in reverse order.
Tail lamps
Turn signals: 21 watt bulb, PY 21 W
Brake light: bulb 21 Watt/5 Watt, W 5 W
Other lights: bulb 21 Watt, P 21 W 1
Turn signal
2 Tail lamp LED
3 Brake light
Changing
1.Remove the cover from the sidewall of the
cargo area.
MINI Coupe, MINI Roadster:
MINI Convertible:
Move the convertible top to its uppermost
position, refer to Loading aid page 117, and
remove the cover of the luggage compart-
ment side wall.
00320051004F004C00510048000300280047004C0057004C005200510003
Page 237 of 283

MOBILITYReplacing components
236
2.Unscrew the desired bulb counterclockwise,
arrows 1.
Another bulb is located behind the luggage
compartment side wall, arrow 2.
3. To insert the new bulb and replace the
cover, proceed in reverse order.
Rear fog lamps/Reverse lights
Bulbs 16 Watt, W 16W
Access the lamps via the rear or underside of the
bumper.
1.Press fastening clips, arrows, together and
remove the lamp holder.
2. Remove the bulb and replace it.
3. To insert the new bulb and bulb holder,
proceed in reverse order.
4. Re-engage the bulb holder so that it audibly
clicks into place.
John Cooper Works: aerodynamic
bumper
Access the lamps via the rear or underside of the
bumper.
1.Unscrew the bulb holder counterclockwise,
arrow.
2. Remove the bulb and replace it.
3. To insert the new bulb and bulb holder,
proceed in reverse order.
License plate lamps
5 watt bulb, C 5 W
1.Using a screwdriver, push the lamp to the
left in the tab of the lamp housing, arrow 1.
2. Remove the lamp, arrow 2 .
3. Replace the bulb.
4. Insert the lamp.
Center brake lamp
This lamp uses LED technology for operation. In
the event of a malfunction, contact your MINI
dealer or a workshop that has specially trained
personnel working in accordance with the
specifications of your MINI manufacturer.
00320051004F004C00510048000300280047004C0057004C005200510003
Page 277 of 283

REFERENCEEverything from A to Z
276
Oil types223
Old batteries, refer to
Disposal 242
Onboard computer 17
– adjusting brightness 80
– changing language 80
– menu guidance 18
– operating principles 17
– overview 17
Opening and closing
– Comfort Access 36
– from inside 32
– from outside 29
– using the door lock 31
– using the remote control 30
Opening and unlocking
– from inside 32
Options, selecting for navigation 135
Orientation menu, refer to Main menu 18
Outlets
– refer to Ventilation 106
Outlets, refer to Air vents 101
Output, refer to Engine
data 250
Outside-air mode
– automatic climate
control 104
Overheated engine, refer to
Coolant temperature 224
P
Paintwork, care229
Park Distance Control PDC 82
Parking
– vehicle 61
Parking aid, refer to Park
Distance Control PDC 82
Parking brake 62
– indicator lamp 13
Parking lamps, replacing bulb 234
Parking lamps/low beams 96
Parts and accessories, see Vehicle equipment 4Pathway lighting
97
Personal Profile 28
Phone numbers
– dialing 174,186
Plastic parts, care 230
Pollen
– refer to Microfilter/activated-
charcoal filter for automatic
climate control 105
– refer to Microfilter for air
conditioner 103
Power convertible top 40
Power failure 242
Power windows 38
Power windows, refer to Windows 38
Pressure, tires 209
Pressure monitoring, tires 87
– Flat Tire Monitor 87
Pressure monitoring of tires, refer to Tire Pressure Monitor
TPM 89
Puncture
– Flat Tire Monitor 87
R
Radio
– controls146
– HD Radio 150
– satellite radio 151
– select waveband 149
– storing stations 150
– switching on/off 146
– tone control 147
– volume 147
Radio key, refer to Integrated key/remote control 28
Radio position, refer to Radio
readiness 60
Radio readiness 60
– switched off 61
– switched on 60
Rain sensor 66
Random play sequence
– external devices 162Range, refer to Cruising
range 71
Reading aloud 199
Reading lamps 99
Rear fog lamp 99
– indicator lamp 13
– replacing bulb 236
Rear lamps
– bulb replacement 235
Rear lamps, refer to Tail
lamps 235
Rear-mounted luggage rack 120
Rear spoiler, see Automatic rear spoiler 85
Rearview mirror, refer to
Mirrors 54
Rear window defroster 103,105
Reception
– quality 150
– radio station 150
Recirculated-air mode 102,104
Recirculation of air, refer to
Recirculated-air
mode 102,104
Reclining seat , refer to
Backrest 51
Refueling 206
Rejecting a call 173,186
Releasing
– hood 222
Reminders 198
Remote control 28
– battery renewal 38
– Comfort
Acces
s 36
– malfunctions 31,37
– service data 225
– tailgate 31
Replacement remote control 28
Replacing bulbs, refer to Lamps and bulbs 232
Replacing tires, refer to New
wheels and tires 219
Reporting safety defects 6
00320051004F004C00510048000300280047004C0057004C005200510003