2012 MERCEDES-BENZ SLK ROADSTER engine
[x] Cancel search: enginePage 74 of 321
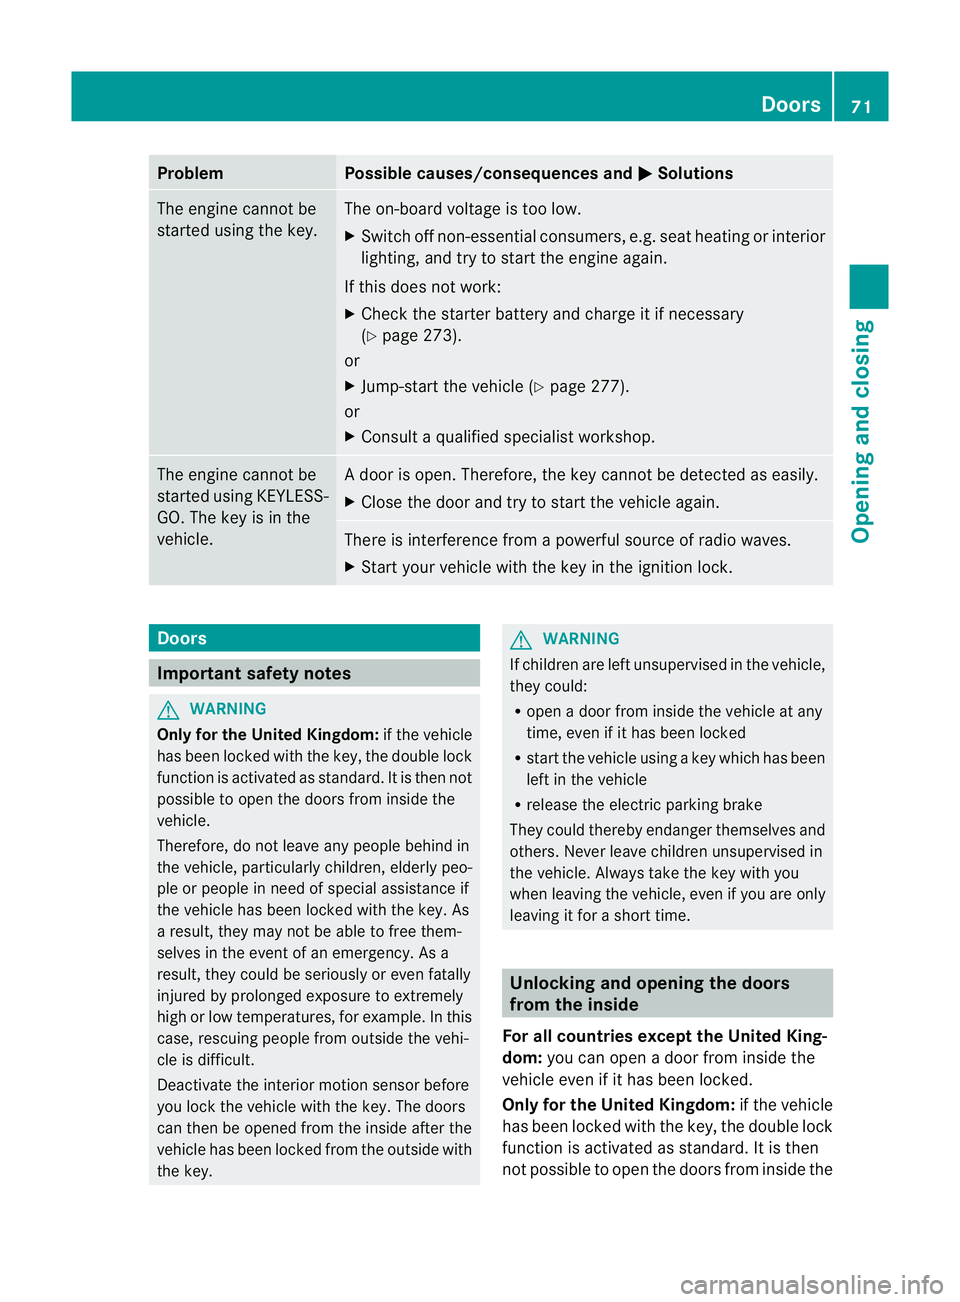
Problem Possible causes/consequences and
M Solutions
The engine cannot be
started using the key. The on-board voltage is too low.
X
Switch off non-essential consumers, e.g. seat heating or interior
lighting, and try to start the engine again.
If this does not work:
X Check the starter battery and charge it if necessary
(Y page 273).
or
X Jump-start the vehicle (Y page 277).
or
X Consult a qualified specialist workshop. The engine cannot be
started using KEYLESS-
GO. The key is in the
vehicle. Ad
oor is open. Therefore, the key cannot be detected as easily.
X Close the door and try to start the vehicle again. There is interference from a powerful source of radio waves.
X
Start your vehicle with the key in the ignition lock. Doors
Important safety notes
G
WARNING
Only for the United Kingdom: if the vehicle
has been locked with the key, the double lock
function is activated as standard. It is then not
possible to open the doors from inside the
vehicle.
Therefore, do not leave any people behind in
the vehicle, particularly children, elderly peo-
ple or people in need of special assistance if
the vehicle has been locked with the key. As
a result, they may not be able to free them-
selves in the event of an emergency. As a
result, they could be seriously or even fatally
injured by prolonged exposure to extremely
high or low temperatures, for example. In this
case, rescuing people from outside the vehi-
cle is difficult.
Deactivate the interior motion sensor before
you lock the vehicle with the key. The doors
can then be opened from the inside after the
vehicle has been locked from the outside with
the key. G
WARNING
If children are left unsupervised in the vehicle,
they could:
R open a door from inside the vehicle at any
time, even if it has been locked
R start the vehicle using akey which has been
left in the vehicle
R release the electric parking brake
They could thereby endanger themselves and
others. Never leave children unsupervised in
the vehicle. Always take the key with you
when leaving the vehicle, even if you are only
leaving it for a short time. Unlocking and opening the doors
from the inside
For all countries except the United King-
dom: you can open a door from inside the
vehicle even if it has been locked.
Only for the United Kingdom: if the vehicle
has been locked with the key, the double lock
function is activated as standard. It is then
not possible to open the doors from inside the Doors
71Opening and closing Z
Page 77 of 321
G
WARNING
Exhaust fumes could enter the vehicle interior
if the engine is running and the boot lid is
open. This could poison you.T herefore, you
should make sure that the boot lid is always
closed when the engine is running.
! The boot lid swings upwards when
opened. Therefore, make sure that there is
sufficient clearance above the boot lid.
i You will find details on the boot lid open-
ing dimensions in the Technical data sec-
tion (Y page 311).
The boot lid can be:
R opened and closed manually from outside
R opened automatically from outside
R unlocked with the emergency key element Opening/closing manually
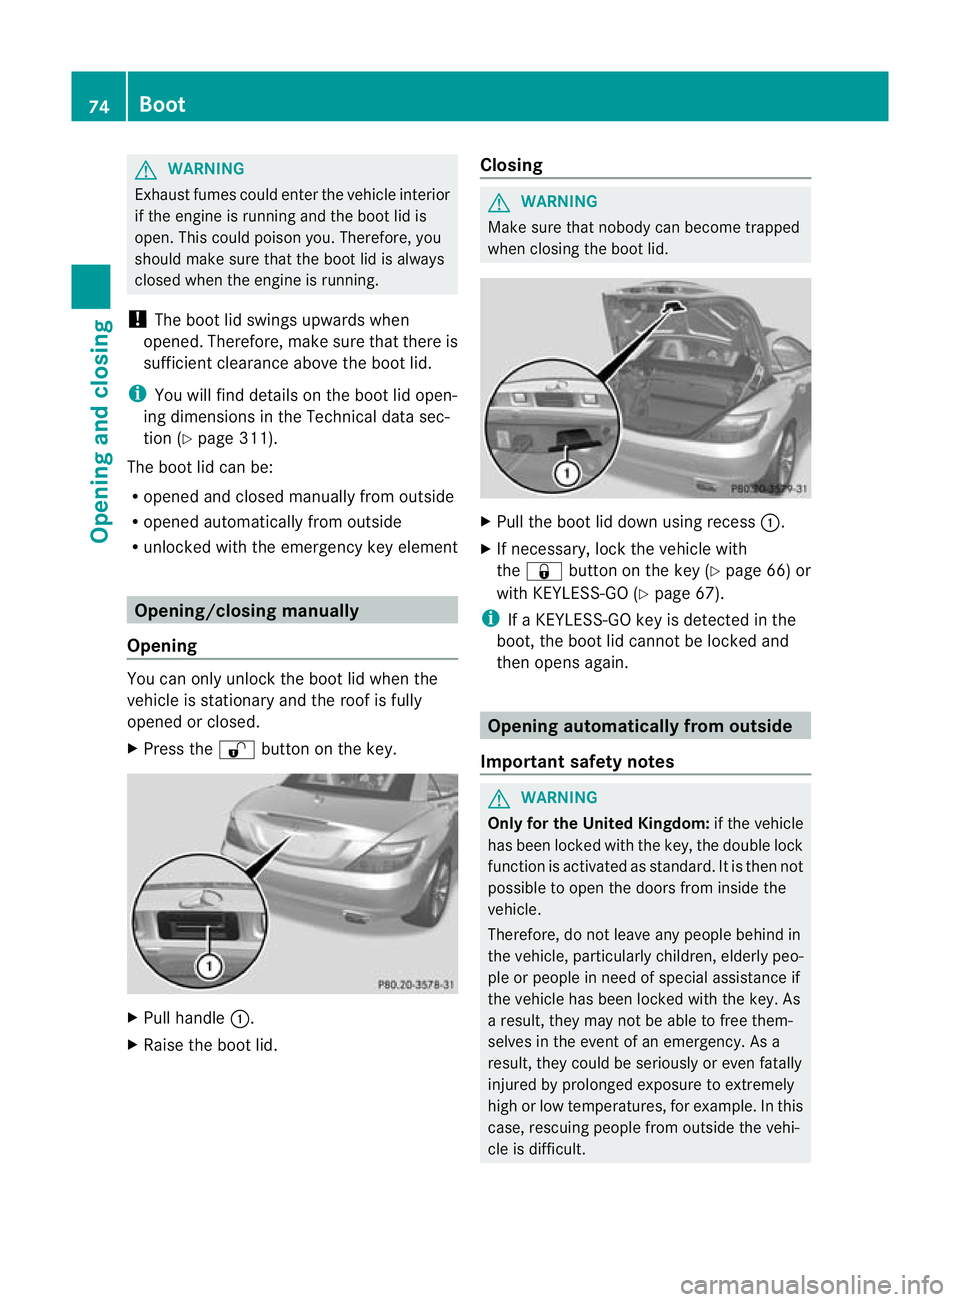
Opening You can only unlock the boot lid when the
vehicle is stationary and the roof is fully
opened or closed.
X
Press the %button on the key. X
Pull handle :.
X Raise the boot lid. Closing G
WARNING
Make sure that nobody can become trapped
when closing the boot lid. X
Pull the boot lid down using recess :.
X If necessary, lock the vehicle with
the & button on the key (Y page 66) or
with KEYLESS-GO (Y page 67).
i If a KEYLESS-GO key is detected in the
boot, the boot lid cannot be locked and
then opens again. Opening automatically from outside
Important safety notes G
WARNING
Only for the United Kingdom: if the vehicle
has been locked with the key, the double lock
function is activated as standard. It is then not
possible to open the doors from inside the
vehicle.
Therefore, do not leave any people behind in
the vehicle, particularly children, elderly peo-
ple or people in need of special assistance if
the vehicle has been locked with the key. As
a result, they may not be able to free them-
selves in the event of an emergency. As a
result, they could be seriously or even fatally
injured by prolonged exposure to extremely
high or low temperatures, for example. In this
case, rescuing people from outside the vehi-
cle is difficult. 74
BootOpening and closing
Page 79 of 321
Never leave children unsupervised in the vehi-
cle. Always take the key with you when leaving
the vehicle, even if you are only leaving it for
a short time.
G
WARNING
Do not leave children unsupervised in the
vehicle, even if they are secured in a child
restraint system. The children could:
R be seriously or even fatally injured on parts
of the vehicle
R be seriously or even fatally injured by pro-
longed exposure to extremely high or
extremely low temperatures
If children open a door, they could:
R seriously or even fatally injure other people
R get out of the vehicle and injure them-
selves, or be seriously or even fatally
injured by a passing vehicle Opening and closing the side win-
dows in the front
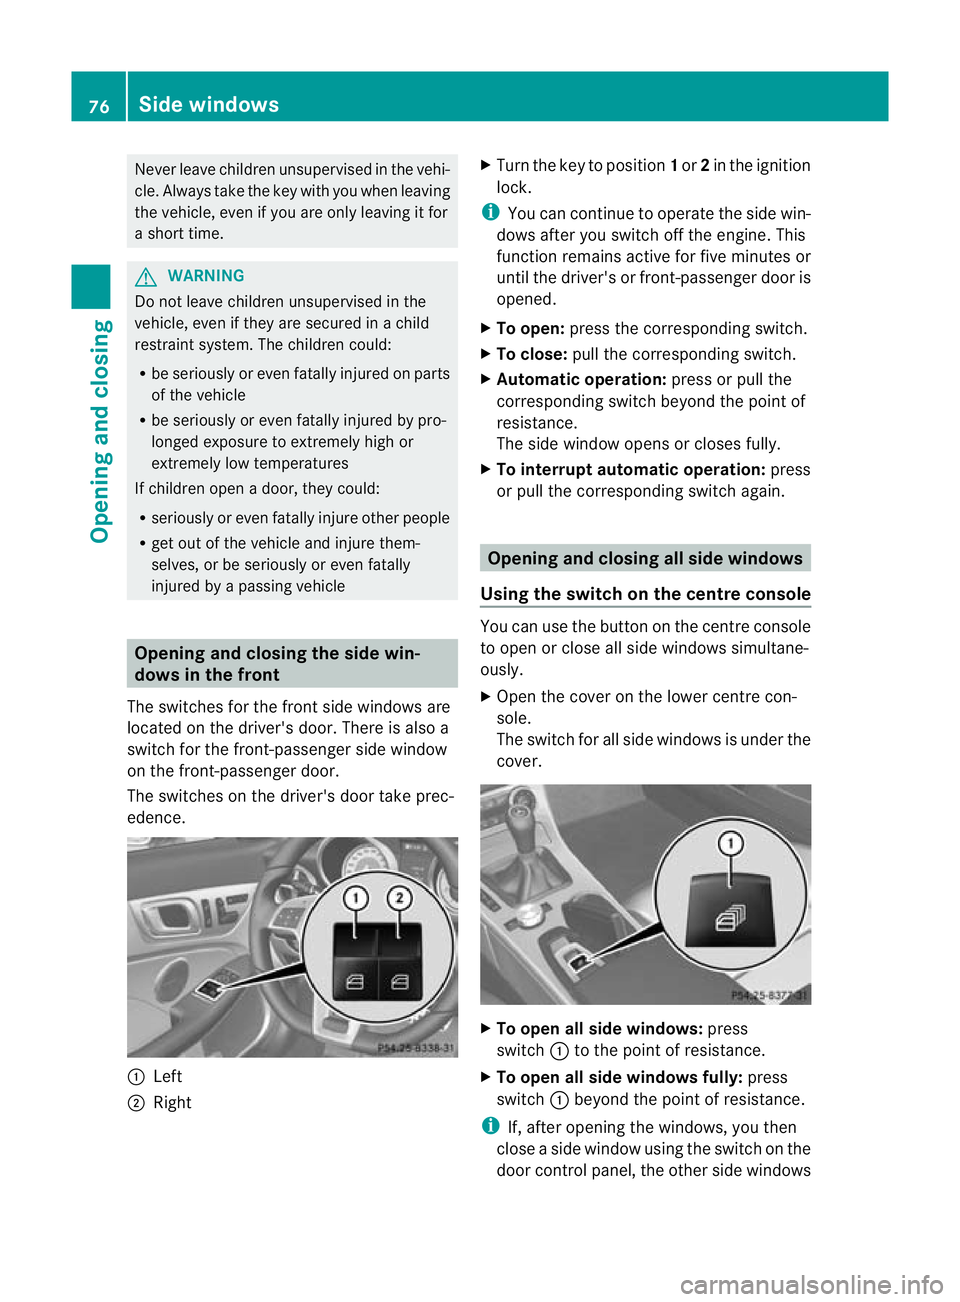
The switches for the front side windows are
located on the driver's door. There is also a
switch for the front-passenger side window
on the front-passenger door.
The switches on the driver's door take prec-
edence. :
Left
; Right X
Turn the key to position 1or 2in the ignition
lock.
i You can continue to operate the side win-
dows after you switch off the engine. This
function remains active for five minutes or
until the driver's or front-passenger door is
opened.
X To open: press the corresponding switch.
X To close: pull the corresponding switch.
X Automatic operation: press or pull the
corresponding switch beyond the point of
resistance.
The side window opens or closes fully.
X To interrupt automatic operation: press
or pull the corresponding switch again. Opening and closing all side windows
Using the switch on the centre console You can use the button on the centre console
to open or close all side windows simultane-
ously.
X Open the cover on the lower centre con-
sole.
The switch for all side windows is under the
cover. X
To open all side windows: press
switch :to the point of resistance.
X To open all side windows fully: press
switch :beyond the point of resistance.
i If, after opening the windows, you then
close a side window using the switch on the
door control panel, the other side windows 76
Side windowsOpening and closing
Page 85 of 321
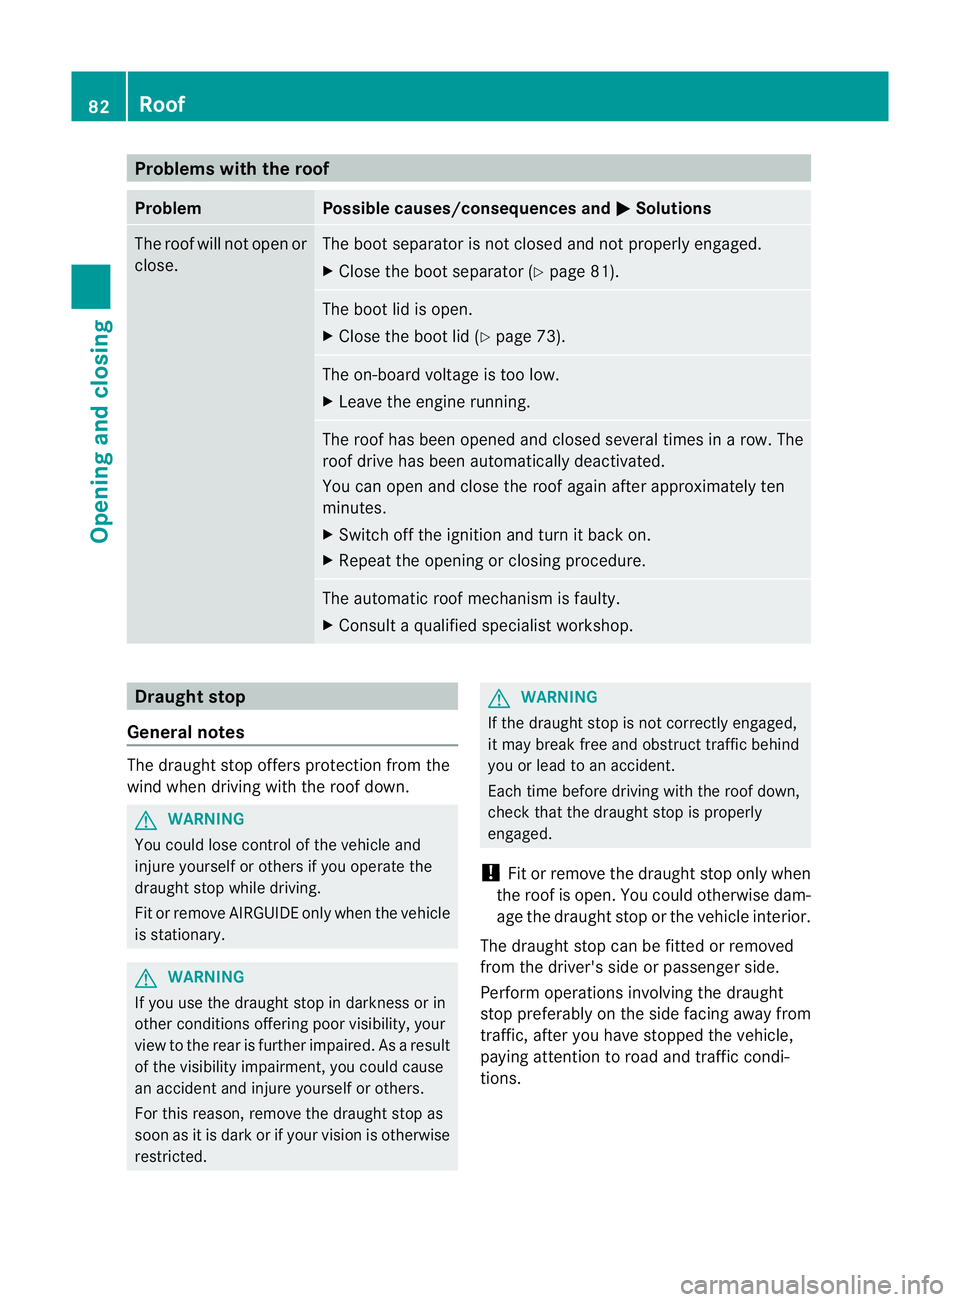
Problems with the roof
Problem Possible causes/consequences and
M Solutions
The roof will not open or
close. The boot separator is not closed and not properly engaged.
X
Close the boot separator (Y page 81). The boot lid is open.
X
Close the boot lid (Y page 73). The on-board voltage is too low.
X
Leave the engine running. The roof has been opened and closed several times in
arow. The
roof drive has been automatically deactivated.
You can open and close the roof again after approximately ten
minutes.
X Switch off the ignition and turn it back on.
X Repeat the opening or closing procedure. The automatic roof mechanism is faulty.
X
Consult a qualified specialist workshop. Draught stop
General notes The draught stop offers protection from the
wind when driving with the roof down.
G
WARNING
You could lose control of the vehicle and
injure yourself or others if you operate the
draught stop while driving.
Fit or remove AIRGUIDE only when the vehicle
is stationary. G
WARNING
If you use the draught stop in darkness or in
other conditions offering poor visibility, your
view to the rear is further impaired. As a result
of the visibility impairment, you could cause
an accident and injure yourself or others.
For this reason, remove the draught stop as
soon as it is dark or if your vision is otherwise
restricted. G
WARNING
If the draught stop is not correctly engaged,
it may break free and obstruct traffic behind
you or lead to an accident.
Each time before driving with the roof down,
check that the draught stop is properly
engaged.
! Fit or remove the draught stop only when
the roof is open. You could otherwise dam-
age the draught stop or the vehicle interior.
The draught stop can be fitted or removed
from the driver's side or passenger side.
Perform operations involving the draught
stop preferably on the side facing away from
traffic, after you have stopped the vehicle,
paying attention to road and traffic condi-
tions. 82
RoofOpening and closing
Page 88 of 321
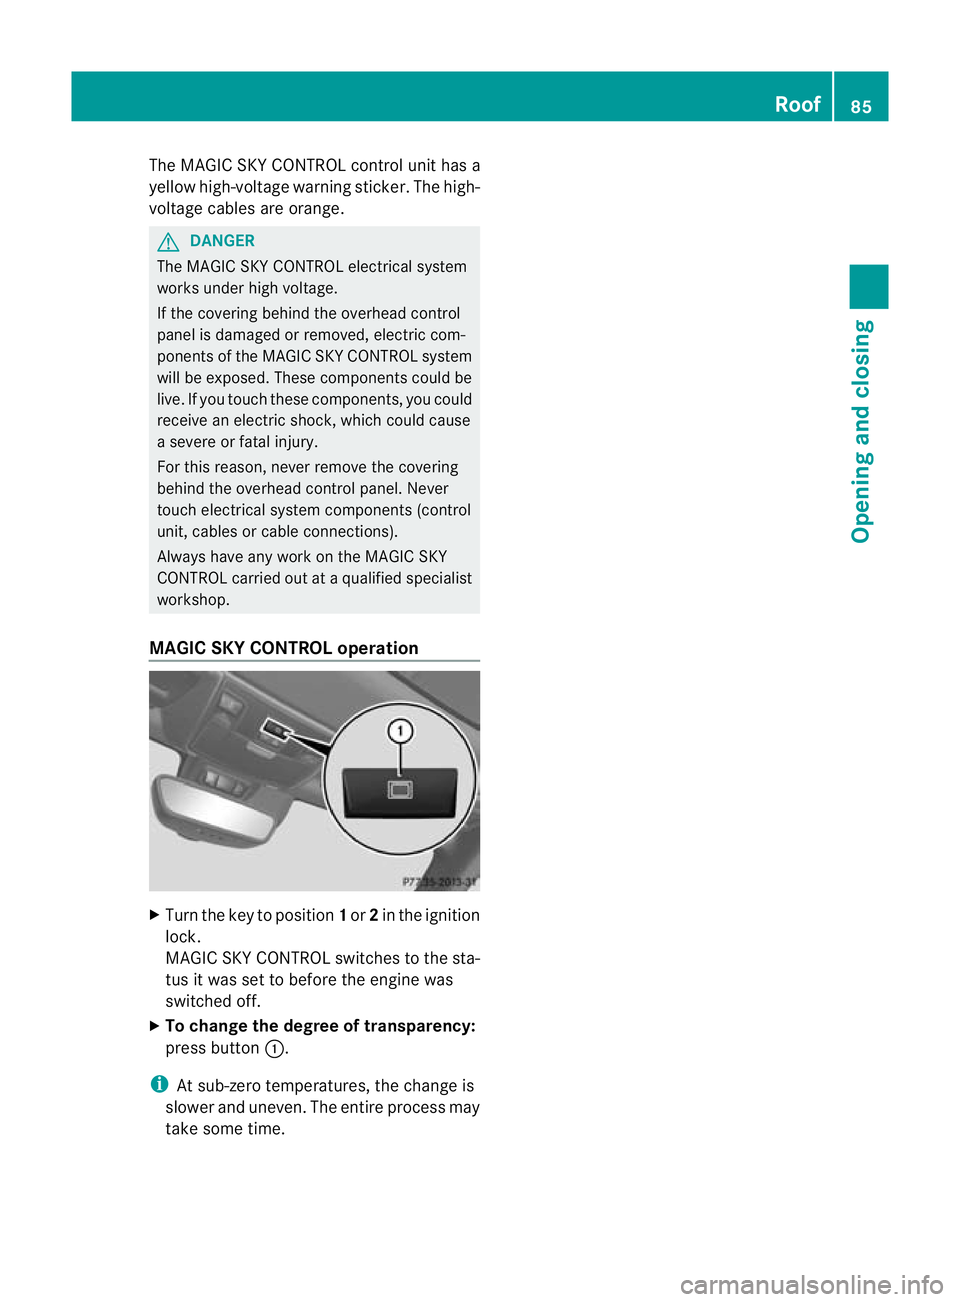
The MAGIC SKY CONTROL control unit has a
yellow high-voltage warning sticker. The high-
voltage cables are orange. G
DANGER
The MAGIC SKY CONTROL electrical system
works under high voltage.
If the covering behind the overhead control
panel is damaged or removed, electric com-
ponents of the MAGIC SKY CONTROL system
will be exposed. These components could be
live. If you touch these components, you could
receive an electric shock, which could cause
a severe or fatal injury.
For this reason, never remove the covering
behind the overhead control panel. Never
touch electrical system components (control
unit, cables or cable connections).
Always have any work on the MAGIC SKY
CONTROL carried out at aqualified specialist
workshop.
MAGIC SKY CONTROL operation X
Turn the key to position 1or 2in the ignition
lock.
MAGIC SKY CONTROL switches to the sta-
tus it was set to before the engine was
switched off.
X To change the degree of transparency:
press button :.
i At sub-zero temperatures, the change is
slowe rand uneven. The entire process may
take some time. Roof
85Opening and closing Z
Page 104 of 321
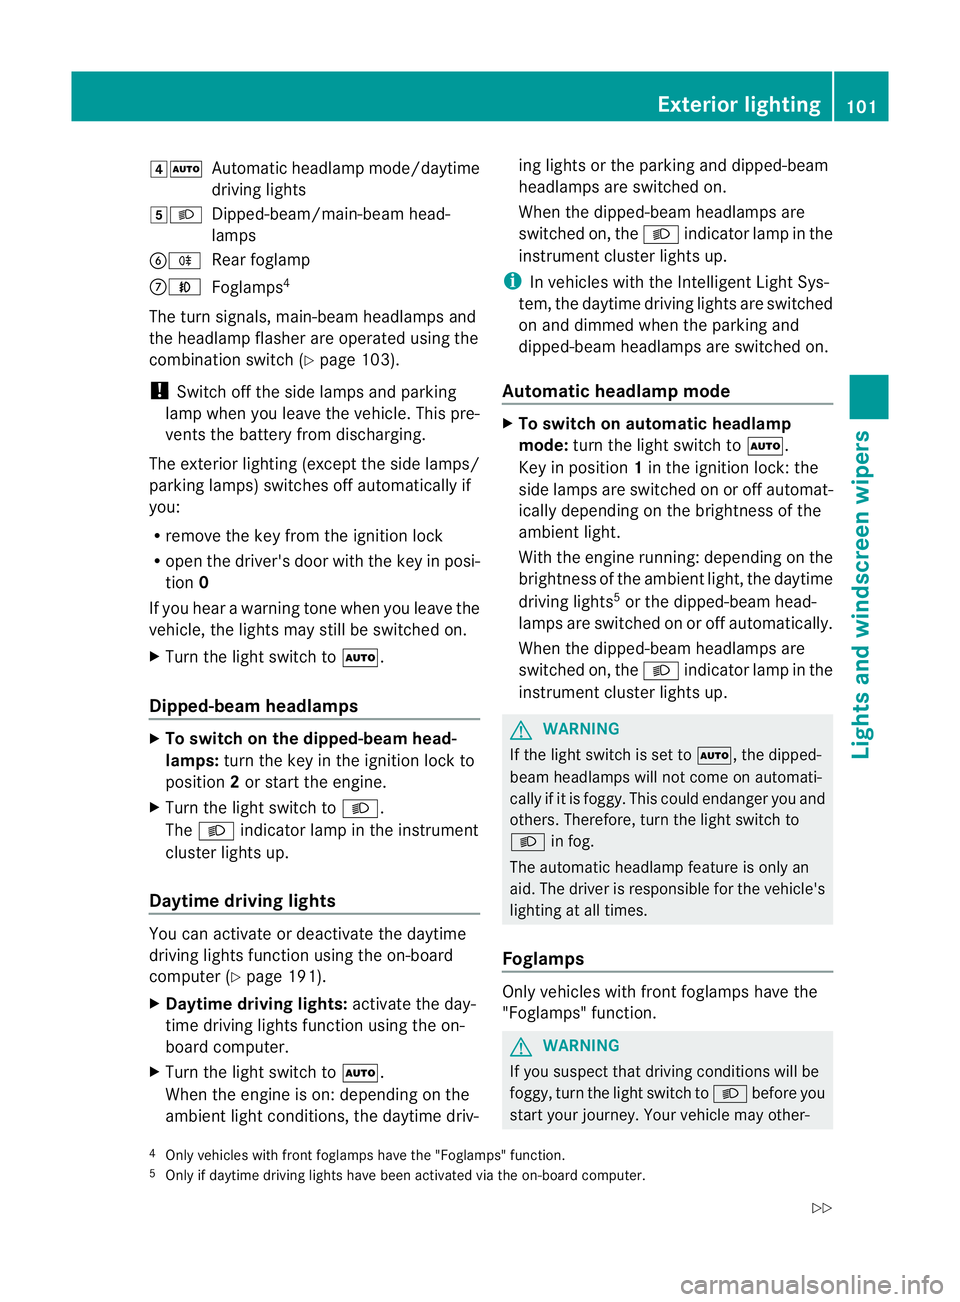
4Ã
Automatic headlamp mode/daytime
driving lights
5L Dipped-beam/main-bea mhead-
lamps
BR Rear foglamp
CN Foglamps 4
The turn signals, main-beam headlamps and
the headlamp flasher are operated using the
combination switch (Y page 103).
! Switch off the side lamps and parking
lamp when you leave the vehicle. This pre-
vents the battery from discharging.
The exterior lighting (except the side lamps/
parking lamps) switches off automatically if
you:
R remove the key from the ignition lock
R open the driver's door with the key in posi-
tion 0
If you hear a warning tone when you leave the
vehicle, the lights may still be switched on.
X Turn the light switch to Ã.
Dipped-beam headlamps X
To switch on the dipped-beam head-
lamps: turn the key in the ignition lock to
position 2or start the engine.
X Turn the light switch to L.
The L indicator lamp in the instrument
cluster lights up.
Daytime driving lights You can activate or deactivate the daytime
driving lights function using the on-board
computer (Y page 191).
X Daytime driving lights: activate the day-
time driving lights function using the on-
board computer.
X Turn the light switch to Ã.
When the engine is on: depending on the
ambient light conditions, the daytime driv- ing lights or the parking and dipped-beam
headlamps are switched on.
When the dipped-beam headlamps are
switched on, the
Lindicator lamp in the
instrument cluster lights up.
i In vehicles with the Intelligent Light Sys-
tem, the daytime driving lights are switched
on and dimmed when the parking and
dipped-beam headlamps are switched on.
Automatic headlamp mode X
To switch on automatic headlamp
mode: turn the light switch to Ã.
Key in position 1in the ignition lock: the
side lamps are switched on or off automat-
ically depending on the brightness of the
ambient light.
With the engine running: depending on the
brightness of the ambient light, the daytime
driving lights 5
or the dipped-beam head-
lamps are switched on or off automatically.
When the dipped-beam headlamps are
switched on, the Lindicator lamp in the
instrument cluster lights up. G
WARNING
If the light switch is set to Ã, the dipped-
beam headlamps will not come on automati-
cally if it is foggy. This could endanger you and
others. Therefore, turn the light switch to
L in fog.
The automatic headlamp feature is only an
aid. The driver is responsible for the vehicle's
lighting at all times.
Foglamps Only vehicles with fron
tfoglamps have the
"Foglamps" function. G
WARNING
If you suspect that driving conditions will be
foggy, turn the light switch to Lbefore you
start your journey. Your vehicle may other-
4 Only vehicles with front foglamps have the "Foglamps" function.
5 Only if daytime driving lights have been activated via the on-board computer. Exterior lighting
101Lights and windscreen wipers
Z
Page 105 of 321
wise not be visible and you could endanger
yoursel
fand others.
X To switch on the foglamps: turn the key
in the ignition lock to position 2or start the
engine.
X Turn the light switch to T,Lor
Ã.
X Press the Nbutton.
The green Nindicator lamp in the instru-
ment cluster lights up.
X To switch off the front foglamps: press
the N button.
The green Nindicator lamp in the instru-
ment cluster goes out.
i If you switch the engine off (key in posi-
tion 1in the ignition lock) and then restart
it, the previous foglamp settings are
restored.
Rear foglamp X
To switch on the rear foglamp: turn the
key in the ignition lock to position 2or start
the engine.
X Turn the light switch to LorÃ.
X Press the Rbutton.
The yellow Rindicator lamp in the
instrument cluster lights up.
X To switch off the rear foglamp: press the
R button.
The yellow Rindicator lamp in the
instrument cluster goes out.
Vehicles with front foglamps :when the light
switch is in the Tposition, the rear fog-
lamp can only be switched on if the foglamps
(without dipped-beamh eadlamps) are
switched on.
i If you switch the engin eoff (key in posi-
tion 1in the ignition lock) and then restart
it, the previous rear foglamp settings are
restored. Adjusting the headlamp range (halogen
headlamps) The headlamp range control allows you to
adjust the cone of light from the headlamps
to sui
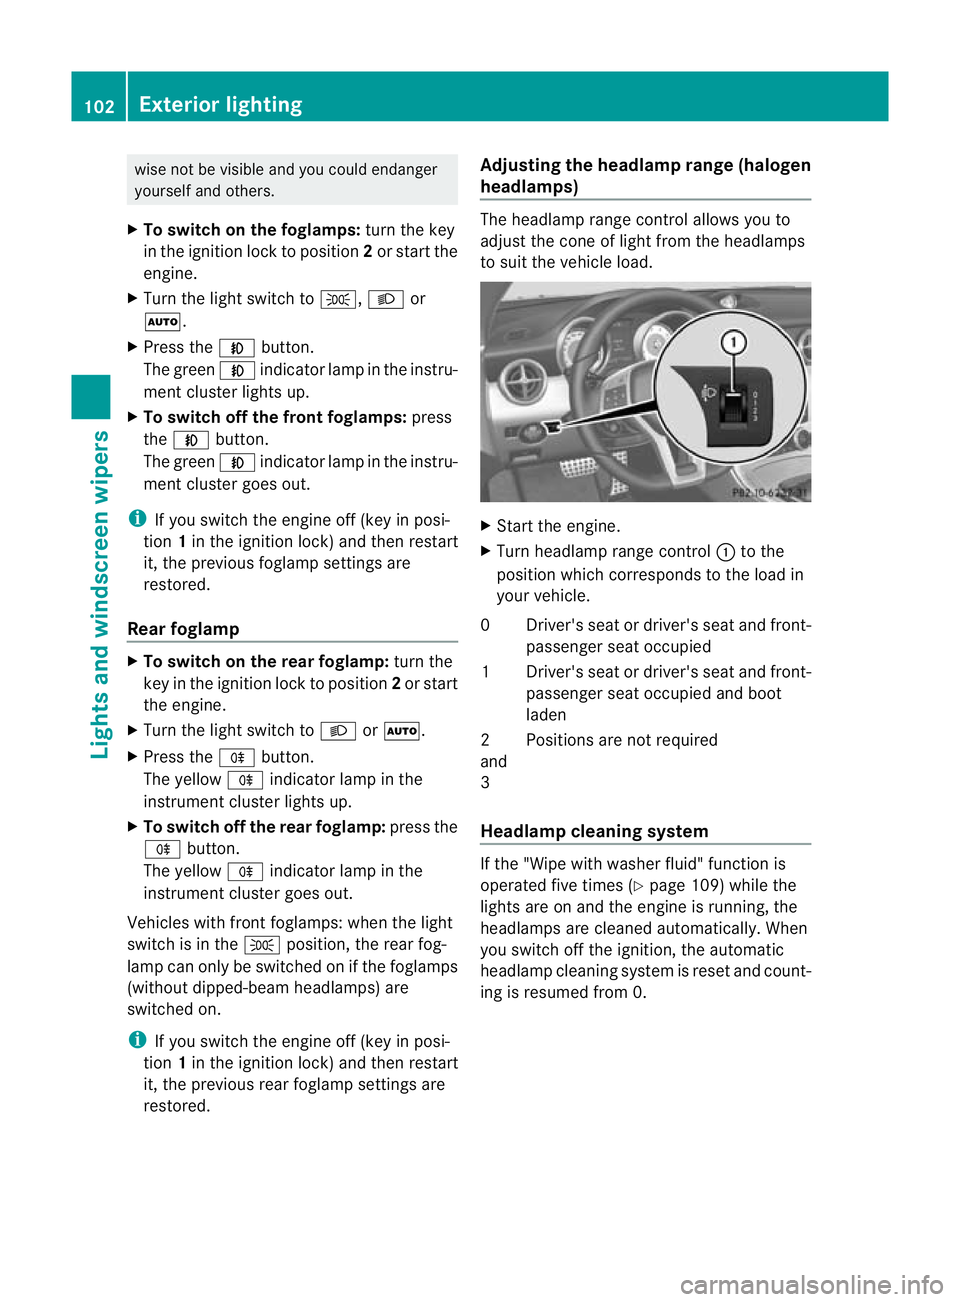
tthe vehicle load. X
Start the engine.
X Turn headlamp range control :to the
position which corresponds to the load in
your vehicle.
0D river's seat or driver's seat and front-
passenger seat occupied
1D river's seat or driver's seat and front-
passenger seat occupied and boot
laden
2
and
3 Positions are not required
Headlamp cleaning system If the "Wipe with washer fluid" function is
operated five times (Y
page 109) while the
lights are on and the engine is running, the
headlamps are cleaned automatically.W hen
you switch off the ignition, the automatic
headlamp cleaning system is reset and count-
ing is resumed from 0. 102
Exterior lightingLights and windscreen wipers
Page 106 of 321
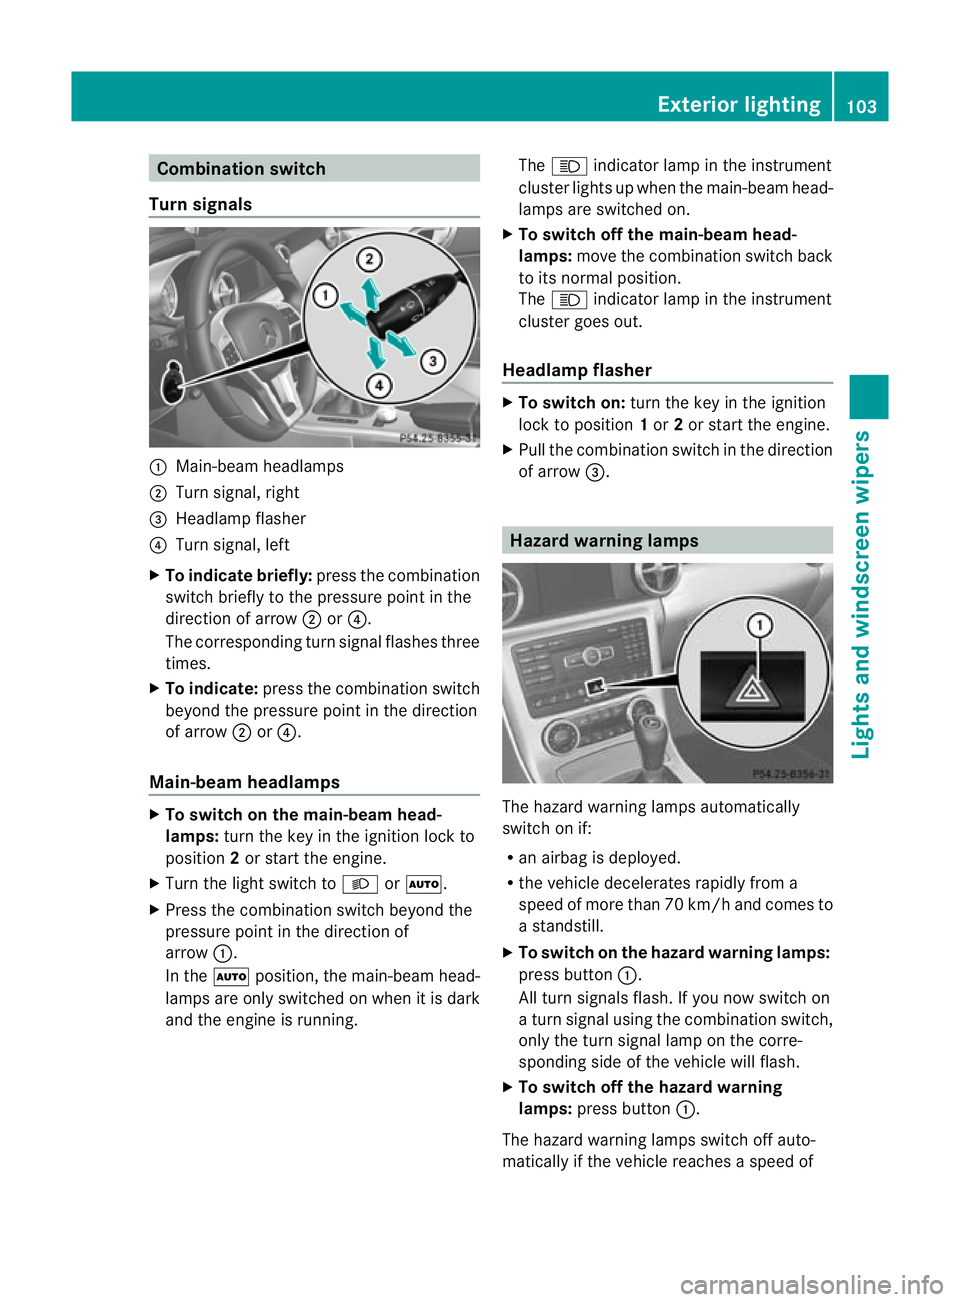
Combination switch
Turn signals :
Main-beam headlamps
; Turn signal, right
= Headlamp flasher
? Turn signal, left
X To indicate briefly: press the combination
switch briefly to the pressure poin tinthe
direction of arrow ;or?.
The corresponding turn signal flashes three
times.
X To indicate: press the combination switch
beyond the pressure point in the direction
of arrow ;or?.
Main-beam headlamps X
To switch on the main-beam head-
lamps: turn the key in the ignition lock to
position 2or start the engine.
X Turn the light switch to LorÃ.
X Press the combination switch beyond the
pressure point in the direction of
arrow :.
In the Ãposition, the main-beam head-
lamps are only switched on when it is dark
and the engine is running. The
K indicator lamp in the instrument
cluster lights up when the main-beam head-
lamps are switched on.
X To switch off the main-beam head-
lamps: move the combination switch back
to its normal position.
The K indicator lamp in the instrument
cluster goes out.
Headlamp flasher X
To switch on: turn the key in the ignition
lock to position 1or 2or start the engine.
X Pull the combination switch in the direction
of arrow =. Hazard warning lamps
The hazard warning lamps automatically
switch on if:
R
an airbag is deployed.
R the vehicle decelerates rapidly from a
speed of more than 70 km/h and comes to
a standstill.
X To switch on the hazard warning lamps:
press button :.
All turn signals flash. If you now switch on
a turn signal using the combination switch,
only the turn signal lamp on the corre-
sponding side of the vehicle will flash.
X To switch off the hazard warning
lamps: press button :.
The hazard warning lamps switch off auto-
matically if the vehicle reaches a speed of Exterior lighting
103Lights and windscreen wipers Z