2012 MERCEDES-BENZ SLK ROADSTER change time
[x] Cancel search: change timePage 4 of 321
Welcome to the world of Mercedes-Benz
First of all, familiarise yourself with yourv ehi-
cle. Read the Owner's Manual, particularly
the safety and warning notes, before you
drive off. This will help you to obtain the max-
imum pleasure from your vehicle and avoid
endangering yourself and others.
The equipment or model designation of your
vehicle may vary according to:
R model
R order
R country variant
R availability
The illustrations in this manual show a left-
hand-drive vehicle. On right-hand-drive vehi-
cles, the layout of components and controls
differs accordingly.
Mercedes-Benzi s constantly updating its
vehicles to the state of the art.
Mercedes-Benz therefore reserves the right
to introduce changes in the following areas:
R design
R equipment
R technical features
The equipment in your vehicle may therefore
differ from that shown in the descriptions and
illustrations.
The following are integral components of the
vehicle:
R Owner's Manual
R Service Booklet
R Equipment-dependent supplements
Keep these documents in the vehicle at all
times. If you sell the vehicle, always pass the
documents on to the new owner.
i You can get to know the important fea-
tures of your vehicle in the interactive Own-
er's Manual on the Internet at:
http://www.mercedes-benz.de/
betriebsanleitung
The technical documentation team at
Daimler AG wishes you safe and pleasant
motoring. 1725842481Z102É1725842481Z102OËÍ
Page 23 of 321
Protection of the environment
Notes
H
Environmental note
Daimler's declared policy is one of compre-
hensive environmental protection.
Our objectives are to use the natural resour-
ces which form the basis of our existence on
this planet sparingly and in a manner which
takes the requirements of both nature and
humanity into consideration.
You too can help to protect the environment
by operating your vehicle in an environmen-
tally-responsible manner.
Fuel consumption and the rate of engine,
transmission, brake and tyre wear depend on
the following factors:
R operating conditions of your vehicle
R your personal driving style
You can influence both factors. Therefore,
please bear the following in mind:
Operating conditions:
R avoid short trips, as these increase fuel
consumption.
R observe the correct tyre pressure.
R do not carry any unnecessary weight in the
vehicle.
R monitor the vehicle's fuel consumption.
R remove the roof rack once you no longer
need it.
R a regularly serviced vehicle will contribute
to environmental protection. You should
therefore adhere to the service intervals.
R all maintenance work should be carried out
at a qualified specialist workshop.
Personal driving style:
R do not depress the accelerator pedal when
starting the engine.
R do not warm up the engine when the vehicle
is stationary.
R drive carefully and maintain a safe distance
from the vehicle in front.
R avoid frequent, sudden acceleration. R
change gear in good time and use each gear
only up to Ôof its maximum engine speed.
R switch off the engine in stationary traffic. Returning an end-of-life vehicle
Mercedes-Benz will take back your
Mercedes-Benz to dispose of it in an environ-
mentally responsible manner, in accordance
with the European Union (EU) End of Life
Vehicles Directive.
The End of Life Vehicles Directive applies to
vehicles with a gross vehicle weight of up to
3.5 t, in accordance with national regulations.
For several years, Mercedes-Benz has been
meeting all the legal requirements for a
design which allows for recycling and re-use.
There is a network of return points and dis-
assembly plants which can recycle your vehi-
cle in an environmentally-responsible man-
ner. The options for recycling vehicles and
parts are constantly being developed and
improved. This means that your Mercedes-
Benz will also continue to meet even the
increased recycling quotas in the future in
good time. You can obtain further information
from your national Mercedes-Benz homepage
or your national hotline number. Vehicle equipment
This Owner's Manual describes all models
and all standard and optional equipment of
your vehicle available at the time of publica-
tion of the Owner's Manual. Country-specific
deviations are possible. Please note that your
vehicle may not be equipped with all features
described. This is also the case for systems
and functions relevant to safety. The equip-
ment in your vehicle may therefore differ from
that shown in the descriptions and illustra-
tions.
All the systems found in your vehicle are listed
in the original purchase agreement of your
vehicle. 20
Introduction
Page 48 of 321
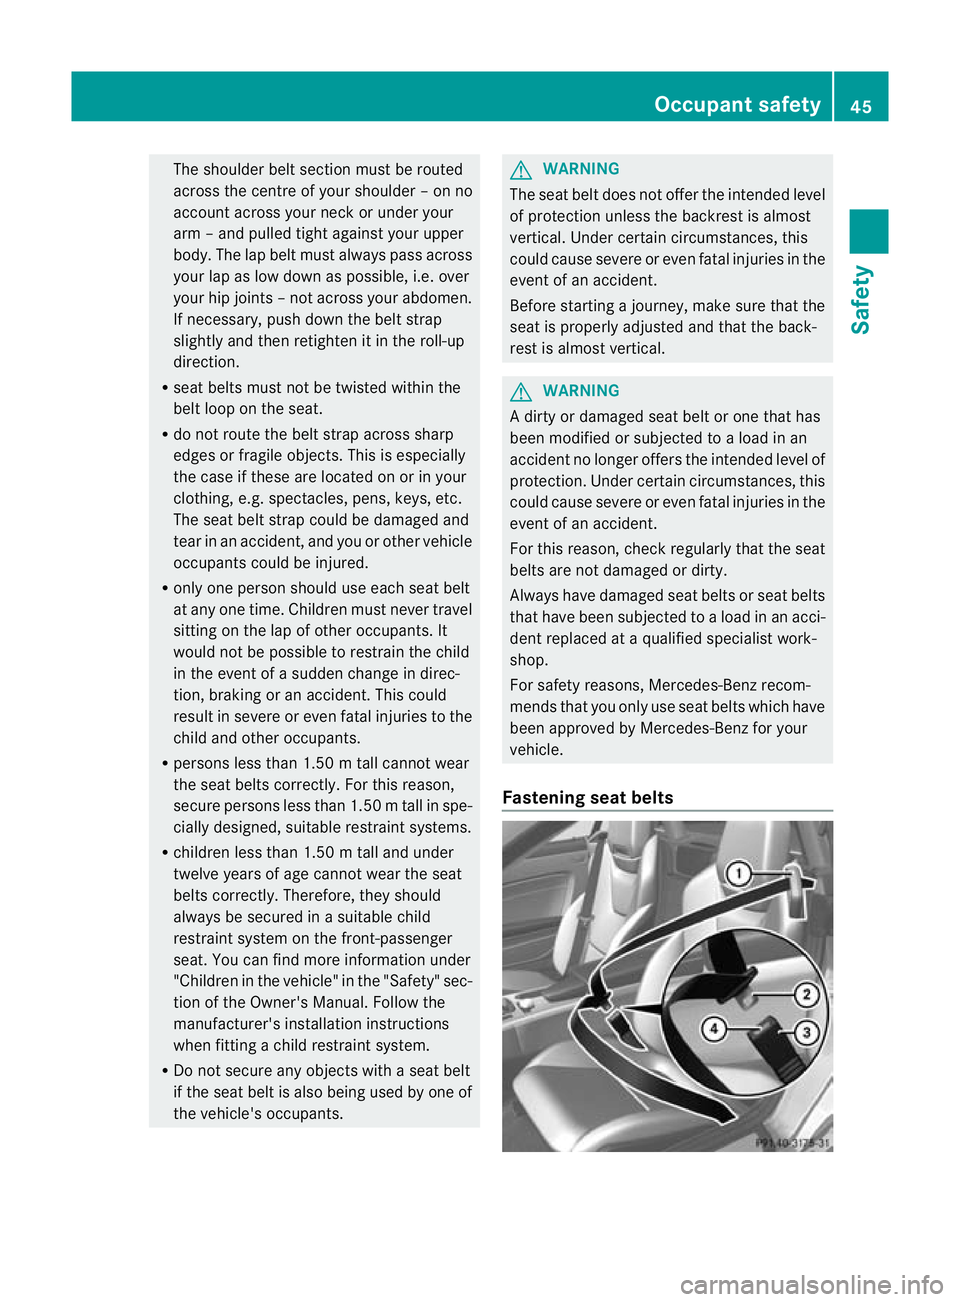
The shoulder belt section must be routed
across the centre of your shoulder – on no
account across your neck or under your
arm –and pulled tight against your upper
body .The lap belt must always pass across
your lap as low down as possible, i.e. over
your hip joints –not across your abdomen.
If necessary, push down the belt strap
slightly and then retighten it in the roll-up
direction.
R seat belts must not be twisted within the
belt loop on the seat.
R do not route the belt strap across sharp
edges or fragile objects. This is especially
the case if these are located on or in your
clothing, e.g. spectacles, pens, keys, etc.
The seat belt strap could be damaged and
tear in an accident, and you or other vehicle
occupants could be injured.
R only one person should use each seat belt
at any one time. Children must never travel
sitting on the lap of other occupants. It
would not be possible to restrain the child
in the event of a sudden change in direc-
tion, braking or an accident .This could
result in severe or even fatal injuries to the
child and other occupants.
R persons less than 1.50 m tall cannot wear
the seat belts correctly. For this reason,
secure persons less than 1.50 mtall in spe-
cially designed, suitable restraint systems.
R children less than 1.50 m tall and under
twelve years of age canno twear the seat
belts correctly. Therefore, they should
always be secured in a suitable child
restraint system on the front-passenger
seat. You can find more information under
"Children in the vehicle" in the "Safety" sec-
tion of the Owner's Manual. Follow the
manufacturer's installation instructions
when fitting a child restraint system.
R Do not secure any objects with a seat belt
if the seat belt is also being used by one of
the vehicle's occupants. G
WARNING
The seat belt does not offer the intended level
of protection unless the backrest is almost
vertical. Under certain circumstances, this
could cause severe or even fatal injuries in the
event of an accident.
Before starting a journey, make sure that the
seat is properly adjusted and that the back-
rest is almost vertical. G
WARNING
Ad irty or damaged seat belt or one that has
been modified or subjected to a load in an
accident no longer offers the intended level of
protection. Under certain circumstances, this
could cause severe or even fatal injuries in the
event of an accident.
For this reason, chec kregularly that the seat
belts are not damaged or dirty.
Always have damaged seat belts or seat belts
that have been subjected to a load in an acci-
dent replaced at a qualified specialist work-
shop.
For safety reasons, Mercedes-Benz recom-
mends that you only use seat belts which have
been approved by Mercedes-Benz for your
vehicle.
Fastening seat belts Occupant safety
45Safety Z
Page 71 of 321
i
If the setting of the locking system is
changed within the signal range of the vehi-
cle, pressing the &or% button locks
or unlocks the vehicle.
The key now functions as follows:
X To unlock the driver's door: press the
% button once.
X To unlockc entrally:press the %but-
ton twice.
X To lock centrally: press the&button.
The KEYLESS-GO function is changed as fol-
lows:
X To unlock the driver's door: touch the
inner surface of the door handle on the
driver's door.
X To unlock centrally: touch the inner sur-
face of the front-passenger door handle.
X To lock centrally: touch the outersensor
surface on one of the door handles. Restoring factor
ysettings
X Press the %and& buttons simulta-
neously for approximately six seconds until
the battery check lamp flashes twice. Emergency key element
General notes If the vehicle can no longer be locked or
unlocked with the key, use the emergency
key element.
If you use the emergency key element to
unlock and open the driver's door or the boot
lid, the anti-thef talarm system will be trig-
gered (Y page 61).
There are several ways to tur noff the alarm:
X To turn the alarm off with the key: press
the % or& button on the key.
or
X Insert the key into the ignition lock.
or X
To deactivate the alarm with KEYLESS-
GO: press the Start/Stop button in the igni-
tion lock. The key must be in the vehicle.
or
X Lock or unlock the vehicle using KEYLESS-
GO. The key must be outside the vehicle.
If you unlock the vehicle using the emergency
key element, the fuel filler flap will not be
unlocked automatically.
X To unlock the fuel filler flap: insert the
key in the ignition lock.
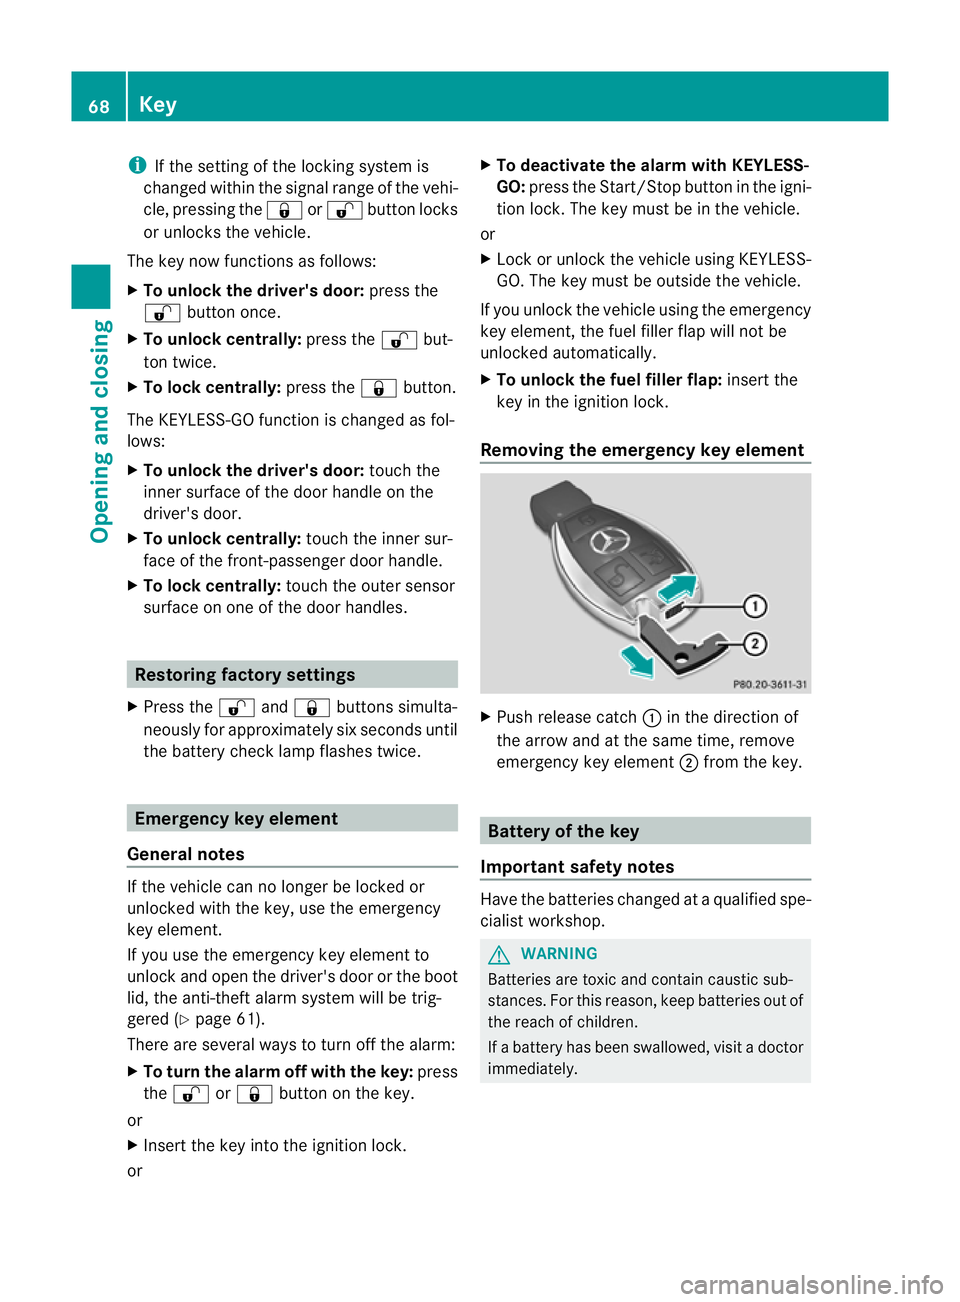
Removing the emergency key element X
Push release catch :in the direction of
the arrow and at the same time, remove
emergency key element ;from the key. Battery of the key
Important safety notes Have the batteries changed at a qualified spe-
cialist workshop. G
WARNING
Batteries are toxic and contain caustic sub-
stances. For this reason, keep batteries out of
the reach of children.
If a battery has been swallowed, visi tadoctor
immediately. 68
KeyOpening and closing
Page 88 of 321
The MAGIC SKY CONTROL control unit has a
yellow high-voltage warning sticker. The high-
voltage cables are orange. G
DANGER
The MAGIC SKY CONTROL electrical system
works under high voltage.
If the covering behind the overhead control
panel is damaged or removed, electric com-
ponents of the MAGIC SKY CONTROL system
will be exposed. These components could be
live. If you touch these components, you could
receive an electric shock, which could cause
a severe or fatal injury.
For this reason, never remove the covering
behind the overhead control panel. Never
touch electrical system components (control
unit, cables or cable connections).
Always have any work on the MAGIC SKY
CONTROL carried out at aqualified specialist
workshop.
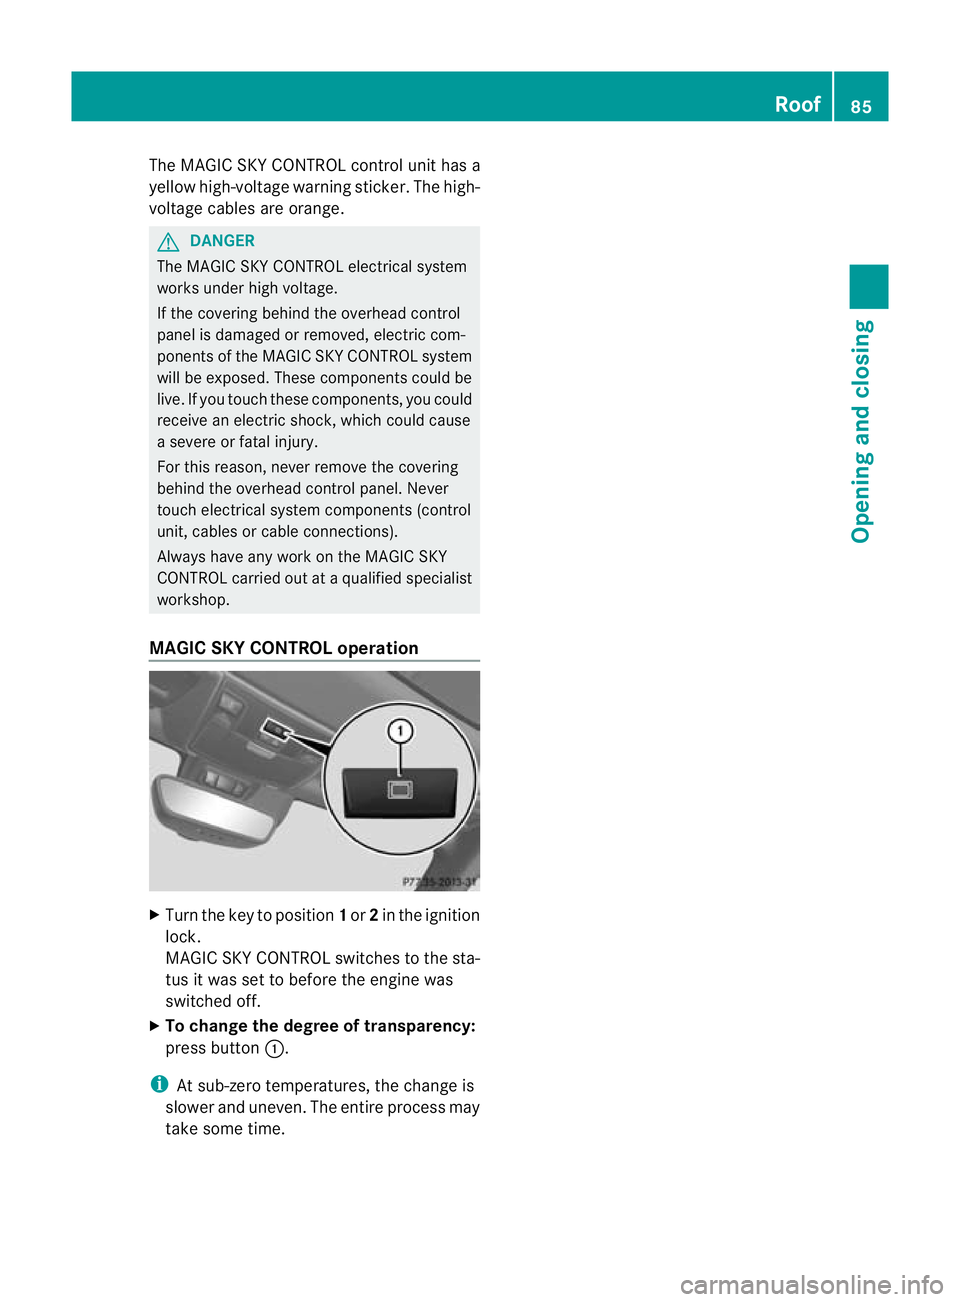
MAGIC SKY CONTROL operation X
Turn the key to position 1or 2in the ignition
lock.
MAGIC SKY CONTROL switches to the sta-
tus it was set to before the engine was
switched off.
X To change the degree of transparency:
press button :.
i At sub-zero temperatures, the change is
slowe rand uneven. The entire process may
take some time. Roof
85Opening and closing Z
Page 109 of 321
The interior lighting automatically switches
on if you:
R unlock the vehicle
R open a door
R remove the key from the ignition lock
The interior light is activated for a short while
when the key is removed from the ignition
lock. You can activat ethis delayed switch-off
using the on-board computer (Y page 193).
Manual interior lighting control X
To switch the interior lighting on/off:
press the cbutton.
X To switch the reading lamps on/off:
press the pbutton. Crash-responsive emergency lighting
The interior lighting is activated automatically
if the vehicle is involved in an accident.
X To switch off the crash-responsive
emergency lighting: press the hazard
warning lamp button.
or
X Lock and then unlock the vehicle using the
key. Replacing bulbs
Important safety notes
Xenon bulbs G
DANGER
Xenon bulbs are under high voltage. If you
touch the electrical contacts of a xenon bulb,
you could suffer an electric shock and be seri-
ously or even fatally injured. For this reason,
do not remove the cover of xenon bulbs.
Do not change the xenon bulbs yourself, but
have them replaced at a qualified workshop.
If your vehicle is equipped with xenon bulbs,
you can recognise this by the following: the cone of light from the xenon bulbs moves
from the top to the bottom and back again
when you start the engine. For this to be
observed, the lights must be switched on
before starting the engine.
Bulbs and lamps are an important aspect of
vehicle safety. You must therefore make sure
that these function correctly at all times.
Have the headlamp setting checked regularly.
Other bulbs
There are bulbs other than the xenon bulbs
that you cannot replace. Replace only the
bulbs listed (Y
page 107). Have the bulbs that
you cannot replace yourself changed at a
qualified specialist workshop.
If you require assistance changing bulbs, con-
sult a qualified specialist workshop.
Do not touch the glass tube of new bulbs with
your bare hands. Even minor contamination
can burn into the glass surface and reduce
the service life of the bulbs. Always use a lint-
free cloth or only touch the base of the bulb
when fitting.
Only use bulbs of the correct type.
If the new bulb still does not light up, consult
a qualified specialist workshop.
Bulbs and lamps are an important aspect of
vehicle safety. You must therefore make sure
that these function correctly at all times.
Have the headlamp setting checked regularly. G
WARNING
Bulbs and lamps can be very hot. You should
therefore allow them to cool down before you
change them. Otherwise, you could be burned
if you touch them.
Keep bulbs out of the reach of children. Oth-
erwise, they could damage the bulbs, for
example, and injure themselves.
Never use a bulb which has been dropped.
Such a bulb may break or even explode and
injure you.
Halogen bulbs are pressurised and can
explode when you change them, particularly
if they are very hot. You should therefore wear 106
Replacing bulbsLights and windscreen wipers
Page 121 of 321
ant does no
tcontain chlorofluorocarbons,
and therefore does not damage the ozone
layer.
Activating/deactivating X
To switch on: press the¿orÁ but-
ton.
The indicator lamp in the ¿orÁ
button lights up.
X To deactivate: press the¿orÁ
button.
The indicator lamp in the ¿orÁ
button goes out. The cooling with air dehu-
midification function has a delayed switch-
off feature.
Problems with the cooling with air
dehumidification function When you press the
¿orÁ button, the
indicator lamp in the button flashes three
times or remains off. You can no longer switch
on the cooling with air dehumidification func-
tion.
X Consult a qualified specialist workshop. Setting climate control to automatic
mode
Only THERMOTRONIC automatic climate con-
trol features the "control climate control
automatically" function.
In automatic mode, the set temperature is
maintained automatically at a constant level.
The system automatically regulates the tem-
perature of the dispensed air, the airflow and
the air distribution.
Automatic mode will achieve optimal opera-
tion if cooling with air dehumidification is also
activated. If desired, cooling with air dehu-
midification can be deactivated. X
Turn the key to position 2in the ignition
lock.
X Set the desired temperature.
X To activate: press theÃbutton.
The indicator lamp in the Ãbutton lights
up. Automatic air distribution and airflow
are activated.
X To switch off: press the_button.
or
X Press the IorK button.
The indicator lamp in the Ãbutton goes
out. Setting the temperature
Air-conditioning system X
Turn the key to position 2in the ignition
lock.
X To increase/reduce: turn thumb-
wheel :clockwise or anti-clockwise
(Y page 115).
Only change the temperature setting in
small increments. Start at 22 †.
THERMOTRONIC automatic climate
control Different temperatures can be set for the
driver's and front-passenger sides.
X Turn the key to position 2in the ignition
lock.
X To increase/reduce: turn controls:and
B (Ypage 116) clockwise or anti-clock-
wise.
Only change the temperature setting in
small increments. Start at 22 †. 118
Operating the climate control systemClimate control
Page 129 of 321
Useful information
i This Owner's Manual describes all models
and all standard and optional equipment
available to your vehicle at the time of pub-
lication of the Owner's Manual. Country-
specific deviations are possible. Please
note that your vehicle may not be equipped
with all features described. This also
applies to safety-relevan tsystems and
functions.
i Please read the information on qualified
specialist workshops (Y page 22).Running-in notes
Important safety notes
G
WARNING
New brake pads/linings only have optimal
braking performance after several hundred
kilometres .Until then, compensate for this by
applying greate rforce to the brake pedal. This
also applies when brake pads/linings or
brake discs have been changed. The first 1,500 km
If you treat the engine with sufficient care
from the very start,y ou will be rewarded with
excellent performance for the remainder of
the engine's life.
R Drive at varying vehicle speeds and engine
speeds for the first 1,500 km.
R Avoid overstraining the vehicle during this
period, e.g. driving at full throttle.
R Change gear in good time, before the rev
counter needle is Ôof the way to the red
area of the rev counter.
R Do not shift down a gear manually in order
to brake. Vehicles with automatic transmission:
R
Try to avoid depressing the accelerator
pedal beyond the point of resistance (kick-
down).
R The shift ranges 3,2or 1should only be
engaged when driving slowly, e.g. when
driving in mountainous terrain.
After 1,500 km, you may gradually bring the
vehicle up to full road and engine speeds.
Additional running-in notes for AMG vehicles:
R do not drive at speeds above 140 km/hf or
the first 1,500 km.
R only allow the engine to reach a maximum
engine speed of 4,500 rpm briefly.
i You should also observe these notes on
running in if the engine or parts of the drive
train on your vehicle have been replaced. AMG vehicles with rear axle locking
differential
Your vehicle is fitted with a self-locking dif-
ferential on the rear axle. Change the oil after
a running-in period of 3,000 km to improve
protection of the rear axle differential. This oil
change extends the service life of the differ-
ential. Have the oil change carried out at a
qualified specialist workshop. Driving
Important safety notes
G
WARNING
Do not place any objects in the driver's foot-
well. If you use a floormat or carpet in the
driver's footwell, make sure that it is correctly
secured and that there is sufficient clearance
for the pedals.
Do not place several floormats on top of one
another.
Loose objects or the floormats could other-
wise get caught between the pedals if you
accelerate or brake suddenly. You will then 126
DrivingDriving and parking