2012 MERCEDES-BENZ SLK ROADSTER engine
[x] Cancel search: enginePage 49 of 321
X
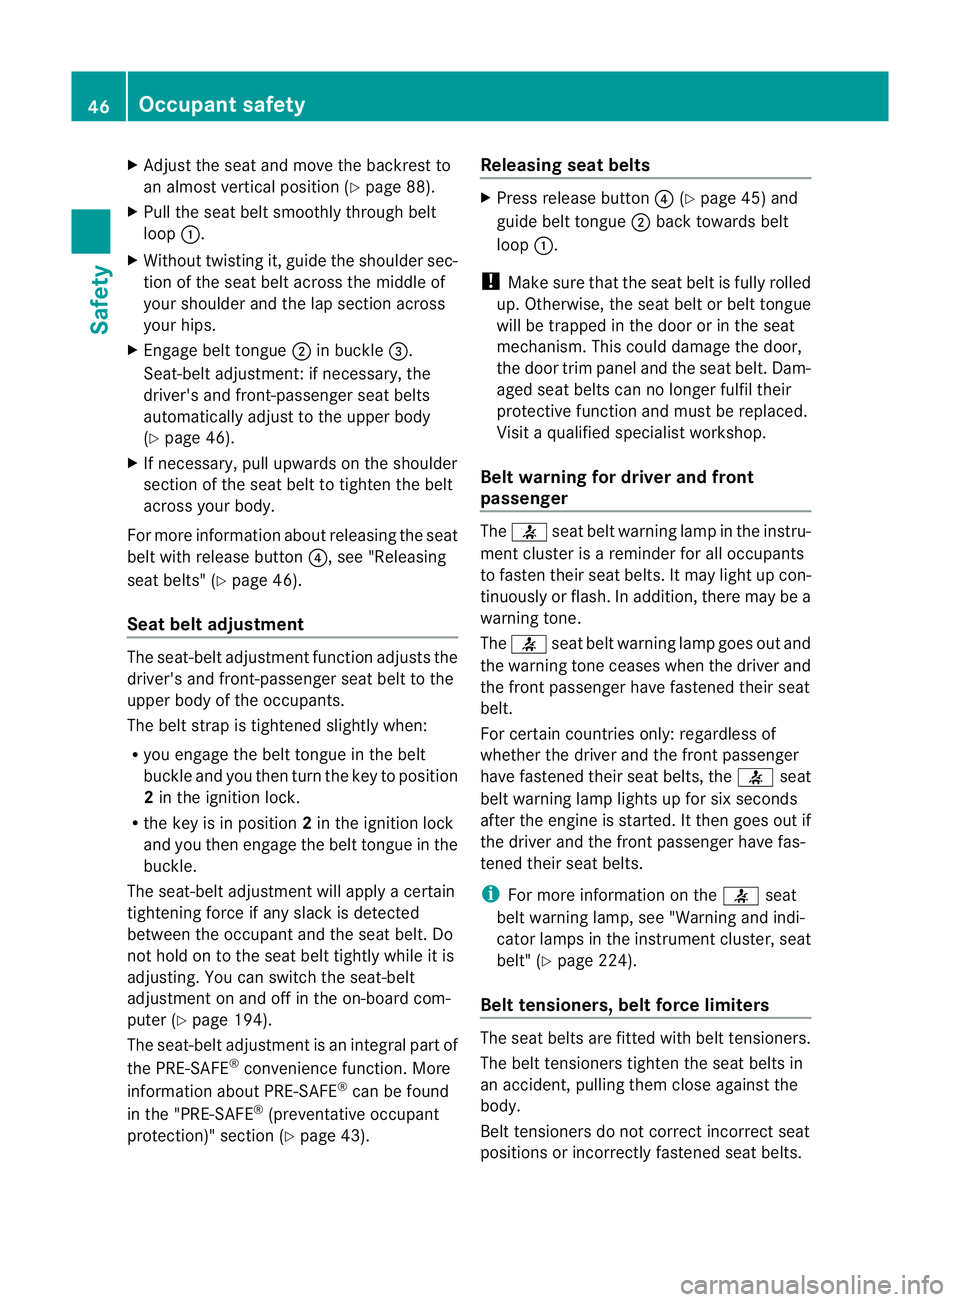
Adjust the seat and move the backrest to
an almos tvertical position (Y page 88).
X Pull the seat belt smoothly through belt
loop :.
X Without twisting it, guide the shoulder sec-
tion of the seat belt across the middle of
your shoulder and the lap section across
your hips.
X Engage belt tongue ;in buckle =.
Seat-belt adjustment:ifn ecessary, the
driver's and front-passenger seat belts
automatically adjust to the upper body
(Y page 46).
X If necessary, pull upwards on the shoulder
section of the seat belt to tighten the belt
across your body.
For more information about releasing the seat
belt with release button ?, see "Releasing
seat belts" (Y page 46).
Seat belt adjustment The seat-belt adjustment function adjusts the
driver's and front-passenger seat belt to the
upper body of the occupants.
The belt strap is tightened slightly when:
R
you engage the belt tongue in the belt
buckle and you then turn the key to position
2in the ignition lock.
R the key is in position 2in the ignition lock
and you then engage the belt tongue in the
buckle.
The seat-belt adjustment will apply a certain
tightening force if any slack is detected
between the occupan tand the sea tbelt. Do
not hold on to the seat belt tightly while it is
adjusting. You can switch the seat-belt
adjustment on and off in the on-board com-
puter (Y page 194).
The seat-belt adjustment is an integral part of
the PRE-SAFE ®
convenience function. More
information about PRE-SAFE ®
can be found
in the "PRE-SAFE ®
(preventative occupant
protection)" section (Y page 43). Releasing seat belts X
Press release button ?(Ypage 45) and
guide belt tongue ;back towards belt
loop :.
! Make sure that the seat belt is fully rolled
up. Otherwise, the seat belt or belt tongue
will be trapped in the door or in the seat
mechanism. This could damage the door,
the door trim panel and the seat belt. Dam-
aged seat belts can no longer fulfil their
protective function and must be replaced.
Visit a qualified specialist workshop.
Belt warning for driver and front
passenger The
7 seat belt warning lamp in the instru-
ment cluster is a reminder for all occupants
to fasten their seat belts. It may light up con-
tinuously or flash. In addition, there may be a
warning tone.
The 7 seat belt warning lamp goes out and
the warning tone ceases when the driver and
the fron tpassenger have fastened their seat
belt.
For certain countries only: regardless of
whether the driver and th efront passenger
have fastened their seat belts, the 7seat
beltw arning lamp lights up for six seconds
after the engine is started. It then goes out if
the driver and the fron tpassenger have fas-
tened their seat belts.
i For more information on the 7seat
belt warning lamp, see "Warning and indi-
cator lamps in the instrumen tcluster, seat
belt" (Y page 224).
Belt tensioners, belt force limiters The seat belts are fitted with belt tensioners.
The belt tensioners tighten the seat belts in
an accident, pulling the mclose against the
body.
Belt tensioners do not correct incorrect seat
positions or incorrectly fastened seat belts. 46
Occupant safetySafety
Page 59 of 321
system remains available with full brake
boosting effect and BAS.
Adaptive brake lamps
i Adaptive brake lamps are only available in
certain countries.
If you brake sharply from a speed of more
than 50 km/h or if braking is assisted by BAS
or BAS PLUS, the brake lamps flash rapidly.
In this way, traffic travelling behind you is
warned in an even more noticeable manner.
If you brake sharply from a speed of more
than 70 km/h to a standstill, the hazard warn-
ing lamps are activated automatically. If the
brakes are applied again, the brake lamps
light up continuously. The hazard warning
lamps switch off automatically if you travel
faster than 10 km/h .You can also switch off
the hazard warning lamps using the hazard
warning switch button (Y page 103).ESP
®
(Electronic Stability Program)
Important safety notes i
See the "Important safety notes" section
(Y page 53).
If ESP ®
detects that the vehicle is deviating
from the direction desired by the driver, one
or more wheels are braked to stabilise the
vehicle. If necessary, the engine output is also
modified to keep the vehicle on the desired
course within physical limits. ESP ®
assists
the driver when pulling away on wet or slip-
pery roads. ESP ®
can also stabilise the vehi-
cle during braking.
If ESP ®
intervenes, the ÷ESP®
warning
lamp flashes in the instrument cluster. G
WARNING
If the ÷ warning lamp in the instrument
cluster flashes, proceed as follows: R
do not deactivate ESP ®
under any circum-
stances.
R only depress the accelerator pedal as far as
necessary when pulling away.
R adapt your driving style to suit the prevail-
ing road and weather conditions.
Otherwise, the vehicle could go into a skid.
ESP ®
cannot reduce the risk of an accident if
you drive too fast. ESP ®
cannot override the
laws of physics.
! The ignition must be switched off if you
are towing the vehicle with the front/rear
axle raised. Intervention by ESP ®
could oth-
erwise damage the brake system.
i Only use wheels with the recommended
tyre sizes. Only then will ESP ®
function
properly.
ETS (Electronic Traction System) Traction control is part of ESP
®
.
Traction control brakes the drive wheels indi-
vidually if they spin. This enables you to pull
away and accelerate on slippery surfaces, for
example if the road surface is slippery on one
side.
Traction control remains active if you deacti-
vate ESP ®
. G
WARNING
Traction control cannot reduce the risk of an
accident if you drive too fast. Traction control
cannot override the laws of physics.
Deactivating/activating ESP ®
(except
AMG vehicles) ESP
®
is activated automatically when the
engine is started.
i Vehicles with ECO start/stop function:
the ECO start/stop function switches the
engine off automatically when the vehicle
comes to a stop. When pulling away again,
the engine starts automatically. ESP ®
remains in its previously selected status. 56
Driving safety systemsSafety
Page 60 of 321
Example: if ESP
®
was deactivated before
the engine was switched off, ESP ®
remains
deactivated when the engine is switched on
again.
It may be best to deactivate ESP ®
in the fol-
lowing situations:
R when using snow chains
R in deep snow
R on sand or gravel G
WARNING
Activate ESP ®
as soo nas the situations
described above no longer apply.E SP®
will
otherwise not be able to stabilise the vehicle
if the vehicle starts to skid or a wheel starts
to spin.
If you deactivate ESP ®
:
R ESP ®
no longer improves driving stability.
R engine torque is not limited and the drive
wheels are able to spin. The spinning of the
wheels results in a cutting action for better
traction.
R traction control is still activated.
R ESP ®
still provides support when you
brake.
If ESP ®
is deactivated and one or more wheels
star tto spin, the ÷ESP®
warning lamp in
the instrument cluster flashes. In such situa-
tions, ESP ®
will not stabilise the vehicle. X
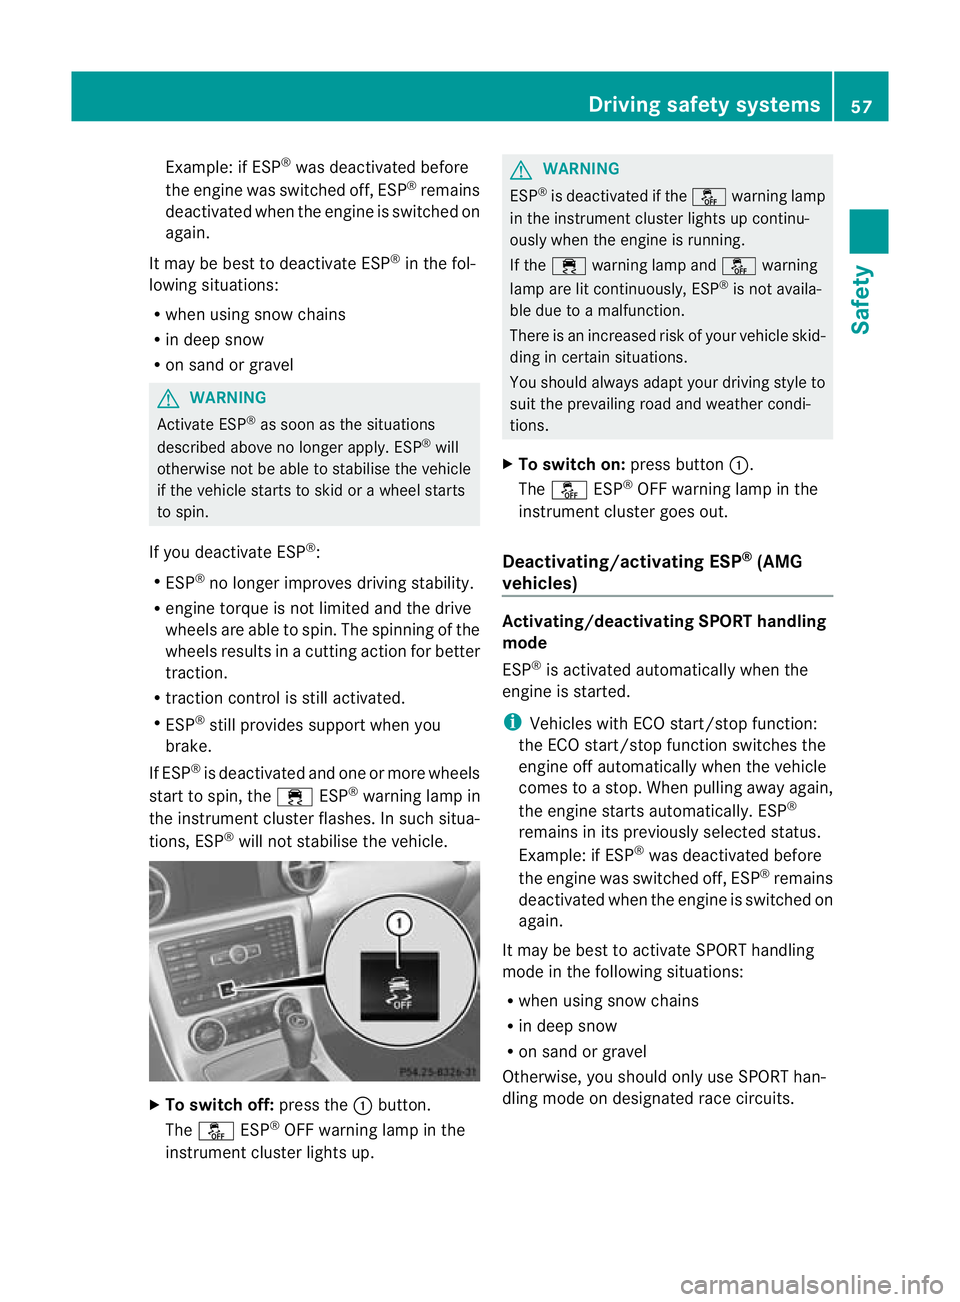
To switch off: press the:button.
The å ESP®
OFF warning lamp in the
instrument cluster lights up. G
WARNING
ESP ®
is deactivated if the åwarning lamp
in the instrument cluster lights up continu-
ously when the engine is running.
If the ÷ warning lamp and åwarning
lamp are lit continuously, ESP ®
is not availa-
ble due to a malfunction.
There is an increased risk of your vehicle skid-
ding in certain situations.
You should always adapt your driving style to
suit the prevailing road and weather condi-
tions.
X To switch on: press button:.
The å ESP®
OFF warning lamp in the
instrument cluster goes out.
Deactivating/activating ESP ®
(AMG
vehicles) Activating/deactivating SPORT handling
mode
ESP
®
is activated automatically when the
engine is started.
i Vehicles with ECO start/stop function:
the ECO start/stop function switches the
engine off automatically when the vehicle
comes to a stop. When pulling away again,
the engine starts automatically. ESP ®
remains in its previously selected status.
Example: if ESP ®
was deactivated before
the engine was switched off, ESP ®
remains
deactivated when the engine is switched on
again.
It may be best to activate SPORT handling
mode in the following situations:
R when using snow chains
R in deep snow
R on sand or gravel
Otherwise, you should only use SPORT han-
dling mode on designated race circuits. Driving safety systems
57Safety Z
Page 61 of 321
G
WARNING
Deactivate SPORT handling mode and acti-
vate ESP ®
as soon as the situations described
above no longer apply.O therwise, SPORT
handling mode will only be able to stabilise
the vehicle to a limited degree if the vehicle
starts to skid or a whee lstarts to spin.
When SPORT handling mode is activated:
R ESP ®
only improves driving stability to a
limited degree.
R engine torque is only restricted to a limited
degree and the drive wheels are able to
spin. The spinning of the wheels results in
a cutting action for better traction.
R traction control is still activated.
R ESP ®
still provides support when you brake
firmly.
If SPORT handling mode is activated and one
or more wheels start to spin, the ÷ESP®
warning lamp in the instrument cluster
flashes. ESP ®
only stabilises the vehicle to a
limited degree. X
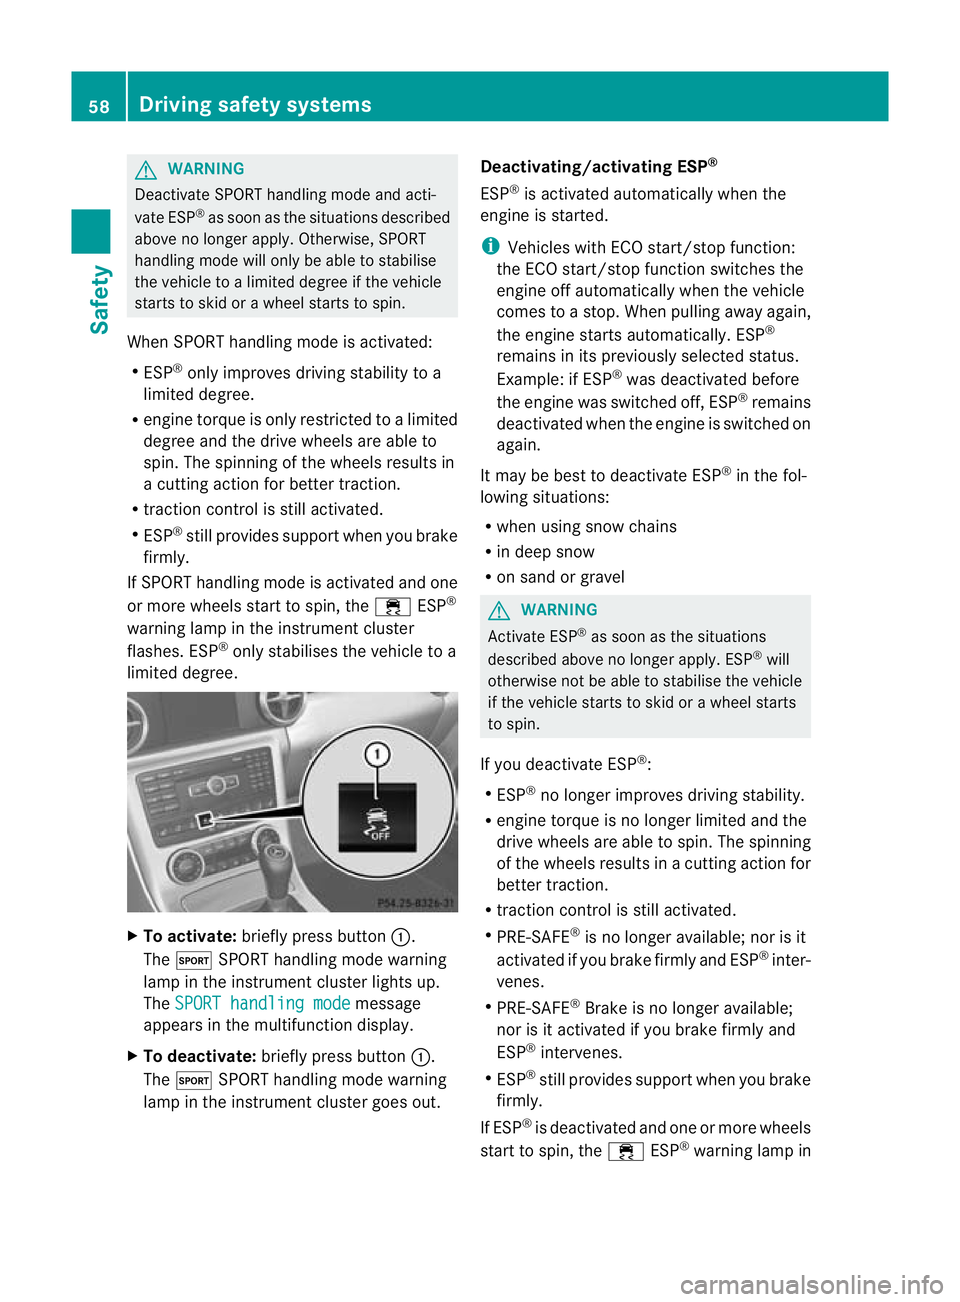
To activate: briefly press button :.
The M SPORT handling mode warning
lamp in the instrument cluster lights up.
The SPORT handling mode message
appears in the multifunctio ndisplay.
X To deactivate: briefly press button :.
The M SPORT handling mode warning
lamp in the instrumen tcluster goes out. Deactivating/activating ESP
®
ESP ®
is activated automatically when the
engine is started.
i Vehicles with ECO start/stop function:
the ECO start/stop function switches the
engine off automatically when the vehicle
comes to a stop. When pulling away again,
the engine starts automatically. ESP ®
remains in its previously selected status.
Example: if ESP ®
was deactivated before
the engine was switched off, ESP ®
remains
deactivated when the engine is switched on
again.
It may be best to deactivate ESP ®
in the fol-
lowing situations:
R when using snow chains
R in deep snow
R on sand or gravel G
WARNING
Activate ESP ®
as soon as the situations
described above no longer apply. ESP ®
will
otherwise not be able to stabilise the vehicle
if the vehicle starts to skid or a wheel starts
to spin.
If you deactivate ESP ®
:
R ESP ®
no longer improves driving stability.
R engine torque is no longer limited and the
drive wheels are able to spin .The spinning
of the wheels results in a cutting action for
better traction.
R traction control is still activated.
R PRE-SAFE ®
is no longer available; nor is it
activated if you brake firmly and ESP ®
inter-
venes.
R PRE-SAFE ®
Brake is no longer available;
nor is it activated if you brake firmly and
ESP ®
intervenes.
R ESP ®
still provides support when you brake
firmly.
If ESP ®
is deactivated and one or more wheels
start to spin, the ÷ESP®
warning lamp in 58
Driving safety systemsSafety
Page 62 of 321
the instrument cluste
rdoes not flash. In such
situations, ESP ®
will not stabilise the vehicle. X
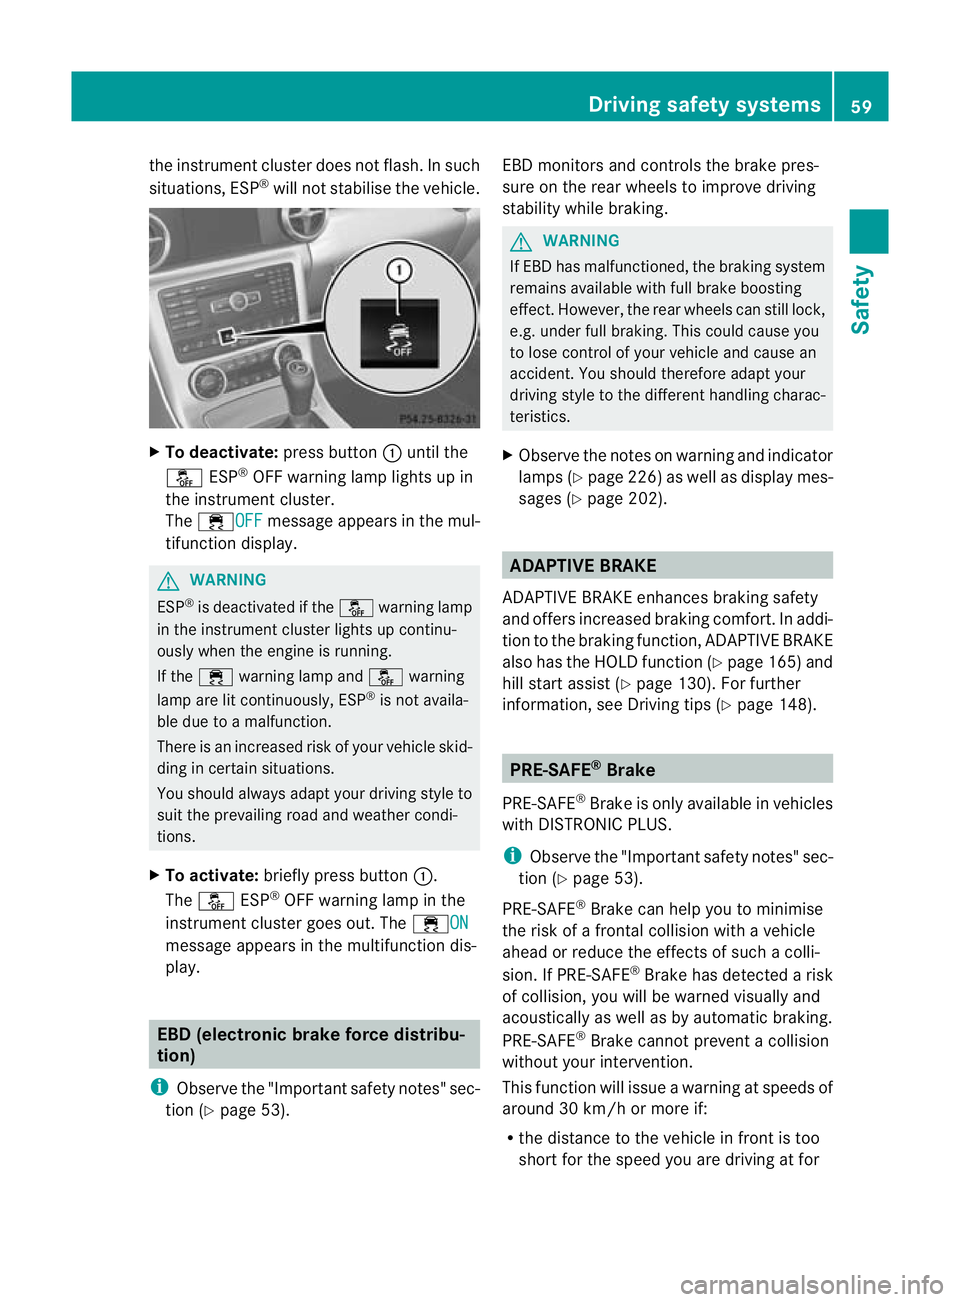
To deactivate: press button:until the
å ESP®
OFF warning lamp lights up in
the instrument cluster.
The ÷OFF message appears in the mul-
tifunction display. G
WARNING
ESP ®
is deactivated if the åwarning lamp
in the instrument cluster lights up continu-
ously when the engine is running.
If the ÷ warning lamp and åwarning
lamp are lit continuously, ESP ®
is not availa-
ble due to a malfunction.
There is an increased risk of your vehicle skid-
ding in certain situations.
You should always adapt your driving style to
suit the prevailing road and weather condi-
tions.
X To activate: briefly press button :.
The å ESP®
OFF warning lamp in the
instrument cluster goes out. The ÷ONmessage appears in the multifunction dis-
play.
EBD (electronic brake force distribu-
tion)
i Observe the "Important safety notes" sec-
tion (Y page 53). EBD monitors and controls the brake pres-
sure on the rear wheels to improve driving
stability while braking. G
WARNING
If EBD has malfunctioned, the braking system
remains available with full brake boosting
effect .However, the rear wheels can still lock,
e.g. under full braking. This could cause you
to lose control of your vehicle and cause an
accident .You should therefore adapt your
driving style to the different handling charac-
teristics.
X Observe the notes on warning and indicator
lamps (Y page 226) as well as display mes-
sages (Y page 202). ADAPTIVE BRAKE
ADAPTIVE BRAKE enhances braking safety
and offers increased braking comfort. In addi-
tion to the braking function, ADAPTIVE BRAKE
also has the HOLD function (Y page 165) and
hill start assist (Y page 130). For further
information, see Driving tips (Y page 148). PRE-SAFE
®
Brake
PRE-SAFE ®
Brake is only available in vehicles
with DISTRONIC PLUS.
i Observe the "Important safety notes" sec-
tion (Y page 53).
PRE-SAFE ®
Brake can help you to minimise
the risk of a frontal collision with a vehicle
ahead or reduce the effect sofsuch a colli-
sion. If PRE-SAFE ®
Brake has detected a risk
of collision, you will be warned visually and
acoustically as well as by automatic braking.
PRE-SAFE ®
Brake cannot prevent a collision
without your intervention.
This function will issue a warning at speeds of
around 30 km/h or more if:
R the distance to the vehicle in front is too
short for the speed you are driving at for Driving safety systems
59Safety Z
Page 64 of 321
R
a narrow vehicle travelling in front, e.g. a
motorbike
R a vehicle travelling in front on a different
line G
WARNING
PRE-SAFE ®
Brake does not react:
R to people or animals
R to oncoming vehicles
R to crossing traffic
R when cornering
As a result, PRE-SAFE ®
Brake may not give
warnings or intervene in critical situations.
There is a ris kofanaccident. Always pay
careful attention to the traffi csituation and be
ready to brake.
In order to maintain the appropriate distance
to the vehicle in front and thus prevent a col-
lision, you must apply the brakes yourself.
X To activate/deactivate: activate or deac-
tivate PRE-SAFE ®
Brake in the on-board
computer (Y page 189).
The Ä symbol appears in the multifunc-
tion display as long as the HOL Dfunction
is not activated (Y page 165).
On vehicles with parking guidance, the
Ä symbol is displayed when Pis
engaged or you are driving faste rthan
35 km/h.
Vehicles with COMAND and navigation sys-
tem: the radar sensor system is switched off
automatically in the vicinity of radio telescope
facilities (Y page 312).
Vehicles without COMAND and a navigation
system and vehicles for Australia: the radar
sensor system and on-board computer must
be switched off in the vicinity of radio tele-
scope facilities (Y page 194).
For PRE-SAFE ®
Brake to assist you when driv-
ing, the radar sensor system must be
switched on (Y page 194) and be opera-
tional.
Following damage to the front end of the vehi-
cle, have the configuration and operation of the radar sensors checked at a qualified spe-
cialist workshop. This also applies to colli-
sions at slow speeds where there is no visible
damage to the front of the vehicle. Anti-theft systems
Immobiliser
The immobiliser prevents your vehicle from
being started without the correct key.
X To activate with the key: remove the key
from the ignition lock.
X To activate with KEYLESS-GO: switch the
ignition off and open the driver's door.
X To deactivate: switch on the ignition.
i The immobiliser is always deactivated
when you start the engine. ATA (Anti-Theft Alarm system)
Av isual and audible alarm is triggered if the
alarm system is primed and you open:
R a door
R the vehicle with the emergency key ele-
ment
R the boot lid
R the bonnet
R the glove compartment
R the stowage space under the armrest
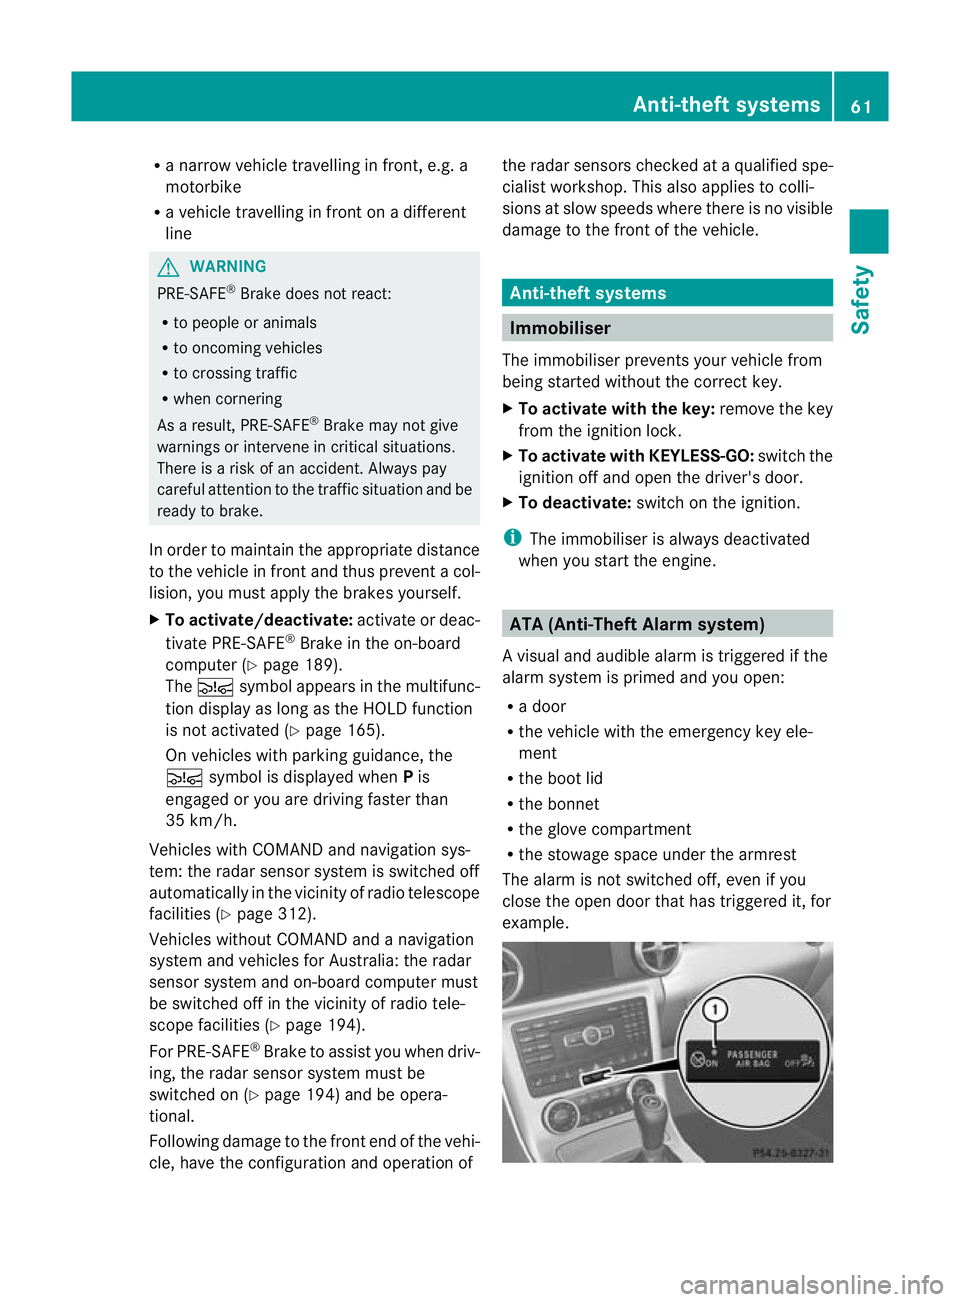
The alarm is not switched off, even if you
close the open door that has triggered it, for
example. Anti-theft systems
61Safety Z
Page 69 of 321
Useful information
i This Owner's Manual describes all models
and all standard and optional equipment
available to your vehicle at the time of pub-
lication of the Owner's Manual. Country-
specific deviations are possible. Please
note that your vehicle may not be equipped
with all features described. This also
applies to safety-relevan tsystems and
functions.
i Please read the information on qualified
specialist workshops (Y page 22).Key
Key functions
The key centrally locks/unlocks:
R the doors
R the boo tlid
R the glove compartment
R the stowage compartment in the centre
console
R the fuel filler flap G
WARNING
Only for the United Kingdom: if the vehicle
has been locked with the key, the double lock
function is activated as standard. It is the nnot
possible to open the doors from inside the
vehicle.
Therefore, do not leave any people behind in
the vehicle, particularly children, elderly peo-
ple or people in need of special assistance if
the vehicle has been locked with the key. As
a result, they may not be able to free them-
selves in the event of an emergency. As a
result, they could be seriously or even fatally
injured by prolonged exposure to extremely
high or low temperatures, for example. In this
case, rescuing people from outside the vehi-
cle is difficult.
Deactivate the interior motion sensor before
you lock the vehicle with the key. The doors can then be opened from the inside after the
vehicle has been locked from the outside with
the key. G
WARNING
If children are left unsupervised in the vehicle,
they could:
R open a door from inside the vehicle at any
time, even if it has been locked
R start the vehicle using akey which has been
left in the vehicle
R release the electric parking brake
They could thereby endanger themselves and
others. Never leave children unsupervised in
the vehicle. Always take the key with you
when leaving the vehicle, even if you are only
leaving it for a short time. G
WARNING
If a key ring is too heavy or too large, the
weight acting on the key could cause it to turn
in the ignition lock or catch on the steering
wheel. This could cause the engine to be
switched off suddenly. You may lose control
of the vehicle and cause an accident. Do not
attach any heavy or large key rings to the key
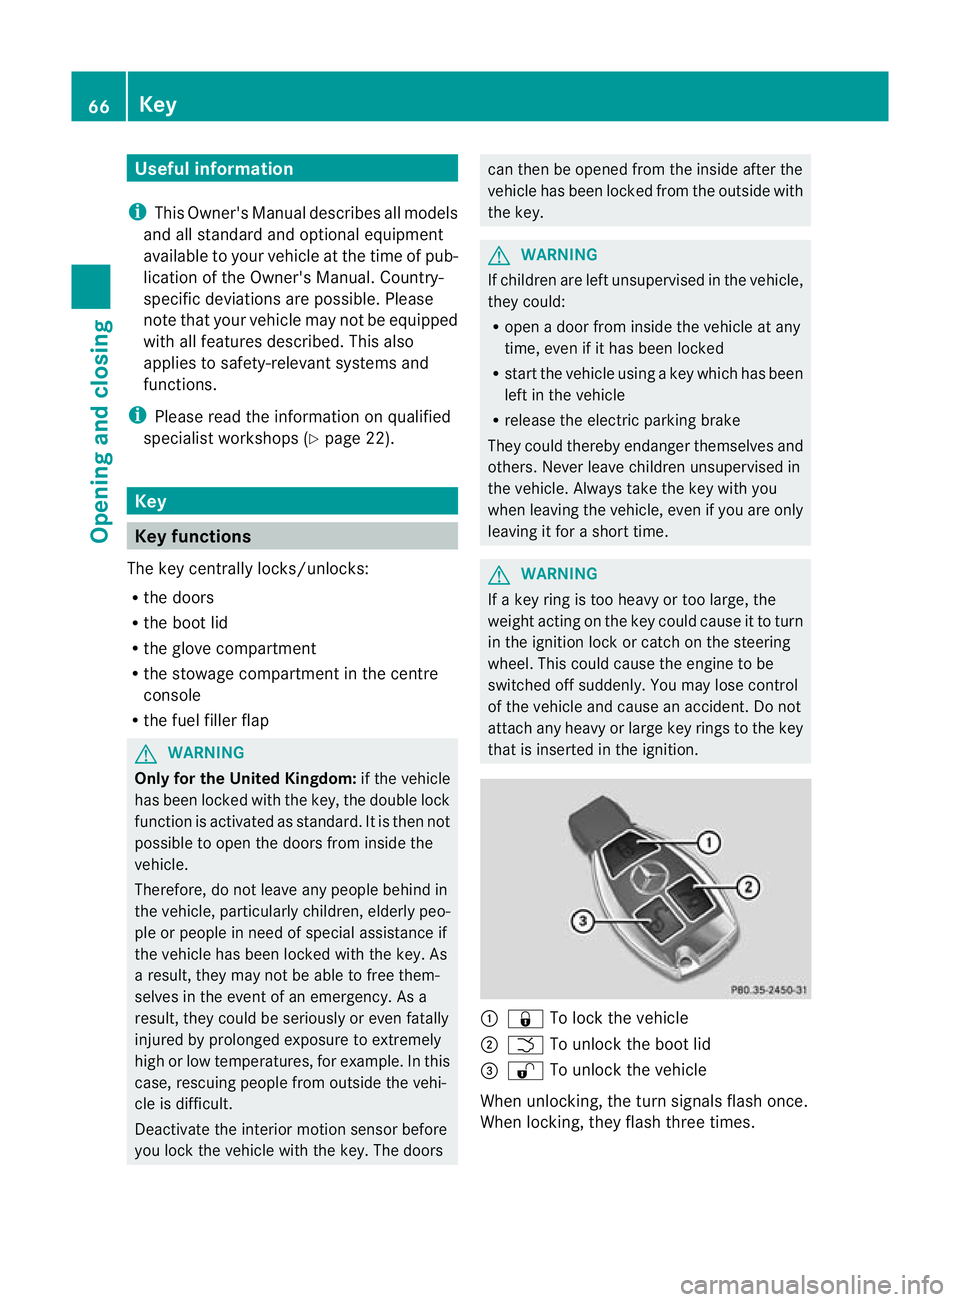
that is inserted in the ignition. :
& To lock the vehicle
; F To unlock the boot lid
= % To unlock the vehicle
When unlocking, the turn signals flash once.
When locking, they flash three times. 66
KeyOpening and closing
Page 70 of 321
When it is dark, the surround lighting also
comes on if it is activated in the on-board
computer (Y page 192).
You can also set an audible signal to confirm
that the vehicle has been locked. The audible
signal can be activated and deactivated using
the on-board computer (Y page 193).
X To unlock centrally: press the%but-
ton.
If you do not open the vehicle within approx-
imately 40 seconds of unlocking:
R the vehicle is locked again.
R the anti-theft system is primed again.
X To lock centrally: press the&button. KEYLESS-GO
Important notes on the use of KEYLESS-
GO R
Do not keep the KEYLESS-GO key together
with:
- electronic devices, e.g. a mobile phone
or another key
- metallic objects, e.g. coins or metal foil
This can affect the functionality of KEY-
LESS-GO.
R Bear in mind that the engine can be started
by any of the vehicle occupants if there is
a KEYLESS-GO key in the vehicle.
Locking and unlocking centrally You can start, lock or unlock the vehicle using
KEYLESS-GO. To do this, you only need carry
the key with you. You can combine the KEY-
LESS-GO functions with those of a conven-
tional key, e.g. using KEYLESS-GO to unlock
and pressing the &button to lock.
When locking or unlocking with KEYLESS-GO,
the distance between the key and the corre-
sponding door handle must not be greater
than 1 m. KEYLESS-GO checks whether a valid key is in
the vehicle by periodically establishing a radio
connection between the vehicle and the key.
This happens:
R when the external door handles are
touched
R when starting the engine
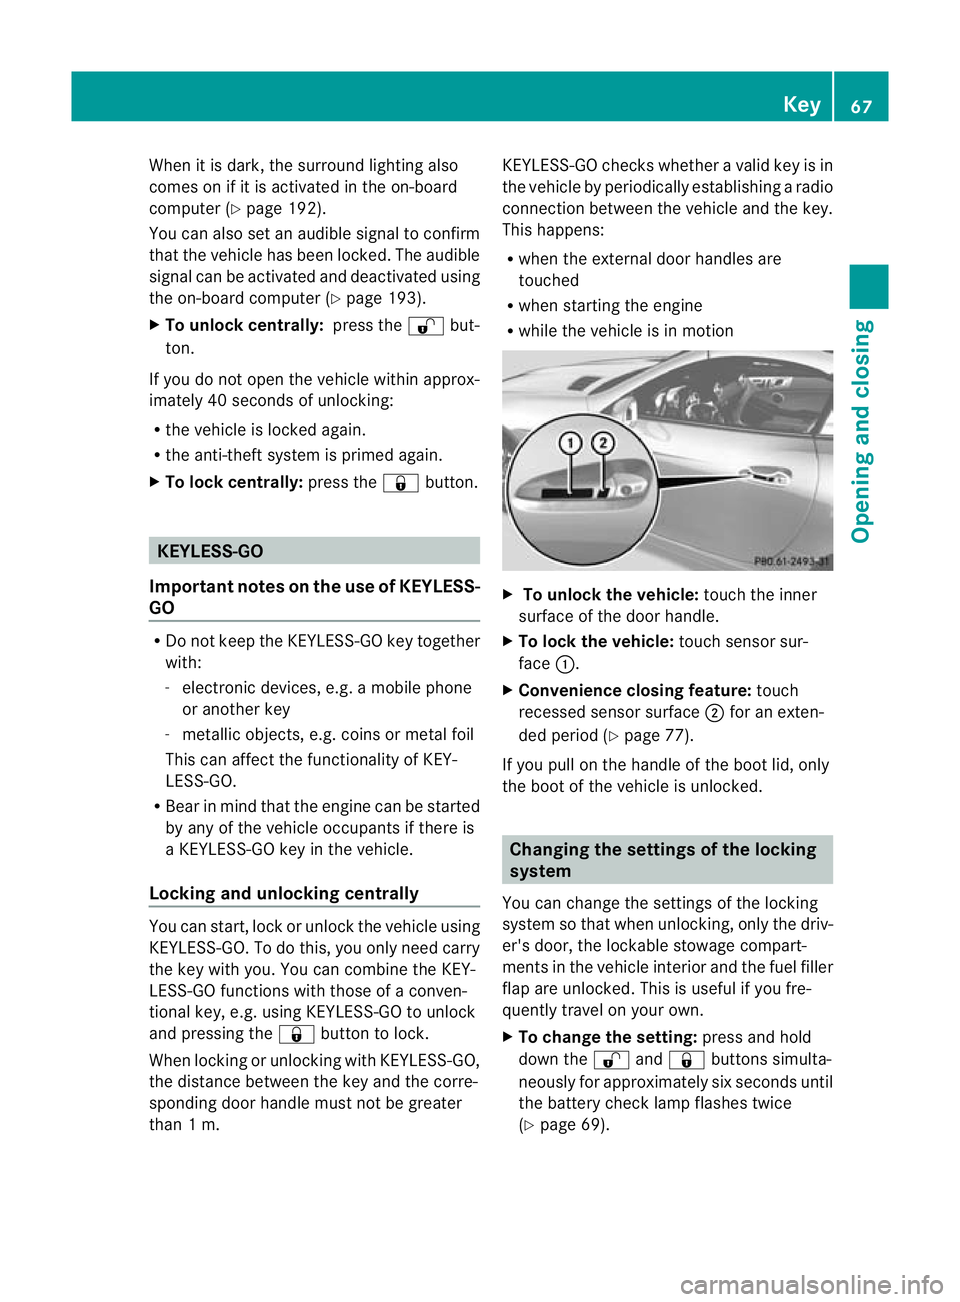
R while the vehicle is in motion X
To unlock the vehicle: touch the inner
surface of the door handle.
X To lock the vehicle: touch sensor sur-
face :.
X Convenience closing feature: touch
recessed sensor surface ;for an exten-
ded period (Y page 77).
If you pull on the handle of the boot lid, only
the boot of the vehicle is unlocked. Changing the settings of the locking
system
You can change the settings of the locking
system so that when unlocking, only the driv-
er's door, the lockable stowage compart-
ments in the vehicle interior and the fuel filler
flap are unlocked. This is useful if you fre-
quently travel on your own.
X To change the setting: press and hold
down the %and& buttons simulta-
neously for approximately six seconds until
the battery check lamp flashes twice
(Y page 69). Key
67Opening and closing Z