2012 MERCEDES-BENZ SLK ROADSTER ECU
[x] Cancel search: ECUPage 239 of 321
Useful information
i This Owner's Manual describes all models
and all standard and optional equipment
available to your vehicle at the time of pub-
lication of the Owner's Manual. Country-
specific deviations are possible. Please
note that your vehicle may not be equipped
with all features described. This also
applies to safety-relevan tsystems and
functions.
i Please read the information on qualified
specialist workshops (Y page 22).Stowage areas
Stowage compartments
Important safety notes G
WARNING
The stowage compartments mus tbe closed
when items are stored in them. Luggage nets
are not designed to secure heavy items of
luggage.
You or other vehicle occupants could be
injured by objects being thrown around if you:
R brake sharply
R change direction suddenly
R have an accident
Sharp-edged and fragile objects must not be
carried in the luggage net.
Do not carry hard objects in the ruffled pock-
ets. Objects must not protrude over the top
of the ruffled pockets.
Front stowage compartments Glove compartment
i The glove compartment flap contains
brackets for coins, pens, and credit and
service cards. X
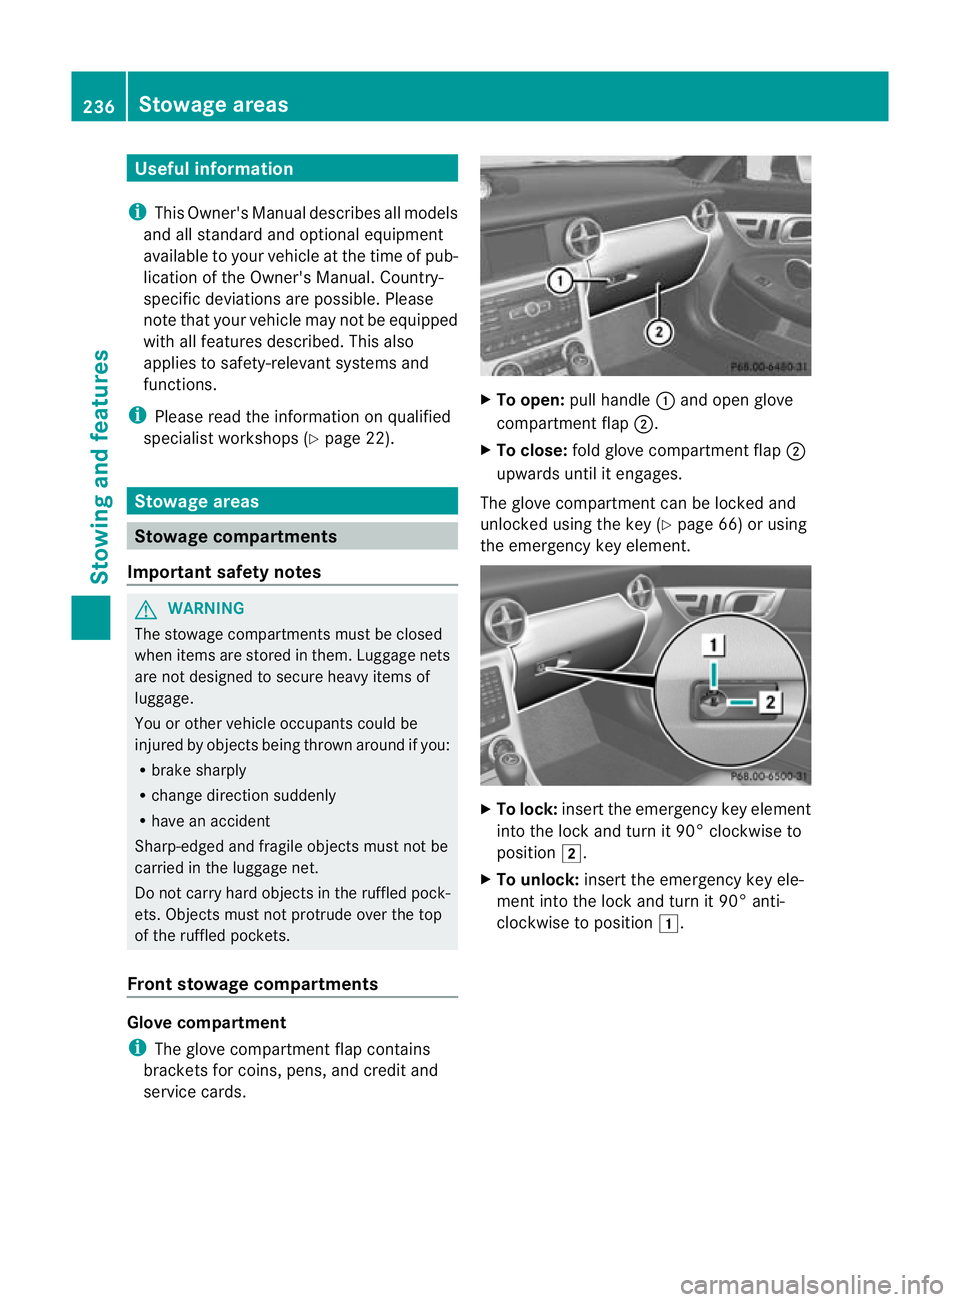
To open: pull handle :and open glove
compartment flap ;.
X To close: fold glove compartment flap ;
upwards until it engages.
The glove compartment can be locked and
unlocked using the key (Y page 66) or using
the emergency key element. X
To lock: insert the emergency key element
into the lock and turn it 90° clockwise to
position 2.
X To unlock: insert the emergency key ele-
ment into the lock and turn it 90° anti-
clockwise to position 1.236
Stowage areasStowing and features
Page 241 of 321
Stowage compartments in the doors
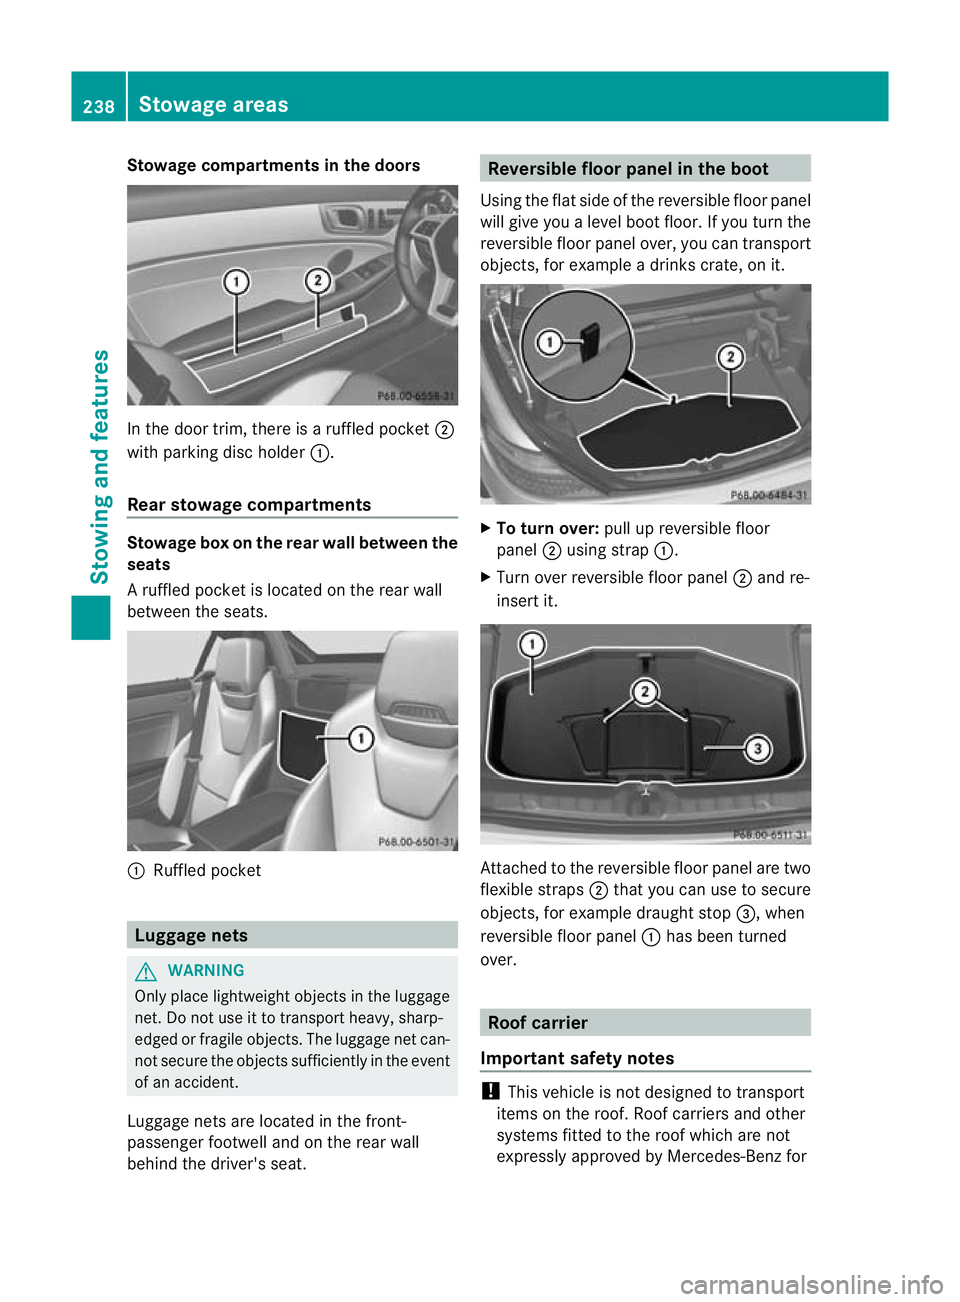
In the door trim, there is a ruffled pocket
;
with parking disc holder :.
Rear stowage compartments Stowage box on the rear wall between the
seats
Ar
uffled pocke tis located on the rear wall
between the seats. :
Ruffled pocket Luggage nets
G
WARNING
Only place lightweight objects in the luggage
net. Do not use it to transport heavy, sharp-
edged or fragile objects. The luggage net can-
not secure the objects sufficiently in the event
of an accident.
Luggage nets are located in the front-
passenger footwell and on the rear wall
behind the driver's seat. Reversible floor panel in the boot
Using the flat side of the reversible floor panel
will give you a level boot floor. If you turn the
reversible floor panel over, you can transport
objects, for example a drinks crate, on it. X
To turn over: pull up reversible floor
panel ;using strap :.
X Turn over reversible floor panel ;and re-
insert it. Attached to the reversible floor panel are two
flexible straps
;that you can use to secure
objects, for example draught stop =, when
reversible floor panel :has been turned
over. Roof carrier
Important safety notes !
This vehicle is not designed to transport
items on the roof. Roof carriers and other
systems fitted to the roof which are not
expressly approved by Mercedes-Benz for 238
Stowage areasStowing and features
Page 242 of 321
this model may not be used, as they could
damage the vehicle and the vario-roof.
At the time of going to print, Mercedes-
Benz does not offer any roo fcarrier or other
roof-fitted systems for this model.
! This vehicle is no tdesigned to transport
any items on the boot lid or to allow luggage
carriers or equipment of any kind to be fit-
ted to the boot lid. Otherwise the vehicle
and the vario-roof could be damaged. Features
Cup holders
Important safety notes G
WARNING
Keep the cup holder closed while the vehicle
is in motion .Otherwise, vehicle occupants
could be injured by objects being thrown
around if you:
R brake sharply
R change direction suddenly
R are involved in an accident
Only use the cup holders for containers of a
suitable size and which have lids .The drinks
could otherwise spill.
Cup holders should not be used for hot drinks.
You may otherwise scald yourself.
Cup holder in the front centre console You can remove the cup holder insert to clean
it. Cleant
he cup holder with clean, lukewarm
water only. X
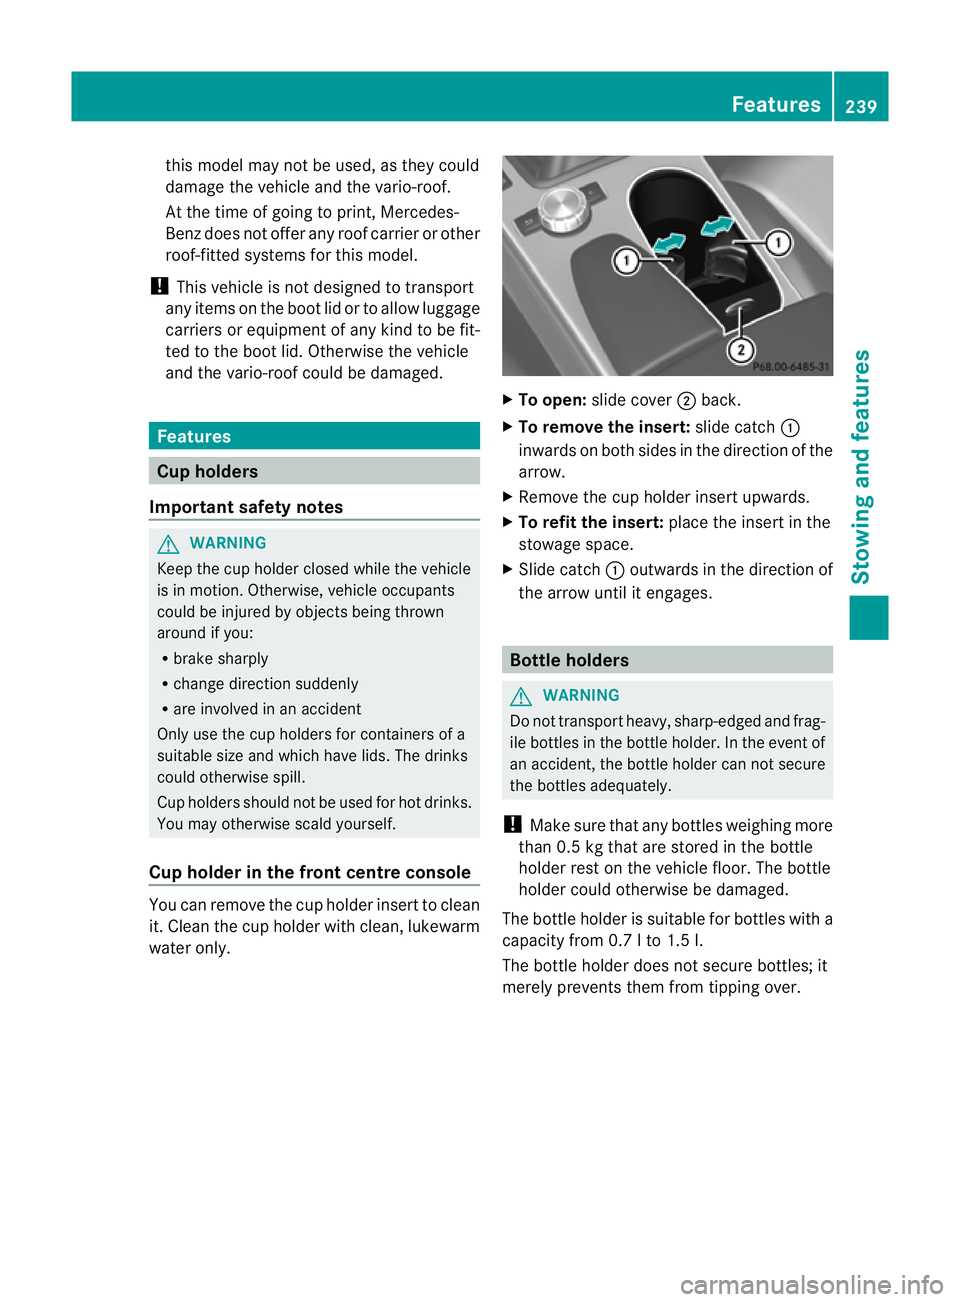
To open: slide cover ;back.
X To remove the insert: slide catch:
inwards on both sides in the direction of the
arrow.
X Remove the cup holder insert upwards.
X To refit the insert: place the insert in the
stowage space.
X Slide catch :outwards in the direction of
the arrow until it engages. Bottle holders
G
WARNING
Do not transport heavy, sharp-edged and frag-
ile bottles in the bottle holder. In the event of
an accident, the bottle holder can not secure
the bottles adequately.
! Make sure that any bottles weighing more
than 0.5 kg that are stored in the bottle
holder rest on the vehicle floor. The bottle
holder could otherwise be damaged.
The bottle holder is suitable for bottles with a
capacity from 0.7 l to 1.5 l.
The bottle holder does not secure bottles; it
merely prevents them from tipping over. Features
239Stowing and features Z
Page 249 of 321
Frequencies for the garage door opener
The radio type approval number and the frequency range for the garage door opener can be
found on the Internet at: http://www.mercedes-benz.de/betriebsanleitung. Floormat on the driver's side
G
WARNING
Make sure that there is sufficien tclearance
around the pedals when floormats are used,
and that the floormats are properly secured.
The floormats must be correctly secured at all
times using the securing knob and retainers.
Before you drive off, chec kthe floormats and
secure them if necessary. Afloormat which is
not properly secured can slip and thereby
interfere with the movemen tofthe pedals.
Do not place floormats on top of one another. X
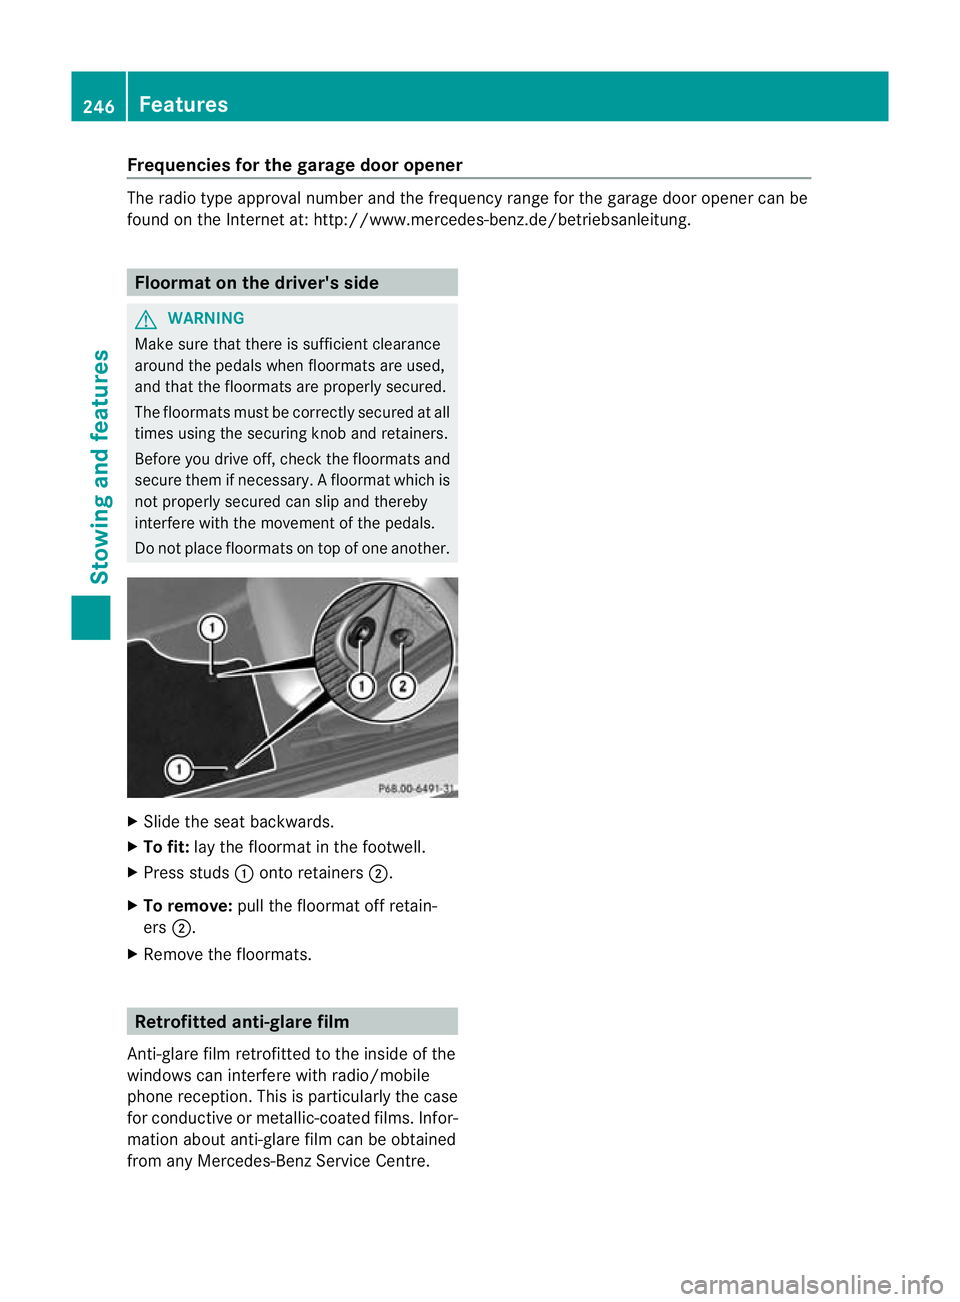
Slide the seat backwards.
X To fit: lay the floormat in the footwell.
X Press studs :onto retainers ;.
X To remove: pull the floormat off retain-
ers ;.
X Remove the floormats. Retrofitted anti-glare film
Anti-glare film retrofitted to the inside of the
windows can interfere with radio/mobile
phone reception. This is particularly the case
for conductive or metallic-coated films. Infor-
mation about anti-glare film can be obtained
from any Mercedes-Benz Service Centre. 246
FeaturesStowing and features
Page 254 of 321
H
Environmental note
When topping up the oil, take care not to spill
any. If oil enters the soil or waterways, it is
harmful to the environment.
! Only use engine oils and oil filters that
have been approved for vehicles with a
service system. You can obtain a list of the
engine oils and oil filters tested and
approved in accordance with the
Mercedes-Benz Specifications for Service
Products at any Mercedes-Benz Service
Centre.
Damage to the engine or exhaust system is
caused by the following:
R using engine oils and oil filters that have
not been specifically approved for the
service system
R changing the engine oil and oil filter after
missing the change interval required by
the service system
R using engine oil additives
! Do not add too much oil. Topping up with
too much engine oil can result in damage
to the engine or to the catalytic converter.
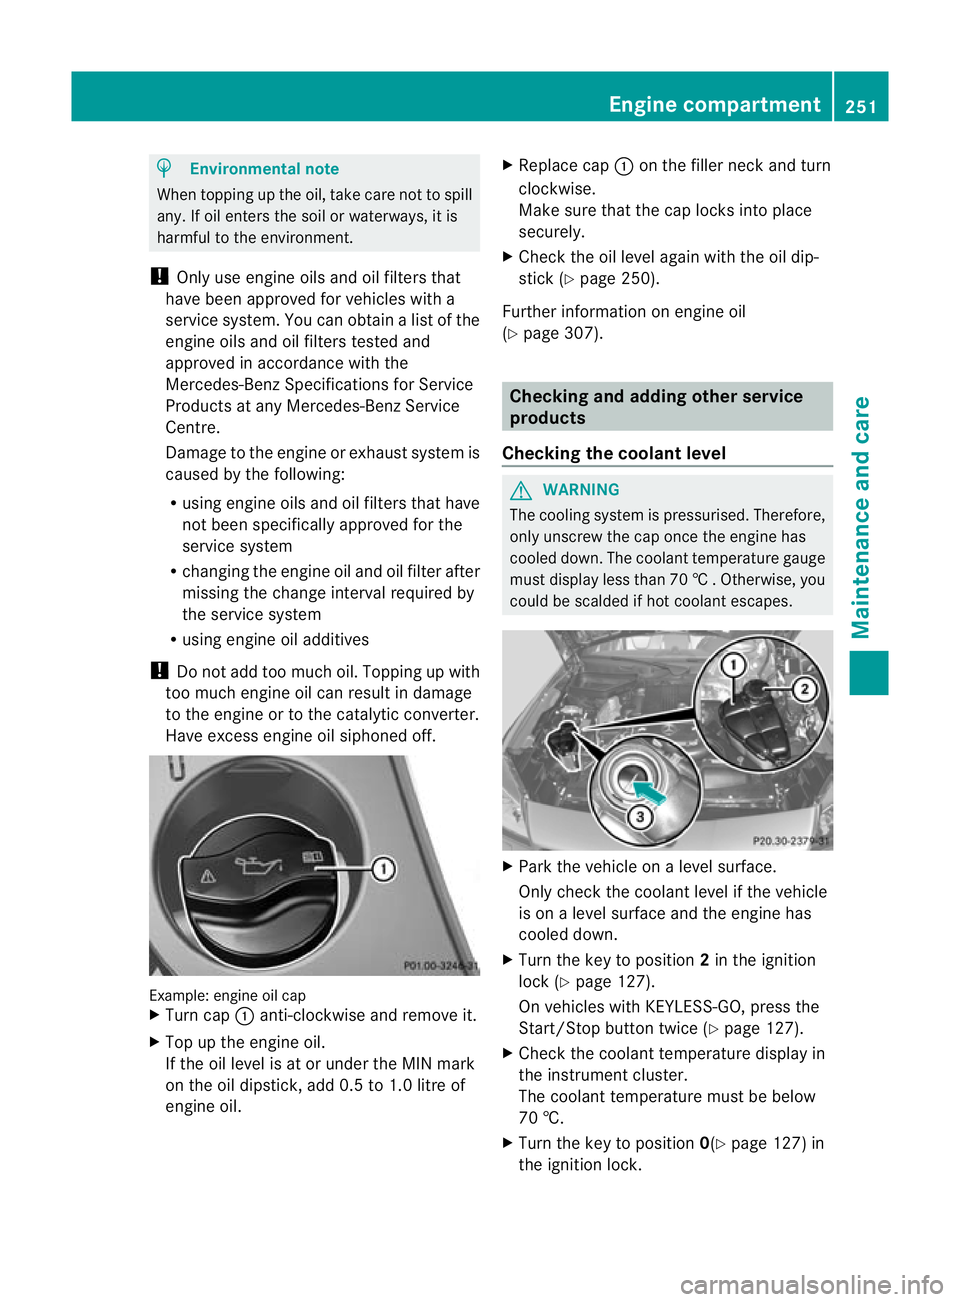
Have excess engine oil siphoned off. Example: engine oil cap
X
Turn cap :anti-clockwise and remove it.
X Top up the engine oil.
If the oil level is at or under the MIN mark
on the oil dipstick, add 0.5 to 1.0 litre of
engine oil. X
Replace cap :on the filler neck and turn
clockwise.
Make sure that the cap locks into place
securely.
X Chec kthe oil level again with the oil dip-
stick (Y page 250).
Further information on engine oil
(Y page 307). Checking and adding other service
products
Checking the coolant level G
WARNING
The cooling system is pressurised. Therefore,
only unscrew the cap once the engine has
cooled down. The coolant temperature gauge
must display less than 70 †.Otherwise, you
could be scalded if hot coolant escapes. X
Park the vehicle on a level surface.
Only check the coolant level if the vehicle
is on a level surface and the engine has
cooled down.
X Turn the key to position 2in the ignition
lock (Y page 127).
On vehicles with KEYLESS-GO, press the
Start/Stop button twice (Y page 127).
X Check the coolant temperature display in
the instrument cluster.
The coolant temperature must be below
70 †.
X Turn the key to position 0(Ypage 127) in
the ignition lock. Engine compartment
251Maintenance and care Z
Page 259 of 321
Always have paintwork repairs carried out
at a qualified specialis
tworkshop.
! Do not use wash programs with a hot wax
treatment under any circumstances.
i The vehicle should preferably be washed
by hand using a soft sponge, car shampoo
and plenty of water.
i Use only insect remover and car shampoo
from the range of recommended and
approved Mercedes-Benz care products.
Cleaning the windows G
WARNING
Switch off the windscreen wipers and remove
the key from the ignition lock before cleaning
the windscreen or the wiper blades. On vehi-
cles with KEYLESS-GO, press the Start/Stop
button repeatedly until all indicator lamps in
the instrument cluster have gone off. The
windscreen wipers could otherwise move and
injure you.
X Clean the inside and outside of the win-
dows with a damp cloth and a cleaning
agent that is recommended and approved
by Mercedes-Benz.
! Do not use dry cloths, abrasive products,
solvents or cleaning agents containing sol-
vents to clean the inside of the windows.
Do not touch the insides of the windows
with hard objects, e.g. an ice scraper or
ring. There is otherwise a risk of damaging
the windows.
! Clean the water drainage channels of the
windscreen and the rear window at regular
intervals. Deposits such as leaves, petals
and pollen may under certain circumstan-
ces prevent water from draining away.T his
can lead to corrosion damage and damage
to electronic components. Cleaning the wiper blades G
WARNING
Switch off the windscreen wipers and remove
the key from the ignition lock before cleaning
the windscreen or the wiper blades. On vehi-
cles with KEYLESS-GO, press the Start/Stop
button repeatedly until all indicator lamps in
the instrument cluster have gone off. The
windscreen wipers could otherwise move and
injure you.
! Do not pull on the wiper blade. Otherwise,
the wiper blade could be damaged.
! Do not clean wiper blades too often and
do not rub them too hard. Otherwise, the
graphite coating could be damaged. This
could cause wiper noise.
X Fold the wiper arms away from the wind-
screen.
X Cleant he wiper blades carefully using a
damp cloth.
X Fold the windscreen wipers back again
before switching on the ignition.
! Hold the wiper arm securely when folding
back. The windscreen could be damaged if
the wiper arm hits against it suddenly.
Cleaning the exterior lighting !
Only use cleaning agents or cleaning
cloths that are suitable for plastic lenses.
Unsuitable cleaning agents or cleaning
cloths could scratch or damage the plastic
lenses of the exterior lighting.
X Cleant he plastic lenses of the exterior
lighting using a wet sponge and a mild
cleaning agent, e.g. Mercedes-Ben zcar
shampoo. Or clean the exterior lighting
with cleaning cloths.
Cleaning the mirror turn signal !
Only use cleaning agents or cleaning
cloths that are suitable for plastic lenses.
Unsuitable cleaning agents or cleaning 256
CareMaintenance and care
Page 263 of 321
Useful information
i This Owner's Manual describes all models
and all standard and optional equipment
available to your vehicle at the time of pub-
lication of the Owner's Manual. Country-
specific deviations are possible. Please
note that your vehicle may not be equipped
with all features described. This also
applies to safety-relevan tsystems and
functions.
i Please read the information on qualified
specialist workshops (Y page 22).Where will I find...?
Warning triangle
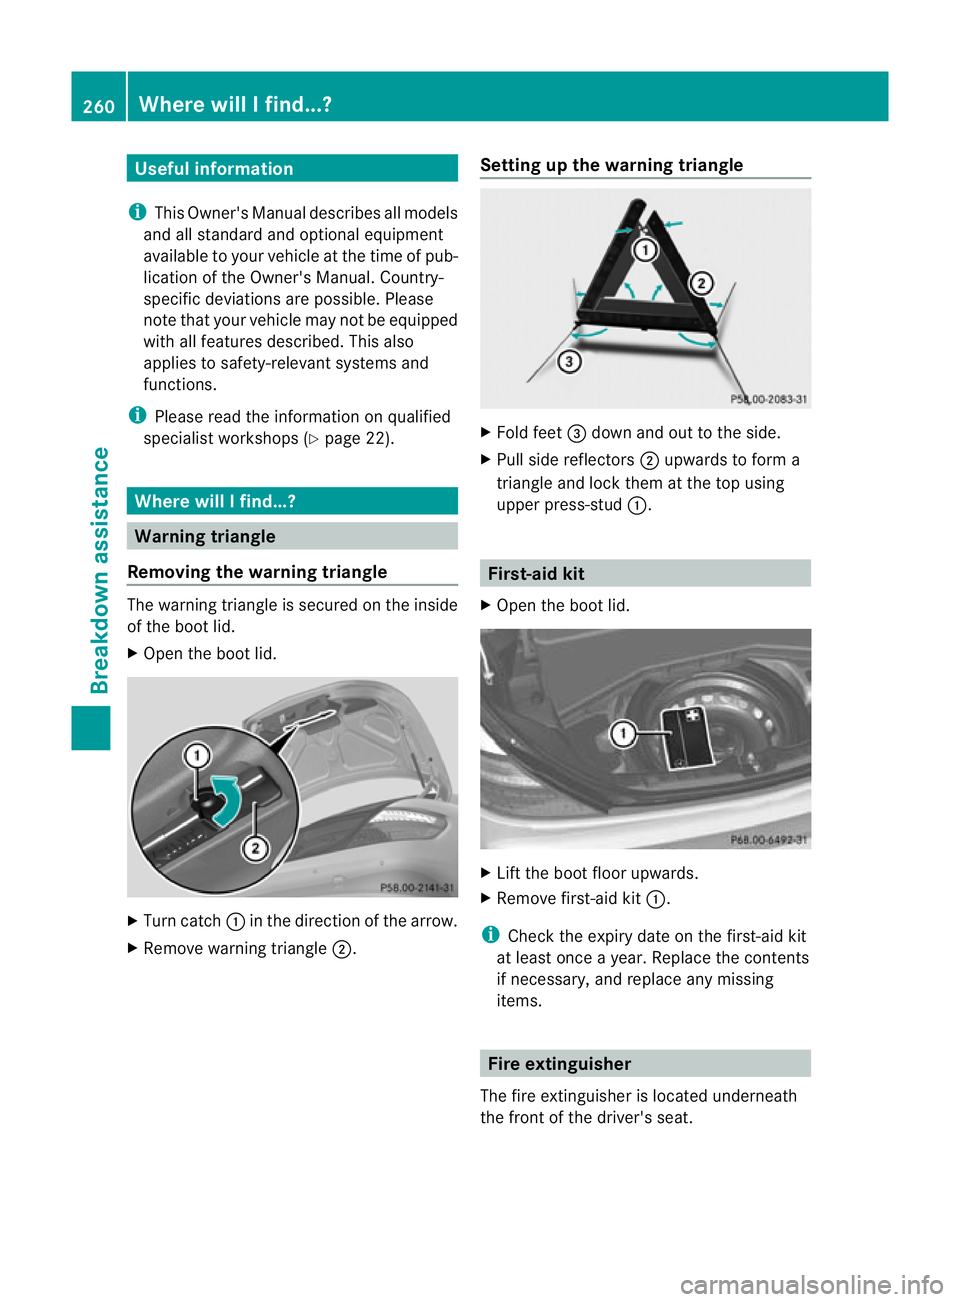
Removing the warning triangle The warning triangle is secured on the inside
of the boo tlid.
X Open the boot lid. X
Turn catch :in the direction of the arrow.
X Remove warning triangle ;.Setting up the warning triangle X
Fold feet =down and out to the side.
X Pull side reflectors ;upwards to form a
triangle and lock the matthe top using
upper press-stud :. First-aid kit
X Open the boot lid. X
Lift the boot floor upwards.
X Remove first-aid kit :.
i Check the expiry date on the first-aid kit
at least once a year. Replace the contents
if necessary, and replace any missing
items. Fire extinguisher
The fire extinguisher is located underneath
the front of the driver's seat. 260
Where will I find...?Breakdown assistance
Page 265 of 321
Collapsible emergency spare wheel
Removing the collapsible emergency
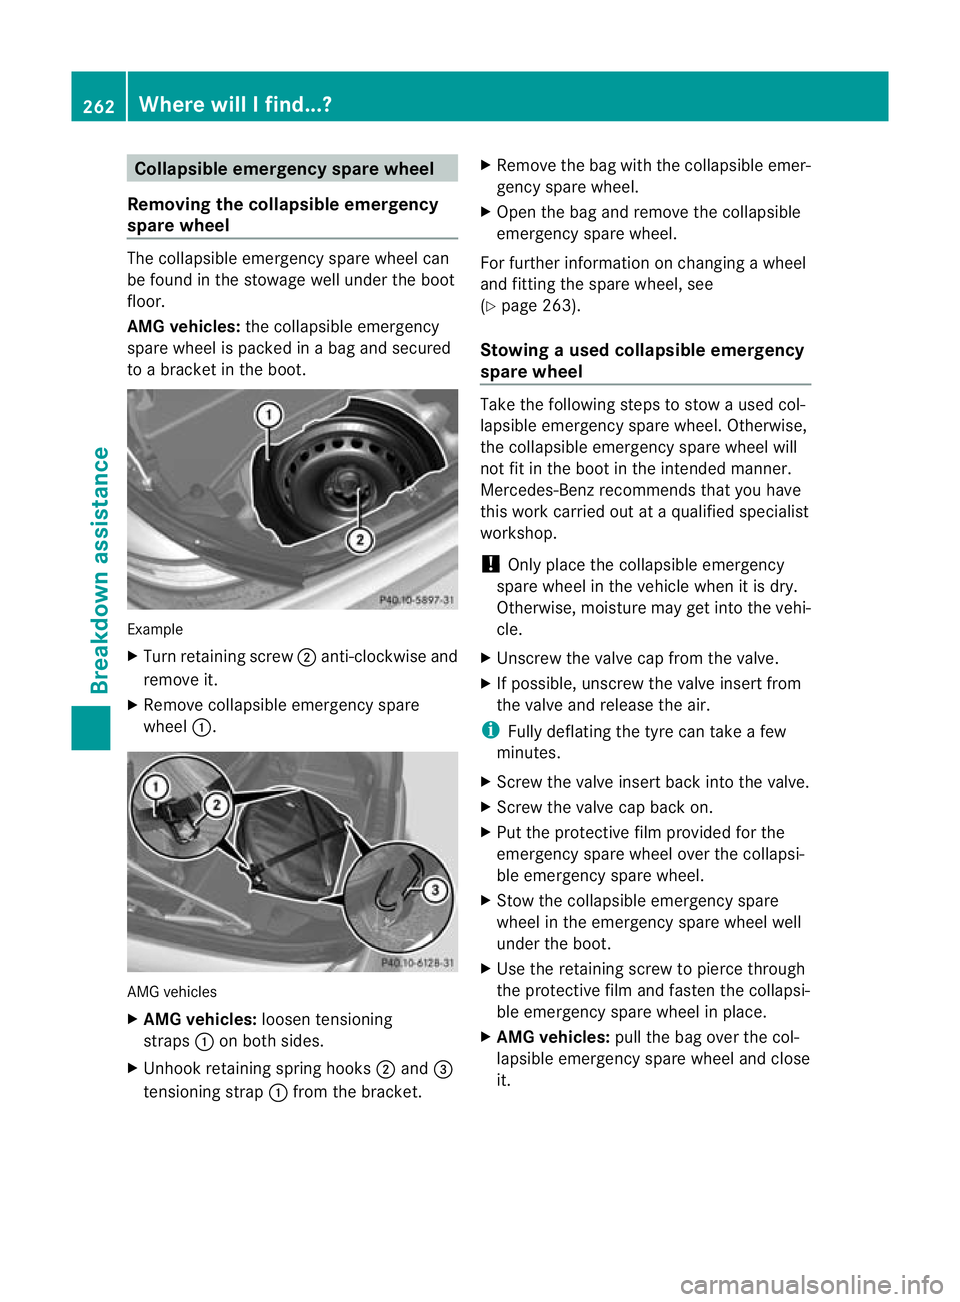
spare wheel The collapsible emergency spare wheel can
be found in the stowage well unde rthe boot
floor.
AMG vehicles: the collapsible emergency
spare wheel is packed in a bag and secured
to a bracket in the boot. Example
X
Turn retaining screw ;anti-clockwise and
remove it.
X Remove collapsible emergency spare
wheel :. AMG vehicles
X
AMG vehicles: loosen tensioning
straps :on both sides.
X Unhook retaining spring hooks ;and =
tensioning strap :from the bracket. X
Remove the bag with the collapsible emer-
gency spare wheel.
X Open the bag and remove the collapsible
emergency spare wheel.
For further information on changing a wheel
and fitting the spare wheel, see
(Y page 263).
Stowing aused collapsible emergency
spare wheel Take the following steps to stow a used col-
lapsible emergency spare wheel. Otherwise,
the collapsible emergency spare wheel will
not fit in the boot in the intended manner.
Mercedes-Benz recommends that you have
this work carried out at a qualified specialist
workshop.
!
Only place the collapsible emergency
spare wheel in the vehicle when it is dry.
Otherwise, moisture may get into the vehi-
cle.
X Unscrew the valve cap from the valve.
X If possible, unscrew the valve insert from
the valve and release the air.
i Fully deflating the tyre can take a few
minutes.
X Screw the valve insert back into the valve.
X Screw the valve cap back on.
X Put the protective film provided for the
emergency spare wheel over the collapsi-
ble emergency spare wheel.
X Stow the collapsible emergency spare
wheel in the emergency spare wheel well
under the boot.
X Use the retaining screw to pierce through
the protective film and fasten the collapsi-
ble emergency spare wheel in place.
X AMG vehicles: pull the bag over the col-
lapsible emergency spare wheel and close
it. 262
Where will I find...?Breakdown assistance