2012 MERCEDES-BENZ SLK ROADSTER ECU
[x] Cancel search: ECUPage 86 of 321
Fitting and removing the draught stop
Preparing for fitting
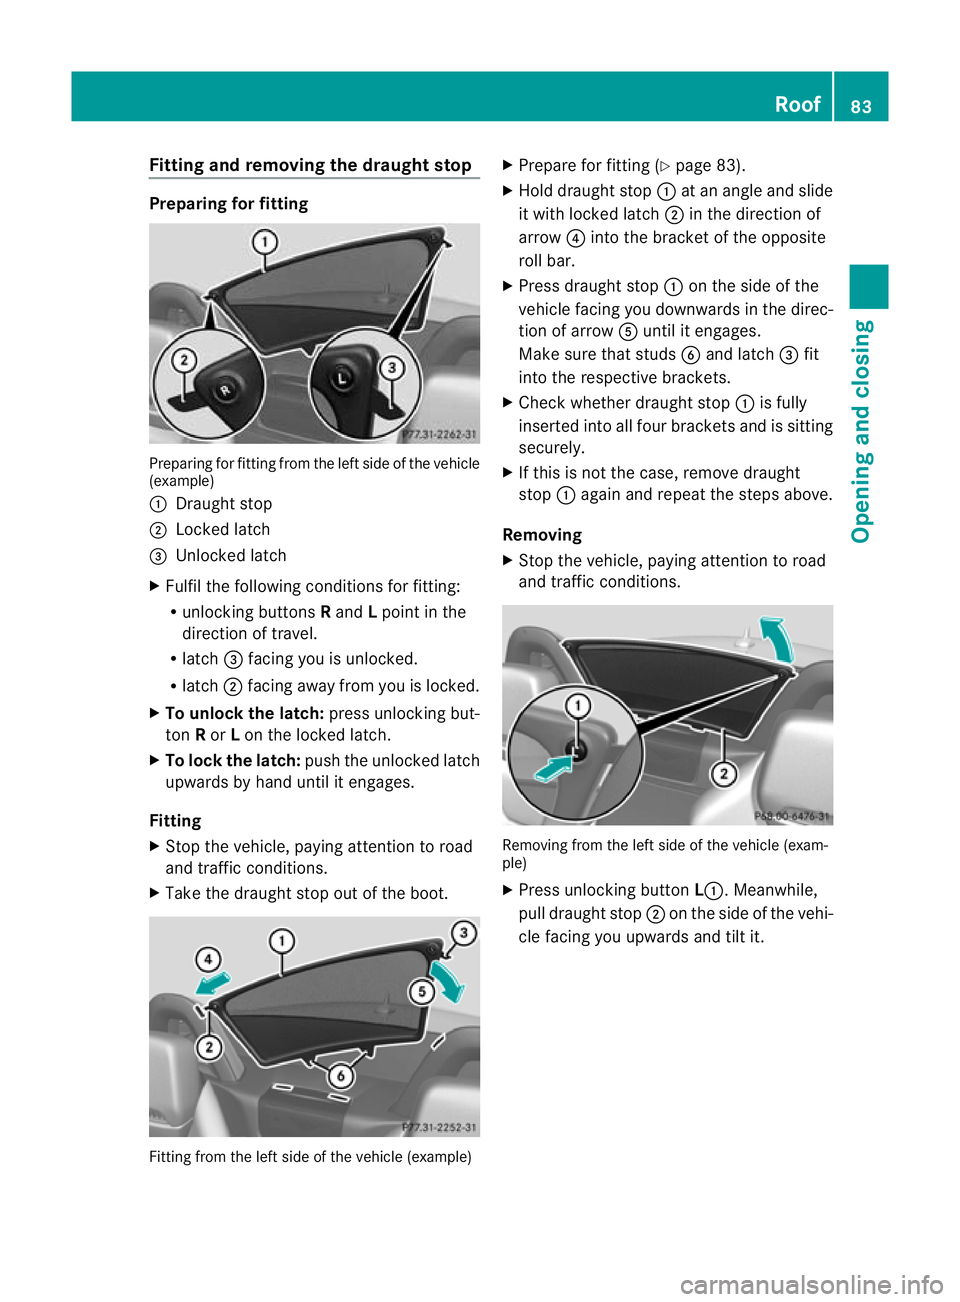
Preparing for fitting from the lef
tside of the vehicle
(example)
: Draught stop
; Locked latch
= Unlocked latch
X Fulfil the following conditions for fitting:
R unlocking buttons Rand Lpoint in the
direction of travel.
R latch =facing you is unlocked.
R latch ;facing away from you is locked.
X To unlock the latch: press unlocking but-
ton Ror Lon the locked latch.
X To lock th elatch: push the unlocked latch
upwards by hand until it engages.
Fitting
X Stop the vehicle, paying attention to road
and traffic conditions.
X Take the draugh tstop ou tofthe boot. Fitting from the left side of the vehicle (example) X
Prepare for fitting (Y page 83).
X Hold draught stop :at an angle and slide
it with locked latch ;in the direction of
arrow ?into the bracket of the opposite
roll bar.
X Press draught stop :on the side of the
vehicle facing you downwards in the direc-
tion of arrow Auntil it engages.
Make sure that studs Band latch =fit
into the respective brackets.
X Check whether draught stop :is fully
inserted into all four brackets and is sitting
securely.
X If this is not the case, remove draught
stop :again and repeat the steps above.
Removing
X Stop the vehicle, paying attention to road
and traffic conditions. Removing from the left side of the vehicle (exam-
ple)
X
Press unlocking button L:.Meanwhile,
pull draught stop ;on the side of the vehi-
cle facing you upwards and tilt it. Roof
83Opening and closing Z
Page 87 of 321
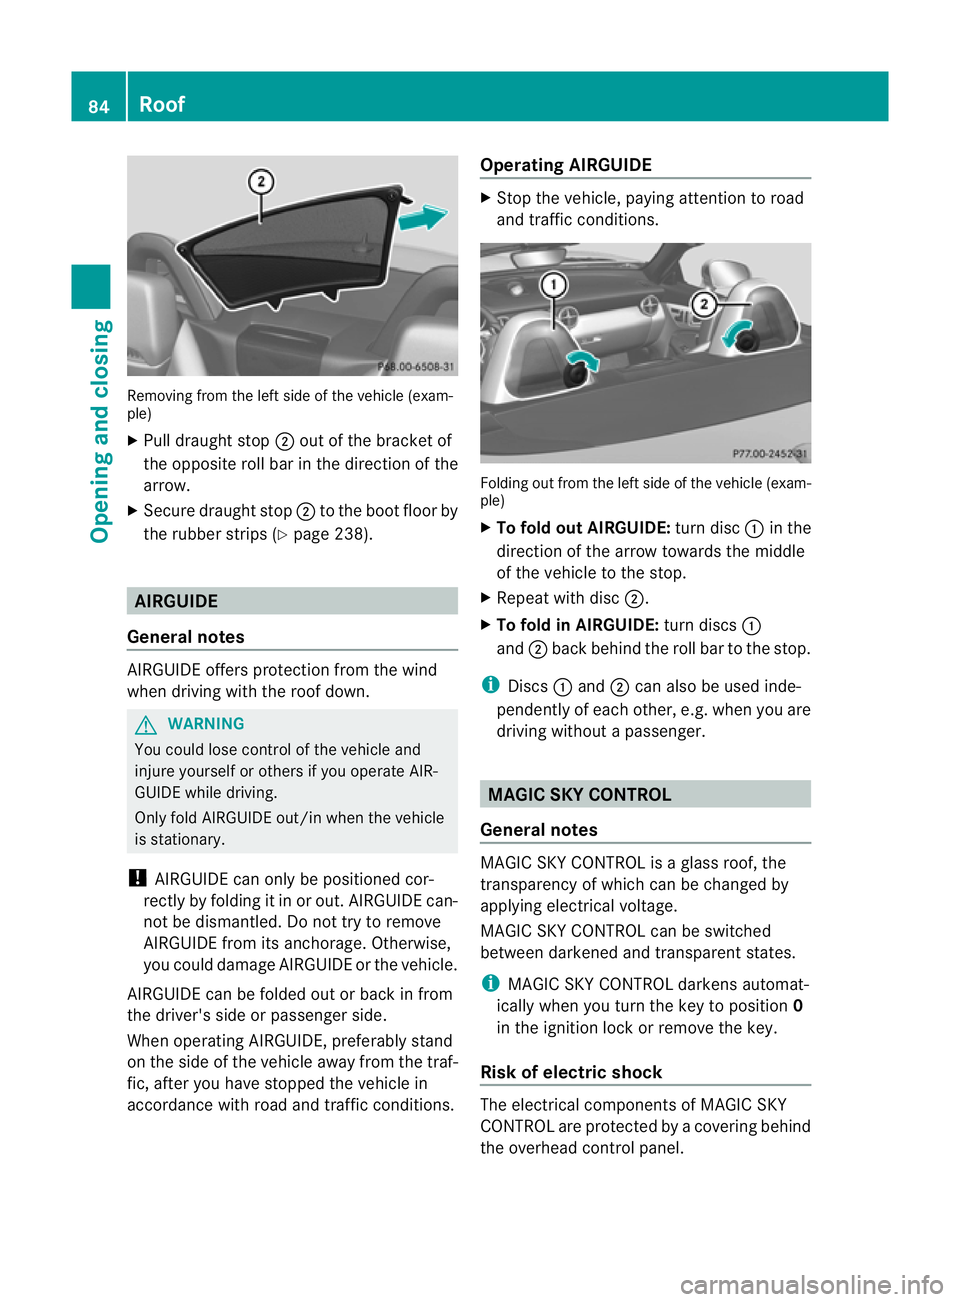
Removing from the left side of the vehicle (exam-
ple)
X
Pull draught stop ;out of the bracket of
the opposite roll bar in the direction of the
arrow.
X Secure draught stop ;to the boot floor by
the rubbe rstrips (Y page 238). AIRGUIDE
General notes AIRGUIDE offers protection from the wind
when driving with the roo fdown. G
WARNING
You could lose control of the vehicle and
injure yourself or others if you operate AIR-
GUIDE while driving.
Only fold AIRGUIDE out/in when the vehicle
is stationary.
! AIRGUIDE can only be positioned cor-
rectly by folding it in or out. AIRGUIDE can-
not be dismantled. Do not try to remove
AIRGUIDE from its anchorage. Otherwise,
you could damage AIRGUIDE or the vehicle.
AIRGUIDE can be folded out or back in from
the driver's side or passenger side.
When operating AIRGUIDE ,preferably stand
on the side of the vehicle away from the traf-
fic, after you have stopped the vehicle in
accordance with road and traffic conditions. Operating AIRGUIDE X
Stop the vehicle, paying attention to road
and traffic conditions. Folding out from the left side of the vehicle (exam-
ple)
X
To fold out AIRGUIDE: turn disc:in the
direction of the arrow towards the middle
of the vehicle to the stop.
X Repeat with disc ;.
X To fold in AIRGUIDE: turn discs:
and ;back behind the roll bar to the stop.
i Discs :and ;can also be used inde-
pendently of each other, e.g. when you are
driving without a passenger. MAGIC SKY CONTROL
General notes MAGIC SKY CONTROL is a glass roof, the
transparency of which can be changed by
applying electrical voltage.
MAGIC SKY CONTROL can be switched
between darkened and transparent states.
i
MAGIC SKY CONTROL darkens automat-
ically when you turn the key to position 0
in the ignition lock or remove the key.
Risk of electric shock The electrical components of MAGIC SKY
CONTROL are protected by a covering behind
the overhead control panel.84
RoofOpening and closing
Page 92 of 321
Seats
Important safety notes
G
WARNING
The seats can still be adjusted when there is
no key in the ignition lock. For this reason,
children should never be left unsupervised in
the vehicle. They could adjust the seats and
become trapped. G
WARNING
Only adjust the driver's seat when the vehicle
is stationary. You will otherwise be distracted
from the road and traffic conditions and you
could lose control of the vehicle as a result of
the seat moving. This could cause an acci-
dent. G
WARNING
Make sure that nobody can become trapped
when adjusting the seats.
Observe the notes on airbags.
Secure children as recommended; see the
"Children in the vehicle" section. G
WARNING
Make sure that the back of your head is sup-
ported at eye level by the central area of the
head restraint .Ifyour head is not supported
correctly by the head restraint, you could suf-
fer a severe neck injury in the event of an
accident .Never drive if the head restraints are
not engaged and set correctly.
! To avoid damage to the seats and the seat
heating, observe the following information:
R do not spill any liquids on the seats. If
liquid is spilled on the seats, dry them as
soon as possible.
R if the seat covers are damp or wet, do not
switch on the seat heating. The seat
heating should also not to be used to dry
the seats.
R clean the seat covers as recommended;
see the "Interior care" section. R
do not transport heavy loads on the
seats. Do not place sharp objects on the
seat cushions, e.g. knives, nails or tools.
The seats should only be occupied by
passengers, if possible.
R when the seat heating is in operation, do
not cover the seats with insulating mate-
rials, e.g. blankets, coats, bags, seat cov-
ers, child seats or booster seats.
! Make sure that there are no objects in the
footwell or behind the seats when moving
the seat back. There is a risk that the seats
and/or the objects could be damaged.
i The head restraints are fitted with the
NECK-PRO system (Y page 43). For this
reason, it is not possible to remove the
head restraints from the seats.
For more information, contact a qualified
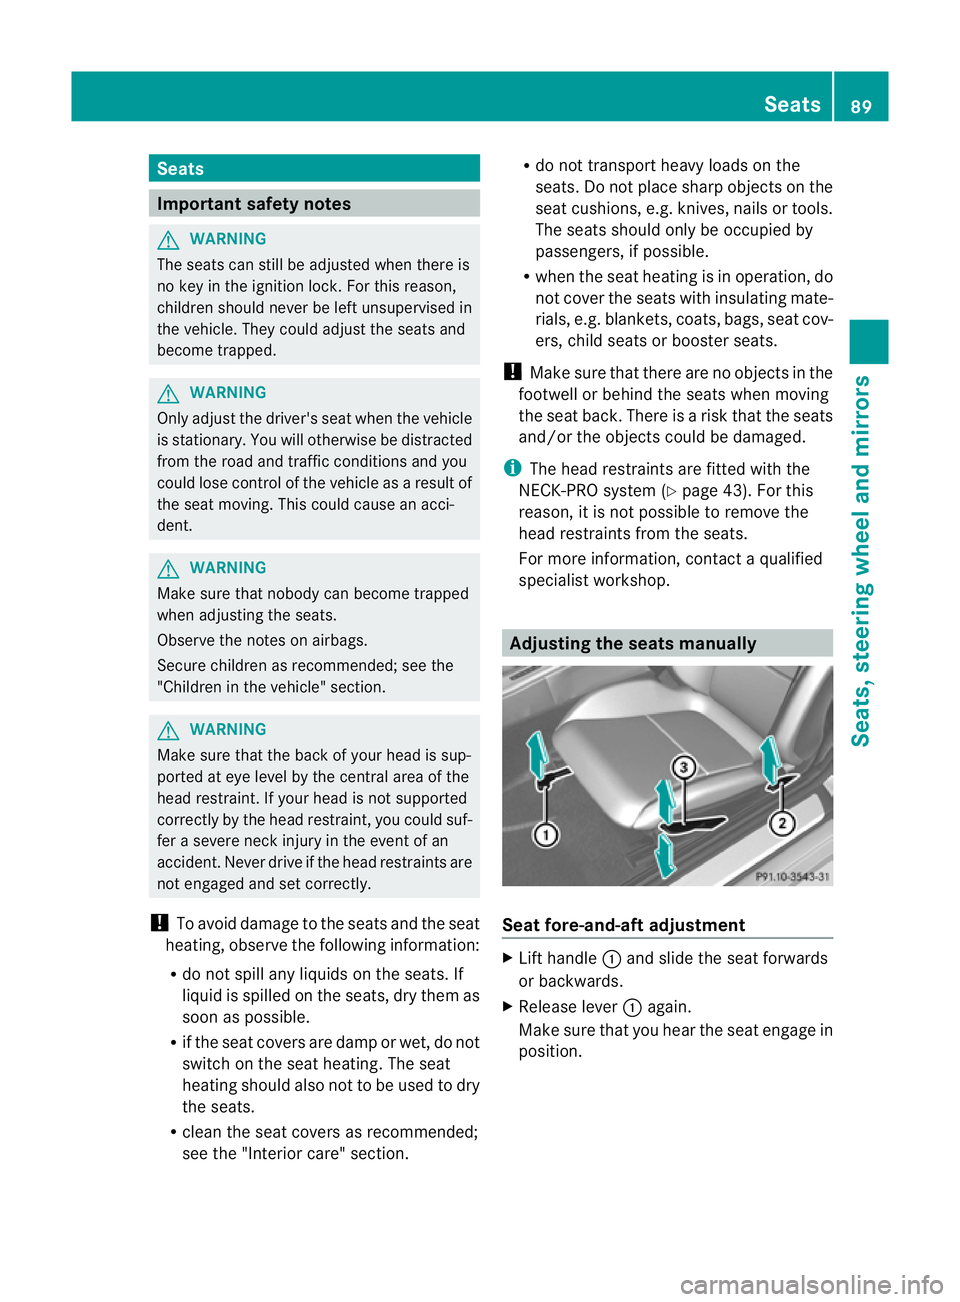
specialist workshop. Adjusting the seats manually
Seat fore-and-aft adjustment
X
Lift handle :and slide the seat forwards
or backwards.
X Release lever :again.
Make sure that you hear the seat engage in
position. Seats
89Seats, steering wheel and mirrors Z
Page 111 of 321
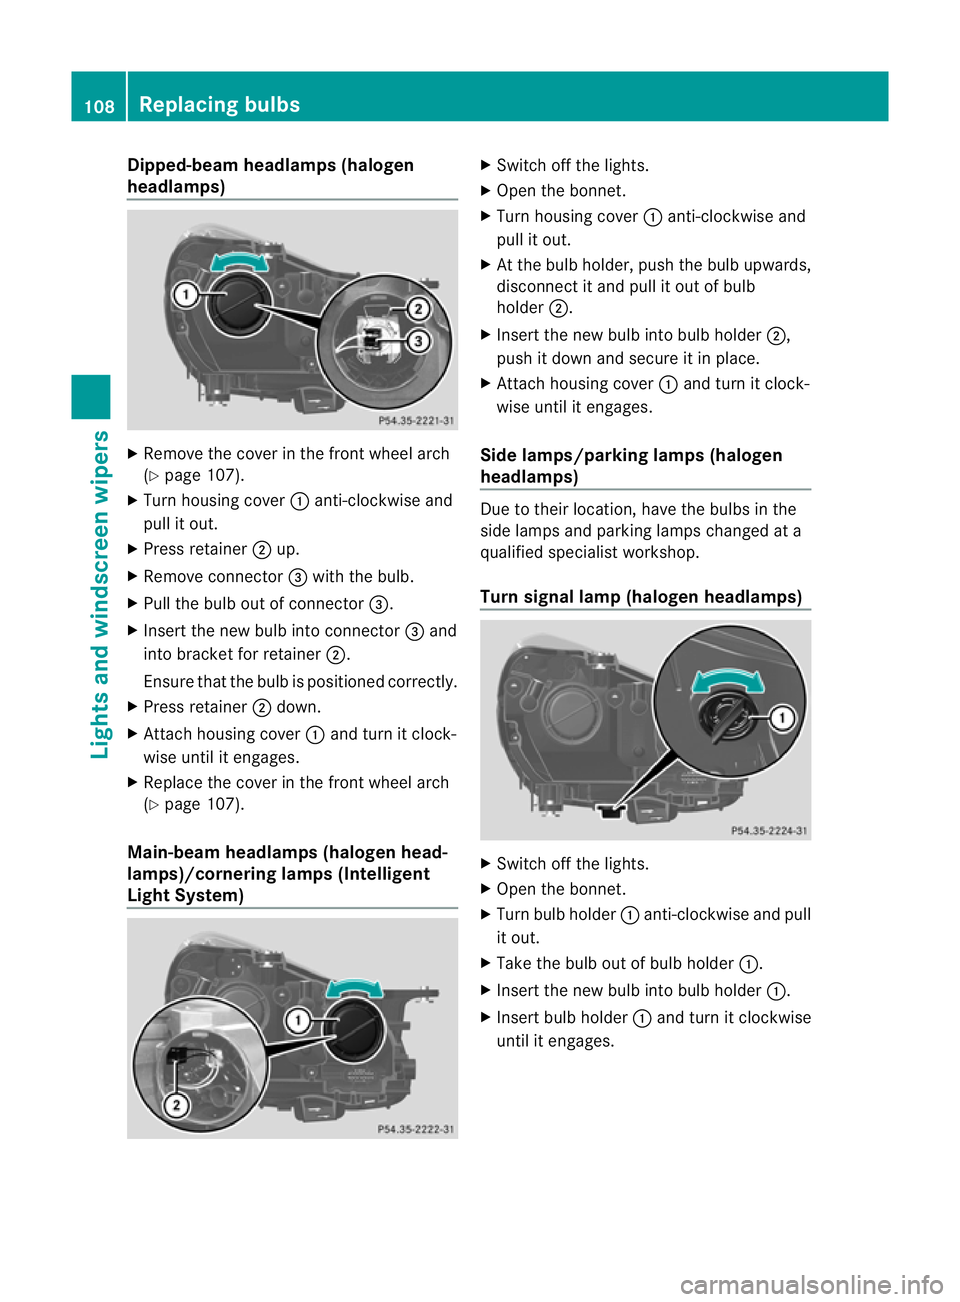
Dipped-beam headlamps (halogen
headlamps)
X
Remove the cover in the front wheel arch
(Y page 107).
X Tur nhousing cover :anti-clockwise and
pull it out.
X Press retainer ;up.
X Remove connector =with the bulb.
X Pull the bulb out of connector =.
X Insert the new bulb into connector =and
into bracket for retainer ;.
Ensure that the bulb is positioned correctly.
X Press retainer ;down.
X Attach housing cover :and turn it clock-
wise until it engages.
X Replace the cover in the front wheel arch
(Y page 107).
Main-beam headlamps (halogen head-
lamps)/cornering lamps (Intelligent
Light System) X
Switch off the lights.
X Open the bonnet.
X Turn housing cover :anti-clockwise and
pull it out.
X At the bulb holder, push the bulb upwards,
disconnect it and pull it out of bulb
holder ;.
X Insert the new bulb into bulb holder ;,
push it down and secure it in place.
X Attach housing cover :and turn it clock-
wise until it engages.
Side lamps/parking lamps( halogen
headlamps) Due to their location, have the bulbs in the
side lamps and parking lamps changed at a
qualified specialist workshop.
Turn signal lamp (halogen headlamps) X
Switch off the lights.
X Open the bonnet.
X Turn bulb holder :anti-clockwise and pull
it out.
X Take the bulb out of bulb holder :.
X Insert the new bulb into bulb holder :.
X Insert bulb holder :and turn it clockwise
until it engages. 108
Replacing bulbsLights and windscreen wipers
Page 129 of 321
Useful information
i This Owner's Manual describes all models
and all standard and optional equipment
available to your vehicle at the time of pub-
lication of the Owner's Manual. Country-
specific deviations are possible. Please
note that your vehicle may not be equipped
with all features described. This also
applies to safety-relevan tsystems and
functions.
i Please read the information on qualified
specialist workshops (Y page 22).Running-in notes
Important safety notes
G
WARNING
New brake pads/linings only have optimal
braking performance after several hundred
kilometres .Until then, compensate for this by
applying greate rforce to the brake pedal. This
also applies when brake pads/linings or
brake discs have been changed. The first 1,500 km
If you treat the engine with sufficient care
from the very start,y ou will be rewarded with
excellent performance for the remainder of
the engine's life.
R Drive at varying vehicle speeds and engine
speeds for the first 1,500 km.
R Avoid overstraining the vehicle during this
period, e.g. driving at full throttle.
R Change gear in good time, before the rev
counter needle is Ôof the way to the red
area of the rev counter.
R Do not shift down a gear manually in order
to brake. Vehicles with automatic transmission:
R
Try to avoid depressing the accelerator
pedal beyond the point of resistance (kick-
down).
R The shift ranges 3,2or 1should only be
engaged when driving slowly, e.g. when
driving in mountainous terrain.
After 1,500 km, you may gradually bring the
vehicle up to full road and engine speeds.
Additional running-in notes for AMG vehicles:
R do not drive at speeds above 140 km/hf or
the first 1,500 km.
R only allow the engine to reach a maximum
engine speed of 4,500 rpm briefly.
i You should also observe these notes on
running in if the engine or parts of the drive
train on your vehicle have been replaced. AMG vehicles with rear axle locking
differential
Your vehicle is fitted with a self-locking dif-
ferential on the rear axle. Change the oil after
a running-in period of 3,000 km to improve
protection of the rear axle differential. This oil
change extends the service life of the differ-
ential. Have the oil change carried out at a
qualified specialist workshop. Driving
Important safety notes
G
WARNING
Do not place any objects in the driver's foot-
well. If you use a floormat or carpet in the
driver's footwell, make sure that it is correctly
secured and that there is sufficient clearance
for the pedals.
Do not place several floormats on top of one
another.
Loose objects or the floormats could other-
wise get caught between the pedals if you
accelerate or brake suddenly. You will then 126
DrivingDriving and parking
Page 133 of 321
i
Follow the shift recommendations in the
multifunction display for an economical
driving style (Y page 136).
i The vehicle locks centrally once you have
pulled away .The locking knobs in the doors
drop down.
You can open the doors from the inside at
any time.
You can also deactivate the automatic lock-
ing feature (Y page 193).
Automatic transmission i
It is only possible to shift the transmission
from position Pto the desired position if
you depress the brake pedal. Only then is
the selector lever lock released.
X Depress the brake pedal and keep it
depressed.
X Shift the transmission to position Dor R.
X Release the brake pedal.
X Carefully depress the accelerator pedal.
The electric parking brake (Y page 147) is
automatically released.
i The vehicle locks centrally once you have
pulled away.T he locking knobs in the doors
drop down.
You can open the doors from the inside at
any time.
You can also deactivate the automatic lock-
ing feature (Y page 193).
i Upshifts take place at higher engine
speeds after a cold start. This helps the
catalytic converter to reach its operating
temperature more quickly.
Hill starta ssist Hill start assist helps you when pulling away
forwards or in reverse on an uphill gradient.
It holds the vehicle for a short time after you
have removed your foot from the brake pedal.
This gives you enough time to move your foot
from the brake pedal to the accelerator pedal and depress it before the vehicle begins to
roll. G
WARNING
Never leave the vehicle when it is held by hill
start assist. After approximately one second,
hill start assist will no longer brake your vehi-
cle and it could roll away.
X Take your foot off the brake pedal.
i Once you have taken your foot off the
brake pedal, the vehicle is held for around
one second.
X Pull away.
Hill start assist will not function if:
R you are pulling away on a level road or a
downhill gradient.
R on vehicles with automatic transmission,
the transmission is in position N.
R the electric parking brake is applied.
R ESP ®
is malfunctioning. ECO start/stop function
Important safety notes G
WARNING
If the ECO symbol appears in the multifunc-
tion display when the engine is switched off,
the engine was switched off automatically.
However, all vehicle systems remain active. If
you open the door, unfasten your seat belt or
remove your foot from the brake pedal, the
engine will automatically start .The vehicle
may begin moving. There is a risk of accident.
To prevent the vehicle from accidentally pull-
ing away, do not release the brake pedal until
you want to drive on.
Do not leave the vehicle until you have
switched off the ignition and secured the vehi-
cle to prevent it from rolling away.
! Always switch the ignition off and take the
key with you when leaving the vehicle. 130
DrivingDriving and parking
Page 138 of 321
Problem Possible causes/consequences and
M Solutions
The coolant tempera-
ture display is showing
more than 120 †. The
coolant warning lamp
may also be lit and a
warning tone may
sound. The coolant level is too low. The coolant is too hot and the engine
is no longer being cooled sufficiently.
X Stop as soon as possible and allow the engine and the coolant
to cool down.
X Check the coolant level (Y page 251). Observe the warning
notes as you do so and top up the coolant if necessary. If the coolant level is correct, the engine radiator fan may be faulty.
The coolant is too hot and the engine is no longer being cooled
sufficiently.
X If the coolant temperature is less than 120 †, you can continue
driving to the nearest qualified specialist workshop.
X Avoid heavy loads on the engine as you do so, e.g. driving on
mountain roads and stop-start traffic. Manual transmission
Important safety notes
G
WARNING
The movement of the pedals must not be
impaired in any way. Do not keep any objects
in the driver's footwell. Make sure that floor-
mats or carpets are correctly secured and
that there is sufficient clearance for the ped-
als.
Do not place several floormats on top of one
another. G
WARNING
Do not change down for additional engine
braking on a slippery road surface. This could
cause the drive wheels to lose their grip and
the vehicle could skid. This could cause you
to lose control of your vehicle and cause an
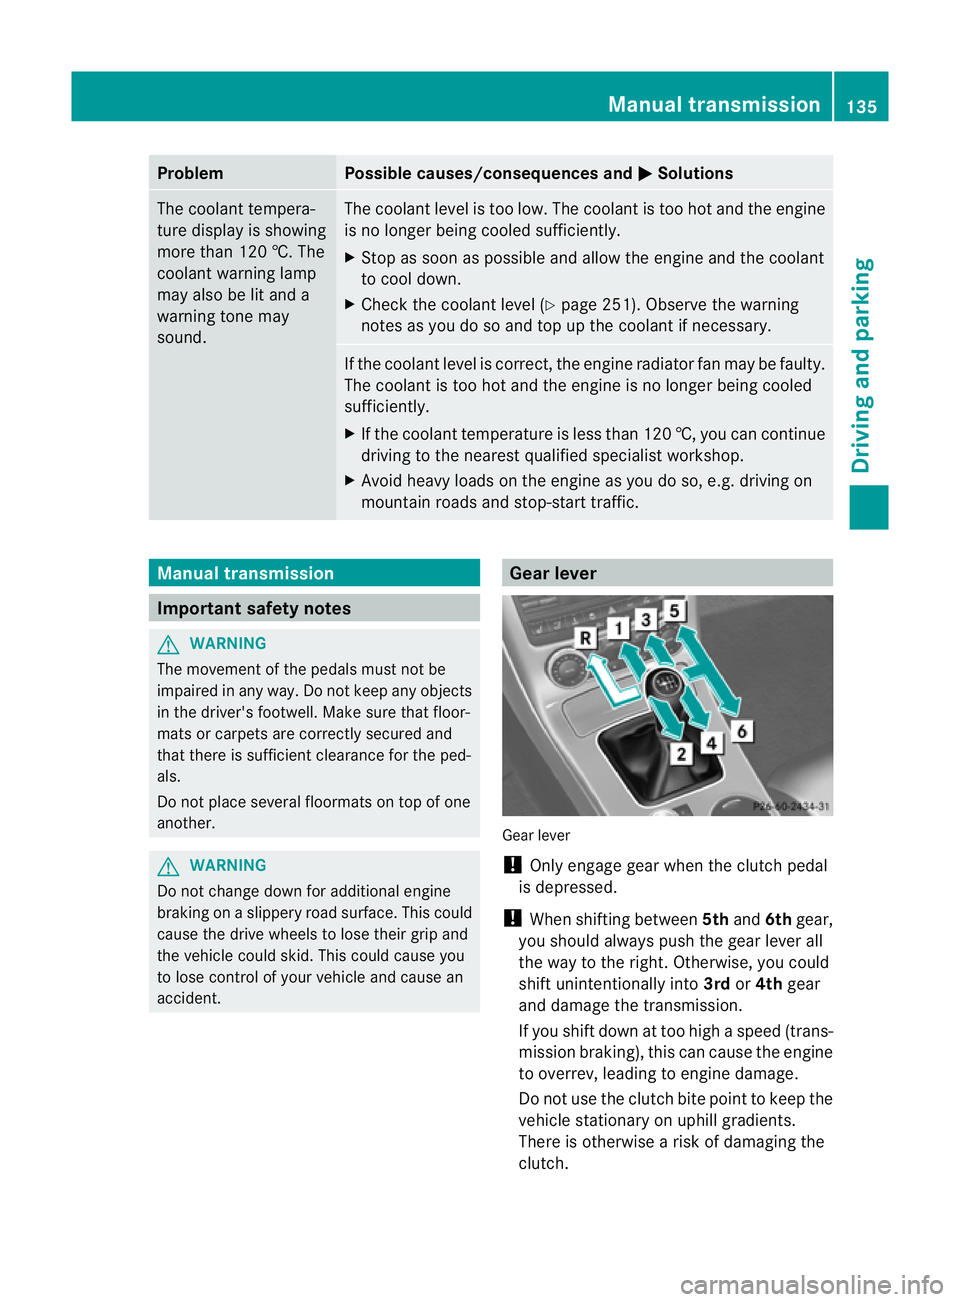
accident. Gear lever
Gear lever
!
Only engage gear when the clutch pedal
is depressed.
! When shifting between 5thand 6thgear,
you should always push the gear lever all
the way to the right. Otherwise, you could
shift unintentionally into 3rdor4th gear
and damage the transmission.
If you shift down at too high a speed (trans-
mission braking), this can cause the engine
to overrev, leading to engine damage.
Do not use the clutch bite point to keep the
vehicle stationary on uphill gradients.
There is otherwise a risk of damaging the
clutch. Manual transmission
135Driving and parking Z
Page 139 of 321
Neutral N with ECO start/stop func-
tion activated
In neutral N, the engine is switched off if the
vehicle speed is below a certai nthreshold and
the clutch pedal is not depressed.
For further information on the ECO start/stop
function, see (Y page 131). Engaging reverse gear
! Only shift into reverse gear Rwhen the
vehicle is stationary. Otherwise, you could
damage the transmission.
i The ECO start/stop function is not avail-
able when reverse gear is engaged.
For further information on the ECO start/
stop function, see (Y page 131).
X Move the gear lever firmly to the left
beyond the point of resistance and then
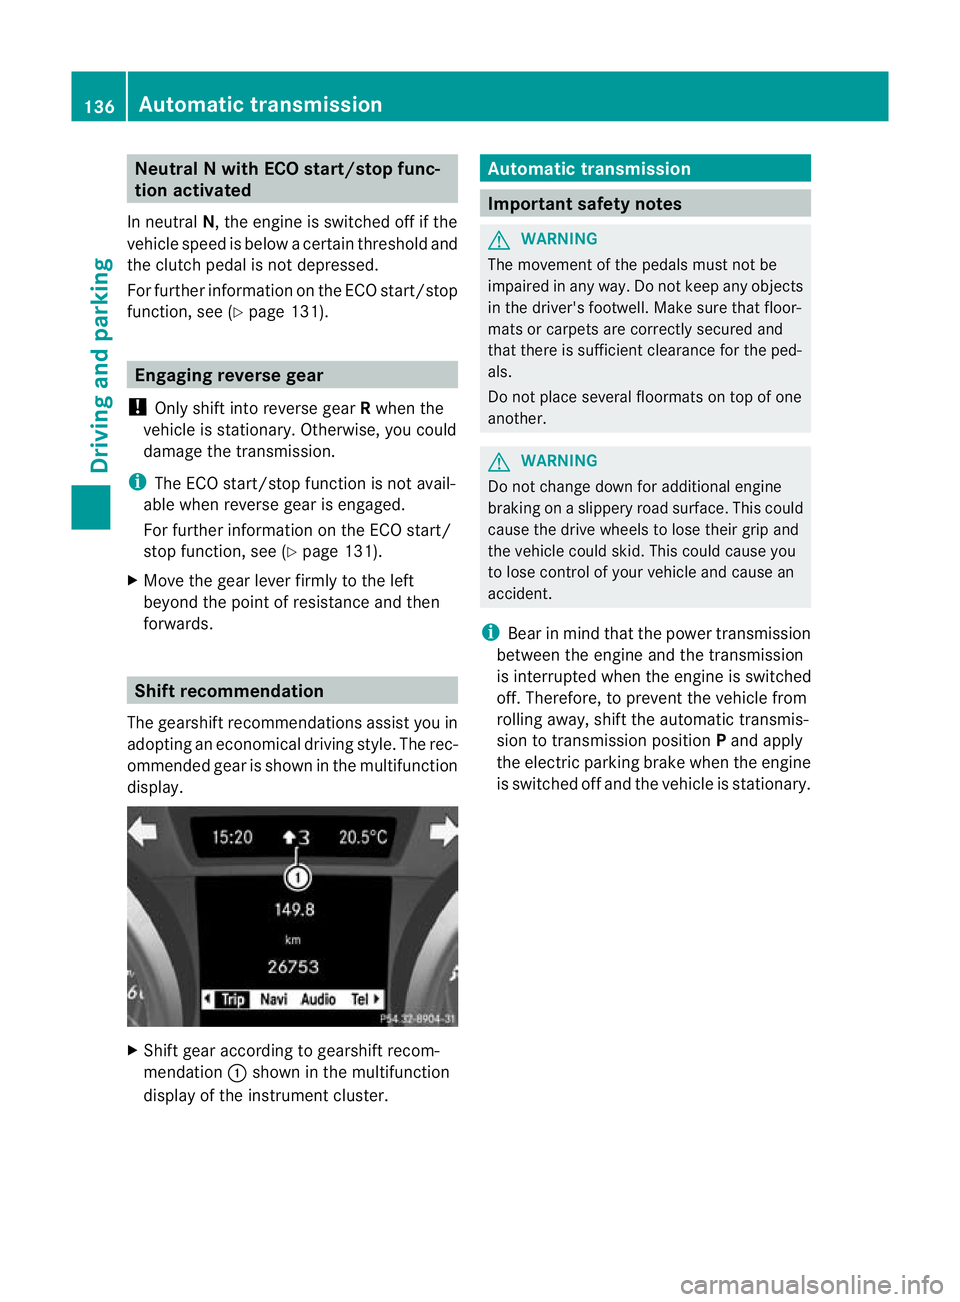
forwards. Shift recommendation
The gearshift recommendations assist you in
adopting an economical driving style. The rec-
ommended gear is shown in the multifunction
display. X
Shift gear according to gearshift recom-
mendation :shown in the multifunction
display of the instrumentc luster. Automatic transmission
Important safety notes
G
WARNING
The movemen tofthe pedals must not be
impaired in any way.D o not keep any objects
in the driver's footwell. Make sure that floor-
mats or carpets are correctly secured and
that there is sufficient clearance for the ped-
als.
Do not place several floormats on top of one
another. G
WARNING
Do not change down for additional engine
braking on a slippery road surface. This could
cause the drive wheels to lose their grip and
the vehicle could skid. This could cause you
to lose control of your vehicle and cause an
accident.
i Bear in mind that the power transmission
between the engine and the transmission
is interrupted when the engine is switched
off. Therefore, to prevent the vehicle from
rolling away, shift the automatic transmis-
sion to transmission position Pand apply
the electric parking brake when the engine
is switched off and the vehicle is stationary. 136
Automatic transmissionDriving and parking