2012 MERCEDES-BENZ SLK ROADSTER charging
[x] Cancel search: chargingPage 8 of 321
Automatic headlamp mode
..............101
Automatic transmission Accelerator pedal position .............138
Automatic drive program ...............139
Changing gea r............................... 137
Display message ............................ 220
Driving tips .................................... 138
Emergency running mode ..............142
Kickdow n....................................... 138
Manual drive program ....................140
Problem (fault) ............................... 142
Progra mselecto rbutton ................ 138
Pulling away ................................... 130
Releasing the parking lock man-
ually ............................................... 142
Selector leve r................................ 137
Shift range s................................... 139
Starting the engine ........................129
Steering wheel gearshift paddle s... 139
Transmission position displa y........ 137
Transmission positions ..................137
Automatic transmission emer-
gency running mode .........................142 B
BAS (Brake Assist System) .................54
Basic settings see Settings
BAS PLUS (Brake Assist System
PLUS) .................................................... 54
Battery (key) Checking .......................................... 69
Important safety notes ....................68
Replacing ......................................... 69
Battery (vehicle)
Charging ........................................ 275
Connecting .................................... 275
Disconnecting ................................ 274
Display message ............................ 212
Important safety notes ..................273
Jump starting ................................. 277
Location ......................................... 274
Removing/fitting ........................... 275
Belt
see Seat belt
Belt force limiters (activation) ...........39Belt tensioner
Activation ......................................... 39
Function .......................................... .46
Bonnet
Active bonne t(pedestrian protec-
tion )............................................... 248
Closing .......................................... .249
Display message ............................ 220
Opening ......................................... 248
Boot
Emergency release ..........................75
Important safety notes ....................73
Opening (automatically from out-
side) ................................................ .74
Boo tlid
Display message ............................ 220
Opening/closing .............................. 73
Opening dimensions ......................311
Boot separator
Display message ............................ 220
General notes .................................. 80
Opening/closing .............................. 81
Bottle holder ...................................... 239
Brake Assist System see BAS (Brake Assist System)
Brake fluid
Display message ............................ 206
Notes ............................................. 308
Brake lamps
Adaptive .......................................... .56
Display message ............................ 209
Brakes
ABS .................................................. 54
BAS .................................................. 54
BAS PLUS ........................................ 54
Brake fluid (notes) .........................308
Display message ............................ 200
Driving tips .................................... 148
High-performance brake system ....149
Important safety notes ..................148
Parking brake ................................ 147
Warning lamp ................................. 226
Breakdown
see Flat tyre
see Towing away/tow-starting
Bulbs
see Changing bulbs Index
5
Page 104 of 321
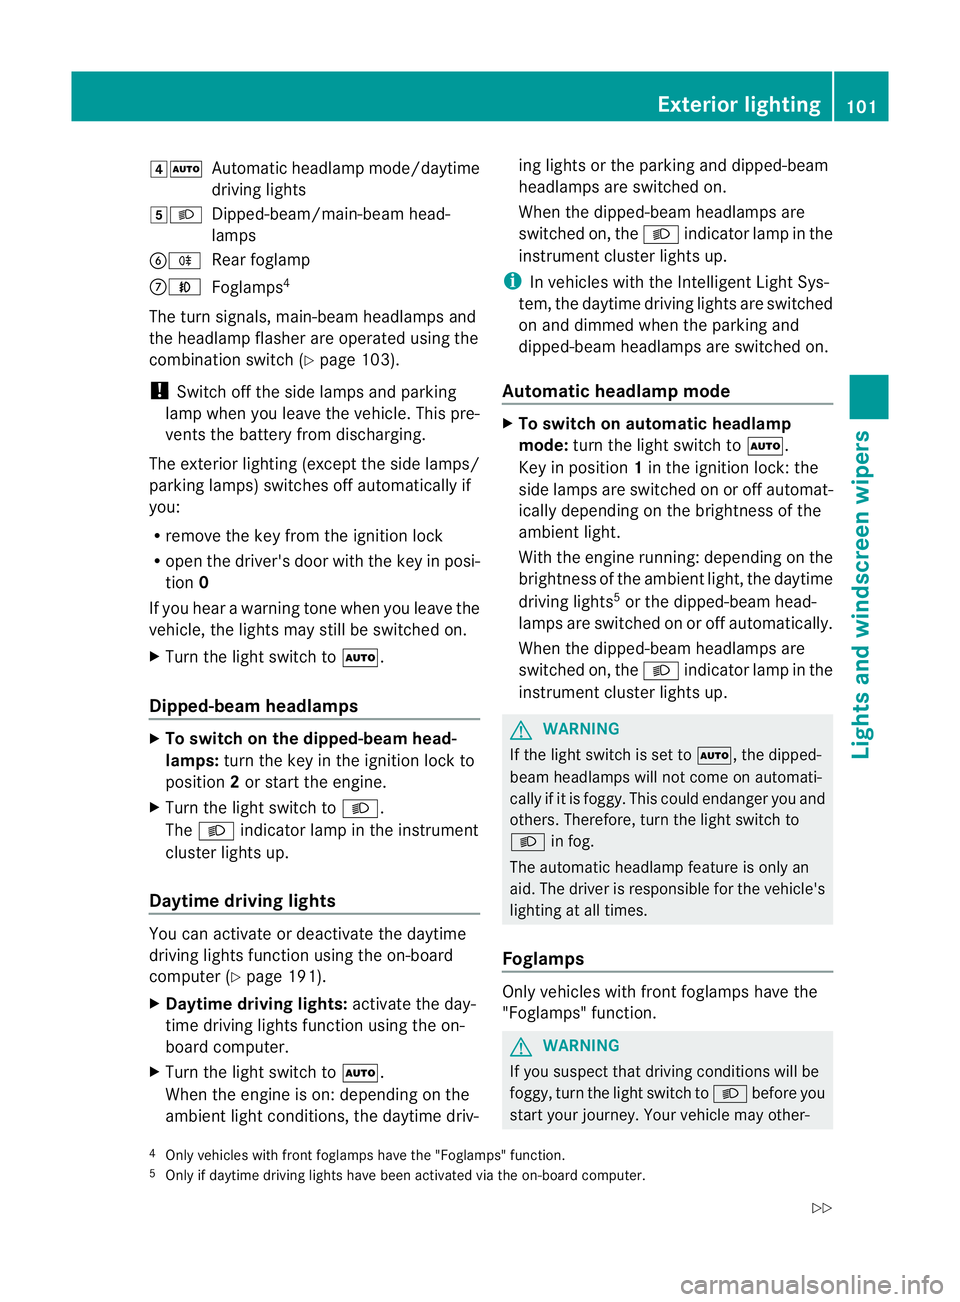
4Ã
Automatic headlamp mode/daytime
driving lights
5L Dipped-beam/main-bea mhead-
lamps
BR Rear foglamp
CN Foglamps 4
The turn signals, main-beam headlamps and
the headlamp flasher are operated using the
combination switch (Y page 103).
! Switch off the side lamps and parking
lamp when you leave the vehicle. This pre-
vents the battery from discharging.
The exterior lighting (except the side lamps/
parking lamps) switches off automatically if
you:
R remove the key from the ignition lock
R open the driver's door with the key in posi-
tion 0
If you hear a warning tone when you leave the
vehicle, the lights may still be switched on.
X Turn the light switch to Ã.
Dipped-beam headlamps X
To switch on the dipped-beam head-
lamps: turn the key in the ignition lock to
position 2or start the engine.
X Turn the light switch to L.
The L indicator lamp in the instrument
cluster lights up.
Daytime driving lights You can activate or deactivate the daytime
driving lights function using the on-board
computer (Y page 191).
X Daytime driving lights: activate the day-
time driving lights function using the on-
board computer.
X Turn the light switch to Ã.
When the engine is on: depending on the
ambient light conditions, the daytime driv- ing lights or the parking and dipped-beam
headlamps are switched on.
When the dipped-beam headlamps are
switched on, the
Lindicator lamp in the
instrument cluster lights up.
i In vehicles with the Intelligent Light Sys-
tem, the daytime driving lights are switched
on and dimmed when the parking and
dipped-beam headlamps are switched on.
Automatic headlamp mode X
To switch on automatic headlamp
mode: turn the light switch to Ã.
Key in position 1in the ignition lock: the
side lamps are switched on or off automat-
ically depending on the brightness of the
ambient light.
With the engine running: depending on the
brightness of the ambient light, the daytime
driving lights 5
or the dipped-beam head-
lamps are switched on or off automatically.
When the dipped-beam headlamps are
switched on, the Lindicator lamp in the
instrument cluster lights up. G
WARNING
If the light switch is set to Ã, the dipped-
beam headlamps will not come on automati-
cally if it is foggy. This could endanger you and
others. Therefore, turn the light switch to
L in fog.
The automatic headlamp feature is only an
aid. The driver is responsible for the vehicle's
lighting at all times.
Foglamps Only vehicles with fron
tfoglamps have the
"Foglamps" function. G
WARNING
If you suspect that driving conditions will be
foggy, turn the light switch to Lbefore you
start your journey. Your vehicle may other-
4 Only vehicles with front foglamps have the "Foglamps" function.
5 Only if daytime driving lights have been activated via the on-board computer. Exterior lighting
101Lights and windscreen wipers
Z
Page 108 of 321
Motorway mode increases the range of the
beam.
Active:
R if you are driving at speeds above
110 km/h and do not make any large steer-
ing movements for 1000 m
R if you are driving at speeds above
130 km/h
Not active: if you are driving at speeds below
80 km/h following activation.
Extended range foglamps The extended range foglamps reduce the
glare experienced by the driver and improve
the illumination of the edge of the carriage-
way.
Active: if you are driving at speeds below
70 km/h and you switch on the rear foglamp
Not active: if you are driving at speeds above
100 km/h or if you switch off the rear foglamp
following activation Headlamps misted up on the inside
The headlamps may mist up on the inside if
there is high atmospheric humidity.
X Drive with the headlamps switched on.
The level of moisture diminishes, depend-
ing on the length of the journey and the
weather conditions (humidity and temper-
ature).
If the level of moisture does not diminish: X
Have the headlamps checked at a qualified
specialist workshop. Interior lighting
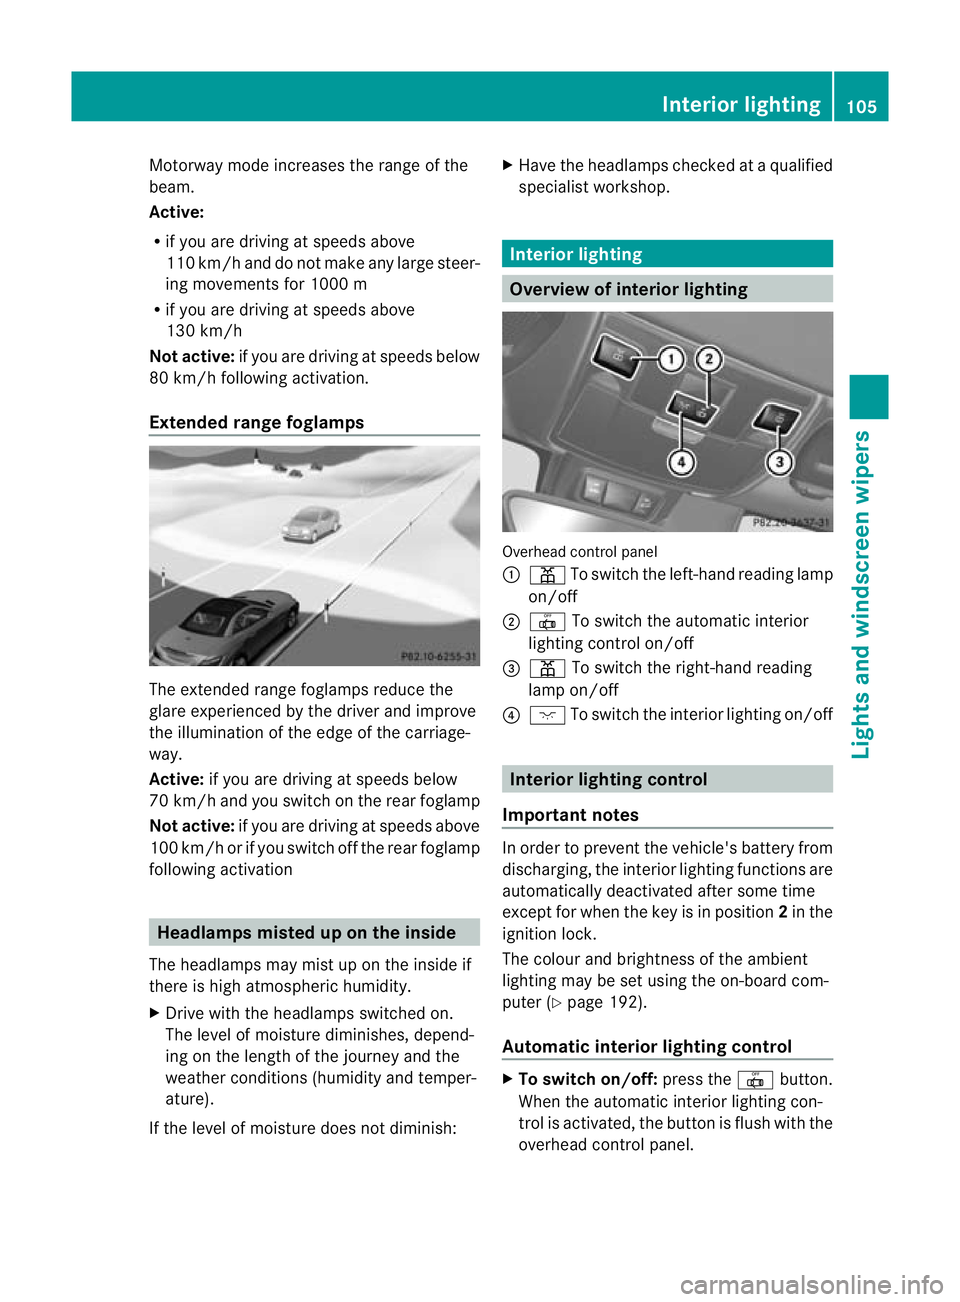
Overview of interior lighting
Overhead control panel
:
p To switch the left-hand reading lamp
on/off
; | To switch the automatic interior
lighting control on/off
= p To switch the right-hand reading
lamp on/off
? c To switch the interior lighting on/off Interior lighting control
Important notes In order to prevent the vehicle's battery from
discharging, the interior lighting functions are
automatically deactivated after some time
except for when the key is in position
2in the
ignition lock.
The colour and brightness of the ambient
lighting may be set using the on-board com-
puter (Y page 192).
Automatic interior lighting control X
To switch on/off: press the|button.
When the automatic interior lighting con-
trol is activated, the button is flush with the
overhead control panel. Interior lighting
105Lights and windscreen wipers Z
Page 208 of 321
Display messages Possible causes/consequences and
M Solutions
The yellow
!warning lamp lights up. If you manually apply or
release the electric parkin gbrake, the red !indicator lamp
flashes.
The electric parking brake is malfunctioning. It is not possible to
apply the electric parking brake manually.
X Vehicles with manual transmission: switch off the ignition.
The electric parking brake is applied automatically.
You can release the electric parking brake using the automatic
emergency release (Y page 147).
X Vehicles with automatic transmission: shift the transmission
to Pas the electric parking brake is not applied automatically.
X Visi taqualified specialist workshop.
i If you do not wish the electric parking brake to be applied,
leave the ignition switched on, e.g. when washing the vehicle in
an automatic car wash or when having the vehicle towed. Excep-
tion :when having the vehicle towed with the rear axle raised
(Y page 278). !
Parking
brake inop‐
erative The yellow
!warning lamp lights up. The red !indicator
lamp flashes for about ten seconds after the electric parking brake
has been applied or released. It then goes out or remains lit.
The electric parking brake is malfunctioning, e.g. because of over-
voltage or undervoltage.
X Remove the cause for the overvoltage or undervoltage, e.g. by
charging the battery or restarting the engine.
X Apply or release the electric parking brake.
If it remains impossible to apply or release the electric parking
brake:
X Switch off the ignition and turn it back on.
X Apply or release the electric parking brake.
If the electric parking brake can still not be released:
X Consult a qualified specialist workshop. The display message is only shown while the vehicle is in motion.
The red
!indicator lamp flashes and the yellow !warning
lamp is lit.
It is not possible to apply the electric parking brake manually.
X Vehicles with manual transmission: engage first gear.
X Vehicles with automatic transmission: shift the transmission
to P.
X Visit a qualified specialist workshop. Display messages
205On-board computer and displays Z
Page 245 of 321
Mobile phone
Important notes G
WARNING
Observe the legal requirements of the country
in which you are currently driving regarding
operating mobile communications equipment
in a vehicle.
If it is permitted by law to operate communi-
cations equipment while the vehicle is in
motion, you must only do so if the traffic sit-
uation permits. Otherwise, you could be dis-
tracted from the traffic conditions, cause an
accident and injure yourself and others.
Two-way radios and fax equipment used with-
out low-reflectio nexterior aerials can inter-
fere with the vehicle's electronics and thereby
jeopardise the operating safety of the vehicle
and your safety .Therefore, you must only use
this equipment if it is correctly connected to
a separate reflection-free exterior aerial. G
WARNING
Excessive levels of electromagnetic radiation
may cause damage to your health and the
health of others. Using an exterior aerial takes
into account current scientific discussions
relating to the possible health risk posed by
electromagnetic fields.
Mercedes-Ben zrecommends the use of an
approved exterior aerial. This ensures:
R optimal mobile phone reception quality in
the vehicle
R mutual influences between the vehicle
electronics and mobile phones are mini-
mised
An exterior aerial has the following advan-
tages:
R it conducts the electromagnetic fields gen-
erated by a wireless device to the exterior.
R the field strength in the vehicle interior is
lower than in a vehicle that does not have
an exterior aerial. i
There are various mobile phone brackets
that may be fitted in your vehicle; in some
cases, these are country-specific.
i You can connect a Bluetooth ®
-capable
mobile phone with Audio 20 or COMAND
Online via the Bluetooth ®
interface. This is
also the case if your vehicle is equipped
with convenience telephony.
More information on suitable mobile phones,
mobile phone brackets and on connecting
Bluetooth ®
-capable mobile phones with
Audio 20 or COMAND Online can be obtained:
R at your Mercedes-Benz Service Centre
R on the Internet at http://www.mercedes-
benz.com/connect
i The functions and services available when
you use the phone depend on your mobile
phone model and service provider.
Inserting the mobile phone X
Open the telephone compartment
(Y page 237).
X Place the mobile phone bracket into the
pre-installed fitting (see the separate
installation instructions for the mobile
phone fitting).
X Inser tthe mobile phone into the mobile
phone bracket (see the separate installa-
tion instructions for the mobile phone fit-
ting).
If the mobile phone is inserted in the mobile
phone bracket, you can speak to the person
you are calling using the hands-free system.
i On some mobile phone brackets, you first
have to connect the mobile phone via Blue-
tooth ®
to the mobile phone bracket (see
the separate operating instructions for the
mobile phone bracket).
If this is the case, the mobile phone does
not have to be inserted into the bracket for
you to be able to use the telephone func-
tions. However, the charging function and
aerial function are not available. 242
FeaturesStowing and features
Page 277 of 321
G
WARNING
For safety reasons, Mercedes-Benz recom-
mends that you only use batteries which have
been tested and approved for yourv ehicle by
Mercedes-Benz .These batteries provide
increased impact protection to prevent vehi-
cle occupants from suffering acid burns
should the battery be damaged in the event
of an accident.
To prevent acid burns, observe the following
safety notes when handling batteries:
R do not lean over the battery.
R do not place any metal objects on a battery.
Otherwise, you could cause a short circuit
and the battery's gas mixture could ignite.
R make sure that you do not create an elec-
trostatic charge, e.g. by wearing synthetic
clothing or as a result of friction on fabrics.
Therefore, you should not pull or slide the
battery over carpets or other synthetic
materials.
R never touch the battery first. To discharge
a possible electrostatic charge, step out of
the vehicle first and touch the bodywork.
R do not wipe the battery using a cloth. The
battery may explode as a result of electro-
static charge or due to flying sparks.
! Switch off the engine and remove the key
before disconnecting the terminal clamps
from the battery. On vehicles with KEY-
LESS-GO, make sure that the ignition is
switched off. Check that all the indicator
lamps in the instrumentc luster are off.You
may otherwise destroy electronic compo-
nents, such as the alternator.
i When you park the vehicle, remove the
key if you do not require any electrical con-
sumers. The vehicle will then use very little
energy, thus conserving battery power.
Mercedes-Benz recommends that you do not
carry out work on batteries yourself, e.g.
removing or charging. Have this work per-
formed at a qualified specialist workshop. Installation location of the battery
Your vehicle is equipped with a battery in the
engine compartment.Iti s located on the front
bulkhead under the water tank on the right-
hand side of the vehicle when viewed in the
direction of travel.
X Apply the electric parking brake and shift
the transmission to position P.
X Switch off all electrical consumers (e.g.
radio, blower, etc.).
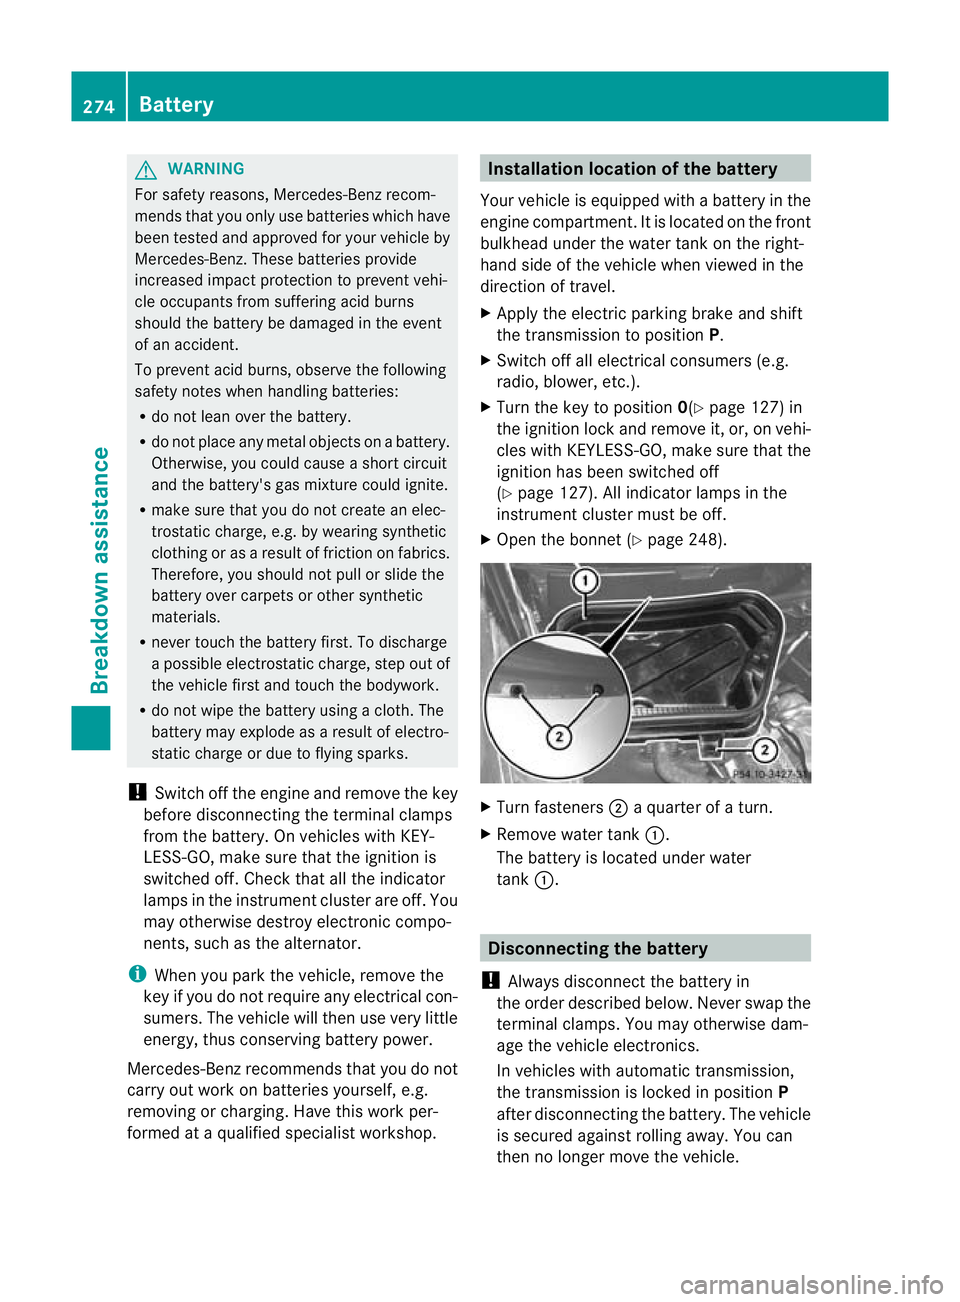
X Turn the key to position 0(Ypage 127) in
the ignition lock and remove it, or, on vehi-
cles with KEYLESS-GO, make sure that the
ignition has been switched off
(Y page 127). All indicator lamps in the
instrument cluster must be off.
X Open the bonnet (Y page 248). X
Turn fasteners ;a quarter of a turn.
X Remove water tank :.
The battery is located under water
tank :. Disconnecting the battery
! Always disconnect the battery in
the order described below. Never swap the
terminal clamps. You may otherwise dam-
age the vehicle electronics.
In vehicles with automatic transmission,
the transmission is locked in position P
after disconnecting the battery. The vehicle
is secured against rolling away. You can
then no longer move the vehicle. 274
BatteryBreakdown assistance
Page 278 of 321
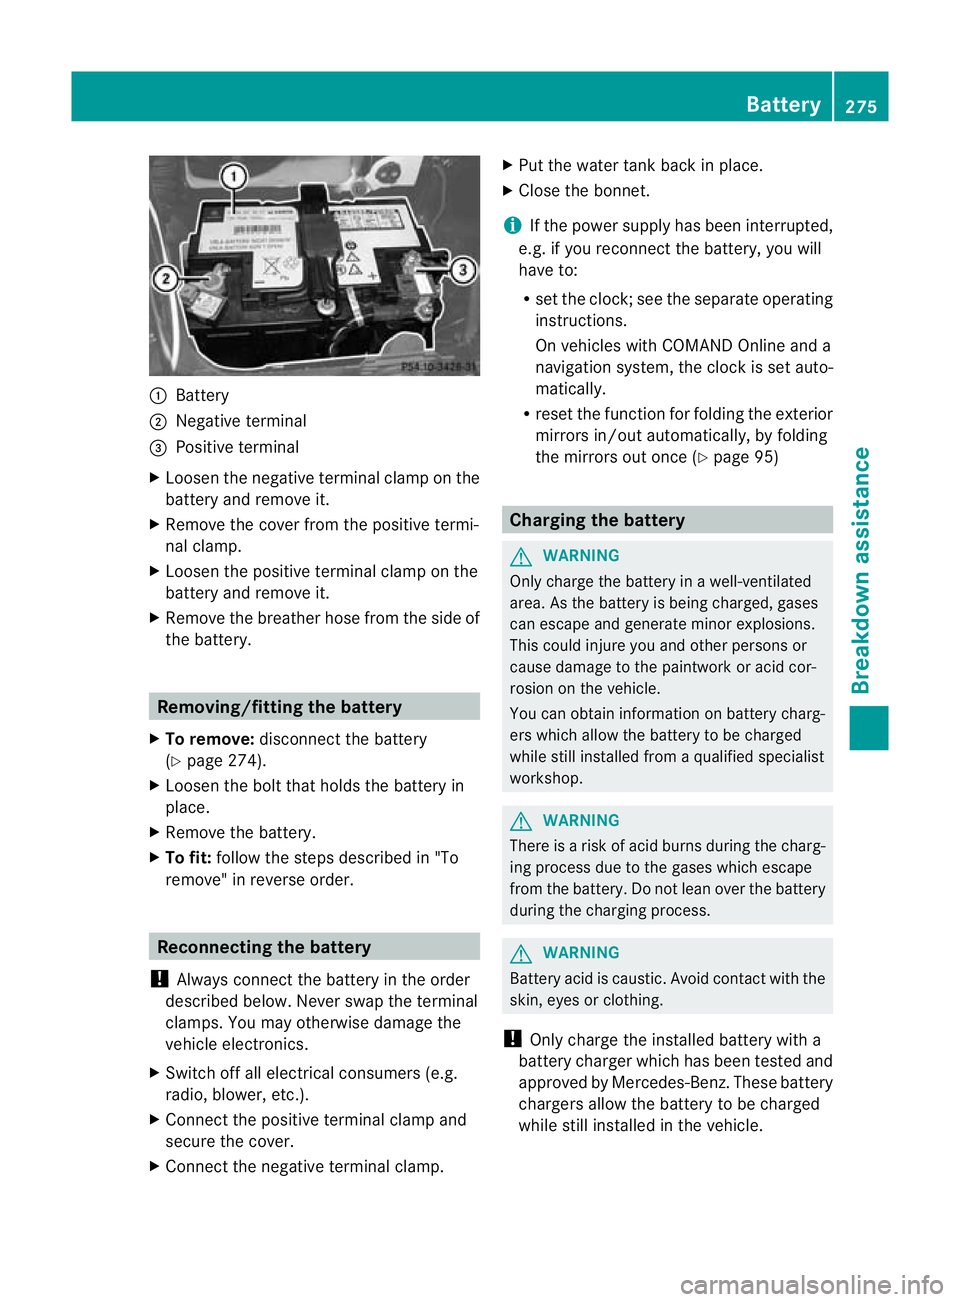
:
Battery
; Negative terminal
= Positive terminal
X Loosen the negative terminal clamp on the
battery and remove it.
X Remove the cover from the positive termi-
nal clamp.
X Loosen the positive terminal clamp on the
battery and remove it.
X Remove the breathe rhose from the side of
the battery. Removing/fitting the battery
X To remove: disconnect the battery
(Y page 274).
X Loosen the bolt that holds the battery in
place.
X Remove the battery.
X To fit: follow the steps described in "To
remove" in reverse order. Reconnecting the battery
! Always connect the battery in the order
described below. Never swap the terminal
clamps. You may otherwise damage the
vehicle electronics.
X Switch off all electrical consumers (e.g.
radio, blower, etc.).
X Connect the positive terminal clamp and
secure the cover.
X Connect the negative terminal clamp. X
Put the water tank back in place.
X Close the bonnet.
i If the power supply has been interrupted,
e.g. if you reconnect the battery, you will
have to:
R set the clock; see the separate operating
instructions.
On vehicles with COMAND Online and a
navigation system, the clock is set auto-
matically.
R reset the function for folding the exterior
mirrors in/out automatically, by folding
the mirrors out once (Y page 95) Charging the battery
G
WARNING
Only charge the battery in a well-ventilated
area. As the battery is being charged, gases
can escape and generate minor explosions.
This could injure you and other persons or
cause damage to the paintwork or acid cor-
rosion on the vehicle.
You can obtain information on battery charg-
ers which allow the battery to be charged
while still installed from a qualified specialist
workshop. G
WARNING
There is a risk of acid burns during the charg-
ing process due to the gases which escape
from the battery. Do not lean over the battery
during the charging process. G
WARNING
Battery acid is caustic. Avoid contact with the
skin, eyes or clothing.
! Only charge the installed battery with a
battery charger which has been tested and
approved by Mercedes-Benz. These battery
chargers allow the battery to be charged
while still installed in the vehicle. Battery
275Breakdown assistance Z
Page 279 of 321
!
Only use battery chargers with a maxi-
mum charging voltage of 14.8 V.
! Only charge the battery using the jump-
start connection point.
The jump-starting connection point is in the
engine compartment (Y page 277).
X Open the bonnet (Y page 248).
X Connect the battery charger to the positive
terminal and earth point in the same order
as when connecting the donor battery in
the jump-starting procedure
(Y page 277).
X Read the battery charger's operating
instructions before charging the battery. 276
BatteryBreakdown assistance