2012 MERCEDES-BENZ SLK ROADSTER battery
[x] Cancel search: batteryPage 8 of 321
Automatic headlamp mode
..............101
Automatic transmission Accelerator pedal position .............138
Automatic drive program ...............139
Changing gea r............................... 137
Display message ............................ 220
Driving tips .................................... 138
Emergency running mode ..............142
Kickdow n....................................... 138
Manual drive program ....................140
Problem (fault) ............................... 142
Progra mselecto rbutton ................ 138
Pulling away ................................... 130
Releasing the parking lock man-
ually ............................................... 142
Selector leve r................................ 137
Shift range s................................... 139
Starting the engine ........................129
Steering wheel gearshift paddle s... 139
Transmission position displa y........ 137
Transmission positions ..................137
Automatic transmission emer-
gency running mode .........................142 B
BAS (Brake Assist System) .................54
Basic settings see Settings
BAS PLUS (Brake Assist System
PLUS) .................................................... 54
Battery (key) Checking .......................................... 69
Important safety notes ....................68
Replacing ......................................... 69
Battery (vehicle)
Charging ........................................ 275
Connecting .................................... 275
Disconnecting ................................ 274
Display message ............................ 212
Important safety notes ..................273
Jump starting ................................. 277
Location ......................................... 274
Removing/fitting ........................... 275
Belt
see Seat belt
Belt force limiters (activation) ...........39Belt tensioner
Activation ......................................... 39
Function .......................................... .46
Bonnet
Active bonne t(pedestrian protec-
tion )............................................... 248
Closing .......................................... .249
Display message ............................ 220
Opening ......................................... 248
Boot
Emergency release ..........................75
Important safety notes ....................73
Opening (automatically from out-
side) ................................................ .74
Boo tlid
Display message ............................ 220
Opening/closing .............................. 73
Opening dimensions ......................311
Boot separator
Display message ............................ 220
General notes .................................. 80
Opening/closing .............................. 81
Bottle holder ...................................... 239
Brake Assist System see BAS (Brake Assist System)
Brake fluid
Display message ............................ 206
Notes ............................................. 308
Brake lamps
Adaptive .......................................... .56
Display message ............................ 209
Brakes
ABS .................................................. 54
BAS .................................................. 54
BAS PLUS ........................................ 54
Brake fluid (notes) .........................308
Display message ............................ 200
Driving tips .................................... 148
High-performance brake system ....149
Important safety notes ..................148
Parking brake ................................ 147
Warning lamp ................................. 226
Breakdown
see Flat tyre
see Towing away/tow-starting
Bulbs
see Changing bulbs Index
5
Page 14 of 321
Opening/closing the garage door
..245
Programming (button in the rear-
view mirror) ................................... 243
Gear indicator (on-board com-
puter) ................................................. .195
Gear or selector lever (cleaning
instructions) ...................................... 258
Gearshift program SETUP (on-board computer) ..........196
Genuine Mercedes-Benz parts .........300
Glove compartment ..........................236 H
Handbrake see Parking brake
Hazard warning lamps ......................103
Headbag Display message ............................ 208
Operation ........................................ .43
Headlamp
Cleaning system (function) ............102
Headlamp cleaning system
Notes ............................................. 309
Headlamps
Misting up ...................................... 105
Topping up the cleaning system ....252
see Automatic headlamp mode
Head level heating (AIRSCARF) ..........91
Head restraints Adjusting ......................................... 90
see NECK-PR Ohead restraints
Heating
see Climate control
High-pressure cleaners ....................254
Hill start assist .................................. 130
HOLD function Display message ............................ 213
Function/notes ............................. 165 I
Ignition lock see Key positions
Immobiliser .......................................... 61
Indicator and warning lamps Coolant .......................................... 231
DISTRONI CPLUS ........................... 233Engine diagnostics
.........................231
Fuel tank ........................................ 231
SPORT handling mode ...................229
Indicator lamps
Display message ............................ 208
see Warning and indicator lamps
Indicators
see Turn signals
Insectp rotection on the radiator ....250
Instrument cluster Overview .......................................... 28
Settings ......................................... 190
Warning and indicator lamps ...........30
Instrument cluster lighting ..............178
Instrument lighting see Instrument cluster lighting
Intelligen tLight System
Activating/deactivatin g................. 191
Display message ............................ 210
Overview ........................................ 104
Setting the dipped-bea mhead-
lamps for driving on the right/left .192
Interior lighting ................................. 105
Automatic control system ..............105
Delayed switch-off (on-board
computer) ...................................... 193
Emergency lighting ........................106
Manual control ............................... 106
Overview ........................................ 105
Reading lamp ................................. 105
Setting the ambient lighting
brightness (on-board computer) ....192
Interior motion sensor ........................62 J
Jack Storage location ............................ 261
Using ............................................. 268
Jump start (engine)
see Jump starting (engine)
Jump starting (engine) ......................277 K
Key Changing the battery .......................69
Checking the battery .......................69 Index
11
Page 21 of 321
Display message
............................ 217
Grip ................................................ 150
Important safety notes ..................286
Replacing ....................................... 294
Service life ..................................... 287
Storing ........................................... 295
Tyr esize (data) .............................. 295
Tyr etread ...................................... 287
see Flat tyre U
Unladen weight ................................. 310
Unlocking Emergency unlocking .......................73
From inside the vehicle (central
unlocking button) ............................. 72V
Vanity mirror (in sun visor) ..............240
Variable SPEEDTRONIC see SPEEDTRONIC
Vehicle
Correct use ...................................... 22
Data acquisition ............................... 23
Display message ............................ 220
Electronics ..................................... 301
Emergency unlocking .......................73
Equipment ....................................... 20
Implied warranty .............................. 23
Individua lsettings .......................... 190
Leaving parked up .........................148
Locking (in an emergency) ...............73
Locking (key )................................... 66
Lowering ........................................ 271
Pulling away ................................... 129
Raising ........................................... 268
Registration ..................................... 22
Towing away .................................. 278
Tow-starting ................................... 278
Transporting .................................. 281
Unlocking (in an emergency) ...........73
Unlocking (key )................................ 66
Vehicle data ................................... 310
Vehicle battery
see Battery (vehicle)
Vehicle dimensions ...........................310Vehicle emergency locking
................73
Vehicle identification number see VIN
Vehicle identification plate ..............302
Vehicle tool kit .................................. 261
Vehicle weights ................................. 310
Vents see Air vents
Video (DVD) ........................................ 187
Video DVD (on-board computer) ......187
VIN ...................................................... 302 W
Warning and indicator lamps ABS ................................................ 226
Brakes ........................................... 226
Distance warning signa l................. 233
ESP ®
.............................................. 228
ESP ®
OFF ....................................... 228
LIM (cruise control) ........................ 151
LIM (DISTRONIC PLUS) ..................157
LIM (variable SPEEDTRONIC) .........154
Overview .......................................... 30
PASSENGER AIRBAG OFF ................49
Reserve fuel ................................... 231
Seat bel t........................................ 224
SRS ................................................ 230
Tyr ep ressure monitor ...................233
Warning triangle ................................ 260
Washer fluid Display message ............................ 222
Wheel bol ttightening torque ...........271
Wheel chock ...................................... 267
Wheeled draught stop see AIRGUIDE
Wheels
Changing/replacing .......................294
Changing awheel .......................... 266
Checking ........................................ 287
Cleaning ......................................... 255
Fitting awheel ............................... 270
Important safety notes ..................286
Removing awheel .......................... 269
Storing ........................................... 295
Tightening torque ........................... 271
Whee lsize/tyre size ...................... 29518
Index
Page 25 of 321
ponents and interference to your compo-
nents caused by other electrical/electronic
components can be largely prevented. Diagnostics connection
G
WARNING
If you connect equipment to the diagnostics
connection, it can affect the operation of the
vehicle systems. This can impair the operating
safety of your vehicle while driving. There is a
risk of accident.
Do not connect any equipment to the diag-
nostics connection. G
WARNING
Loose equipment or equipment cables that
are connected to the diagnostics connection
can obstruct the area around the pedals. The
equipment or the cables could get between
the pedals in the event of sudden braking or
acceleration. As a result, the movement of the
pedals may be impaired. There is a risk of
accident.
Do not attach any equipment or cables in the
driver footwell.
! If the engine is switched off and equip-
ment on the diagnostics connection is
used, the starter battery may discharge.
The diagnostics connection is only intended
for the connection of diagnostic equipment at
a qualified specialist workshop.
Connecting equipment to the diagnostics
connection can, for example, lead to emis-
sions monitoring information being reset.
This may lead to the vehicle failing to meet
the requirements of the nex temissions test
during the main inspection. Qualified specialist workshop
Aq ualified specialist workshop has the nec-
essary specialist knowledge, tools and quali-
fications to correctl ycarry out the work required on your vehicle
.This is especially the
case for work relevant to safety.
Observe the information in the Service Book-
let.
Always have the following work carried out at
a qualified specialist workshop:
R work relevant to safety
R service and maintenance work
R repair work
R alterations, installation work and modifica-
tions
R work on electronic components
Mercedes-Ben zrecommends that you use a
Mercedes-Benz Service Centre. Vehicle registration
Mercedes-Benz may ask its Service Centres
to carry out technical inspections on certain
vehicles to improve their quality or safety.
If you did not purchase your vehicle from an
authorised specialist dealer and your vehicle
has never been inspected at a Mercedes-
BenzS ervice Centre, it is possible that your
vehicle is not registered in your name with
Mercedes-Benz. Mercedes-Benz can only
infor myou about vehicle checks if it has your
registration data.
It is advisable to register your vehicle with a
Mercedes-Benz Service Centre.
InformM ercedes-Benza s soon as possible
abouta ny change in address or vehicle own-
ership. Correc
tuse G
WARNING
Various warning stickers are affixed to your
vehicle. Their purpose is to draw your atten-
tion, and the attention of others, to various
dangers. Therefore, do not remove any warn-
ing stickers unless the sticker clearly states
that you may do so. 22
Introduction
Page 70 of 321
When it is dark, the surround lighting also
comes on if it is activated in the on-board
computer (Y page 192).
You can also set an audible signal to confirm
that the vehicle has been locked. The audible
signal can be activated and deactivated using
the on-board computer (Y page 193).
X To unlock centrally: press the%but-
ton.
If you do not open the vehicle within approx-
imately 40 seconds of unlocking:
R the vehicle is locked again.
R the anti-theft system is primed again.
X To lock centrally: press the&button. KEYLESS-GO
Important notes on the use of KEYLESS-
GO R
Do not keep the KEYLESS-GO key together
with:
- electronic devices, e.g. a mobile phone
or another key
- metallic objects, e.g. coins or metal foil
This can affect the functionality of KEY-
LESS-GO.
R Bear in mind that the engine can be started
by any of the vehicle occupants if there is
a KEYLESS-GO key in the vehicle.
Locking and unlocking centrally You can start, lock or unlock the vehicle using
KEYLESS-GO. To do this, you only need carry
the key with you. You can combine the KEY-
LESS-GO functions with those of a conven-
tional key, e.g. using KEYLESS-GO to unlock
and pressing the &button to lock.
When locking or unlocking with KEYLESS-GO,
the distance between the key and the corre-
sponding door handle must not be greater
than 1 m. KEYLESS-GO checks whether a valid key is in
the vehicle by periodically establishing a radio
connection between the vehicle and the key.
This happens:
R when the external door handles are
touched
R when starting the engine
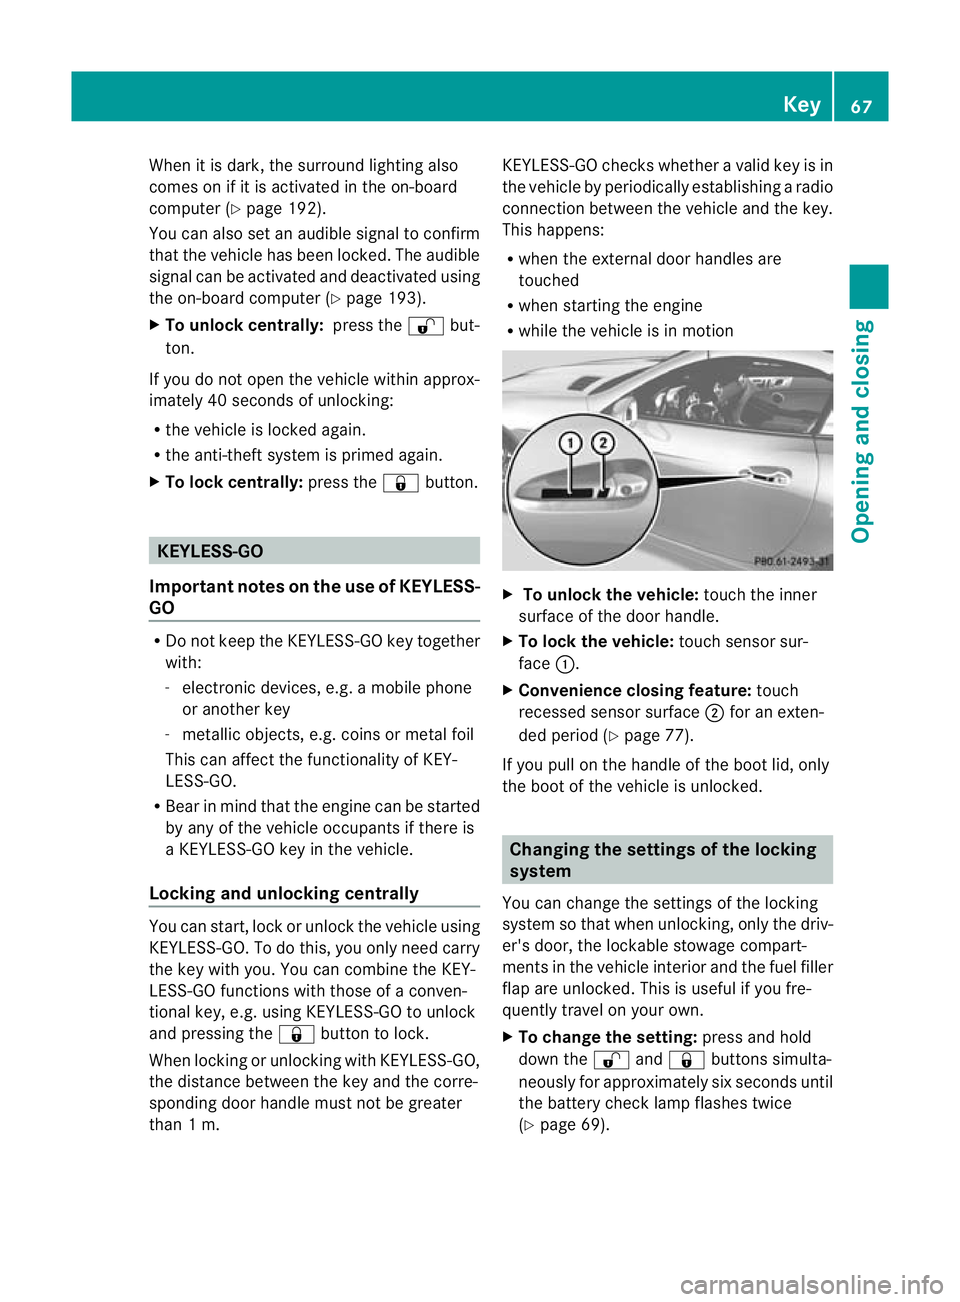
R while the vehicle is in motion X
To unlock the vehicle: touch the inner
surface of the door handle.
X To lock the vehicle: touch sensor sur-
face :.
X Convenience closing feature: touch
recessed sensor surface ;for an exten-
ded period (Y page 77).
If you pull on the handle of the boot lid, only
the boot of the vehicle is unlocked. Changing the settings of the locking
system
You can change the settings of the locking
system so that when unlocking, only the driv-
er's door, the lockable stowage compart-
ments in the vehicle interior and the fuel filler
flap are unlocked. This is useful if you fre-
quently travel on your own.
X To change the setting: press and hold
down the %and& buttons simulta-
neously for approximately six seconds until
the battery check lamp flashes twice
(Y page 69). Key
67Opening and closing Z
Page 71 of 321
i
If the setting of the locking system is
changed within the signal range of the vehi-
cle, pressing the &or% button locks
or unlocks the vehicle.
The key now functions as follows:
X To unlock the driver's door: press the
% button once.
X To unlockc entrally:press the %but-
ton twice.
X To lock centrally: press the&button.
The KEYLESS-GO function is changed as fol-
lows:
X To unlock the driver's door: touch the
inner surface of the door handle on the
driver's door.
X To unlock centrally: touch the inner sur-
face of the front-passenger door handle.
X To lock centrally: touch the outersensor
surface on one of the door handles. Restoring factor
ysettings
X Press the %and& buttons simulta-
neously for approximately six seconds until
the battery check lamp flashes twice. Emergency key element
General notes If the vehicle can no longer be locked or
unlocked with the key, use the emergency
key element.
If you use the emergency key element to
unlock and open the driver's door or the boot
lid, the anti-thef talarm system will be trig-
gered (Y page 61).
There are several ways to tur noff the alarm:
X To turn the alarm off with the key: press
the % or& button on the key.
or
X Insert the key into the ignition lock.
or X
To deactivate the alarm with KEYLESS-
GO: press the Start/Stop button in the igni-
tion lock. The key must be in the vehicle.
or
X Lock or unlock the vehicle using KEYLESS-
GO. The key must be outside the vehicle.
If you unlock the vehicle using the emergency
key element, the fuel filler flap will not be
unlocked automatically.
X To unlock the fuel filler flap: insert the
key in the ignition lock.
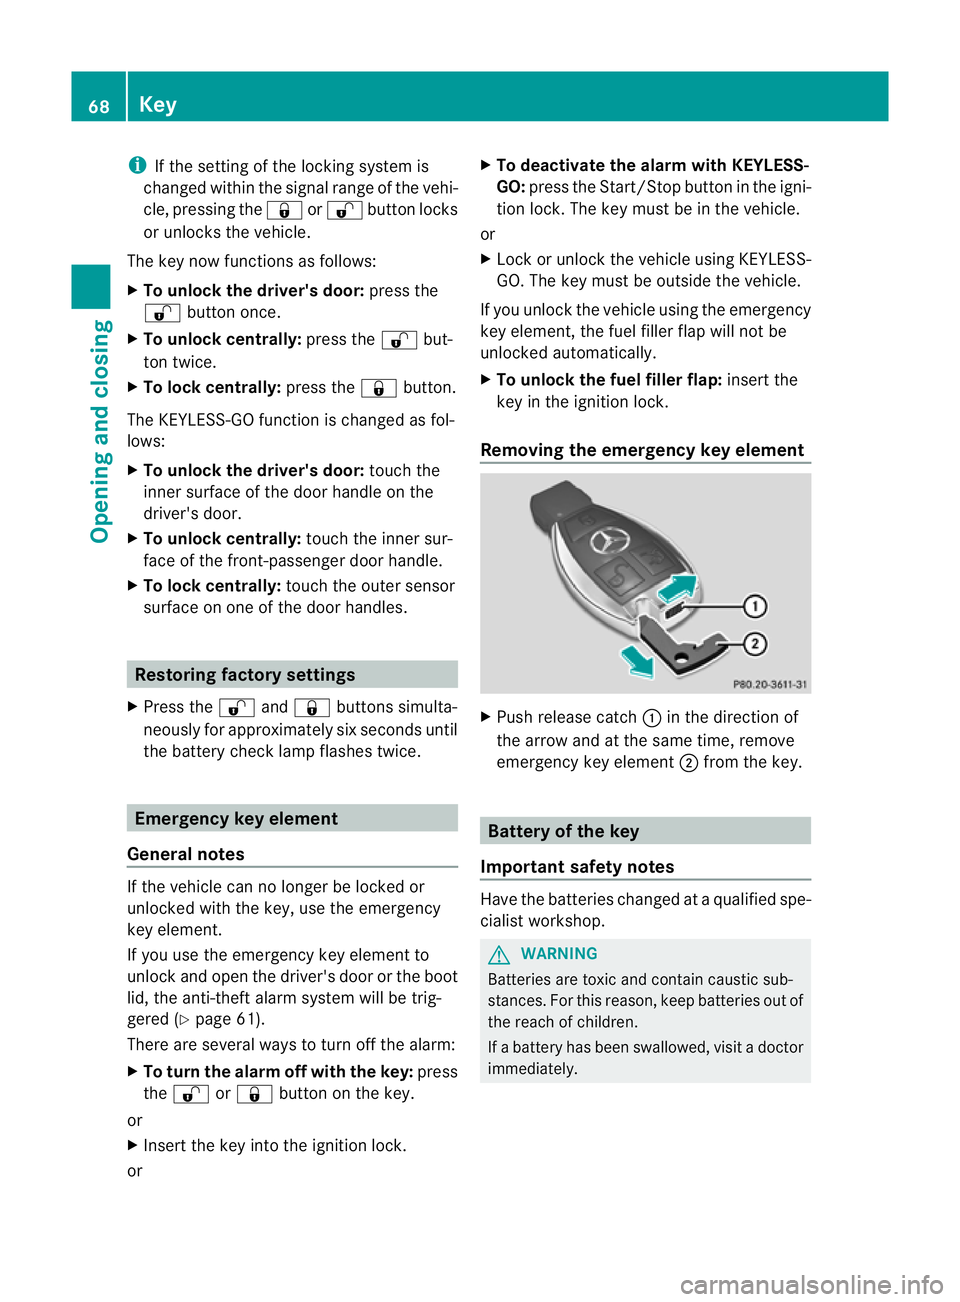
Removing the emergency key element X
Push release catch :in the direction of
the arrow and at the same time, remove
emergency key element ;from the key. Battery of the key
Important safety notes Have the batteries changed at a qualified spe-
cialist workshop. G
WARNING
Batteries are toxic and contain caustic sub-
stances. For this reason, keep batteries out of
the reach of children.
If a battery has been swallowed, visi tadoctor
immediately. 68
KeyOpening and closing
Page 72 of 321
H
Environmental note Batteries contain pollutants.
It is illegal to dispose of them
with the household rubbish.
They must be collected sep-
arately and disposed of in an
environmentally responsible
recycling system.
Dispose of batteries in an
environmentally responsible
manner
.Take discharged
batteries to a qualified spe-
cialis tworkshop or to a col-
lection point for used batter-
ies.
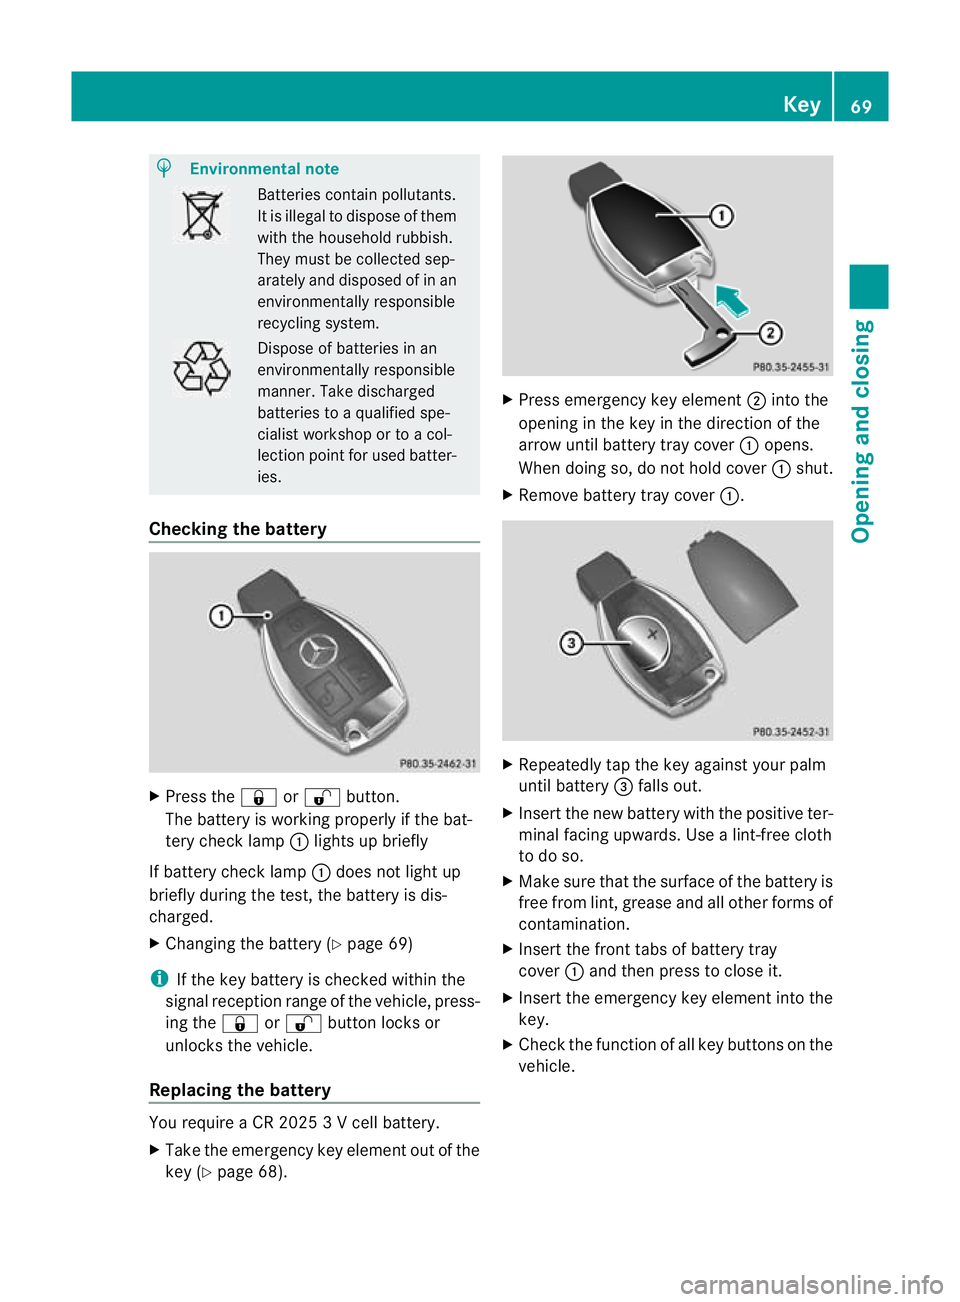
Checking the battery X
Press the &or% button.
The battery is working properly if the bat-
tery check lamp :lights up briefly
If battery check lamp :does not light up
briefly during the test, the battery is dis-
charged.
X Changing the battery (Y page 69)
i If the key battery is checked within the
signal reception range of the vehicle, press-
ing the &or% button locks or
unlocks the vehicle.
Replacing the battery You require a CR 2025 3 V cell battery.
X
Take the emergency key element out of the
key (Y page 68). X
Press emergency key element ;into the
opening in the key in the direction of the
arrow until battery tray cover :opens.
When doing so, do not hold cover :shut.
X Remove battery tray cover :. X
Repeatedly tap the key against your palm
until battery =falls out.
X Insert the new battery with the positive ter-
minal facing upwards. Use a lint-free cloth
to do so.
X Make sure that the surface of the battery is
free from lint, grease and all other forms of
contamination.
X Insert the front tabs of battery tray
cover :and then press to close it.
X Insert the emergency key element into the
key.
X Check the function of all key buttons on the
vehicle. Key
69Opening and closing Z
Page 73 of 321
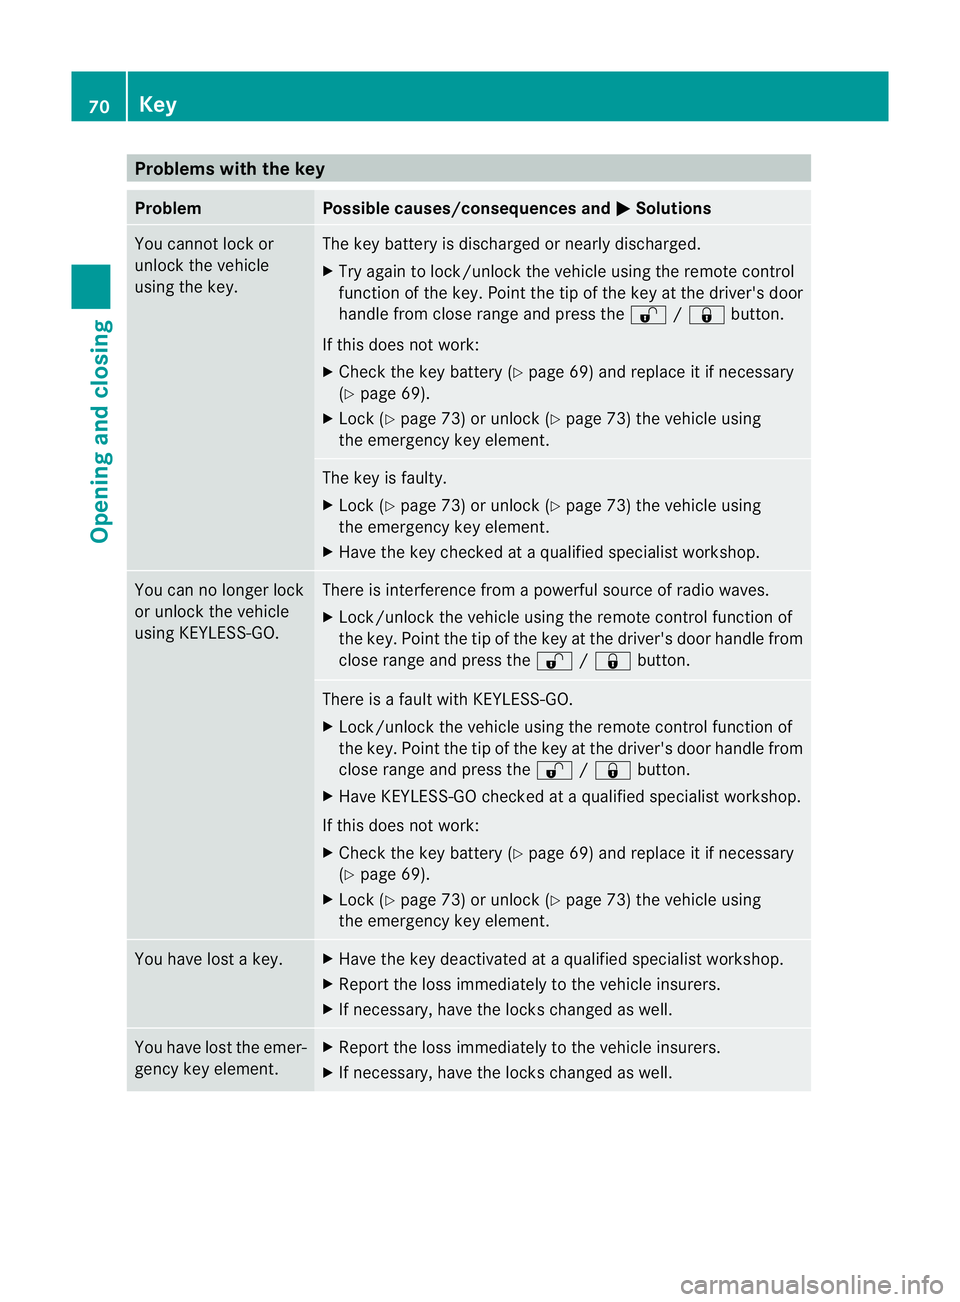
Problems with the key
Problem Possible causes/consequences and
M Solutions
You cannot lock or
unlock the vehicle
using the key. The key battery is discharged or nearly discharged.
X
Try again to lock/unlock the vehicle using the remote control
function of the key. Point the tip of the key at the driver's door
handle from close range and press the %/& button.
If this does not work:
X Check the key battery (Y page 69) and replace it if necessary
(Y page 69).
X Lock (Y page 73) or unlock (Y page 73) the vehicle using
the emergency key element. The key is faulty.
X
Lock (Y page 73) or unlock (Y page 73) the vehicle using
the emergency key element.
X Have the key checked at a qualified specialist workshop. You can no longer lock
or unlock the vehicle
using KEYLESS-GO. There is interference from a powerful source of radio waves.
X
Lock/unlock the vehicle using the remote control function of
the key. Point the tip of the key at the driver's door handle from
close range and press the %/& button. There is a fault with KEYLESS-GO.
X
Lock/unlock the vehicle using the remote control function of
the key. Point the tip of the key at the driver's door handle from
close range and press the %/& button.
X Have KEYLESS-GO checked at a qualified specialist workshop.
If this does not work:
X Check the key battery (Y page 69) and replace it if necessary
(Y page 69).
X Lock (Y page 73) or unlock (Y page 73) the vehicle using
the emergency key element. You have lost a key. X
Have the key deactivated at a qualified specialist workshop.
X Report the loss immediately to the vehicle insurers.
X If necessary, have the locks changed as well. You have lost the emer-
gency key element. X
Report the loss immediately to the vehicle insurers.
X If necessary, have the locks changed as well. 70
KeyOpening and closing