2012 MERCEDES-BENZ SL ROADSTER navigation
[x] Cancel search: navigationPage 349 of 637
Managing personal POIs
X Call up the "Personal POIs" menu
(Y page 344).
X Select Manage personal POIs Manage personal POIs in the
menu and press Wto confirm.
X Select Not classified
Not classified, COMAND Online
COMAND Online
or your own category and press Wto con-
firm.
X Select a personal POI and press Wto con-
firm.
The personal POI is displayed.
Observe the additional information on man-
aging personal POI categories (Y page 347):
R Renaming
R Changing the category
R Deleting
Saving personal POIs There are three ways of saving personal POIs.
You must insert an SD memory card to do so.
The No memory card No memory card message otherwise
appears.
Personal POIs and routes are saved on the
memory card in the same data format in
which the geographical data is stored. This
format is based on the open GPX (GPS
Exchange) format.
Option 1
X Insert the SD memory card (Y page 472).
X To switch to navigation mode: press the
Ø button.
X Hide the menu to show the map in full
screen mode (Y page 324).
X Press Wthe COMAND controller for longer
than two seconds.
The current position of the vehicle is saved as a personal POI on the SD memory card in
the Not classified
Not classified category.
i The crosshair position is saved in the
scrolling map function (Y page 373).Option 2
X Insert the SD memory card (Y page 472).
X To switch to navigation mode: press the
Ø button.
X To show the menu: pressWthe COMAND
controller.
X Select Position
Position in the navigation system
menu bar by turning cVdthe COMAND
controller and press Wto confirm.
X Select Save Saveposition
position as
aspersonal
personal POI
POI
or Save
Save crosshair
crosshair pos.
pos.as
aspersonal
personal
POI
POI ("Move map" function active) and press
W to confirm.
The list of personal categories appears.
X Select a category and press Wto confirm.
X Enter the name for the personal POI. Char-
acter entry (Y page 303).
Option 3
X Insert the SD memory card (Y page 472).
X To switch to navigation mode: press the
Ø button.
X Call up the address entry menu
(Y page 326).
X Select Save Savefrom the address entry menu
and press Wto confirm.
X Select Save as personal POI Save as personal POI and press
W to confirm.
X Select a category.
X Enter the name.
The current address is saved as a personal
POI on the SD memory card.
Importing personal POIs via the online
function You can import personal POIs (destinations,
routes) via the online function (Y page 446).
When importing, you can choose whether to
write files to the SD memory card or to file
them in the address book. The imported per-
sonal POIs have their own icon and are filed in
the COMAND Online COMAND Online category.346
NavigationCOMAND Online
Page 350 of 637
Selecting as the destination
X
Insert the SD memory card (Y page 472).
X To switch to navigation mode: press the
Ø button.
X To show the menu: pressWthe COMAND
controller.
X Select Destination
Destination in the navigation sys-
tem menu bar by turning cVdthe
COMAND controller and press Wto con-
firm.
X Select From
From personal
personal POIs
POIsand press W
to confirm.
The categories of personal POIs appear. Selection Explanation
Not classi‐
Not classi‐
fied fied Standard entry for per-
sonal POIs.
COMAND COMAND
Online Online Personal POIs which you
have imported via the
online function
(Y
page 446). Coffee shop Coffee shop Icon and category that
you have created yourself
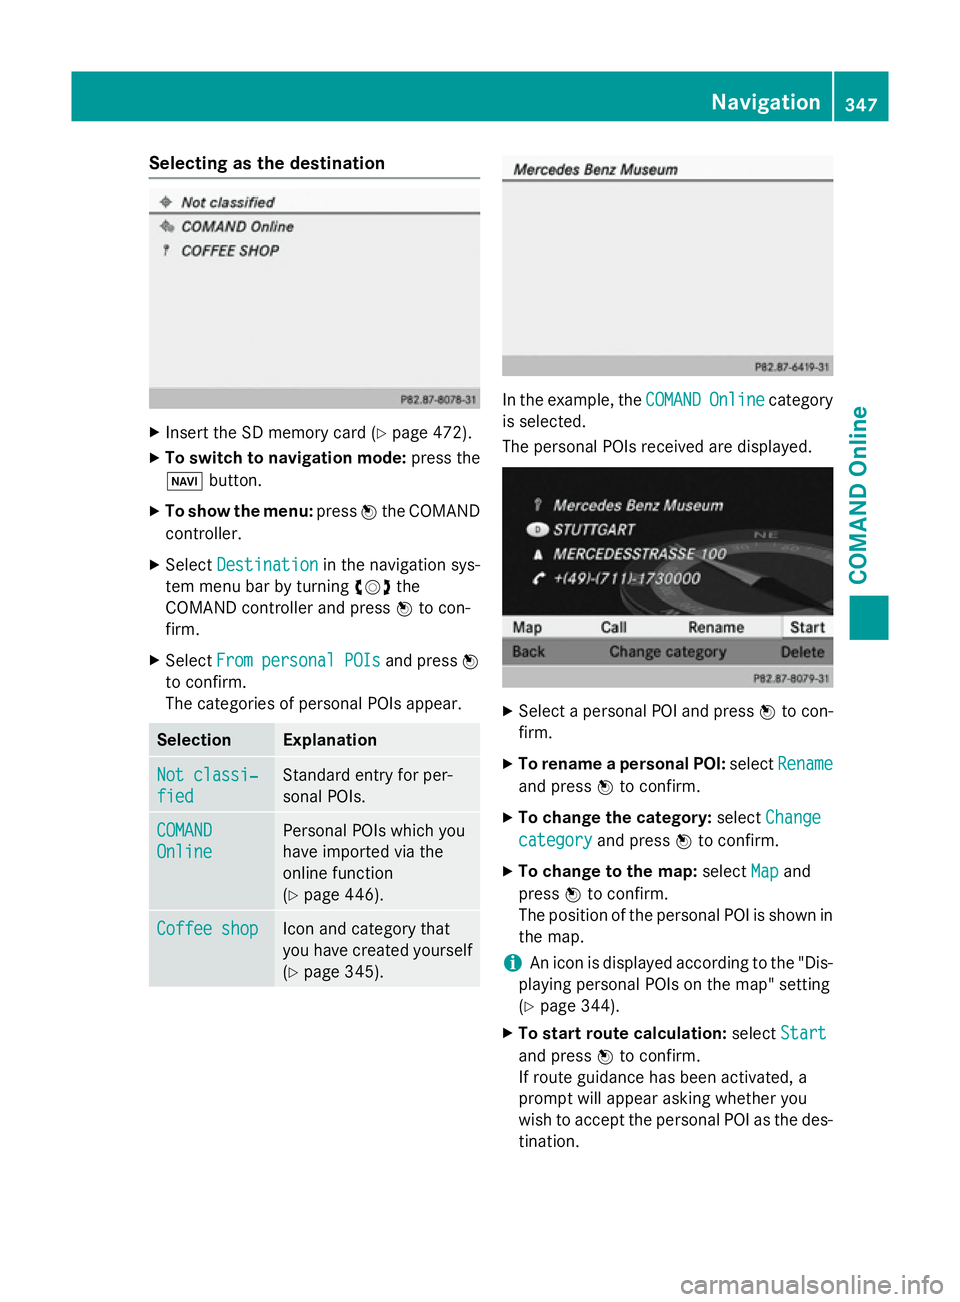
(Y page 345). In the example, the
COMAND
COMAND Online Onlinecategory
is selected.
The personal POIs received are displayed. X
Select a personal POI and press Wto con-
firm.
X To rename a personal POI: selectRename Rename
and press Wto confirm.
X To change the category: selectChange
Change
category
category and pressWto confirm.
X To change to the map: selectMap
Mapand
press Wto confirm.
The position of the personal POI is shown in
the map.
i An icon is displayed according to the "Dis-
playing personal POIs on the map" setting
(Y page 344).
X To start route calculation: selectStart Start
and press Wto confirm.
If route guidance has been activated, a
prompt will appear asking whether you
wish to accept the personal POI as the des- tination. Navigation
347COMAND Online Z
Page 351 of 637
If route guidance has not been activated,
route calculation for the personal POI will
start immediately.
X Select Yes
Yes orNo No and press Wto confirm.
If you select Yes
Yes, the personal POI is accep-
ted as the destination.
If you select No No, the process will be cancel-
led.
X To make a call: selectCall
Calland press Wto
confirm. COMAND Online switches to tele-
phone mode (Y page 398).
i Call
Call is available if the personal POI has a
telephone number and a mobile phone is
connected to COMAND Online
(Y page 390).
X To delete a personal POI: selectDelete
Delete
and press Wto confirm.
A prompt appears asking whether you wish to delete the POI.
X Select Yes YesorNo
No and press Wto confirm.
If you select Yes
Yes, the personal POI is
deleted.
If you select No No, the process will be cancel-
led. ViaMichelin travel guide
Overview If COMAND Online offers the ViaMichelin
travel guide in navigation mode, you can
select tourist destinations, including routes.
In this case, the travel guide data is on a SD
memory card. First place the SD memory card
in the SD card slot (Y page 472). You can download available updates from the
Mercedes-Benz webshop.
i You can also subsequently obtain travel
guide data from the Mercedes-Benz Acces- sory webshop.
The travel guide offers you tourist destina-
tions and routes: R in the vicinity of the current vehicle position
R along the calculated route
R in the vicinity of the destination
R through selection on the map
R on a specific topic, for example, Paris, the
Alps or German wine routes
You can select:
R which travel guide data on the map can be
shown and selected (e.g. restaurants and
tourist routes)
R whether information on tourist destina-
tions is read out as you approach them
Activating/deactivating travel guide
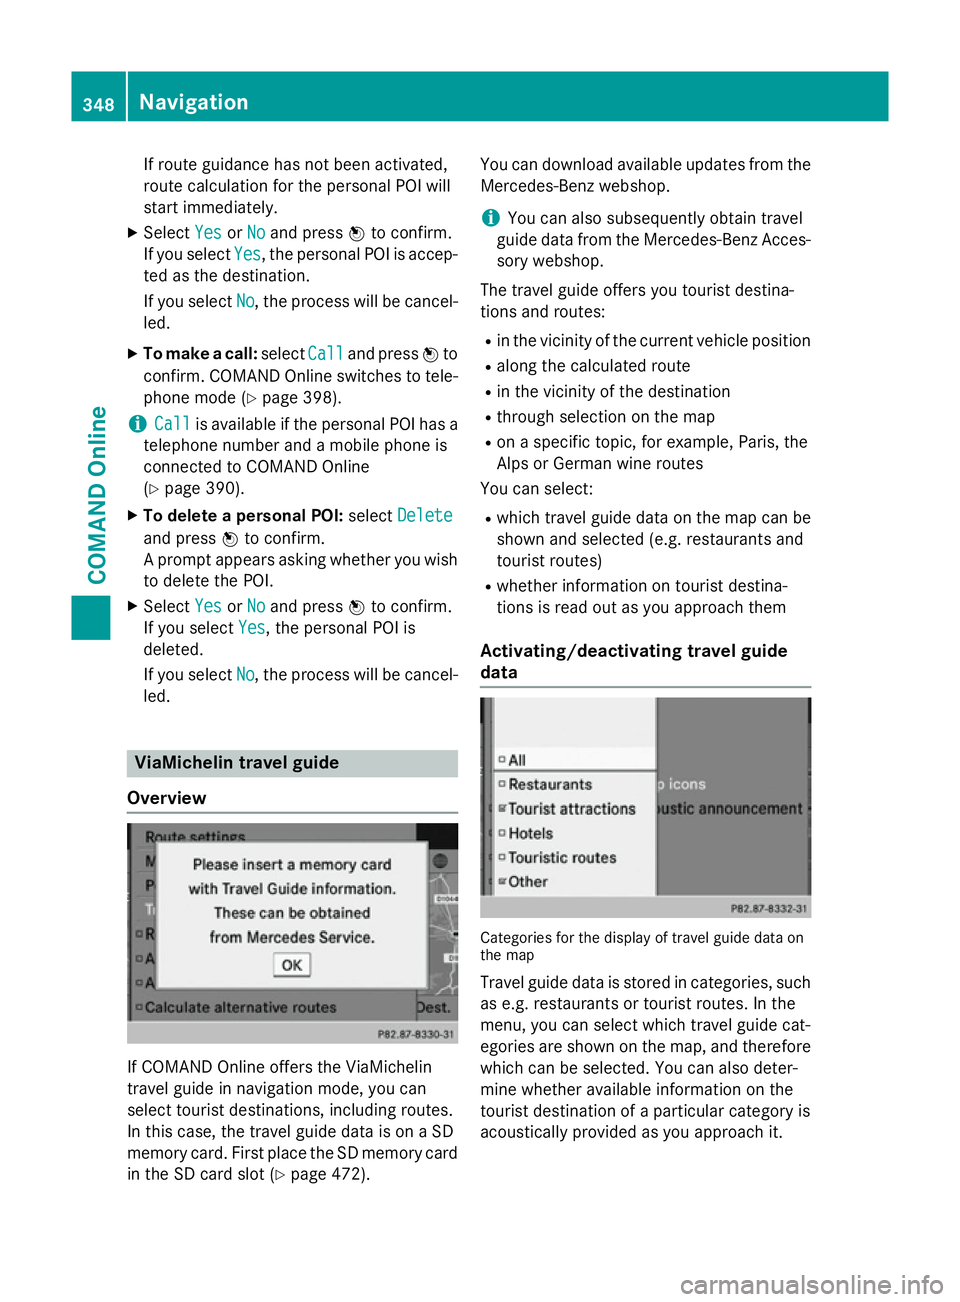
data Categories for the display of travel guide data on
the map
Travel guide data is stored in categories, such as e.g. restaurants or tourist routes. In the
menu, you can select which travel guide cat-
egories are shown on the map, and thereforewhich can be selected. You can also deter-
mine whether available information on the
tourist destination of a particular category is
acoustically provided as you approach it. 348
NavigationCOMAND Online
Page 352 of 637
X
To switch to navigation mode: press the
Ø button.
X To show the menu bar: pressWthe
COMAND controller.
X Select Navi
Navi in the main function bar by
sliding ZVand turning cVdthe COMAND
controller and press Wto confirm.
X Select Travel
Travel guide
guideand press Wto con-
firm.
X Select Map icons
Map icons orAcoustic
Acoustic
announcement
announcement and pressWto confirm.
The menu displays the available categories.
X Select a category and press Wto confirm.
Switch the category on Oor off ª.
If you selected Map
Mapicons
icons and switched on
a category, you can select the available
tourist destinations of that category on the map.
If you selected Acoustic announcement Acoustic announcement
and switched on a category, you hear infor-
mation as you approach a tourist destina-
tion. The information must be available as
an audio file for this destination.
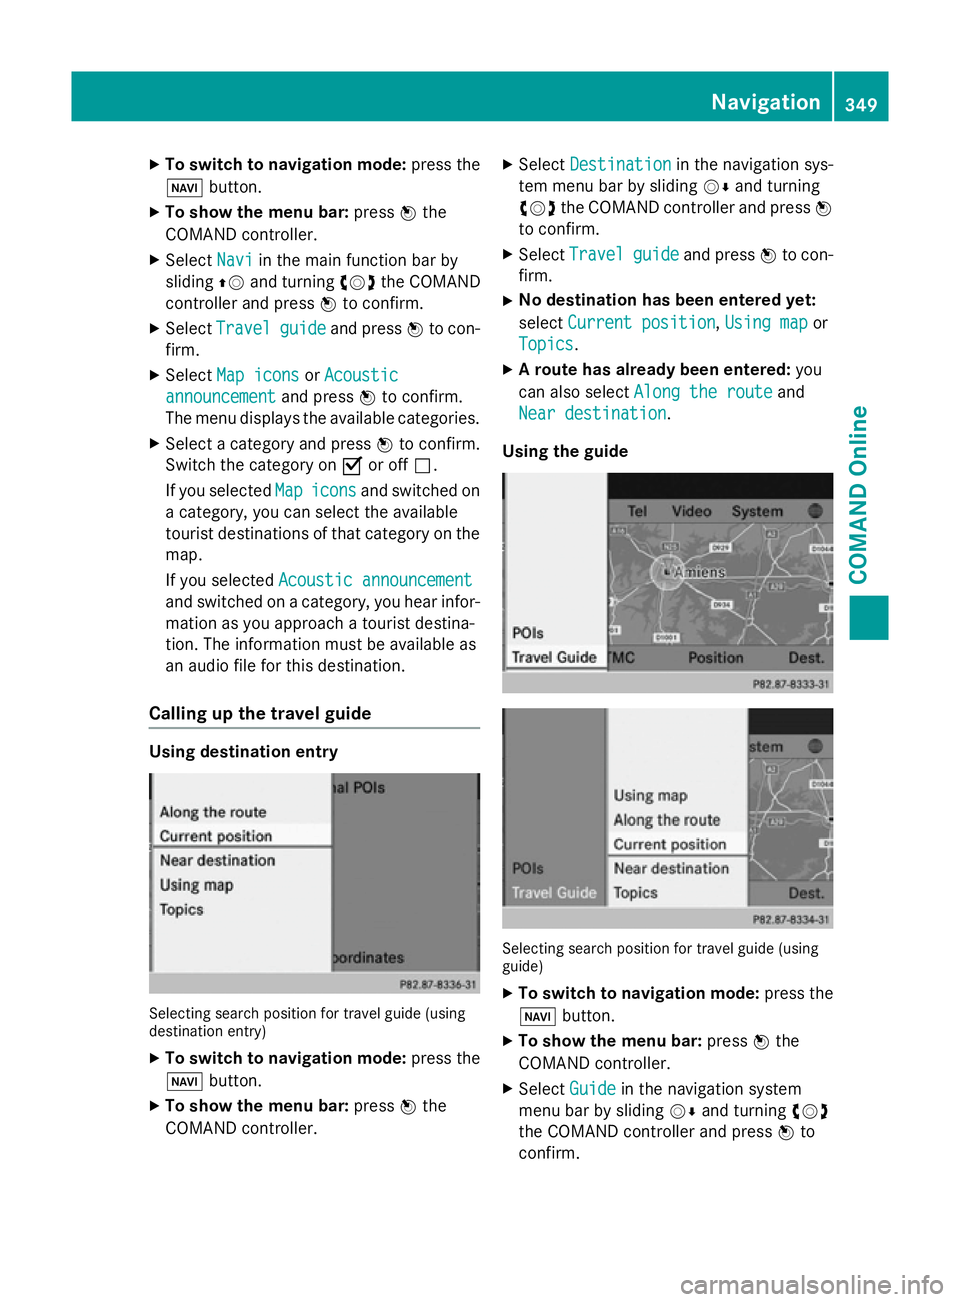
Calling up the travel guide Using destination entry
Selecting search position for travel guide (using
destination entry)
X To switch to navigation mode: press the
Ø button.
X To show the menu bar: pressWthe
COMAND controller. X
Select Destination Destination in the navigation sys-
tem menu bar by sliding VÆand turning
cVd the COMAND controller and press W
to confirm.
X Select Travel
Travel guide
guideand press Wto con-
firm.
X No destination has been entered yet:
select Current position Current position, Using map
Using mapor
Topics
Topics .
X A route has already been entered: you
can also select Along the route
Along the route and
Near destination
Near destination.
Using the guide Selecting search position for travel guide (using
guide)
X To switch to navigation mode: press the
Ø button.
X To show the menu bar: pressWthe
COMAND controller.
X Select Guide
Guide in the navigation system
menu bar by sliding VÆand turning cVd
the COMAND controller and press Wto
confirm. Navigation
349COMAND Online Z
Page 353 of 637
X
Select Travel
Travel guide
guideand press Wto con-
firm.
X No destination has been entered yet:
select Current position
Current position, Using map
Using map or
Topics
Topics .
X A route has already been entered: you
can also select Along the route
Along the route and
Near destination
Near destination.
Selecting topics You can choose from a variety of topics. Top-
ics can be listed based on places (e.g.coun-
tryside) or on content (e.g. wine guide).
X Call up the travel guide (Y page 349).
X Select Topics
Topics .
A list appears.
X Select a topic and press Wto confirm.
The system selects a map view that allows the tourist destinations and routes for the
topic to be displayed.
X Select a tourist destination or route on the
map and press Wto confirm.
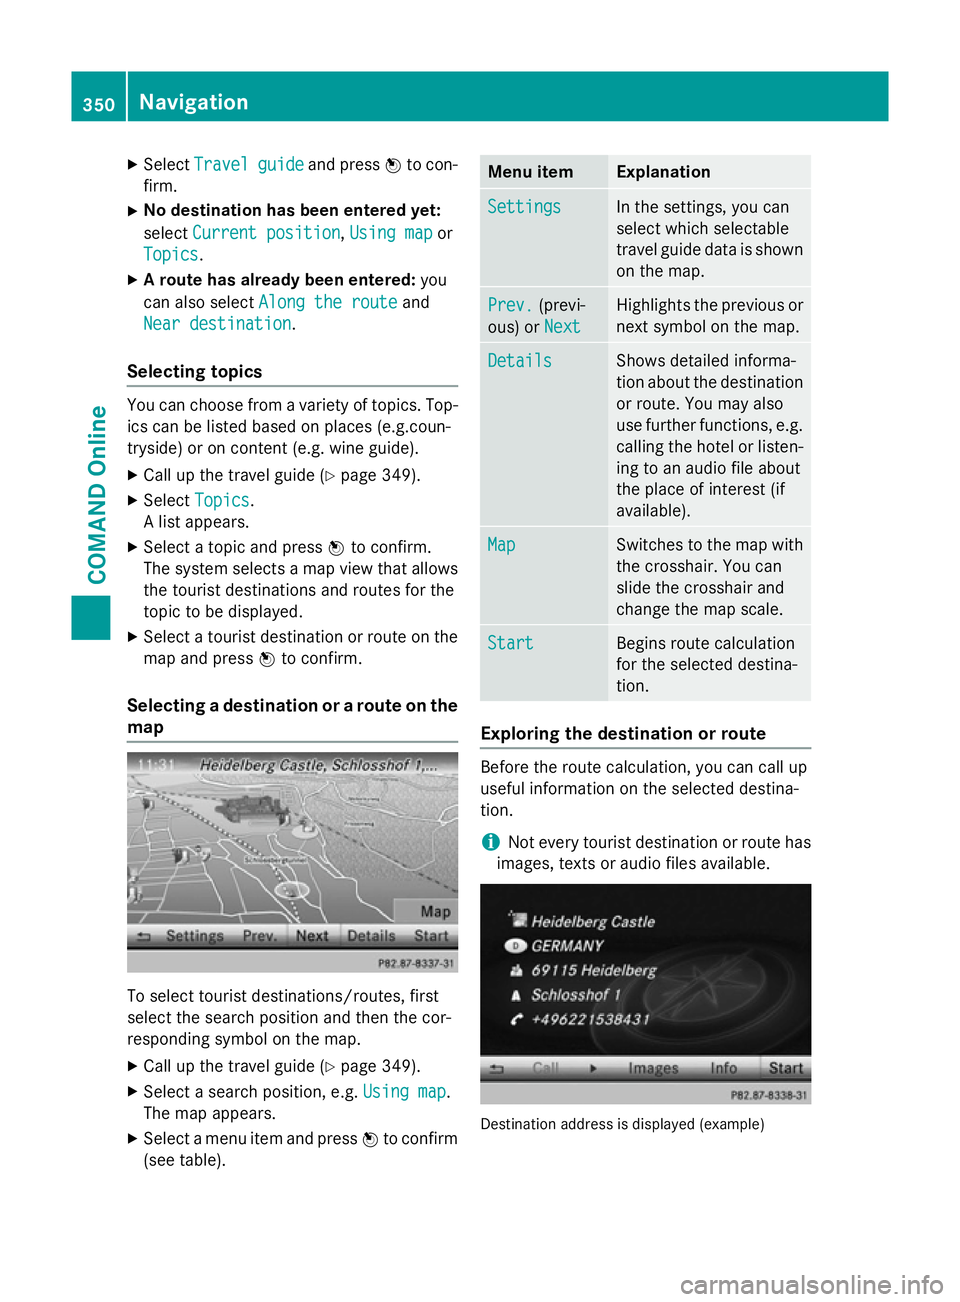
Selecting a destination or a route on the map To select tourist destinations/routes, first
select the search position and then the cor-
responding symbol on the map.
X Call up the travel guide (Y page 349).
X Select a search position, e.g. Using map Using map.
The map appears.
X Select a menu item and press Wto confirm
(see table). Menu item Explanation
Settings
Settings In the settings, you can
select which selectable
travel guide data is shown
on the map. Prev. Prev.
(previ-
ous) or Next
Next Highlights the previous or
next symbol on the map. Details
Details Shows detailed informa-
tion about the destination
or route. You may also
use further functions, e.g.
calling the hotel or listen-
ing to an audio file about
the place of interest (if
available). Map Map Switches to the map with
the crosshair. You can
slide the crosshair and
change the map scale. Start Start Begins route calculation
for the selected destina-
tion.
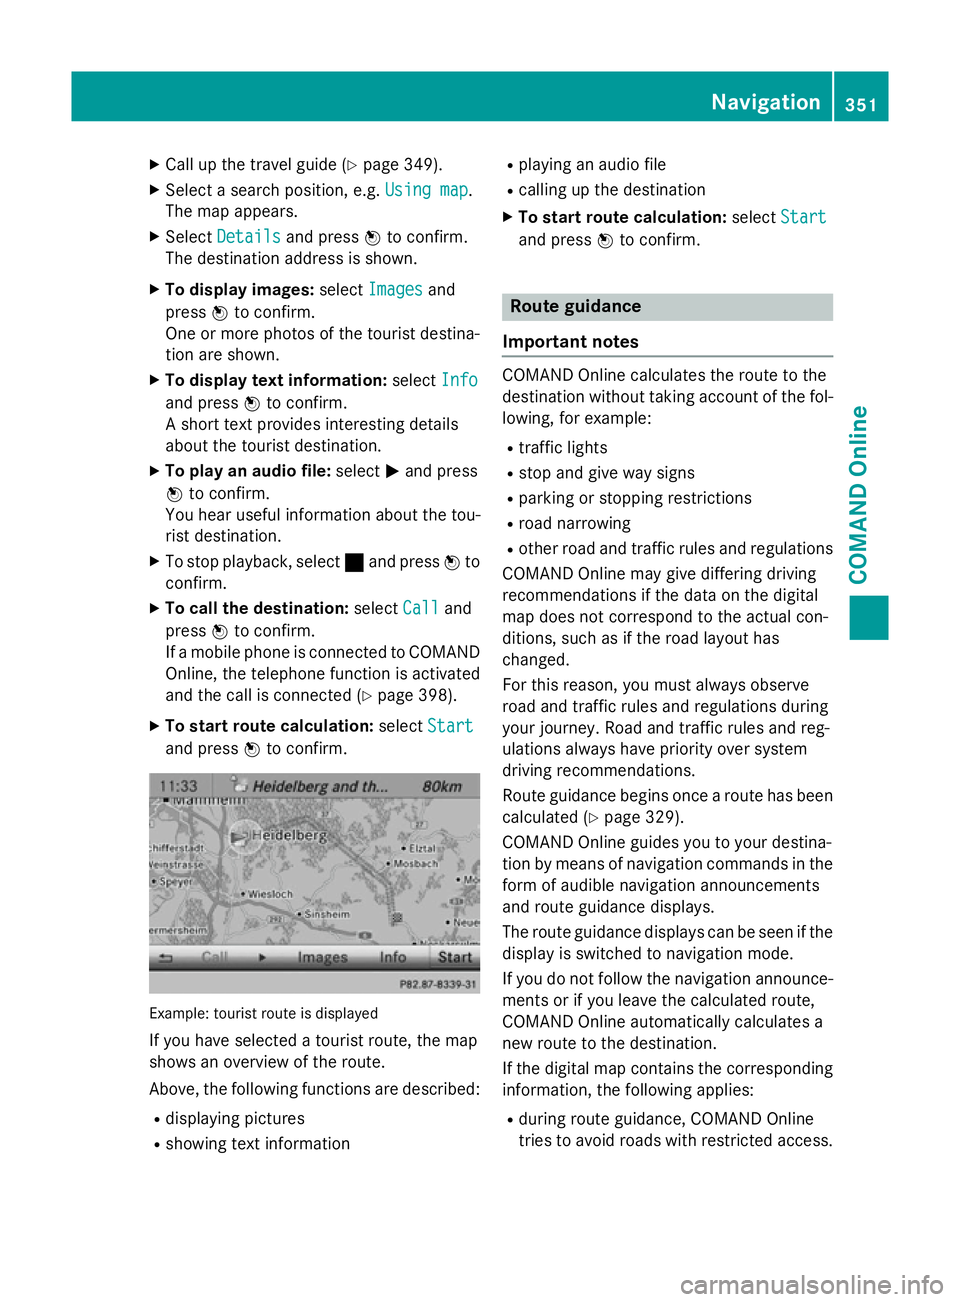
Exploring the destination or route
Before the route calculation, you can call up
useful information on the selected destina-
tion.
i Not every tourist destination or route has
images, texts or audio files available. Destination address is displayed (example)350
NavigationCOMAND Online
Page 354 of 637
X
Call up the travel guide (Y page 349).
X Select a search position, e.g. Using map
Using map .
The map appears.
X Select Details
Details and press Wto confirm.
The destination address is shown.
X To display images: selectImages
Images and
press Wto confirm.
One or more photos of the tourist destina-
tion are shown.
X To display text information: selectInfo
Info
and press Wto confirm.
A short text provides interesting details
about the tourist destination.
X To play an audio file: selectMand press
W to confirm.
You hear useful information about the tou-
rist destination.
X To stop playback, select ¯and press Wto
confirm.
X To call the destination: selectCall
Call and
press Wto confirm.
If a mobile phone is connected to COMAND Online, the telephone function is activated
and the call is connected (Y page 398).
X To start route calculation: selectStart
Start
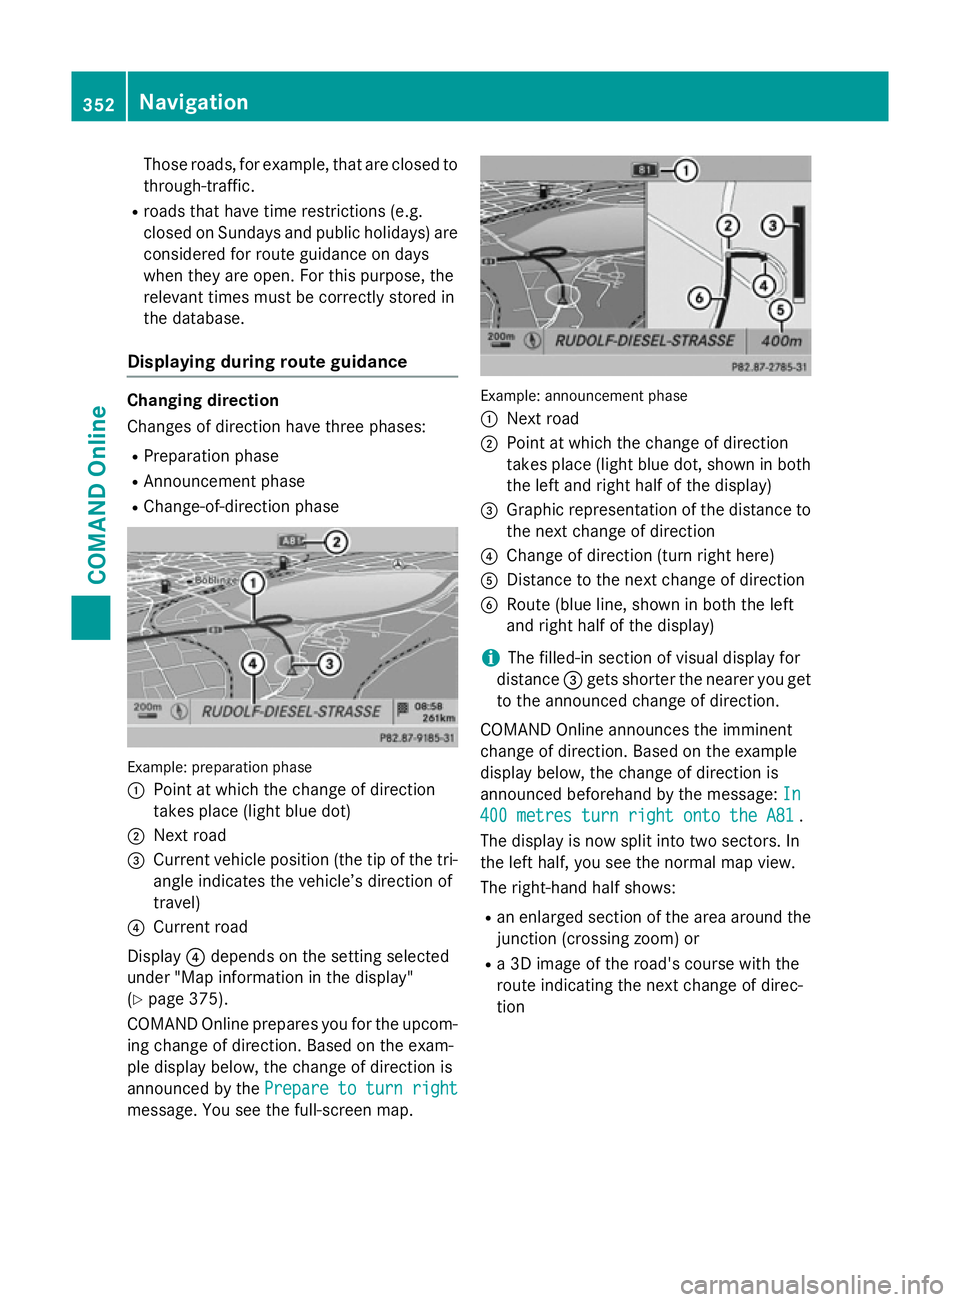
and press Wto confirm. Example: tourist route is displayed
If you have selected a tourist route, the map
shows an overview of the route.
Above, the following functions are described:
R displaying pictures
R showing text information R
playing an audio file
R calling up the destination
X To start route calculation: selectStart
Start
and press Wto confirm. Route guidance
Important notes COMAND Online calculates the route to the
destination without taking account of the fol-
lowing, for example:
R traffic lights
R stop and give way signs
R parking or stopping restrictions
R road narrowing
R other road and traffic rules and regulations
COMAND Online may give differing driving
recommendations if the data on the digital
map does not correspond to the actual con-
ditions, such as if the road layout has
changed.
For this reason, you must always observe
road and traffic rules and regulations during
your journey. Road and traffic rules and reg-
ulations always have priority over system
driving recommendations.
Route guidance begins once a route has been
calculated (Y page 329).
COMAND Online guides you to your destina-
tion by means of navigation commands in the
form of audible navigation announcements
and route guidance displays.
The route guidance displays can be seen if the
display is switched to navigation mode.
If you do not follow the navigation announce- ments or if you leave the calculated route,
COMAND Online automatically calculates a
new route to the destination.
If the digital map contains the corresponding
information, the following applies:
R during route guidance, COMAND Online
tries to avoid roads with restricted access. Navigation
351COMAND Online Z
Page 355 of 637
Those roads, for example, that are closed to
through-traffic.
R roads that have time restrictions (e.g.
closed on Sundays and public holidays) are
considered for route guidance on days
when they are open. For this purpose, the
relevant times must be correctly stored in
the database.
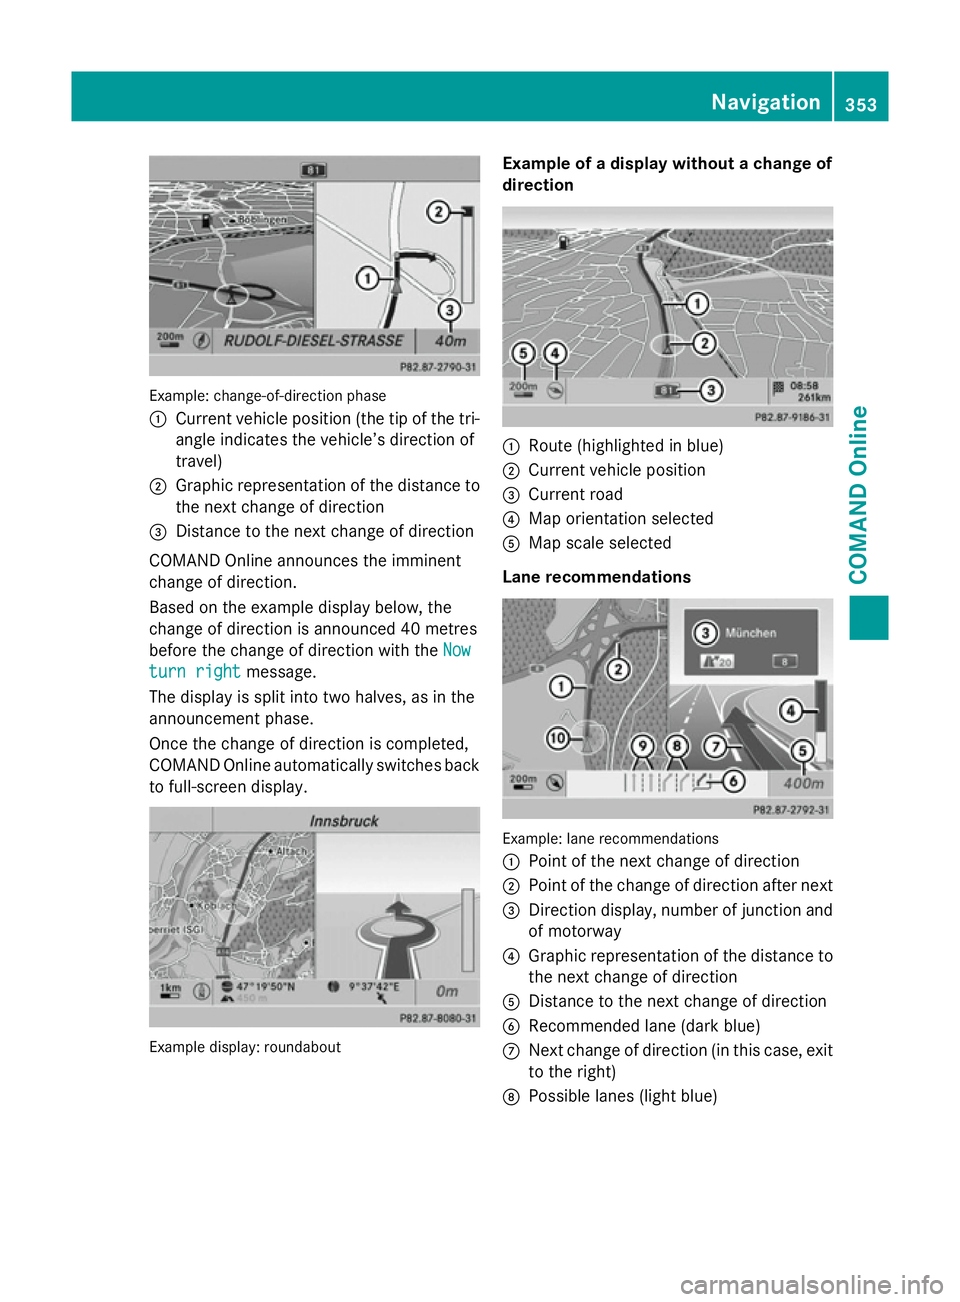
Displaying during route guidance Changing direction
Changes of direction have three phases:
R Preparation phase
R Announcement phase
R Change-of-direction phase Example: preparation phase
:
Point at which the change of direction
takes place (light blue dot)
; Next road
= Current vehicle position (the tip of the tri-
angle indicates the vehicle’s direction of
travel)
? Current road
Display ?depends on the setting selected
under "Map information in the display"
(Y page 375).
COMAND Online prepares you for the upcom-
ing change of direction. Based on the exam-
ple display below, the change of direction is
announced by the Prepare to turn right
Prepare to turn right
message. You see the full-screen map. Example: announcement phase
:
Next road
; Point at which the change of direction
takes place (light blue dot, shown in both
the left and right half of the display)
= Graphic representation of the distance to
the next change of direction
? Change of direction (turn right here)
A Distance to the next change of direction
B Route (blue line, shown in both the left
and right half of the display)
i The filled-in section of visual display for
distance =gets shorter the nearer you get
to the announced change of direction.
COMAND Online announces the imminent
change of direction. Based on the example
display below, the change of direction is
announced beforehand by the message: In In
400 metres turn right onto the A81
400 metres turn right onto the A81 .
The display is now split into two sectors. In
the left half, you see the normal map view.
The right-hand half shows:
R an enlarged section of the area around the
junction (crossing zoom) or
R a 3D image of the road's course with the
route indicating the next change of direc-
tion 352
NavigationCOMAND Online
Page 356 of 637
Example: change-of-direction phase
:
Current vehicle position (the tip of the tri-
angle indicates the vehicle’s direction of
travel)
; Graphic representation of the distance to
the next change of direction
= Distance to the next change of direction
COMAND Online announces the imminent
change of direction.
Based on the example display below, the
change of direction is announced 40 metres
before the change of direction with the Now
Now
turn right turn right message.
The display is split into two halves, as in the
announcement phase.
Once the change of direction is completed,
COMAND Online automatically switches back to full-screen display. Example display: roundabout Example of a display without a change of
direction
:
Route (highlighted in blue)
; Current vehicle position
= Current road
? Map orientation selected
A Map scale selected
Lane recommendations Example: lane recommendations
:
Point of the next change of direction
; Point of the change of direction after next
= Direction display, number of junction and
of motorway
? Graphic representation of the distance to
the next change of direction
A Distance to the next change of direction
B Recommended lane (dark blue)
C Next change of direction (in this case, exit
to the right)
D Possible lanes (light blue) Navigation
353COMAND Online Z