Page 113 of 210
.
X Select Options using
the; button and
press th")
Cha
nging anaddress book entry
Cha nging anent ry X
Opt ion1:sear chfor anaddre ssbook entry
and selec titf rom thelistu sing the
9: buttons(Ypage 109).
X Select Options using
the; button and
press the9button toconfirm.
X Select Change and
press the9button to
confirm.
X Option 2:call upthe detailed viewforan
address bookentry (Ypage 110).
X Select Options using
the; button and
press the9button toconfirm.
X Select Change Entry and
press the9
button toconfirm.
Irrespective ofthe option, theinput menu
cont aining datafields appea rs.
X Proceed asdescribed under"Enterin g
characters" inthe "Enterin gcharacters in
the address andphone books" section
(Y page 23).
Changing thecategory ofatelephone
number datafield X
Display thedetailed viewforanaddress
book entry (Ypage 110)andhighlig htthe
telephone numberdatafield.
X Select Options using
the; button and
press the9button toconfirm.
X Select Change Category and
press the
9 button toconfirm.
X Select anumber category, e.g.Home .
X Select atelephone category,e.g.Mobile Phone .
X Select Preferred if
desired andpress the
9 button toconfirm.
Depending onthe previous state,switch
the option onO oroff ª.T hephone
number isdispla yedasthe first number inthe
phone bookandcanbediale d
immediately.
X Select Save and
press 9toconfirm .
The new category isstored. Calling
anumber storedinan entry
Co nditio ns The
mobi lephone mustbeconnected viathe
Blue tooth ®
interface .
Option 1 X
Displ aydetai lsfor anadd ress book entry
(Y pag e110).
X Select thetelep hone numbe rdata field
usin gth e9: buttons and pres sth e
9 buttonto confirm .
The telepho nemak esthecall. Thedispl ay
swit ches totelepho nemod e.
Opt ion 2 X
Dis play details foranaddre ssbook entry.
X Sel ect thete lepho nenum berdatafiel d
usin gth e9: buttons .
X Sel ect Opt ions usin
gth e; buttona nd
pre ssthe 9button toconfi rm.
X Sel ect Call and
pressthe 9button to
confi rm.
The telephone makes thecall.
Opti on3 X
Sel ect anaddre ssbook entry inthe list
us ing the 9: buttons.
X Pre ssthe 6 button.
The telephone makes thecall. Us
ingthe addres sbo ok
111Tel epho ne Z
Page 114 of 210
withthe¤symbol andselect
it from thelist.
X Display detailsforanaddress bookentry
(Y page 110).
X Select thead")
Star
ting route guidance toan entry
Option 1 X
Search foranaddress bookentry
(Y page 109)withthe¤symbol andselect
it from thelist.
X Display detailsforanaddress bookentry
(Y page 110).
X Select theaddress datafieldusing the
9: buttonsandpress the9button
to conf irm.
Option 2 X
Search foranaddress bookentry
(Y page 109)withthe¤symbol andselect
it from thelist.
X Select Options using
the; button and
press the9button toconf irm.
X Select Navigate and
press the9button
to conf irm.
If the address dataiscomplete andit
matches thedigital map,route guidance
starts.
Subsequent operationwilldepend onhow
complete theaddress dataitems areand
whether theycorrespon dwith thedata in
the digital mapinthe navigation system.
They donot correspon d,for example, if
they arenot written inthe same wayasthe
destination entry. Voice
tags
Adding orchanging avoice tag You
canentervoic etag svia theVoic eCont rol
Syst em(Ypage 191). Once you have
assign edavoic etag toan addre ssbook entry,
you can callupthis ent rywith avoic e
com man dand dialaphon enum ber, for
exam ple.You canadd onevoic etag per
addre ssbook entry. X
Sear chfor anaddre ssbook entrywith or
with outavoic etag (¦ symbo l)
(Y page 109).
X Sele ctOpt ions usin
gth e; buttonand
pres sth e9 butt ontocon firm.
X Sele ctVoi ceName and
pres sth e9
butt ontocon firm.
X Sele ctAdd or
Cha nge and
pres sth e9
butt ontocon firm.
Subs equen toperation isvoice- controlled.
The Voice ControlSyst emguides you
thr ough thedialogs.
Deleting avoice tag X
Sear chfor anaddre ssbook entrywith a
voic etag (Ypage 109).
X Sele ctOpt ions usin
gth e; buttonand
pres sth e9 butt ontocon firm.
X Sele ctVoi ceName and
pres sth e9
butt ontocon firm.
X Sele ctDel ete and
pres s9 tocon firm.
Ad eletion prompt appears.
X Select Yes or
No and
press the9button
to con firm.
If you select Yes ,
COMAND deletesthe
voice tag.
If you select No ,
the process willbeaborted.
Listening toav oice tag X
Sear chfor anaddre ssbook entrywith a
voic etag (Ypage 109).
X Sele ctOpt ions usin
gth e; buttonand
pres sth e9 butt ontocon firm.
X Sele ctVoi ceName and
pres sth e9
butt ontocon firm.
X Sele ctLis ten and
pres sth e9 butt onto
con firm.
You hear thevoic etag . 112
Using
thead dress bookTelep hone
Page 115 of 210

Imp
orting cont acts
Cond itions You
canimpo rtco ntact stothe address book
from anexter nalBluetooth ®
device oran SD
memory card.
The Bluetooth ®
device needstobe inside the
vehicle andhastobe switched on,activated,
and authorized. Itmust beable totrans mit
cont acts and/or vCardsviaBluetooth ®
.
i Around 900entriescan bestored inthe
address book.When themaximum number
has been reached, youcan delete existing
entr ies(Ypage 110),and then import new
ones.
Import ingcontacts X
Start thedata exchan geon the exter nal
device (seetheexter naldevice's operating
instr uctions).
or
X Insert anSD memory card.
X Select Address Book in
the address book
using the:=; buttonsand
press the9button toconf irm.
X Select Download Contacts and
press the
9 button toconf irm.
Am enu appears. X
Select FromMobile Phone ,
From The Memory
Card or
Receive Business Card(s) and
press 9tocon firm.
The contact sare import ed. Deleting
contacts X
With theaddress bookshown, select
Address Book and
press the9button to
con firm.
Am enu appears.
X Select Delete Contacts and
press the
9 button tocon firm.
X Select oneofthe following options:
R Interna lContact s R
From Mobile Phone R
From TheMemory Card R
Receive dBusines sCards R
Delete All Ap
rompt correspo ndingtoyou rselection
appears.
X Select Yes or
No and
press the9button
to con firm.
If you select Yes ,
the contact sare deleted
accor dingtoyour select ion.
If you select No ,
the process willbeaborted. Opera
tingthetelephone usingthe
mult ifunction steeringwheel Telephone
menu
Introd uction You
canoperate thetelephon eusing the
function sin the "Tele phone" menu,provided
you have connected itto the Mercedes-Benz
hands-free system.
The displa yin the "Tele phone" menudepends
on the status ofthe telephone.
X Switch onthe telephone andCOMAND.
X Press theV orU button toselect the
TEL displa
y.
Telephone isready toreceive calls Bluetooth
®
interface telephony: whetherthe
network provider's nameisdispla yed
depends onthe telephone connected. Operat
ingthe telephone usingthemult ifunction steeringwheel
113Telephone Z
Page 116 of 210

Accept
ingacall
When thetelep hone isrea dyfor use ,you can
accep tacallat any time .When acall is
incoming, youseethename ortelephone
number inthe multifunction display.
X Press the6 button onthe multifunction
steering wheel. Rejecting
orending acall
X Press the~ button onthe multifunctio n
steeri ngwhe el. Cal
linganumbe rfrom theCOM AND
phone book
You may select and diala numbe rfrom the
COMAND phonebookatany time, provid ed
you rmobile phone isready toreceive calls.
i Ifyou have imported contacts
(Y page 113), youcan select thephone
book entriesofthe mobile phonebyusing
the multifunct ionsteerin gwheel.
X Press theV orU button toselect the
TEL display
.
X Press the& or* button toopen the
phone bookinthe multifunct iondisplay .
X Press the& or* button repeatedly
until thedesired entryis highlighted.
The saved names aredisplay ed
alphabetically .
i Ifyou press andhold the& or*
button forlonger thanonesecond, the
multifunct iondisplay willskip from thefifth
entr yto the first entryfound under the
following letter.Release thebutton tostop. :
Mode
; Call er's name
X To mak eacall: press the6 button on
the multifunct ionsteerin gwheel.
i Ifthere areseveral numbers forthis
name, youseealist ofsub-ent ries.
X Press the6 button again.
The Connecting call... message
appears inthe multifunct iondisplay along
with thenumber beingdialed andthe
name, ifit is stored inthe phone book.
The phone number dialedisstored inthe
appropriate calllist.
X To exit without connectingacall: press
the ~ button onthe multifunctio n
steeri ngwhe el. Redial
ing
X Press theV orU button tosel ect the
TEL dis
pla y.
X Press the6 button.
You seethelast call dialed .
X To scroll throug hthe listo fdialed calls:
press the& or* buttonrepeat edly
unt ilthe desire dent ryisshown .
X To ma keacall: press the6 button. 114
Oper
ating thetelep hone using themu ltifunct ionsteer ingwheelTelep hone
Page 117 of 210
COMAN
Dfea tures ........ .......... ........... 116
Ra dio mod e........ .......... .................. .... 116
HD Radio <0023002300230023002300230023002300230023002300230023002300230023
0023002300230023002300230023002300230023002300230023002300230023
002300230023002300230023002300230023002300230023> 120
Sat ellite radio<0023002300230023002300230023002300230023002300230023002300230023
0023002300230023002300230023002300230023002300230023002300230023
0023002300230023> 121
Audio CD/DVD andMP3 mode ........ 126
MUSIC REGISTER<0023002300230023002300230023002300230023002300230023002300230023
00230023002300230023002300230023002300230023002300230023> 137
Media Interfacemode <0023002300230023002300230023002300230023002300230023002300230023
002300230023002300230023> 141
Audio AUXmode <0023002300230023002300230023002300230023002300230023002300230023
002300230023002300230023002300230023002300230023002300230023> 147 115Audio
Page 118 of 210

COMAN
Dfea tures
Thes eOper atingIn st ruc tions desc ribeall
st andar dand optionalequipm enta vail able
for you rCOMAND systematthe time of
purcha se.Cou ntry-specifi cdeviation sare
possible. Pleasenotethat your COMAND
system maynotbeequipped withallthe
features described. Rad
iomode General
information
i Portable electronicdevices inthe vehicle
may seriously impairradiorecept ion. Switching
onrad iomode
Opt ion 1 X
Press the$ function button .
The radio display appears.
Rad iomode: youwillhear thelast station
played onthe last waveband.
i Repeatedly pressingthe$ function
button switchesthrough thewavebands in
the order FM,AM, WB(Ypage 117)and
SatRadio. Pressingthe button againtakes
you back toFM radio mode.
Opt ion 2 X
Select Audio in
the main functionbarusing
the 9=; buttonsand press the
9 button tocon firm.
If radio mode wasthelast mode selected,
it will now beactive.
If anoth eraudio mode isswitch edon, you
can now switch toradio mode inthe audio
menu.
X Select Audio using
the9 button and
press the9button tocon firm.
The audio menu appears. :
Main function bar
; Current audiooperatin gmode
= Audio menu
X Select Radio (radio
mode) usingthe
9: buttonsand press the9button
to con firm. Radio
display
: Display window withstationselect ion
; Preset position ofthe select edstat ion
= Name ofthe select edstat ion
? Frequenc yof the select edstat ion
A Sound settings
B Waveband submenu(FM,AM,WB)
C Todisplay radiotext(FM and AMdigita l
only )
D Memo ryfuncti ons
E Radio functi ons 116
Radio
modeAudio
Page 119 of 210

Switching
wavebands
Option 1 You
canswitch theradio between theFM, AM
and WBwaveband.
X Press the$ functionbutton repeatedly
until thedesired waveband isselected.
Option 2 X
Press :tohighlight thesubmenu.
X To selec tawaveband: press the; or
= button repeatedlyuntil thecurrently
sel ected waveba ndishig hlighted (FM ,
AM ,
or WB ).
X Press 9.
The waveba ndsub menu opens. 1
Wave band submenu
The #dot indicates thecurrently
sel ected waveba nd.
X Sele ctthe waveba nd(FM, AM,orWB). Sel
ecting astatio n
Se lecti ng stati onsusi ng the stati on
se arc hfuncti on X
Press the; or= button whenthe
disp lay/se lectio nwindow isact ive.
or
X Press theE orF buttononthe
COMA NDcontrol panel.
St ation searchscan sup ordown andstops
at the nextst ation found. Selecting
stations viathesta tion
pr esets Quick
setting
X Press anumb erkey, such asl.
Direct lyin thesta tion presets
X Selec tPres ets (radio
mode) using
the :=; buttons and press the
9 butt ontocon firm .
or
X Press the9butt onwhen thedisplay/
selec tionwindow isact ive.
The station presetmenu appears. The#
dot indicat esunder which preset the
curren tlyselect edstat ionisstor ed. St
ation preset sin radio mode
X Select achann elusing the9:
button sand press the9button tocon firm.
Tuning instat ions byentering the
freq uency manually This
function isavailable inradio mode.
Opt ion 1
X Press theU button .
Opt ion 2
X Select Radio in
the radio display using
the :=; buttonsand press the
9 button tocon firm. Rad
iomod e
117Audio
Page 120 of 210

X
Sel ect EnterFrequency and
pressthe
9 button toconfi rm.
Irre spe ctive ofthe optionused ,an inp ut
menu willap pe ar.
X Enter afreq uency using the numb erkey s.
CO MAND tunesin to the freq uency
enter ed. Wave
band Fre
quen cy AM 530
-1710 kHz FM 87.8
-107.9 MHz WB
(Weather Band ) Wea
ther report
cha nnel s i
Youcan onlyenter currently permi tted
numb ers.
i Ifyo uenter afreq uency inthe FMorAM
wa veb and swh ich isou tsid ethe freq uency
rang e,CO MAND tunesin to the next lowe r
freq uency. Sto
ring astatio n
Sto ringstati onsmanua lly The
reareten presets availabl e for each
wa veb and (FM,AM, andSatR adio).
Qui cksav e
X Pre ssand holdanum berk ey, e.g. l,
until youhear aton e.
The stationisstor ed.
Directly inthe stat ionpresets
X Press the9button whenthedisplay/
select ionwindow isactive.
or
X Select Presets in
the radio display using
the :=; buttonsand press the
9 button tocon firm.
In both cases, thestationpreset sappear.
The #dot indicat esunder which preset
the curren tlyselect edstat ionisstor ed. St
ation preset s
X Select apreset usingthe9:
button sand press andhold the9button
until youhear aton e.
The stationisstor edunder thepreset .
Stor ingstat ions automat ically This
function automatic allystoresstat ions
with adequate reception.Thesearch startsat
the lowest frequenc y.Ifstat ions arefound,
COMAND storesthem startingatmemory
slot 1.Storing iscomplet ewhen thehighest
frequenc yhas been reached orwhen 10
stat ions have been found. Stations stored
manually inthe preset memory willbelost. It
is possible thatCOMAND doesnotfillall
memory slotswhen storing.
Opt ion 1
X Press the9button whenthedisplay/
select ionwindow isactive.
X Select Autosto re in
the preset menuusing
the 9: buttonsand press the9
button tocon firm.
Opt ion 2
X Select Presets in
the radio display using
the :=; buttonsand press the
9 button tocon firm.
X Select Autosto re and
press the9button
to con firm.
In both cases, COMAND searchesfor
stat ions thatcanbereceived. Youwillsee
a message tothis effec t.The available 118
Rad
iomod eAudio
 1
1 2
2 3
3 4
4 5
5 6
6 7
7 8
8 9
9 10
10 11
11 12
12 13
13 14
14 15
15 16
16 17
17 18
18 19
19 20
20 21
21 22
22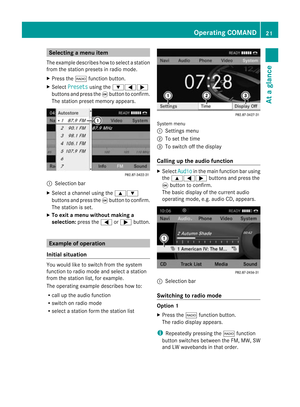 23
23 24
24 25
25 26
26 27
27 28
28 29
29 30
30 31
31 32
32 33
33 34
34 35
35 36
36 37
37 38
38 39
39 40
40 41
41 42
42 43
43 44
44 45
45 46
46 47
47 48
48 49
49 50
50 51
51 52
52 53
53 54
54 55
55 56
56 57
57 58
58 59
59 60
60 61
61 62
62 63
63 64
64 65
65 66
66 67
67 68
68 69
69 70
70 71
71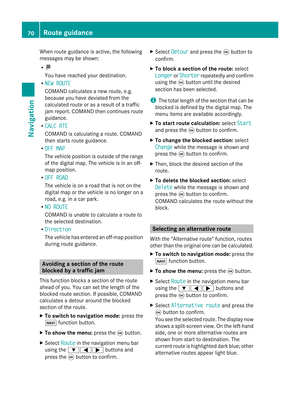 72
72 73
73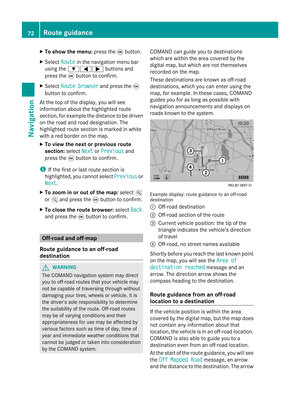 74
74 75
75 76
76 77
77 78
78 79
79 80
80 81
81 82
82 83
83 84
84 85
85 86
86 87
87 88
88 89
89 90
90 91
91 92
92 93
93 94
94 95
95 96
96 97
97 98
98 99
99 100
100 101
101 102
102 103
103 104
104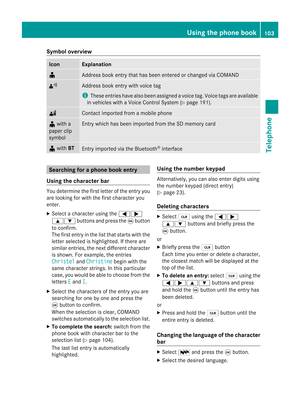 105
105 106
106 107
107 108
108 109
109 110
110 111
111 112
112 113
113 114
114 115
115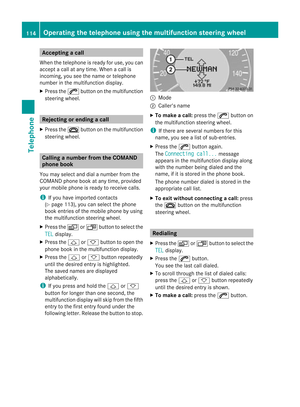 116
116 117
117 118
118 119
119 120
120 121
121 122
122 123
123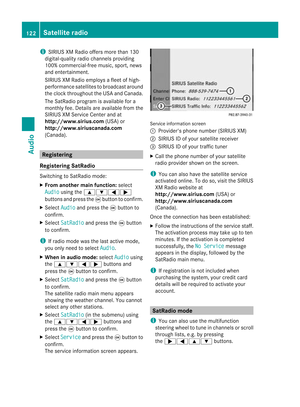 124
124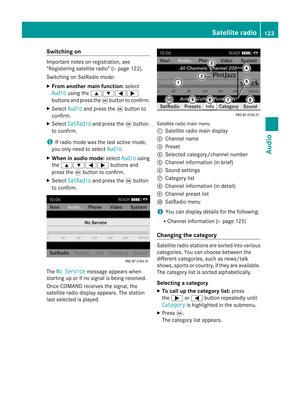 125
125 126
126 127
127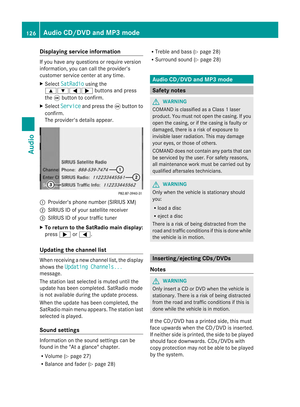 128
128 129
129 130
130 131
131 132
132 133
133 134
134 135
135 136
136 137
137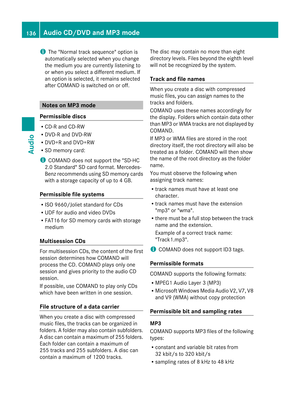 138
138 139
139 140
140 141
141 142
142 143
143 144
144 145
145 146
146 147
147 148
148 149
149 150
150 151
151 152
152 153
153 154
154 155
155 156
156 157
157 158
158 159
159 160
160 161
161 162
162 163
163 164
164 165
165 166
166 167
167 168
168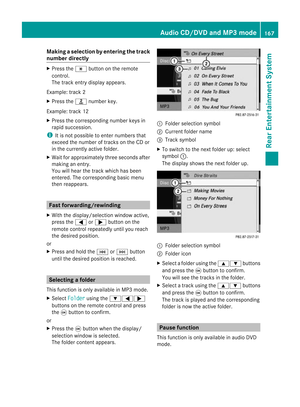 169
169 170
170 171
171 172
172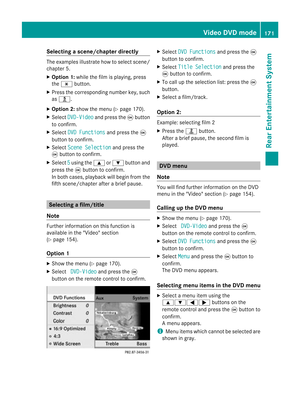 173
173 174
174 175
175 176
176 177
177 178
178 179
179 180
180 181
181 182
182 183
183 184
184 185
185 186
186 187
187 188
188 189
189 190
190 191
191 192
192 193
193 194
194 195
195 196
196 197
197 198
198 199
199 200
200 201
201 202
202 203
203 204
204 205
205 206
206 207
207 208
208 209
209