Page 81 of 210

X
Sel ect the destina tionusing the
9: buttons andpressthe 9button
to confi rm.
The destina tionaddre ssissho wn.
X Sel ect Save and
pressthe 9button to
confi rm.
Yo ucan now select stora geopti ons
(Y page 79).
Se lecti ng sto rage options X
To save thedestinatio nwi thout a
name :sel ect SaveWit houtNam e and
pre ssthe 9button toconfi rm.
CO MAND storesthe destina tioninthe
de stina tionmemo ryand uses the addre ss
as the destina tionname .
X To save thedestinatio nwi th aname :
sel ect SaveWit hNam e and
pressthe 9
bu tton toconfi rm.
X Sel ect acate gory,e.g. Home ,
and pressthe
9 button toconfi rm.
The inputmenu appe ars with data fields
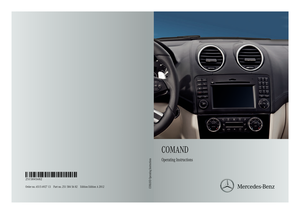
and thecharacte rba r. Examp
ledispl ay:s avin gad estin ation withaname
: Select eddata fieldwithcursor
; Character bar
X Proceed asdescribed under"Entering
charact ers"inthe Enterin gcharact ersin navigation
mode(entering acity)" section
(Y page 23).
X Then select¬ andpress the9butt on
to con firm .
COMA NDstores thedest inationunder the
name entered.
Assigning adesti nation toan address
book entry An
addres swith completeaddre ssdata that
is suit able fornav igat ioncan beassign edto
an already existing addres sbook entry.You
can then late rst art rout eguidan cetothis
addre ssstraigh tfrom theaddress book
(Y pag e112).
X Select Assign toAddress BookEntry and
press the9button toconfirm.
X Select acategory ,e.g. Home ,
and press the
9 button toconfirm.
You willsee theaddress book either with
the chara cterbaroras asele ction list.
X To selectan address bookentry:
proceed asdescri bedinthe "Sea rching for
an add ress book entry" section
(Y pag e109).
COMAND storesthedata ifthe address
book entry selected does notyetcontain
naviga bleadd ress data.
If the sele cted address book entry already
contains navigableadd ress data,a prompt
wil lapp ear asking whethe ryou wish to
overwrite theexistin gdata.
X Select Yes or
No and
press the9button
to conf irm.
If you select Yes ,
COMAND storesthedata. Dele
ting adesti nation orthehom e
ad dress from thed esti nation mem ory
X To switch onnav igat ionmod e:pres sth e
Ø function butt on.
X To show themen u:pres sth e9 butt on. Destina
tionmem ory
79Naviga tion Z
Page 82 of 210

X
Sel ect Destination in
the navi gation
menu baru sing the:=;
buttons andpress the9button toconfirm.
X Select FromMemory and
press the9
button toconfirm.
You willsee thedestination memorylist
either withthecharacter bar(option 1)or
as aselection list(option 2).
X Option 1–d esti nation mem orylistwith
char acterbar :proc eedasdesc ribed inthe
"En tering char acters" section(Y page 23).
X Opt ion2–d esti nation mem orylistasa
selecti onlist :selec tadestination using
the 9: buttons and press the9
butt ontocon firm.
The address dataappears forthe select ed
ent ry.
X Select Delete and
press the9butt onto
con firm.
Ap rompt appears asking whethe ryou wish
to delete thedestination .
X Select Yes or
No and
press the9button
to conf irm.
If you select Yes ,
COMAND deletesthe
destination .You see amessage tothis
effect .
If you select No ,
the process willbe
canceled.
i Ifthe navigable addressdataforthe
destinat ionbeing deleted isalso assigned
to an address bookentry,COMAND will
also delete thisdata from there. Ifthe
correspon dingaddress bookentrydoes
not cont ainany further data,suchas
telephone numbers,COMAND deletesthe
entir eaddress bookentry. Previous
destinations Introdu
ction
COMAND automatically storestheprevious
destinat ionsforwhich theroute calculation
was start ed.Ifthe memory isfull, COMAND deletes
theoldest destination .You can also
store onedestination fromthelistofprevious
destination sin the destination memory.Itwill
be stored therepermanent ly. Storing
adesti nation permanent lyin
th edest inationmem ory
X Proc eedasdesc ribed inthe"Fr om thelist
of prev ious destinations"sec tion
(Y page 78). St
orin gth evehicle positioninthelist
of previous destinations
X To switch onnav igat ionmod e:pres sth e
Ø function butt on.
X To show themen u:pres sth e9 butt on.
X Sele ctPos ition in
thenav igat ionmen u
bar usin gth e:=; buttonsand
pres sth e9 butt ontocon firm.
X Sele ctSav e Veh
icle Pos
ition and
pres s
th e9 butt ontocon firm.
COMA NDstores thecur ren tveh icle
posit ionasadest inationinthelist of
prev ious destinations. St
orin gth ecross hairposit ioninthe
list ofprevious destinations
Rou teguid ance notactive Ac
rossha irapp ears onthe map ifyou have
moved themap manua lly.Y ou can store the
crosshair positionasadestination inthe list
of previous destination s.
X To show themenu: pressthe9button .
X Select Position in
the navigation menu
bar using the:=; buttonsand
press the9button toconf irm.
X Select SaveCrosshair Position and
press the9button toconf irm. 80
Previous
destinationsNavigation
Page 83 of 210

Route
guidanc eis acti ve X
To sho wthe men u:pre ssthe 9button.
X Sel ect Posi tion in
the navi gation menu
ba ru sing the:=; buttonsand
press the9button toconfirm.
X Select Destination PositionMap and
press the9button toconfirm.
You willsee themap withacrosshair atthe
destination.
X To show themenu: pressthe9button.
X Select Position in
the navigation menu
bar using the:=; buttonsand
press the9button toconfirm.
X Select SaveCrosshair Position and
press the9button toconfirm.
COMAND storesthecrosshair positionas
a destination inthe listofprevious
destinations. Del
eting oneofthe previous
destinations
X To switch onnavigation mode:pressthe
Ø function button.
X To show themenu: pressthe9button.
X Select Position in
the navigation menu
bar using the:=; buttonsand
press the9button toconfirm.
X Select FromLastDestinations and
press the9button toconfirm.
The listofprevious destinations appears.
X Select thedesired destination andpress
the 9button toconfirm.
The destination addressappears.
X Select Delete and
press the9button to
confirm.
Ap rompt appears, asking whethe rthe
entr yshould bedeleted. X
Select Yes or
No and
press the9button
to confirm .
If you select Yes ,
the entr yis deleted.
If you select No ,
the process willbe
canceled. Map
operation andsettings Notes
Company logosdisplayedonthe map are
trademarks ofthe respective companies and
used solely forthe purpose ofindicating the
location ofthese companies. Theuseofsuch
logos forthe map does notindicate approval,
support oradvertisement ofthe navigation
system bythe respective companies. Adjust
ingthe map scale
X To call upthe scale bar:press theU
or T button.
The map scale appea rsat the upper edge
of the screen.
X To zoom inthe map :press theU
button asoften asnecessary.
X To zoom outthemap :press theT
button asoften asnecessary. Map
withscale
: Map scale
; Currently setmap scale asindicated by
the needle onthe scale bar
= Current mapscale expressed asanumber
with unit Map
operat ionand settings
81Navigation Z
Page 84 of 210
. Moving
themap
Showin gthe crosshair X
To hide themenu: pressthe9 button")
Unit
ofmeasurement =inthe COMAND
displa ydepends onthe selection madeforthe
instrument cluster(seethevehicle
Operator's Manual). Moving
themap
Showin gthe crosshair X
To hide themenu: pressthe9 button
and when theFull Screen menu
itemis
shown, pressthe9button.
X To scroll themap: press the=;
9: buttons.
Ac rossha irapp ears onthe map. Ifyou
press oneofthe buttons again,the map
moves underthecrossha irin the
correspo ndingdirection. :
Current vehicl eposi tion
; Cross hair
= Detail sof the crossha irposi tion
? Map scale selected
Displ ay= may bethe name ofastreet, for
exampl e,provid edthe digitalmap contains
the necessary data.Oritm aysho wthegeo-
co ord inat eposi tiono fthe crosshair ifthe
Geo-coordinates displa
yis switched on
(Y page 85). Hiding
thecrosshair andcentering the
map onthe vehicle position or
destination X
Press thek button.
The crosshair disappearsand themap is
set tothe vehicle position.
or
X Set themap tothe vehicle position; seethe
explanation below. Centering
themap onthe vehicle or
destination position
Centering themap onthe vehicle
position X
To show themenu: pressthe9button.
X Select Position in
the navigation menu
bar using the:=; buttonsand
press the9button toconfirm .
X Select Vehicle Position Map and
press
the 9button toconfirm or,ifthe crosshair
is shown, pressthe% backbutton.
This hides thecrosshair.
Centering onthe destination X
To show themenu: pressthe9button.
X Select Position in
the navigation menu
bar using the:=; buttonsand
press the9button toconfirm .
X Select Destination PositionMap and
press the9button toconfirm .
The crosshair iscent ered onthe
destination. 82
Map
operat ionand settingsNavigat ion
Page 85 of 210

Map
display
Setting themap orientation Map
orientati on
: Currently setmap orientati on
The followi ngdisp laymodes arepossi ble:
R 0 North orientati on(the map view is
disp layed sothat north isalw aysup)
R ¤ Orientati oninthe dire ction oftravel (the
map isdisp layed sothat theheading is
alw aysup; the orange pointofthe icon
poi nts north)
R ¤ Bird's-e yeview (themap isdisp layed so
that theheading isalw aysup, the map
projection reproducesthecurvatu reofthe
earth andtheorange pointofthe icon
poi nts north)
X To show themenu: pressthe9button.
X Select Navi in
the mainfunction barusing
the 9=; buttonsandpress the
9 button toconfirm.
X Select MapDisplay and
press the9
button toconfirm.
The äicon indica testhe current setting. Map
displaymenu
: Map orientati onoptions
; Toset pointofinterest icons
X Select North Up ,
Heading Up or
Bird's- eye View usi
ng the 9: buttonsand
press the9button toconfirm.
X To exitthe menu: pressthe=
or ; button.
The map orientati onchanges accordingly.
Poi ntofintere stico nson the map You
cansetthe points ofinterest youwishto
have displayed asicons onthe map. Points of
interest are,forexampl e,gas stations, hotels,
cinemas andrestau rants.
The followi ngsettings arepossi ble:
R Standar dSymbols Icon
displaydetermi nedbythe factory
settings
R Persona lSymbols You
candetermi nethe icons yourself
R No Symbols X
To show themenu: pressthe9button.
X Select Navi in
the mainmenu barusing the
9=; buttonsand press the9
button tocon firm.
X Select MapDisplay and
press the9
button tocon firm. Map
opera tionandsettings
83Navigation Z
Page 86 of 210

X
Sel ect StandardSymbols ,
Per sonal Sym
bols or
No Sym bols .
If yo usel ect Per sonal Sym
bols ,
the list of
poi nts ofinter estappe ars .
X To switchthe ico ndisplay on/off:select
the pointofinterest using the 9:
buttons andpress the9button toconfirm.
Dependi ngon the previ oussetting, the
icons willbe swi tched onO oroff ª.Y ou
can switch onthe icon display sfor more
than onepoint ofinter est.
i The listshows allicons thatarecont ained
on the digital mapacross allcount ries.
However, notallpoints ofinter estare
availa bleinall count ries.Asaresult, certain
point ofinter esticons maynotbedisplay ed
on the map, evenifthe icon display is
switched on.
X To exit themenu: pressthe=
or ; button . Map
informa tioninthe display
Displaying mapinforma tion During
routeguidance, youcan have map
inform ationdisplay edatthe bottom edgeof
the display .
X To show themenu: pressthe9button .
X Select Navi in
the main menu barusing the
9=; buttonsand press the9
button toconf irm.
X Select Information On Map and
press the
9 button toconf irm.
The äicon indicates thecurrent setting.
X Select Arrival Time/Distance ,
Current Street ,
Geo-coordina tes or
None and
press the9button toconf irm.
X To exit themenu: pressthe=
or ; button . Arrival
time/dist ancetothe destinat ion Arrival
time/dist ancedisplay switched on
: Icon fordestination
; Distan cetothe destination
= Icon forestimated timeofarrival
? Estimated timeofarrival
You canonly seethis display duringroute
guidance. Whenscrolling themap
(Y page 82),youwillsee data, e.g.road
names, depending onthe crosshair position
if the digital mapsupports thisdata.
i During routecalculation, orifthe vehicle
is traveling onanon- digitized road,the
linear distance tothe destination isshown.
In this case, thedisplay willbegrayed out.
Road display Road
display active
: Road name ordesignation 84
Map
operat ionand settingsNavigation
Page 87 of 210

; Current vehicle position: latitude
coordina tes
= Current vehicle position")
Geo-c
oordinate display Geo-coord
inatedisplayactive
: Current heightabo veavera gesea level
(rou nded tothe nearest 100ft)
; Current vehicle position: latitude
coordina tes
= Current vehicle position: longitu de
coordina tes
? Numbe rofG PS satellites currentlybeing
used
There mustbesufficient GPSrecept ionforall
displays tobe shown. Ifthis isnot thecase,
the display willbegrayed out.Height
display :may varyfrom theactual value,
because thenavigation systemusestheGPS
signal forthe calculation.
"None" menuoption Display
switched off
: Currently setmap orient ation
i During the"Move map"function,youcan
see additional datadepending onthe
position ofthe crosshair, suchasaroad
name, ifthe digital mapsupports thisdata. Additional
settings Avoiding
anarea
General information COMAND
makesitpossible toavoid areas
you donot wish todrive through.
If you activat eor deactivat earoute block
while route guidance isactive, COMAND will
calculate anew route. Ifyou activat eor
deactivat earoute block whileroute guidance
is inact ive,COMAND willuse thenew setting
for the next route guidance.
i Freeways withinblocked areasarealway s
taken intocons ideration inthe route
calculation.
This funct ionisnot availabl ewhile the
vehicle isin motion .
X To switch tonavigation mode:pressthe
Ø functionbutton .
X To show themenu: pressthe9button .
X Select Navi in
the main functionbar using
the 9=; buttonsand press the
9 button toconf irm.
X Select Block area and
press the9
button toconf irm.
If you have notyetsetanarea tobe
avoided, themap withthecrosshair
appears (option1).
If you have already setone ormore areas
to be avoided, alist appears (option2).
Option 1:the map appears Addit
ional settings
85Navigation Z
Page 88 of 210

X
To scrol lthe map: pressthe =;
9: buttons.
X To setthe map scale :pre ssthe U or
T button.
The scaleba ra ppears.
X Press theU orT buttonagain.
The map view iszoom edinor out.
X To add anarea tobe avoided :press the
9 butt on.
Ar ed square onthe map delimits thearea
to be avoided. X
To set the size ofthe squa re:press the
U orT button .
The square isenlarged orreduced.
X To confirm thesetting: pressthe9
button .
The listappears. Thepreviously selected
area tobe avoided hasbeen added and
activat ed.
X Ifyou want touse listfunc tions,proceed
accor dingtothe instruct ions described
under "Option 2:the listappears". Opt
ion 2:the listappears Ex
ample display: "Avoidarea"list
X Select Avoid newarea using
the
9: buttonsand press the9button
to con firm.
The map withthecross hairappears.
X Proceed accordingtothe instruct ions
under "Option 1:the map appears" ifyou
wish toset anew area tobe avoided.
The following illustration showsanexample
with twoareas thataretobe avoided. :
Area curren tlybeing avoided
; New areatobe avoided, thesize ofwhich
can stillbeadjusted
Switching anavoided areaon/off X
Select anent ryinthe listusing the
9: buttonsand press the9button
to con firm.
The avoided areaisswitch edon O oroff
ª depending onthe previous status. 86
Addit
ional settingsNavigation
 1
1 2
2 3
3 4
4 5
5 6
6 7
7 8
8 9
9 10
10 11
11 12
12 13
13 14
14 15
15 16
16 17
17 18
18 19
19 20
20 21
21 22
22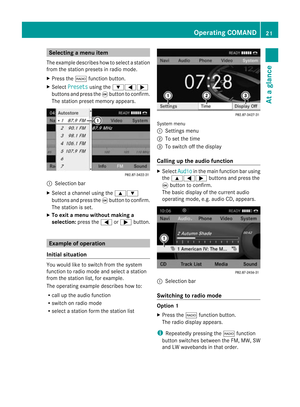 23
23 24
24 25
25 26
26 27
27 28
28 29
29 30
30 31
31 32
32 33
33 34
34 35
35 36
36 37
37 38
38 39
39 40
40 41
41 42
42 43
43 44
44 45
45 46
46 47
47 48
48 49
49 50
50 51
51 52
52 53
53 54
54 55
55 56
56 57
57 58
58 59
59 60
60 61
61 62
62 63
63 64
64 65
65 66
66 67
67 68
68 69
69 70
70 71
71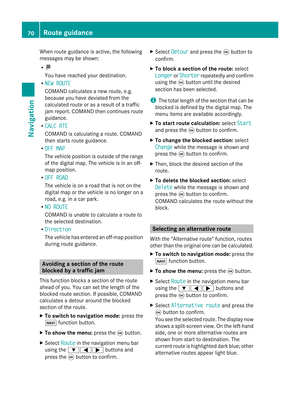 72
72 73
73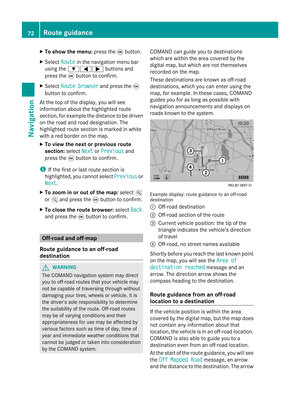 74
74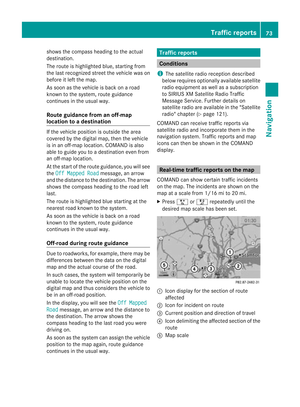 75
75 76
76 77
77 78
78 79
79 80
80 81
81 82
82 83
83 84
84 85
85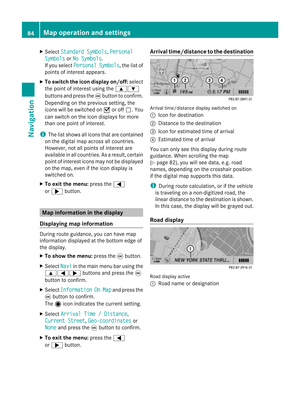 86
86 87
87 88
88 89
89 90
90 91
91 92
92 93
93 94
94 95
95 96
96 97
97 98
98 99
99 100
100 101
101 102
102 103
103 104
104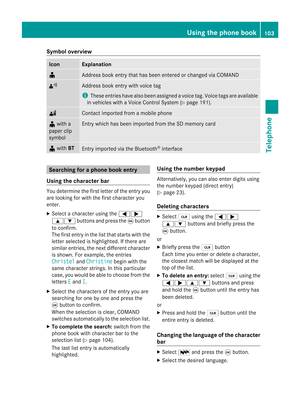 105
105 106
106 107
107 108
108 109
109 110
110 111
111 112
112 113
113 114
114 115
115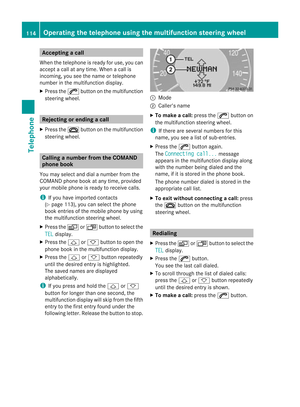 116
116 117
117 118
118 119
119 120
120 121
121 122
122 123
123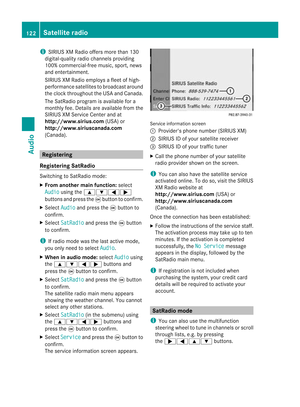 124
124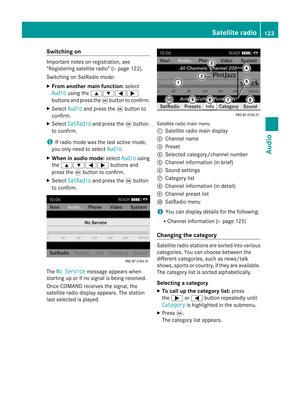 125
125 126
126 127
127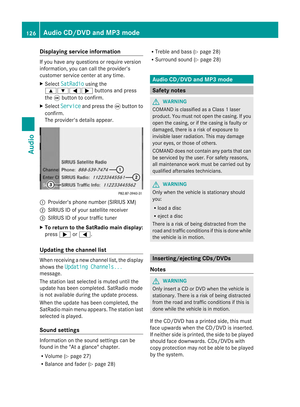 128
128 129
129 130
130 131
131 132
132 133
133 134
134 135
135 136
136 137
137 138
138 139
139 140
140 141
141 142
142 143
143 144
144 145
145 146
146 147
147 148
148 149
149 150
150 151
151 152
152 153
153 154
154 155
155 156
156 157
157 158
158 159
159 160
160 161
161 162
162 163
163 164
164 165
165 166
166 167
167 168
168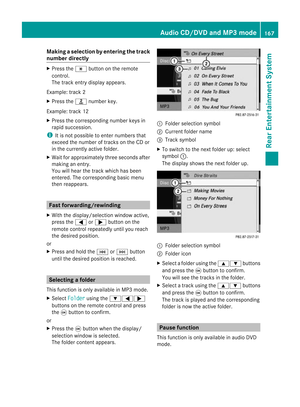 169
169 170
170 171
171 172
172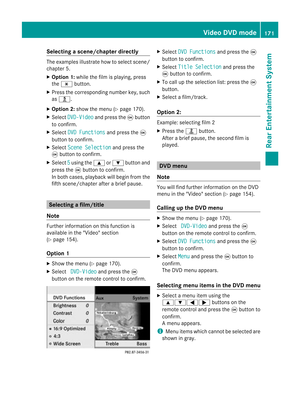 173
173 174
174 175
175 176
176 177
177 178
178 179
179 180
180 181
181 182
182 183
183 184
184 185
185 186
186 187
187 188
188 189
189 190
190 191
191 192
192 193
193 194
194 195
195 196
196 197
197 198
198 199
199 200
200 201
201 202
202 203
203 204
204 205
205 206
206 207
207 208
208 209
209