2012 MERCEDES-BENZ GLK SUV change wheel
[x] Cancel search: change wheelPage 10 of 381

Bulbs
see Changing bulbs C
Calling up a fault see Display messages
Car
see Vehicle
Care
Automatic car wash .......................318
Carpets .......................................... 323
Display ........................................... 322
Exterior lighting ............................. 320
Gear or selector lever ....................322
High-pressure cleaner .................... 318
Interior ........................................... 322
Matt paintwork .............................. 319
Notes ............................................. 317
Paint .............................................. 319
Plastic trim .................................... 322
Reversing camera ..........................321
Roof lining ...................................... 323
Seat belt ........................................ 323
Seat cover ..................................... 323
Sensors ......................................... 321
Steering wheel ............................... 322
Tail pipes ....................................... 321
Trim pieces .................................... 323
Washing by hand ........................... 318
Wheels ........................................... 319
Windows ........................................ 320
Wiper blades .................................. 320
Wooden trim .................................. 323
Car wash (care) ................................. 318
CD player/CD changer (12-button
multifunction steering wheel) .......... 233
Central locking Automatic locking (on-board com-
puter) ............................................. 241
Locking/unlocking (key) ..................76
Centre console
Lower section .................................. 38
Upper section .................................. 37
Changing bulbs
Cornering light function .................121
Dipped-beam headlamps ...............120
Important safety notes ..................118Main-beam headlamps ................... 120
Overview of bulb type
s.................. 119
Parking lamps (front) .....................120
Reversing lamps ............................ 121
Standing lamps .............................. 120
Turn signals (front) ......................... 120
Turn signals (rear) ..........................121
Child-proof locks
Important safety notes ....................64
Rear doors ....................................... 64
Children
In the vehicle ................................... 54
Restraint systems ............................ 54
Child seat
Automatic recognition .....................56
ISOFIX .............................................. 57
On the front-passenger sea t............ 55
Problem (malfunction) .....................60
Recommendations ...........................62
Suitable positions ............................ 60
Top Tether ....................................... 58
Cigarette lighter ................................ 307
Cleaning Mirror turn signal ........................... 320
Trailer tow hitch ............................. 321
Climate control
Auxiliary heating/ventilation .......... 137
Controlling automatically ...............132
Convenience opening/closing
(air-recirculation mode )................. 136
Cooling with air dehumidification ..131
Demisting the windows .................. 134
Demisting the windscreen .............134
Important safety notes ..................128
Indicator lamp ................................ 132
Information on using
THERMOTRONIC automatic cli-
mate control .................................. 131
Notes on using THERMATIC auto-
matic climate control .....................129
Overview of systems ......................128
Problems with cooling with air
dehumidification ............................ 132
Problem with the rear window
heating .......................................... 135
Rear control panel .........................130
Setting the air distribution .............133
Setting the airflow .........................134 Index
7
Page 152 of 381
i
You can start the engine without preglow
if the engine is warm.
Using KEYLESS-GO to start the engine G
WARNING
Your vehicle can be started using a valid KEY-
LESS-GO key. For this reason, children should
never be left unsupervised in the vehicle.
Always take the key with you when leaving the
vehicle, even if you are only leaving it for a
short time.
i The Start/Stop button can be used to
start the vehicle manually without inserting
the key into the ignition lock. The key must
be in the vehicle and the Start/Stop button
must be inserted in the ignition lock. This
mode for starting the engine operates inde-
pendently of the ECO start/stop automatic
engine start function.
X Depress the brake pedal and keep it
depressed.
X To start a petrol engine: press the Start/
Stop button (Y page 147) once.
The engine starts.
X To start a diesel engine: press the Start/
Stop button (Y page 147) once.
Preglow is activated and the engine starts. Pulling away
Manual transmission X
Depress the brake pedal and keep it
depressed.
X Fully depress the clutch pedal.
X Shift to either first gear or reverse gear R.
X Release the parking brake (Y page 165).
X Release the brake pedal.
X Slowly release the clutch pedal and gently
depress the accelerator pedal.
! Change gear in good time and avoid spin-
ning the wheels. Otherwise, you could dam-
age the vehicle. i
Follow the shift recommendations in the
multifunction display for an economical
driving style (Y page 155).
i The vehicle locks centrally once you have
pulled away. The locking knobs in the doors
drop down.
You can open the doors from the inside at
any time.
You can also deactivate the automatic door
lock (Y page 241).
Automatic transmission G
WARNING
If the engine speed is above the idling speed
and you engage transmission position Dor
R, the vehicle could pull away suddenly. There
is a risk of an accident.
When engaging transmission position Dor R,
always firmly depress the brake pedal and do
not simultaneously accelerate.
i It is only possible to shift the transmission
from position Pto the desired position if
you depress the brake pedal. Only then is
the parking lock released.
X Depress the brake pedal and keep it
depressed.
X Shift the transmission to position Dor R.
X Release the parking brake (Y page 165).
X Release the brake pedal.
X Carefully depress the accelerator pedal.
i The vehicle locks centrally once you have
pulled away. The locking knobs in the doors
drop down.
You can open the doors from the inside at
any time.
You can also deactivate the automatic door
lock (Y page 241).
i Upshifts take place at higher engine
speeds after a cold start. This helps the
catalytic converter to reach its operating
temperature more quickly. Driving
149Driving and parking Z
Page 162 of 381
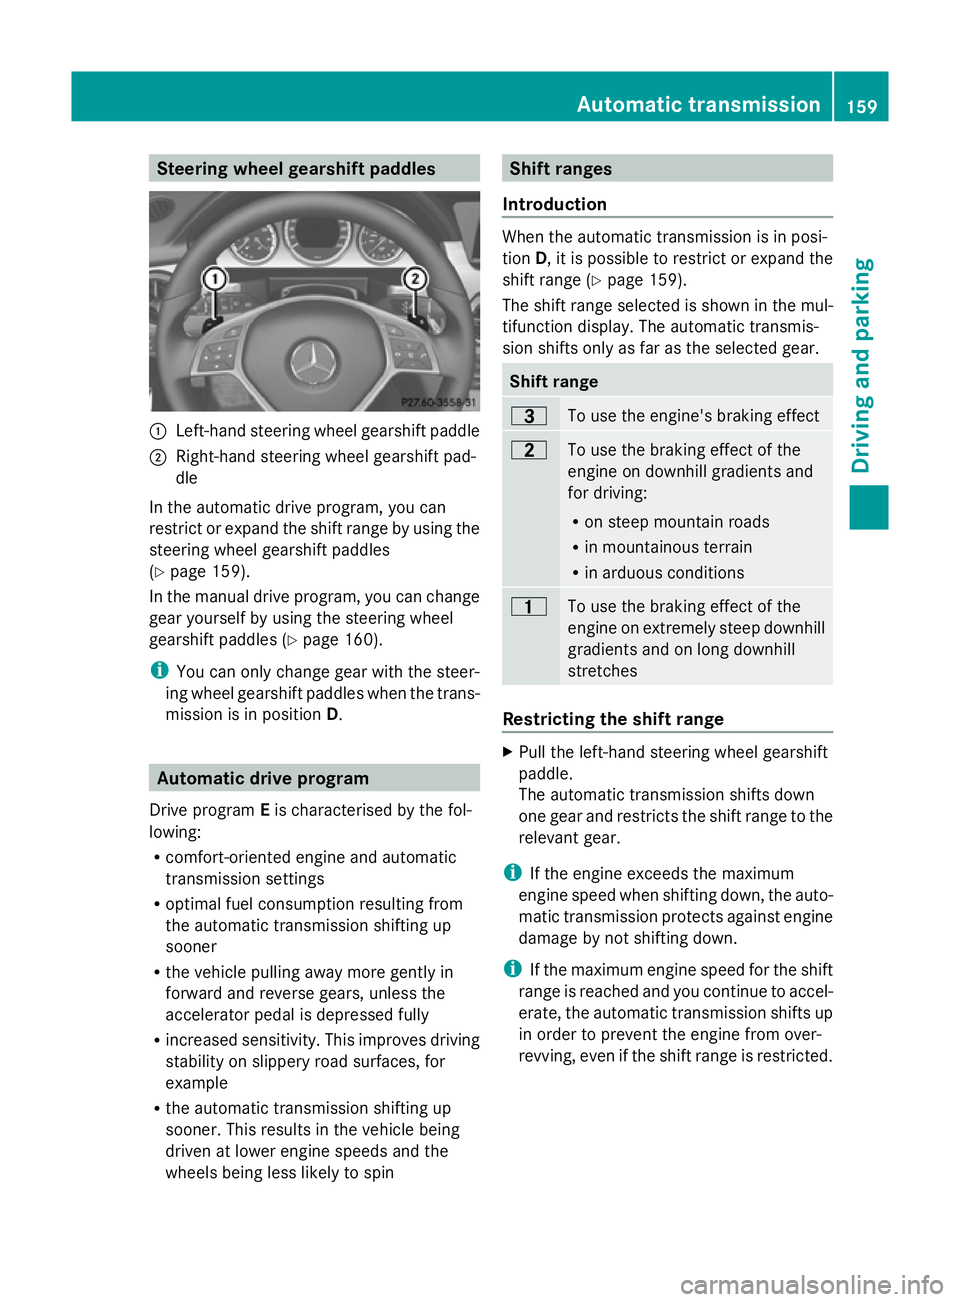
Steering wheel gearshift paddles
:
Left-hand steering wheel gearshift paddle
; Right-hand steering wheel gearshift pad-
dle
In the automatic drive program, you can
restrict or expand the shift range by using the
steering wheel gearshift paddles
(Y page 159).
In the manual drive program, you can change
gear yourself by using the steering wheel
gearshift paddles (Y page 160).
i You can only change gear with the steer-
ing wheel gearshift paddles when the trans-
mission is in position D.Automatic drive program
Drive program Eis characterised by the fol-
lowing:
R comfort-oriented engine and automatic
transmission settings
R optimal fuel consumption resulting from
the automatic transmission shifting up
sooner
R the vehicle pulling away more gently in
forward and reverse gears, unless the
accelerator pedal is depressed fully
R increased sensitivity. This improves driving
stability on slippery road surfaces, for
example
R the automatic transmission shifting up
sooner. This results in the vehicle being
driven at lower engine speeds and the
wheels being less likely to spin Shift ranges
Introduction When the automatic transmission is in posi-
tion
D, it is possible to restrict or expand the
shift range (Y page 159).
The shift range selected is shown in the mul-
tifunction display. The automatic transmis-
sion shifts only as far as the selected gear. Shift range
=
To use the engine's braking effect
5
To use the braking effect of the
engine on downhill gradients and
for driving:
R
on steep mountain roads
R in mountainous terrain
R in arduous conditions 4
To use the braking effect of the
engine on extremely steep downhill
gradients and on long downhill
stretches
Restricting the shift range
X
Pull the left-hand steering wheel gearshift
paddle.
The automatic transmission shifts down
one gear and restricts the shift range to the
relevant gear.
i If the engine exceeds the maximum
engine speed when shifting down, the auto-
matic transmission protects against engine
damage by not shifting down.
i If the maximum engine speed for the shift
range is reached and you continue to accel-
erate, the automatic transmission shifts up
in order to prevent the engine from over-
revving, even if the shift range is restricted. Automatic transmission
159Driving and parking Z
Page 163 of 381
Extending the shift range
X
Pull the right-hand steering wheel gearshift
paddle.
The shift range is derestricted.
Clearing the shift range restriction X
Pull and hold the right-hand steering wheel
gearshift paddle until Dis shown again in
the multifunction display.
The automatic transmission shifts from the
current shift range directly to D.
Selecting the ideal shift range X
Pull the left-hand steering wheel gearshift
paddle and hold it in position.
The automatic transmission shifts to the
gear which allows optimum acceleration
and deceleration. To do this, the automatic
transmission shifts down one or more
gears. Manual drive program
Activating the manual drive program Manual drive program
Mcan be selected
using the program selector button. In manual
drive program M, you can change gear using
the steering wheel gearshift paddles if the
transmission is in position D. The gear selec-
ted is shown in the multifunction display.
X Press the program selector button
(Y page 158) repeatedly until Mappears in
the multifunction display.
Upshifting X
Pull the right-hand steering wheel gearshift
paddle (Y page 159).
The automatic transmission shifts up to the
next gear. Downshifting X
Pull the left-hand steering wheel gearshift
paddle (Y page 159).
The automatic transmission shifts down to
the next gear.
i For maximum acceleration, pull the left-
hand steering wheel gearshift paddle until
the transmission selects the optimum gear
for the current speed.
Kickdown You can also use kickdown for maximum
acceleration in manual drive program
M.
X Depress the accelerator pedal beyond the
pressure point.
The transmission shifts to a lower gear
depending on the engine speed.
Deactivating the manual drive program X
Vehicles without the dynamic handling
package with sports mode: press the
program selector button (Y page 158)
repeatedly until Eor Sappears in the mul-
tifunction display.
X Vehicles with the dynamic handling
package with sports mode: press the
program selector button (Y page 158).M
is no longer shown in the multifunction dis-
play. 160
Automatic transmissionDriving and parking
Page 170 of 381
i
The ECO display summarises the driving
characteristics from the start of the journey
to its completion. Therefore, there are
dynamic changes in the bars at the start of
a journey. During a prolonged driving time,
these changes are smaller. For dynamic
changes, perform a manual reset.
For further information on the ECO display,
see (Y page 231). Short journeys
! Vehicles with a diesel particle filter: if
the vehicle is mostly driven for short dis-
tances, it is possible that malfunctions may
occur during the automatic cleaning of the
diesel particle filter. This may lead to fuel
collecting in the engine oil and cause
engine failure. Therefore, if you frequently
drive short distances, you should take a 20
minute trip on a motorway or rural road at
least every 500km. Braking
Important safety notes G
WARNING
If you shift down on a slippery road surface in
an attempt to increase the engine's braking
effect, the drive wheels could lose their grip.
This increases the risk of skidding and having
an accident.
Do not shift down for additional engine brak-
ing on a slippery road surface.
Downhill gradients On long and steep downhill gradients, you
must select shift range
1,2or 3in good time.
Take particular note of this when driving a
laden vehicle and when towing a trailer.
i This also applies if you have activated
cruise control or SPEEDTRONIC. This will use the braking effect of the engine,
so less braking will be required to prevent the
vehicle from gaining speed. This relieves the
load on the brake system and prevents the
brakes from overheating and wearing too
quickly.
Heavy and light loads
G
WARNING
The braking system can overheat if you leave
your foot on the brake pedal while driving.
This increases the braking distance and could
even cause the braking system to fail. There
is a risk of an accident.
Never use the brake pedal as a footrest. Do
not simultaneously depress both the brake
pedal and the accelerator pedal while driving.
! Depressing the brake pedal constantly
results in excessive and premature wear to
the brake pads.
If the brakes have been subjected to a heavy
load, do not stop the vehicle immediately.
Drive on for a short while. This allows the air-
flow to cool the brakes more quickly.
If the brakes have been used only moderately,
you should occasionally test their effective-
ness. To do this, brake more firmly from a
higher speed. This improves the grip of the
brakes.
Wet road surfaces If you have driven for a long time in heavy rain
without braking, there may be a delayed reac-
tion from the brakes when braking for the first
time. This may also occur after the vehicle has
been washed.
You have to depress the brake pedal more
firmly. Maintain a greater distance from the
vehicle in front.
After driving on a wet road or having the vehi-
cle washed, brake firmly while paying atten-
tion to the traffic conditions. This will warm
up the brake discs, thereby drying them more Driving tips
167Driving and parking Z
Page 174 of 381
R
Always keep the engine running and in gear
when driving on a downhill gradient. Acti-
vate DSR (Y page 213).
R Drive slowly and evenly, if necessary at
walking pace.
R Ensure that the wheels are in contact with
the ground at all times.
R Drive with extreme care on unknown off-
road routes where visibility is poor. For
safety reasons, get out of the vehicle first
and survey the off-road route.
R Check the depth of water before fording
rivers and streams.
R Look out for obstacles such as rocks, holes,
tree stumps and furrows.
R Always keep the side windows and the pan-
orama sliding sunroof closed during the
journey.
R Do not stray from marked routes or paths.
i Information about retrofitting special all-
terrain tyres is available from any qualified
specialist workshop.
Checklist before driving off-road X
Engine oil level: check the engine oil and
top it up if necessary.
X Tyre-change tool kit: check that the jack
is working and make sure you have the
wheelbrace, a robust tow cable and a fold-
ing spade in the vehicle.
X Wheels and tyres: check the tyre tread
depth and tyre pressure.
X Check for damage and remove any foreign
objects, e.g. small stones, from the
wheels/tyres.
X Replace any missing valve caps.
X Replace dented or damaged wheels.
Checklist after driving off-road Driving over rough terrain places greater
demands on your vehicle than driving on nor-
mal roads. After driving off-road, check the
vehicle. This allows you to detect damage promptly and reduce the risk of an accident
to yourself and other road users.
X Deactivate DSR ( Ypage 213).
X Clean the headlamps and rear lights and
check for damage.
X Clean the front and rear licence plates.
X Clean the wheels/tyres with a water jet and
remove any foreign objects.
X Clean the wheels, wheel arches and the
vehicle underside with a water jet; check
for any foreign objects and damage.
X Check whether twigs or other parts of
plants have become trapped. These
increase the risk of fire and can damage
fuel pipes, brake hoses or the rubber bel-
lows of the axle joints and propeller shafts.
X After the trip, examine without fail the
entire undercarriage, wheels, tyres, brakes,
bodywork structure, steering, chassis and
exhaust system for damage.
X After driving for extended periods across
sand, mud, gravel, water or in similarly dirty
conditions, have the brake discs, wheels,
brake pads/linings and axle joints checked
and cleaned.
X If you detect strong vibrations after off-road
travel, check for foreign objects in the
wheels and drive train and remove them if
necessary. Foreign objects can disturb the
balance and cause vibrations. Driving tips
171Driving and parking Z
Page 176 of 381
R
Observe the warnings for off-road driving
(Y page 170).
R Drive slowly.
R Accelerate gently and make sure that the
wheels are gripping.
R Avoid high engine speeds, except when
driving on sandy and muddy routes with
high driving resistance.
R Select a shift range appropriate to the gra-
dient.
R Before tackling steep downhill gradients,
select shift range 1.
Maximum gradient-climbing capability On good road surfaces, 70% of the maximum
gradient-climbing capability is available.
i If the load on the front axle is reduced
when pulling away on a steep uphill slope,
the front wheels have a tendency to spin.
4ETS recognises this and brakes the
wheels accordingly. The rear wheel torque
is increased and it is easier to pull away.
Hilltops When driving up an uphill gradient, slightly
reduce pressure on the accelerator immedi-
ately before reaching the brow of the hill.
Make use of the vehicle's own impetus to
travel over the brow.
This style of driving prevents:
R the vehicle from lifting off the ground on the
brow of a hill
R the vehicle from travelling too quickly down
the other side.
Driving downhill R
Drive slowly.
R Do not drive at an angle down steep
inclines. Steer into the line of fall and drive
with the front wheels aligned straight. Oth-
erwise, the vehicle could slip sideways, tip
and overturn. R
Before tackling steep downhill gradients,
select shift range 1.
R Activate DSR. If this is not sufficient, brake
gently. When doing so, make sure that the
vehicle is facing in the direction of the line
of fall.
R Check that the brakes are working normally
after a long downhill stretch.
i Off-road ABS is activated when the off-
road drive program is selected.
At speeds below 30 km/h, the front wheels
lock cyclically during braking. The digging-
in effect achieved in the process reduces
the stopping distance when driving off-
road. The steerability of the vehicle is con-
siderably reduced if the wheels lock. Driving systems
Cruise control
Important safety notes Cruise control maintains a constant road
speed for you. It brakes automatically in order
to avoid exceeding the set speed. You must
select a low gear in good time on long and
steep downhill gradients, especially if the
vehicle is laden or towing a trailer. On vehicles
with automatic transmission, select shift
range
1,2or 3. By doing so, you will make
use of the braking effect of the engine. This
relieves the load on the brake system and
prevents the brakes from overheating and
wearing too quickly. G
WARNING
Do not change down for additional engine
braking on a slippery road surface. This could
cause the drive wheels to lose their grip and
the vehicle could skid.
Use cruise control only if road and traffic con-
ditions make it appropriate to maintain a
steady speed for a prolonged period. You can
store any road speed above 30 km/h. Driving systems
173Driving and parking Z
Page 179 of 381
SPEEDTRONIC
Important safety notes G
WARNING
Never depress the brake pedal continuously
while the vehicle is in motion, e.g. never cause
the brakes to rub by applying constant slight
pedal pressure. This causes the brake system
to overheat, increases the braking distance
and can lead to the brakes failing completely. G
WARNING
Do not change down for additional engine
braking on a slippery road surface. This could
cause the drive wheels to lose their grip and
the vehicle could skid. G
WARNING
SPEEDTRONIC is only an aid designed to
assist driving. You are responsible for the
vehicle's speed and for braking in good time.
SPEEDTRONIC brakes automatically so that
you do not exceed the set speed. On long and
steep downhill gradients, especially if the
vehicle is laden or towing a trailer, you must
shift to a lower gear in good time or select
shift range 1,2or 3on vehicles with auto-
matic transmission. By doing so, you will
make use of the braking effect of the engine.
This relieves the load on the brake system and
prevents the brakes from overheating and
wearing too quickly. If you need additional
braking, depress the brake pedal repeatedly
rather than continuously.
You can set a variable or permanent limit
speed:
R variable for speed limits, e.g. in built-up
areas
R permanent for long-term speed restric-
tions, e.g. when driving with winter tyres
fitted (Y page 178)
i The speed indicated in the speedometer
may differ slightly from the limit speed
stored. Variable SPEEDTRONIC General notes
With the cruise control lever, you can operate
cruise control or DISTRONIC PLUS and vari-
able SPEEDTRONIC.
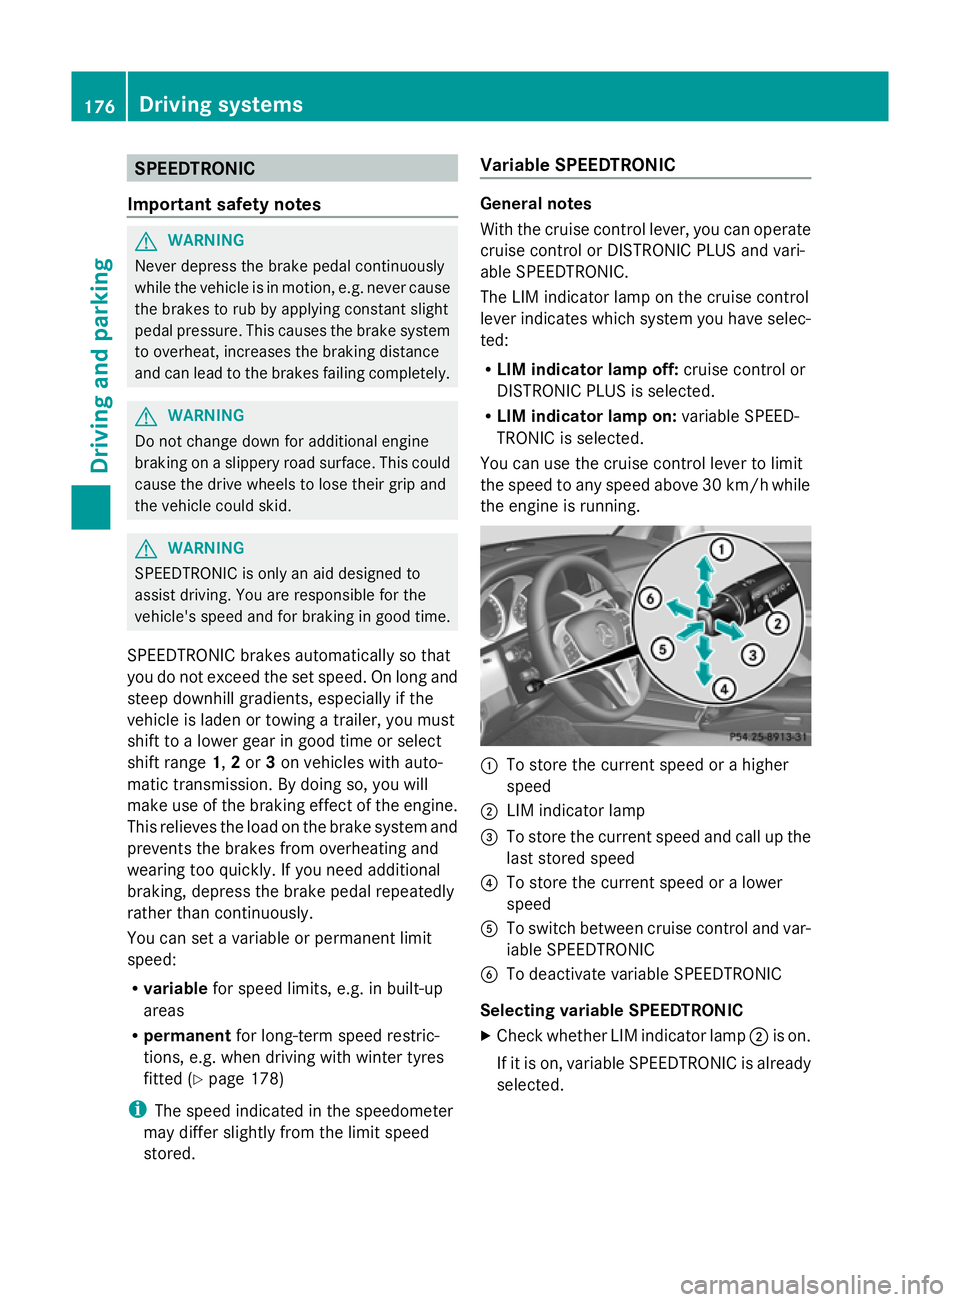
The LIM indicator lamp on the cruise control
lever indicates which system you have selec-
ted:
R LIM indicator lamp off: cruise control or
DISTRONIC PLUS is selected.
R LIM indicator lamp on: variable SPEED-
TRONIC is selected.
You can use the cruise control lever to limit
the speed to any speed above 30 km/hw hile
the engine is running. :
To store the current speed or a higher
speed
; LIM indicator lamp
= To store the current speed and call up the
last stored speed
? To store the current speed or a lower
speed
A To switch between cruise control and var-
iable SPEEDTRONIC
B To deactivate variable SPEEDTRONIC
Selecting variable SPEEDTRONIC
X Check whether LIM indicator lamp ;is on.
If it is on, variable SPEEDTRONIC is already
selected. 176
Driving systemsDriving and parking