2012 MERCEDES-BENZ GLK SUV change wheel
[x] Cancel search: change wheelPage 306 of 381
Detaching and storing the safety net
X
Detach guide rod ;from bracket :
(Y page 302).
X Press the red button on the upper and lower
guide rods.
X Fold the safety net and roll it up. To prevent
noise, roll the belt adjuster and belt hook
into the safety net.
X Put the safety net in the loading tray in the
stowage well under the luggage compart-
ment floor. X
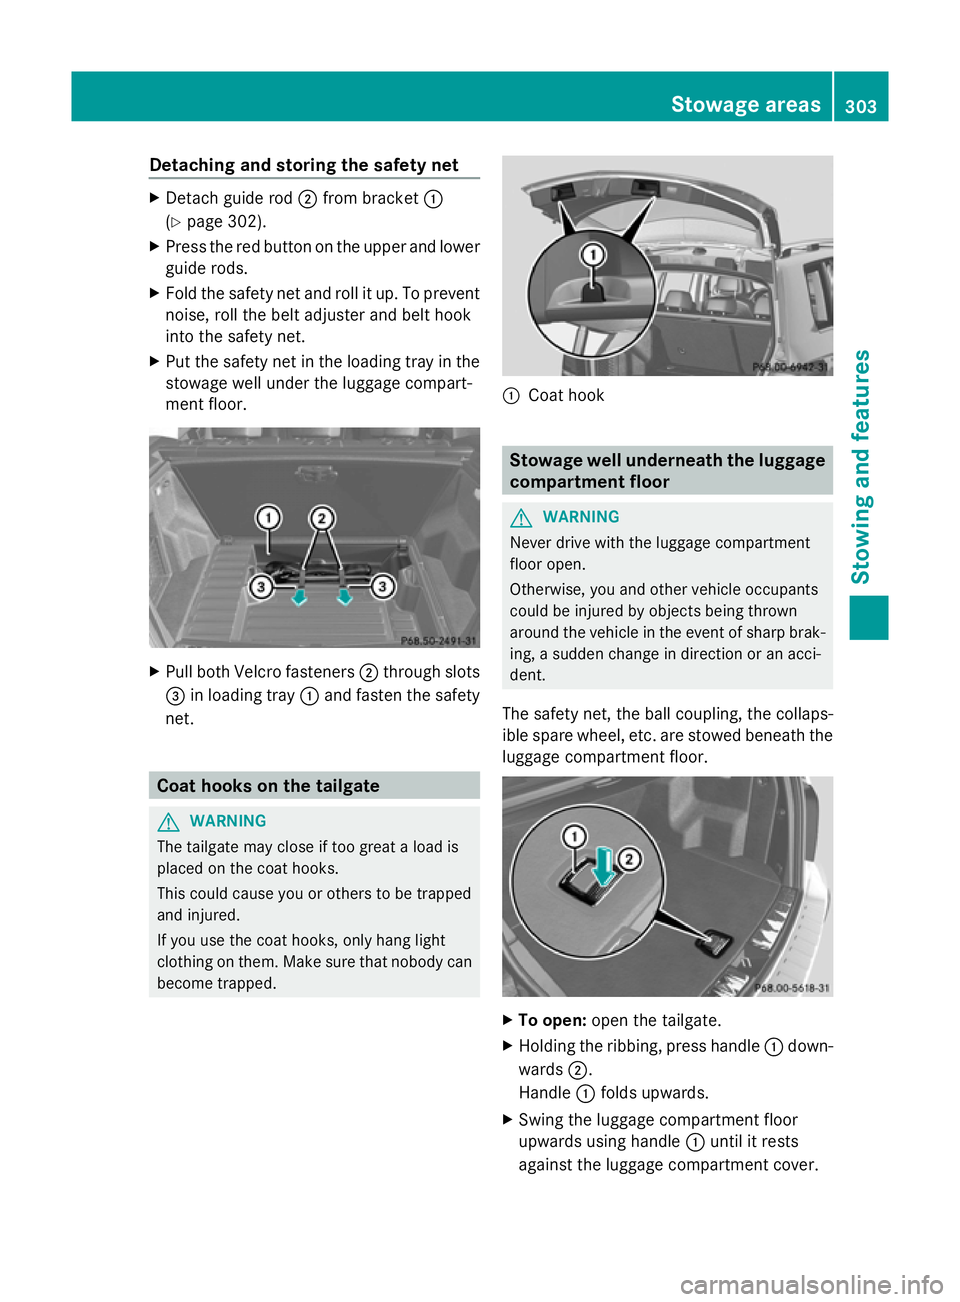
Pull both Velcro fasteners ;through slots
= in loading tray :and fasten the safety
net. Coat hooks on the tailgate
G
WARNING
The tailgate may close if too great a load is
placed on the coat hooks.
This could cause you or others to be trapped
and injured.
If you use the coat hooks, only hang light
clothing on them. Make sure that nobody can
become trapped. :
Coat hook Stowage well underneath the luggage
compartment floor
G
WARNING
Never drive with the luggage compartment
floor open.
Otherwise, you and other vehicle occupants
could be injured by objects being thrown
around the vehicle in the event of sharp brak-
ing, a sudden change in direction or an acci-
dent.
The safety net, the ball coupling, the collaps-
ible spare wheel, etc. are stowed beneath the
luggage compartment floor. X
To open: open the tailgate.
X Holding the ribbing, press handle :down-
wards ;.
Handle :folds upwards.
X Swing the luggage compartment floor
upwards using handle :until it rests
against the luggage compartment cover. Stowage areas
303Stowing and fea tures Z
Page 316 of 381
Have service work carried out as described
in the Service Booklet. This may otherwise
lead to increased wear and damage to the
major assemblies or the vehicle.
A qualified specialist workshop, e.g. a
Mercedes-Benz Service Centre, will reset the
ASSYST PLUS service interval display after
the service work has been carried out. You
can also obtain further information on main-
tenance work, for example.
Special service requirements
Arduous operating conditions or increased
loads on the vehicle will require some service
work to be performed more often than for a
vehicle in normal use. Such arduous condi-
tions include regular city driving with frequent
intermediate stops and use in mountainous
terrain or on poor road surfaces.
For example, if the vehicle is used under ardu-
ous operating conditions, have air filters,
engine oil and oil filters changed frequently
and check the wheels often. Further informa-
tion can be obtained at a qualified specialist
workshop, e.g. a Mercedes-Benz Service
Centre.
Driving abroad
An extensive Mercedes-Benz Service network
is also available in other countries. The
Service Hotline's current telephone numbers
for use when you are abroad are to be found
in the "Mercedes-Benz Service24h" section
of the Service Booklet. AdBlue
®
service display
i For BlueTEC vehicles only.
To function properly, BlueTEC exhaust gas
aftertreatment must be operated with the
reducing agent AdBlue ®
. AdBlue ®
is topped
up as part of the service. Under normal oper-
ating conditions, a full tank of AdBlue ®
should
last until the next service due date.
Depending on how and where the vehicle is
used, there may be an increase in the AdBlue
®
consumption, resulting in the next
service due date being brought forward.
Certain display messages show that
AdBlue ®
must be topped up, e.g.
Refill AdBlue at workshop See Own‐
Refill AdBlue at workshop See Own‐
er's Manual er's Manual
Refill AdBlue at workshop No start Refill AdBlue at workshop No start
in .. km in .. km
A warning tone also sounds.
You can no longer start the engine when the
AdBlue ®
supply has been used up.
R 4-button multifunction steering wheel
(Y page 266)
R 12-button multifunction steering wheel
(Y page 269)
! Have the AdBlue ®
tank topped up at a
qualified specialist workshop only. The
vehicle may otherwise be damaged or
soiled.
Before taking a trip with your vehicle outside
Europe, have the AdBlue ®
supply checked at
a qualified specialist workshop. If necessary,
have AdBlue ®
topped up. Before a longer stay
outside of Europe, consult a qualified special-
ist workshop.
Observe the notes on AdBlue ®
(Y page 368).
You can obtain further information about
BlueTEC exhaust gas aftertreatment and
AdBlue ®
from any Mercedes-Benz Service
Centre. Engine compartment
Bonnet
Opening the bonnet G
WARNING
Do not pull the release lever while the vehicle
is in motion. If you do so, the bonnet may open
up and block your view. Engine compartment
313Maintenance and care Z
Page 325 of 381
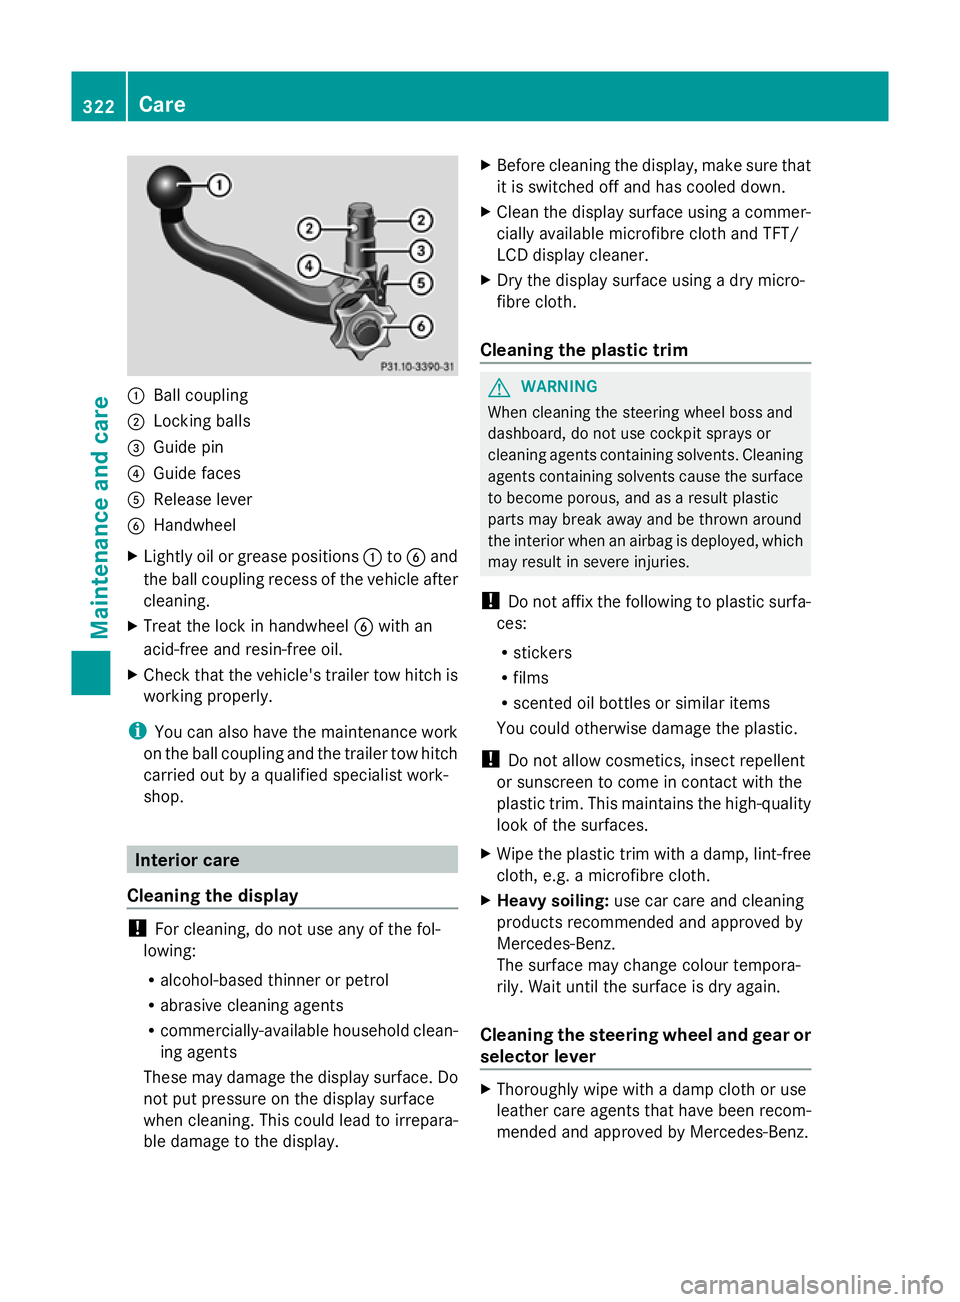
:
Ball coupling
; Locking balls
= Guide pin
? Guide faces
A Release lever
B Handwheel
X Lightly oil or grease positions :toB and
the ball coupling recess of the vehicle after
cleaning.
X Treat the lock in handwheel Bwith an
acid-free and resin-free oil.
X Check that the vehicle's trailer tow hitch is
working properly.
i You can also have the maintenance work
on the ball coupling and the trailer tow hitch
carried out by a qualified specialist work-
shop. Interior care
Cleaning the display !
For cleaning, do not use any of the fol-
lowing:
R alcohol-based thinner or petrol
R abrasive cleaning agents
R commercially-available household clean-
ing agents
These may damage the display surface. Do
not put pressure on the display surface
when cleaning. This could lead to irrepara-
ble damage to the display. X
Before cleaning the display, make sure that
it is switched off and has cooled down.
X Clean the display surface using a commer-
cially available microfibre cloth and TFT/
LCD display cleaner.
X Dry the display surface using a dry micro-
fibre cloth.
Cleaning the plastic trim G
WARNING
When cleaning the steering wheel boss and
dashboard, do not use cockpit sprays or
cleaning agents containing solvents. Cleaning
agents containing solvents cause the surface
to become porous, and as a result plastic
parts may break away and be thrown around
the interior when an airbag is deployed, which
may result in severe injuries.
! Do not affix the following to plastic surfa-
ces:
R stickers
R films
R scented oil bottles or similar items
You could otherwise damage the plastic.
! Do not allow cosmetics, insect repellent
or sunscreen to come in contact with the
plastic trim. This maintains the high-quality
look of the surfaces.
X Wipe the plastic trim with a damp, lint-free
cloth, e.g. a microfibre cloth.
X Heavy soiling: use car care and cleaning
products recommended and approved by
Mercedes-Benz.
The surface may change colour tempora-
rily. Wait until the surface is dry again.
Cleaning the steering wheel and gear or
selector lever X
Thoroughly wipe with a damp cloth or use
leather care agents that have been recom-
mended and approved by Mercedes-Benz. 322
CareMaintenance and care
Page 330 of 381
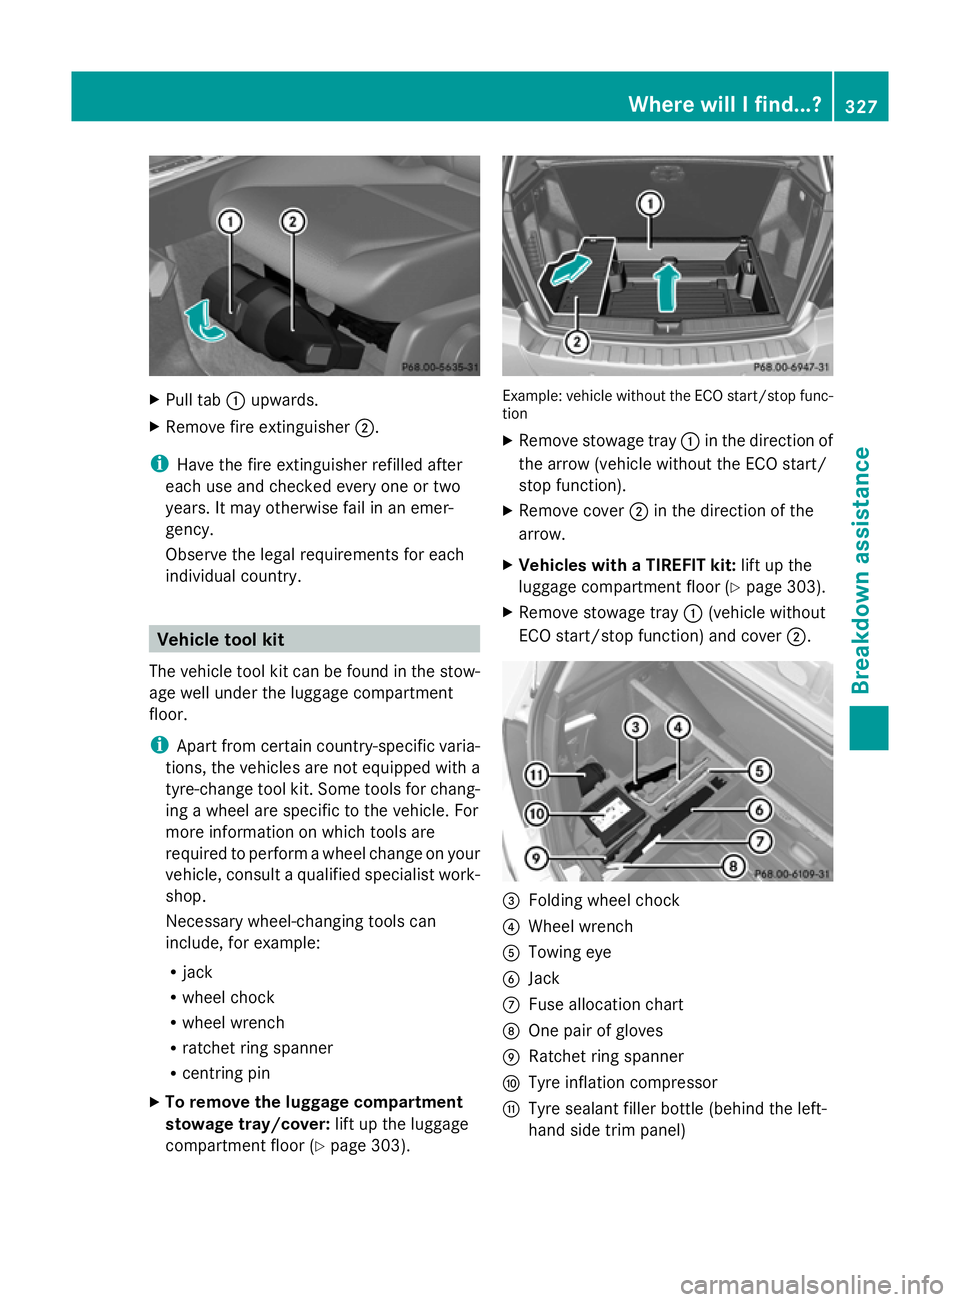
X
Pull tab :upwards.
X Remove fire extinguisher ;.
i Have the fire extinguisher refilled after
each use and checked every one or two
years. It may otherwise fail in an emer-
gency.
Observe the legal requirements for each
individual country. Vehicle tool kit
The vehicle tool kit can be found in the stow-
age well under the luggage compartment
floor.
i Apart from certain country-specific varia-
tions, the vehicles are not equipped with a
tyre-change tool kit. Some tools for chang-
ing a wheel are specific to the vehicle. For
more information on which tools are
required to perform a wheel change on your
vehicle, consult a qualified specialist work-
shop.
Necessary wheel-changing tools can
include, for example:
R jack
R wheel chock
R wheel wrench
R ratchet ring spanner
R centring pin
X To remove the luggage compartment
stowage tray/cover: lift up the luggage
compartment floor (Y page 303). Example: vehicle without the ECO start/stop func-
tion
X
Remove stowage tray :in the direction of
the arrow (vehicle without the ECO start/
stop function).
X Remove cover ;in the direction of the
arrow.
X Vehicles with a TIREFIT kit: lift up the
luggage compartment floor (Y page 303).
X Remove stowage tray :(vehicle without
ECO start/stop function) and cover ;. =
Folding wheel chock
? Wheel wrench
A Towing eye
B Jack
C Fuse allocation chart
D One pair of gloves
E Ratchet ring spanner
F Tyre inflation compressor
G Tyre sealant filler bottle (behind the left-
hand side trim panel) Where will I find...?
327Breakdown assistance
Page 332 of 381
i
Fully deflating the tyre may take a few
minutes.
X Screw the valve insert back into the valve.
X Screw the valve cap back on.
X Place the valve extractor back into the vehi-
cle tool kit.
X Stow the collapsible emergency spare
wheel in the emergency spare wheel well
under the luggage compartment and fasten
in place. Flat tyre
Preparing the vehicle
Your vehicle may be equipped with:
R a TIREFIT kit
R an emergency spare wheel
X Stop the vehicle as far away as possible
from traffic on solid, non-slippery and level
ground.
X Switch on the hazard warning lamps.
X Firmly depress the parking brake.
X Bring the front wheels into the straight-
ahead position.
X Vehicles with manual transmission:
engage first or reverse gear.
X Vehicles with automatic transmission:
move the DIRECT SELECT lever to P.
X Switch off the engine.
X Vehicles without KEYLESS-GO: remove
the key from the ignition lock.
X Vehicles with KEYLESS-GO: open the
driver's door.
The on-board electronics have status 0,
which is the same as the key having been
removed.
X Vehicles with KEYLESS-GO: remove the
Start/Stop button from the ignition lock
(Y page 147). X
All occupants must get out of the vehicle.
Make sure that they are not endangered as
they do so.
X Make sure that no one is near the danger
area while a wheel is being changed. Any-
one who is not directly assisting in the
wheel change should, for example, stand
behind the barrier.
X Get out of the vehicle. Pay attention to traf-
fic conditions when doing so.
X Close the driver's door.
X Place the warning triangle (Y page 326) a
suitable distance away. Observe legal
requirements. TIREFIT kit
Using the TIREFIT kit TIREFIT is a tyre sealant.
You can use TIREFIT to seal punctures of up
to 4 mm, particularly those in the tyre tread.
You can use TIREFIT at outside temperatures
down to Ò20 †. G
WARNING
In the following situations, the tyre sealant is
unable to provide sufficient breakdown assis-
tance, as it is unable to seal the tyre properly:
R there are cuts or punctures in the tyre
larger than those mentioned above.
R the wheel rim is damaged.
R you have driven at very low tyre pressures
or on a flat tyre.
There is a risk of accident.
Do not drive any further. Contact a qualified
specialist workshop.
X Do not remove any foreign objects which
have penetrated the tyre, e.g. screws or
nails.
X Remove the tyre sealant bottle, the accom-
panying "max. 80 km/h" sticker and the
tyre inflation compressor from the stowage Flat tyre
329Breakdown assistance Z
Page 333 of 381
well underneath the luggage compartment
floor (Y page 327). X
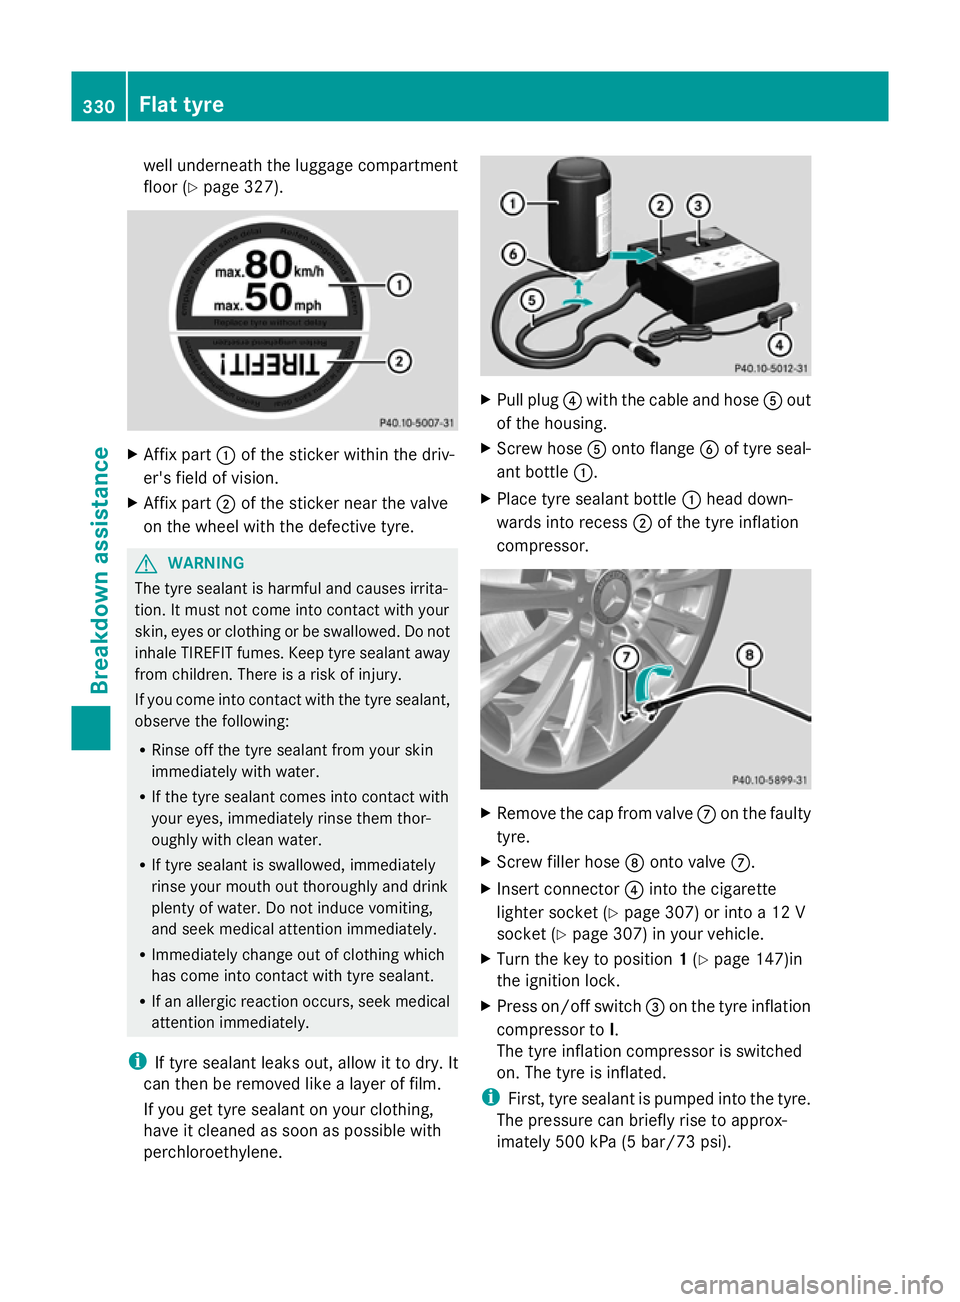
Affix part :of the sticker within the driv-
er's field of vision.
X Affix part ;of the sticker near the valve
on the wheel with the defective tyre. G
WARNING
The tyre sealant is harmful and causes irrita-
tion. It must not come into contact with your
skin, eyes or clothing or be swallowed. Do not
inhale TIREFIT fumes. Keep tyre sealant away
from children. There is a risk of injury.
If you come into contact with the tyre sealant,
observe the following:
R Rinse off the tyre sealant from your skin
immediately with water.
R If the tyre sealant comes into contact with
your eyes, immediately rinse them thor-
oughly with clean water.
R If tyre sealant is swallowed, immediately
rinse your mouth out thoroughly and drink
plenty of water. Do not induce vomiting,
and seek medical attention immediately.
R Immediately change out of clothing which
has come into contact with tyre sealant.
R If an allergic reaction occurs, seek medical
attention immediately.
i If tyre sealant leaks out, allow it to dry. It
can then be removed like a layer of film.
If you get tyre sealant on your clothing,
have it cleaned as soon as possible with
perchloroethylene. X
Pull plug ?with the cable and hose Aout
of the housing.
X Screw hose Aonto flange Bof tyre seal-
ant bottle :.
X Place tyre sealant bottle :head down-
wards into recess ;of the tyre inflation
compressor. X
Remove the cap from valve Con the faulty
tyre.
X Screw filler hose Donto valve C.
X Insert connector ?into the cigarette
lighter socket (Y page 307) or into a 12 V
socket (Y page 307) in your vehicle.
X Turn the key to position 1(Y page 147)in
the ignition lock.
X Press on/off switch =on the tyre inflation
compressor to I.
The tyre inflation compressor is switched
on. The tyre is inflated.
i First, tyre sealant is pumped into the tyre.
The pressure can briefly rise to approx-
imately 500 kPa (5 bar/73 psi). 330
Flat tyreBreakdown assistance
Page 335 of 381
number, e.g. on the B-pillar on the driver's
side.
X Correct the tyre pressure if it is still at least
130 kPa (1.3 ba r/19 psi) (see the fuel filler
flap for values).
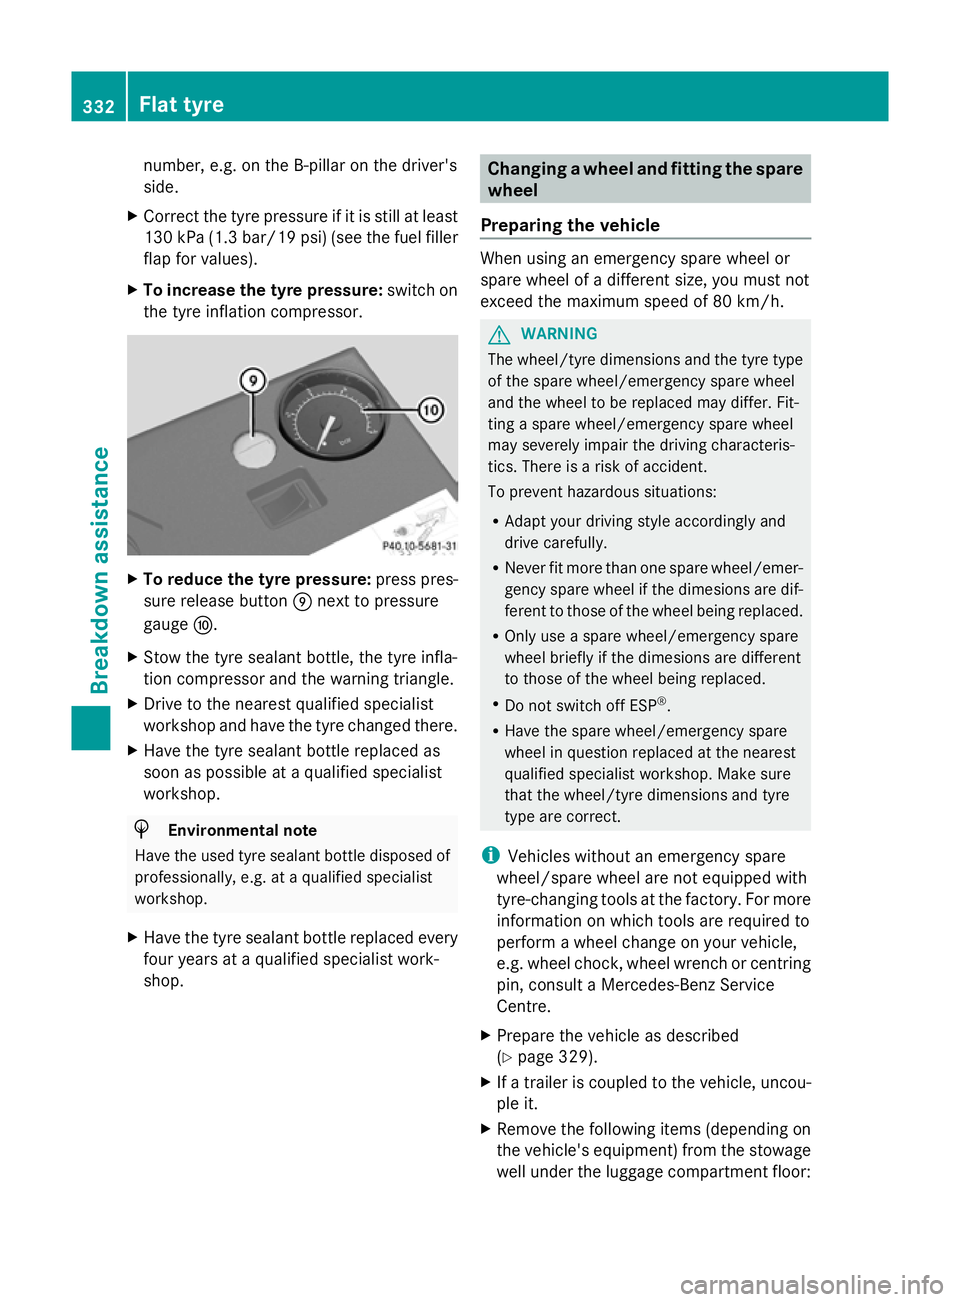
X To increase the tyre pressure: switch on
the tyre inflation compressor. X
To reduce the tyre pressure: press pres-
sure release button Enext to pressure
gauge F.
X Stow the tyre sealant bottle, the tyre infla-
tion compressor and the warning triangle.
X Drive to the nearest qualified specialist
workshop and have the tyre changed there.
X Have the tyre sealant bottle replaced as
soon as possible at a qualified specialist
workshop. H
Environmental note
Have the used tyre sealant bottle disposed of
professionally, e.g. at a qualified specialist
workshop.
X Have the tyre sealant bottle replaced every
four years at a qualified specialist work-
shop. Changing a wheel and fitting the spare
wheel
Preparing the vehicle When using an emergency spare wheel or
spare wheel of a different size, you must not
exceed the maximum speed of 80 km/h.
G
WARNING
The wheel/tyre dimensions and the tyre type
of the spare wheel/emergency spare wheel
and the wheel to be replaced may differ. Fit-
ting a spare wheel/emergency spare wheel
may severely impair the driving characteris-
tics. There is a risk of accident.
To prevent hazardous situations:
R Adapt your driving style accordingly and
drive carefully.
R Never fit more than one spare wheel/emer-
gency spare wheel if the dimesions are dif-
ferent to those of the wheel being replaced.
R Only use a spare wheel/emergency spare
wheel briefly if the dimesions are different
to those of the wheel being replaced.
R Do not switch off ESP ®
.
R Have the spare wheel/emergency spare
wheel in question replaced at the nearest
qualified specialist workshop. Make sure
that the wheel/tyre dimensions and tyre
type are correct.
i Vehicles without an emergency spare
wheel/spare wheel are not equipped with
tyre-changing tools at the factory. For more
information on which tools are required to
perform a wheel change on your vehicle,
e.g. wheel chock, wheel wrench or centring
pin, consult a Mercedes-Benz Service
Centre.
X Prepare the vehicle as described
(Y page 329).
X If a trailer is coupled to the vehicle, uncou-
ple it.
X Remove the following items (depending on
the vehicle's equipment) from the stowage
well under the luggage compartment floor: 332
Flat tyreBreakdown assistance
Page 336 of 381
R
the emergency spare wheel
R the wheel bolts for the emergency spare
wheel
R the tyre inflation compressor
R the wheel wrench
R the folding wheel chock
R the jack
R the ratchet ring spanner
X Secure the vehicle to prevent it from rolling
away.
Securing the vehicle against rolling
away If your vehicle is equipped with a wheel chock,
it can be found in the vehicle tool kit
(Y page 327).
The folding wheel chock is an additional
securing measure to prevent the vehicle from
rolling away, for example when changing a
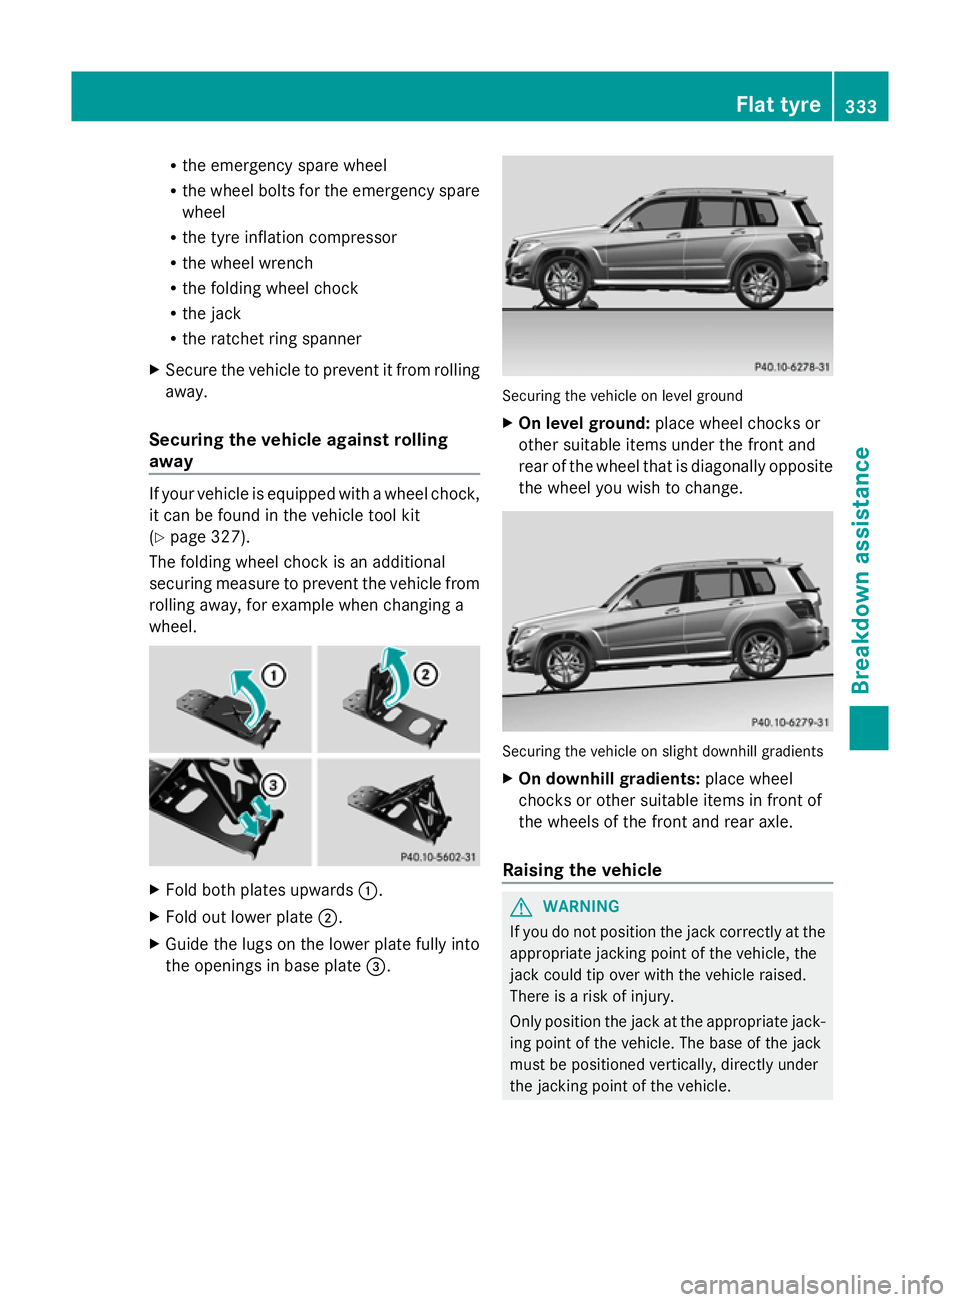
wheel. X
Fold both plates upwards :.
X Fold out lower plate ;.
X Guide the lugs on the lower plate fully into
the openings in base plate =. Securing the vehicle on level ground
X
On level ground: place wheel chocks or
other suitable items under the front and
rear of the wheel that is diagonally opposite
the wheel you wish to change. Securing the vehicle on slight downhill gradients
X
On downhill gradients: place wheel
chocks or other suitable items in front of
the wheels of the front and rear axle.
Raising the vehicle G
WARNING
If you do not position the jack correctly at the
appropriate jacking point of the vehicle, the
jack could tip over with the vehicle raised.
There is a risk of injury.
Only position the jack at the appropriate jack-
ing point of the vehicle. The base of the jack
must be positioned vertically, directly under
the jacking point of the vehicle. Flat tyre
333Breakdown assistance Z