2012 MERCEDES-BENZ GLK SUV fuel cap
[x] Cancel search: fuel capPage 15 of 381
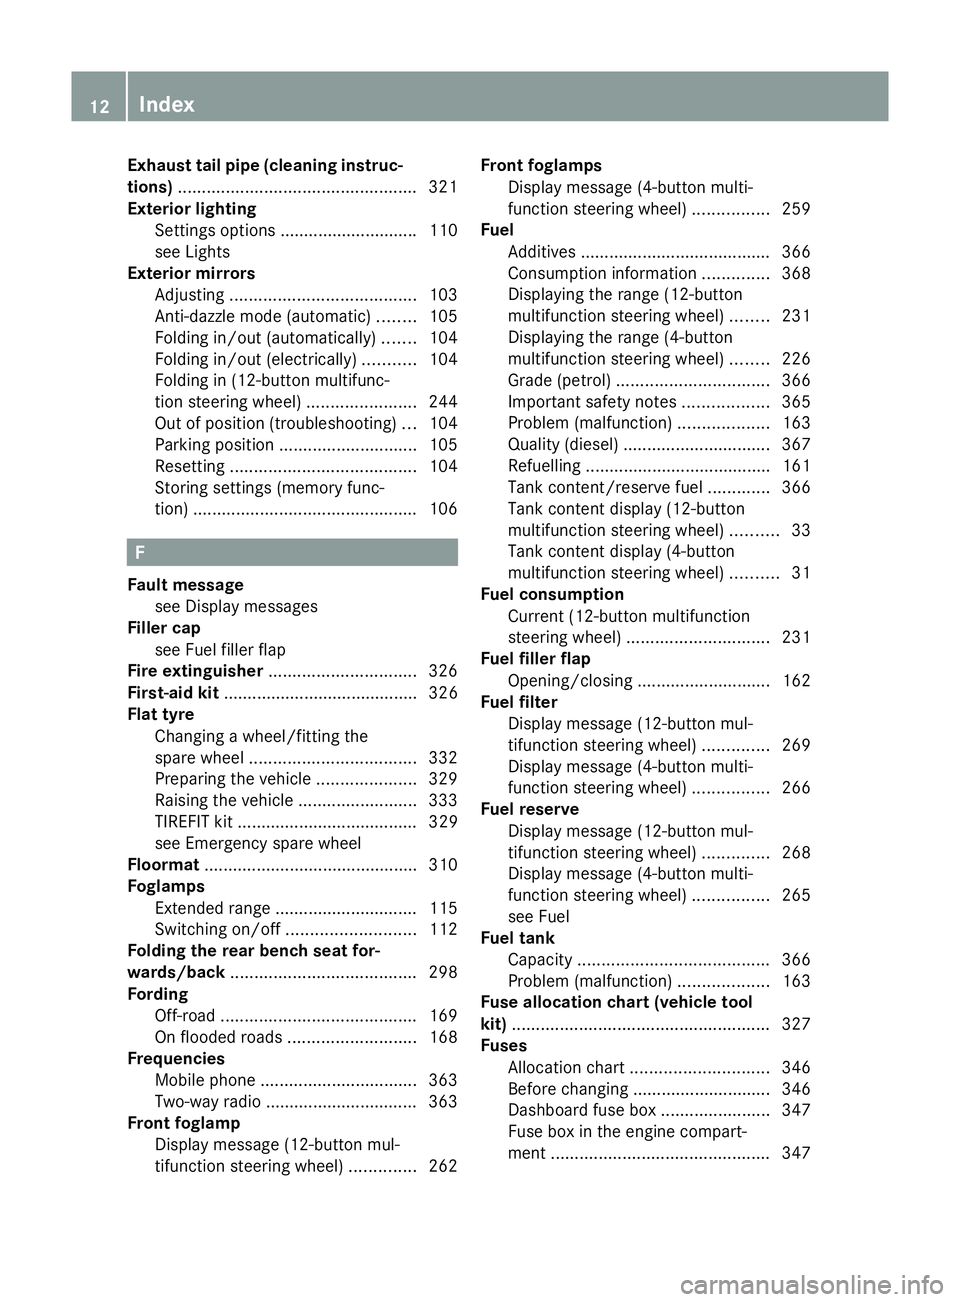
Exhaust tail pipe (cleaning instruc-
tions) .................................................. 321
Exterior lighting Settings options ............................ .110
see Lights
Exterior mirrors
Adjusting ....................................... 103
Anti-dazzle mode (automatic) ........105
Folding in/out (automatically). ......104
Folding in/out (electrically). ..........104
Folding in (12-button multifunc-
tion steering wheel) .......................244
Out of position (troubleshooting) ...104
Parking position ............................. 105
Resetting ....................................... 104
Storing settings (memory func-
tion) ............................................... 106F
Fault message see Display messages
Filler cap
see Fuel filler flap
Fire extinguisher ............................... 326
First-aid kit ......................................... 326
Flat tyre Changing a wheel/fitting the
spare wheel ................................... 332
Preparing the vehicle .....................329
Raising the vehicle .........................333
TIREFIT kit ...................................... 329
see Emergency spare wheel
Floormat ............................................ .310
Foglamps Extended range .............................. 115
Switching on/off ........................... 112
Folding the rear bench seat for-
wards/back ....................................... 298
Fording Off-road ......................................... 169
On flooded roads ........................... 168
Frequencies
Mobile phone ................................. 363
Two-way radio ................................ 363
Front foglamp
Display message (12-button mul-
tifunction steering wheel) ..............262Front foglamps
Display message (4-button multi-
function steering wheel) ................259
Fuel
Additives ........................................ 366
Consumption information ..............368
Displaying the range (12-button
multifunction steering wheel) ........231
Displaying the range (4-button
multifunction steering wheel) ........226
Grade (petrol) ................................ 366
Important safety notes ..................365
Problem (malfunction) ...................163
Quality (diesel )............................... 367
Refuelling ...................................... .161
Tank content/reserve fuel .............366
Tank content display (12-button
multifunction steering wheel) ..........33
Tank content display (4-button
multifunction steering wheel) ..........31
Fuel consumption
Current (12-button multifunction
steering wheel) .............................. 231
Fuel filler flap
Opening/closing ............................ 162
Fuel filter
Display message (12-button mul-
tifunction steering wheel) ..............269
Display message (4-button multi-
function steering wheel) ................266
Fuel reserve
Display message (12-button mul-
tifunction steering wheel) ..............268
Display message (4-button multi-
function steering wheel) ................265
see Fuel
Fuel tank
Capacity ........................................ 366
Problem (malfunction) ...................163
Fuse allocation chart (vehicle tool
kit) ...................................................... 327
Fuses Allocation chart ............................. 346
Before changing ............................. 346
Dashboard fuse box .......................347
Fuse box in the engine compart-
ment .............................................. 34712
Index
Page 24 of 381
Rear
............................................... 298
Under driver's seat/front-
passenger seat .............................. 298
Stowage net ....................................... 298
Stowage space Stowage net ................................... 298
Summer opening
see Convenience opening feature
Summer tyres .................................... 352
Sun visor ............................................ 305
Supplement Restraint System see SRS (Supplemental Restraint
System)
Surround lighting (12-button mul-
tifunction steering wheel) ................240
Switching off the alarm (ATA) ............72 T
Tailgate Display message (12-button mul-
tifunction steering wheel) ..............279
Display message (4-button multi-
function steering wheel) ................278
Emergency unlocking .......................88
Important safety notes ....................85
Limiting the opening angle ...............88
Opening/closing (automatically
from inside) ...................................... 87
Opening/closing (automatically
from outside) ................................... 86
Opening/closing (from outside) .......85
Opening dimensions ......................372
Tail lamp
Display message (12-button mul-
tifunction steering wheel) ..............261
Display message (4-button multi-
function steering wheel) ................258
Tank
see Fuel tank
Tank content
Displaying the range (12-button
multifunction steering wheel) ........231
Displaying the range (4-button
multifunction steering wheel) ........226 Fuel gauge (12-button multifunc-
tion steering wheel)
.........................33
Fuel gauge (4-button multifunc-
tion steering wheel) .........................31
Technical data
Capacities ...................................... 365
Information .................................... 362
Trailer loads ................................... 374
Tyres/wheels ................................. 357
Vehicle data ................................... 372
Telephone
Accepting a call ............................. 235
Display message (12-button mul-
tifunction steering wheel) ..............281
Menu (on-board computer) ............234
Number from the phone book ....... .235
Redialling ....................................... 236
Rejecting/ending a call .................235
Telephone compartment ................297
Temperature
Coolant (12-button multifunction
steering wheel) .............................. 227
Coolant (4-button multifunction
steering wheel) .............................. 224
Outside temperature (12-button
multifunction steering wheel) ........227
Outside temperature (4-button
multifunction steering wheel) ........225
Setting (climate control) ................132
TEMPOMAT
Function/notes ............................. 173
Theft-deterrent system
ATA (Anti-Theft Alarm system) .........72
Immobiliser ...................................... 71
Time
Setting the clock (4-button multi-
function steering wheel) ................227
see Separate Owner's manual
TIREFIT kit .......................................... 329
Top Tether ............................................ 58
Total distance recorder Displaying (12-button multifunc-
tion steering wheel) .......................230
Displaying (4-button multifunc-
tion steering wheel) .......................226
Tow-away protection ..........................72 Index
21
Page 165 of 381
Refuelling
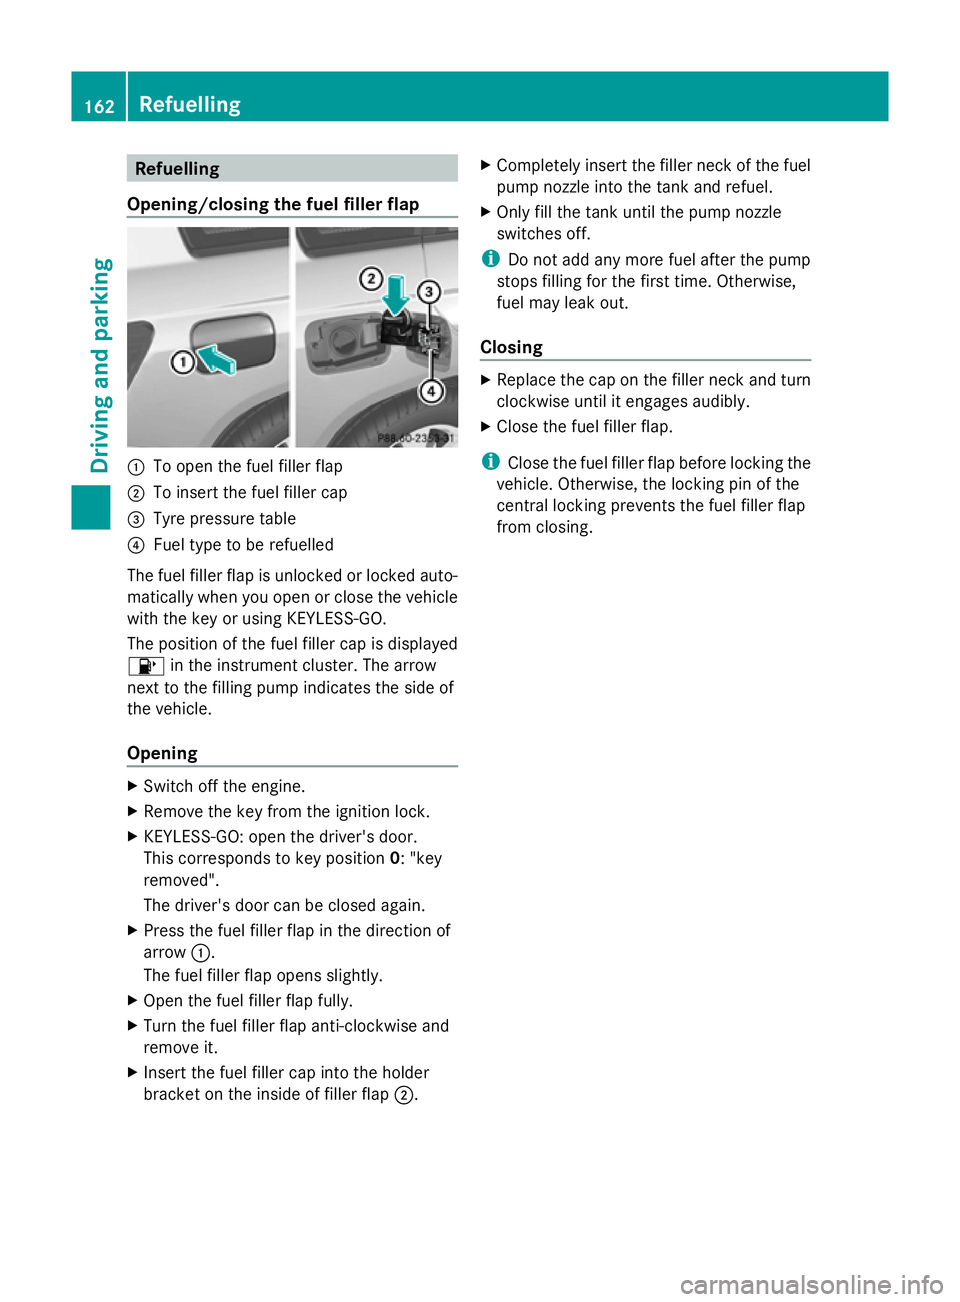
Opening/closing the fuel filler flap :
To open the fuel filler flap
; To insert the fuel filler cap
= Tyre pressure table
? Fuel type to be refuelled
The fuel filler flap is unlocked or locked auto-
matically when you open or close the vehicle
with the key or using KEYLESS-GO.
The position of the fuel filler cap is displayed
8 in the instrument cluster. The arrow
next to the filling pump indicates the side of
the vehicle.
Opening X
Switch off the engine.
X Remove the key from the ignition lock.
X KEYLESS-GO: open the driver's door.
This corresponds to key position 0: "key
removed".
The driver's door can be closed again.
X Press the fuel filler flap in the direction of
arrow :.
The fuel filler flap opens slightly.
X Open the fuel filler flap fully.
X Turn the fuel filler flap anti-clockwise and
remove it.
X Insert the fuel filler cap into the holder
bracket on the inside of filler flap ;.X
Completely insert the filler neck of the fuel
pump nozzle into the tank and refuel.
X Only fill the tank until the pump nozzle
switches off.
i Do not add any more fuel after the pump
stops filling for the first time. Otherwise,
fuel may leak out.
Closing X
Replace the cap on the filler neck and turn
clockwise until it engages audibly.
X Close the fuel filler flap.
i Close the fuel filler flap before locking the
vehicle. Otherwise, the locking pin of the
central locking prevents the fuel filler flap
from closing. 162
RefuellingDriving and parking
Page 174 of 381
R
Always keep the engine running and in gear
when driving on a downhill gradient. Acti-
vate DSR (Y page 213).
R Drive slowly and evenly, if necessary at
walking pace.
R Ensure that the wheels are in contact with
the ground at all times.
R Drive with extreme care on unknown off-
road routes where visibility is poor. For
safety reasons, get out of the vehicle first
and survey the off-road route.
R Check the depth of water before fording
rivers and streams.
R Look out for obstacles such as rocks, holes,
tree stumps and furrows.
R Always keep the side windows and the pan-
orama sliding sunroof closed during the
journey.
R Do not stray from marked routes or paths.
i Information about retrofitting special all-
terrain tyres is available from any qualified
specialist workshop.
Checklist before driving off-road X
Engine oil level: check the engine oil and
top it up if necessary.
X Tyre-change tool kit: check that the jack
is working and make sure you have the
wheelbrace, a robust tow cable and a fold-
ing spade in the vehicle.
X Wheels and tyres: check the tyre tread
depth and tyre pressure.
X Check for damage and remove any foreign
objects, e.g. small stones, from the
wheels/tyres.
X Replace any missing valve caps.
X Replace dented or damaged wheels.
Checklist after driving off-road Driving over rough terrain places greater
demands on your vehicle than driving on nor-
mal roads. After driving off-road, check the
vehicle. This allows you to detect damage promptly and reduce the risk of an accident
to yourself and other road users.
X Deactivate DSR ( Ypage 213).
X Clean the headlamps and rear lights and
check for damage.
X Clean the front and rear licence plates.
X Clean the wheels/tyres with a water jet and
remove any foreign objects.
X Clean the wheels, wheel arches and the
vehicle underside with a water jet; check
for any foreign objects and damage.
X Check whether twigs or other parts of
plants have become trapped. These
increase the risk of fire and can damage
fuel pipes, brake hoses or the rubber bel-
lows of the axle joints and propeller shafts.
X After the trip, examine without fail the
entire undercarriage, wheels, tyres, brakes,
bodywork structure, steering, chassis and
exhaust system for damage.
X After driving for extended periods across
sand, mud, gravel, water or in similarly dirty
conditions, have the brake discs, wheels,
brake pads/linings and axle joints checked
and cleaned.
X If you detect strong vibrations after off-road
travel, check for foreign objects in the
wheels and drive train and remove them if
necessary. Foreign objects can disturb the
balance and cause vibrations. Driving tips
171Driving and parking Z
Page 219 of 381
G
WARNING
You could lose control of the vehicle/trailer
combination if it begins to swerve. The vehi-
cle/trailer combination could even overturn.
There is a risk of an accident.
On no account should you attempt to
straighten out the vehicle/trailer combina-
tion by increasing speed. Decrease your
speed and do not countersteer. Brake if nec-
essary. G
WARNING
If you exceed the permissible noseweight
while carrying a load, the carrier system could
detach from the vehicle and fall on the road.
There is a risk of an accident and injury.
Always maintain the permissible noseweight
when carrying loads.
! Depressing the brake pedal constantly
results in excessive and premature wear to
the brake pads.
You can use carrier systems, e.g. bicycle
racks or load-bearing implements, on the ball
coupling. The maximum noseweight of
75 kg applies when using carrier systems on
the ball coupling.
When using a detachable trailer coupling,
make sure you observe the trailer coupling
manufacturer's operating instructions.
When reversing the vehicle towards the
trailer, make sure there is nobody between
the trailer and the vehicle.
Couple and uncouple the trailer carefully. If
you do not couple the trailer to the towing
vehicle correctly, the trailer could become
detached.
Make sure that the following values are not
exceeded:
R the permissible trailer drawbar noseweight
R the permissible trailer load R
the permissible rear axle load of the towing
vehicle
R the maximum permissible gross vehicle
weight of both the towing vehicle and the
trailer
The applicable permissible values, which
must not be exceeded, can be found:
R in the vehicle documents
R on the identification plates of the trailer tow
hitch, the trailer and the vehicle
If the values differ, the lowest value applies.
You will find the values approved by the man-
ufacturer on the vehicle identification plates
and those for the towing vehicle under "Tech-
nical data".
When towing a trailer, your vehicle's handling
characteristics will be different in comparison
to when driving without a trailer.
The vehicle/trailer combination:
R is heavier
R is restricted in its acceleration and gradi-
ent-climbing capability
R has an increased braking distance
R is affected more by strong crosswinds
R demands more sensitive steering
R has a larger turning circle
This can impair the vehicle's handling char-
acteristics. Adapt your style of driving accord-
ingly. Maintain a safe distance. Drive care-
fully.
When towing a trailer, always adjust your
speed to the current road and weather con-
ditions. Do not exceed the maximum permis-
sible speed for your vehicle/trailer combina-
tion.
General notes i
When towing a trailer, set the tyre pres-
sure on the rear axle of the towing vehicle
for a maximum load; see the tyre pressure
table in the fuel filler flap (Y page 353).
You will find fitting dimensions and loads in
the "Technical data" section (Y page 373).216
Towing a trailerDriving and parking
Page 220 of 381
The maximum noseweight of the trailer draw-
bar on the ball coupling is 80 kg. However,
the actual noseweight may not be higher than
the value which is given on the trailer tow
hitch or trailer identification plates. The low-
est weight applies.
! Use a drawbar noseweight as close as
possible to the maximum permissible nose-
weight. Do not use a noseweight of less
than 50kg, otherwise the trailer may come
loose.
Note that the payload and the rear axle load
are reduced by the actual payload.
i The height of the ball coupling changes
with the load of the vehicle. If necessary,
use a trailer with a height-adjustable draw-
bar.
Driving tips i
Observe the notes on ESP ®
trailer stabi-
lisation (Y page 69).
The maximum permissible speed for vehicle/
trailer combinations depends on the type of
trailer. Before beginning the journey, check
the trailer's documents to see what the max-
imum permitted speed is. Observe the legally
prescribed maximum speed in the relevant
country.
For certain Mercedes-Benz vehicles, the max-
imum permissible rear axle load is increased
when towing a trailer. Refer to the "Technical
data" section to find out whether this applies
to your vehicle. If you utilise any of the added
maximum rear axle load when towing a trailer,
the vehicle/trailer combination may not
exceed a maximum speed of 100 km/h for
reasons concerning the operating permit.
This also applies in countries in which the
permissible maximum speed for vehicle/
trailer combinations is above 100 km/h.
When towing a trailer, your vehicle's handling
characteristics will be different in comparison
to when driving without a trailer, and it will
consume more fuel. Change into a lower gear in good time on long
and steep downhill gradients. On vehicles
with automatic transmission, you have to
select shift range
1,2or 3.
i This also applies if you have activated
cruise control or SPEEDTRONIC.
This will use the braking effect of the engine,
so less braking will be required to prevent the
vehicle from gaining speed. This relieves the
load on the brake system and prevents the
brakes from overheating and wearing too
quickly. If you need additional braking,
depress the brake pedal repeatedly rather
than continuously.
Driving tips R
Maintain a greater distance from the vehi-
cle in front than when driving without a
trailer.
R Avoid braking abruptly. If possible, brake
gently at first to allow the trailer to run on.
Then, increase the braking force rapidly.
R The values given for gradient-climbing
capabilities from a standstill refer to sea
level. When driving in mountainous areas,
note that the power output of the engine,
and consequently the vehicle's gradient-
climbing capability, decrease with increas-
ing altitude.
If the trailer swings from side to side:
X Do not accelerate.
X Do not countersteer.
X Brake if necessary. Fitting the ball coupling
X Make a note of the ball coupling key num-
ber.
i You can use this number to obtain a
replacement key from a Mercedes-Benz
Service Centre. Towing a trailer
217Driving and parking Z
Page 344 of 381
Jump-starting
G
WARNING
There is a risk of acid burns when jump-starting a vehicle due to the gases which escape from
the battery. Do not lean over the battery while the engine is being jump-started. G
WARNING
Gases escaping from the battery during jump-starting may cause minor explosions. Avoid cre-
ating sparks. Keep naked flames away from the battery, and do not smoke.
Comply with safety precautions when handling batteries. You will find these under "Battery (vehi-
cle)" in the index. G
WARNING
Non-combusted fuel can collect in the exhaust system and ignite. There is a risk of fire. Avoid
repeated and lengthy starting attempts.
! Vehicles with a petrol engine: avoid repeated and lengthy starting attempts. Otherwise,
the non-combusted fuel may damage the catalytic converter.
Do not use a rapid-charging device to start the vehicle. If your vehicle's battery is discharged,
the engine can be jump-started from another vehicle or from a second battery using jump
leads. Observe the following points:
R the battery is not accessible in all vehicles. If the other vehicle's battery is not accessible,
jump-start the vehicle using a second battery or a jump-starting device.
R vehicles with a petrol engine: only jump-start the vehicle when the engine and exhaust
system are cold.
R do not start the engine if the battery is frozen. Let the battery thaw first.
R jump-starting may only be performed from batteries with a nominal voltage of 12 V.
R only use jump leads that have a sufficient cross-section and insulated terminal clamps.
R if the battery is fully discharged, leave the battery that is being used to jump-start connected
for a few minutes before attempting to start. This charges the empty battery a little.
R make sure that the two vehicles do not touch.
Make sure that:
R the jump leads are not damaged.
R bare parts of the terminal clamp do not come into contact with other metal parts while the
jump leads are connected to the battery.
R the jump leads cannot come into contact with parts such as the V-belt pulley or the fan.
These parts move when the engine is started and while it is running.
X Firmly depress the parking brake.
X Manual transmission: engage neutral.
X Automatic transmission: shift the automatic transmission to position P.
X Switch off all electrical consumers (e.g. radio, blower, etc.).
X Open the bonnet (Y page 313). Jump-starting
341Breakdown assistance Z
Page 356 of 381
If you have fitted M+S tyres:
X
Check the tyre pressures (Y page 353).
X Restart the tyre pressure loss warning sys-
tem (Y page 355).
After fitting a spare wheel or an emergency
spare wheel, do not drive faster than
80 km/h. Snow chains
G
WARNING
If you have fitted snow chains to the front
wheels, they may scrape against the vehicle
body or chassis components. This could
cause damage to the vehicle or the tyres.
There is a risk of an accident.
To avoid hazardous situations:
R never fit snow chains on the front wheels
R fit snow chains to the rear wheels in pairs.
! Vehicles with steel wheels: if you wish
to fit snow chains to steel wheels, make
sure that you remove the respective
wheels' hubcaps first. The hubcaps may
otherwise be damaged.
For safety reasons, Mercedes-Benz recom-
mends that you only use snow chains that
have been specially approved for your vehicle
by Mercedes-Benz, or that are of a corre-
sponding standard of quality.
If you intend to fit snow chains, please bear
the following points in mind:
R snow chains cannot be fitted to all wheel-
tyre combinations. Permissible wheel-tyre
combinations (Y page 357).
R only use snow chains when the road sur-
face is completely snow-covered. Remove
the snow chains as soon as possible when
you come to a road that is not snow-cov-
ered.
R local regulations may restrict the use of
snow chains. Observe the appropriate reg-
ulations if you wish to fit snow chains. R
Do not exceed the maximum permissible
speed of 50 km/h.
R Snow chains must not be fitted to the emer-
gency spare wheel, e.g. a collapsible emer-
gency spare wheel.
i You can deactivate ESP ®
(Y page 67)
when pulling away with snow chains fitted.
This way you can allow the wheels to spin
in a controlled manner, achieving an
increased driving force (cutting action). Tyre pressure
Tyre pressure specifications
G
WARNING
Tyres with too low or too high tyre pressure
contain the following hazards:
R they can burst, in particular if the vehicle is
heavily laden or when driven at high
speeds.
R the tyres can wear excessively and/or
unevenly, which can severely impair tyre
traction.
R the driving, steering and braking character-
istics may be severely impaired.
There is a risk of accident.
Follow recommended tyre inflation pressures
and check the pressure of all the tyres includ-
ing the spare wheel:
R at least every two weeks
R if the load changes
R before beginning a long journey
R for changed operating conditions, e.g. off-
road driving
If necessary, correct the tyre pressure.
You will find a table of tyre pressures for var-
ious operating conditions on the inside of
your vehicle's fuel filler flap.
Operation with an emergency spare
wheel: the applicable value is stated on the
wheel and in the "Wheel/tyre combinations"
section (Y page 357). Tyre pressure
353Wheels and tyres Z