2012 MERCEDES-BENZ CLS SHOOTING BRAKE warning light
[x] Cancel search: warning lightPage 165 of 405
G
WARNING
Electrostatic charge can lead to the creation
of sparks and to fuel vapours igniting. There
is a risk of fire and explosion.
Touch the vehicle bodywork just before open-
ing the fuel filler cap. This will discharge a
possible electrostatic charge.
! Do not use petrol to refuel vehicles with a
diesel engine. Do not use diesel to refuel
vehicles with a petrol engine. Do not switch
on the ignitio nifyou accidentally refuel
with the wrong fuel. Otherwise, the fuel will
enter the fuel system. Even small amounts
of the wrong fuel could result in damage to
the fuel system and the engine. The repair
costs are high. Notify aqualified specialist
workshop and have the fuel tan kand fuel
lines drained completely.
! Overfilling the fuel tank could damage the
fuel system.
! Take care not to spill any fuel on painted
surfaces .You could otherwise damage the
paintwork.
! Use a filter when adding fuel from a fuel
can. The fuel lines and/or the diesel injec-
tion system could otherwise be blocked by
particles from the fuel can.
If you overfill the fuel tank, fuel may spray out
when the fuel pump nozzle is removed.
Further information on fuel and on fuel grades
can be found in the "Fuel" section
(Y page 386). Refuelling
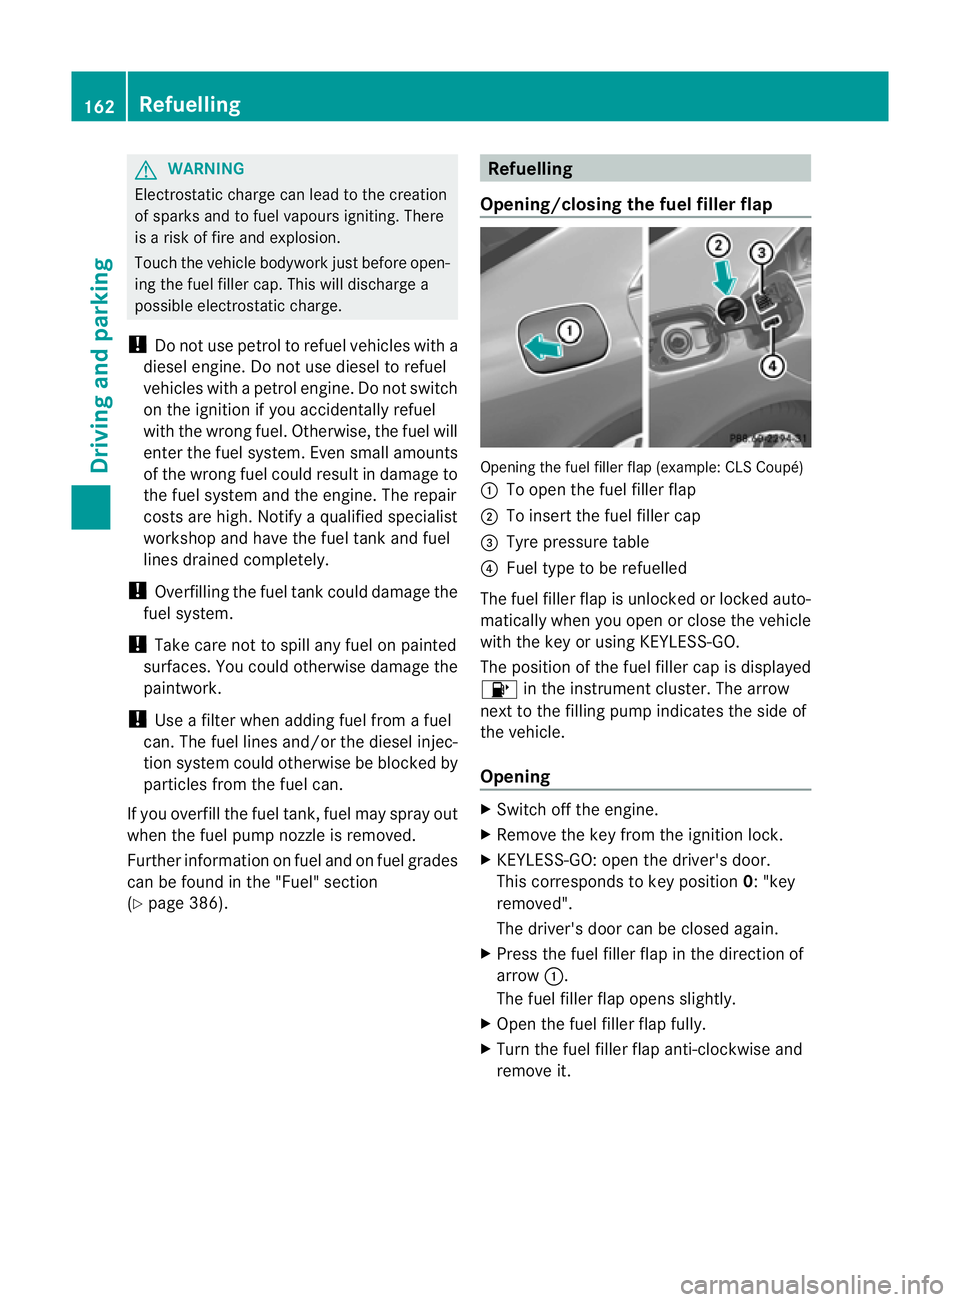
Opening/closing the fuel filler flap Opening the fuel filler flap (example: CLS Coupé)
:
To open the fuel filler flap
; To insert the fuel filler cap
= Tyre pressure table
? Fuel type to be refuelled
The fuel filler flap is unlocked or locked auto-
matically when you open or close the vehicle
with the key or using KEYLESS-GO.
The position of the fuel filler cap is displayed
8 in the instrument cluster. The arrow
next to the filling pump indicates the side of
the vehicle.
Opening X
Switch off the engine.
X Remove the key from the ignition lock.
X KEYLESS-GO: open the driver's door.
This corresponds to key position 0: "key
removed".
The driver's door can be closed again.
X Press the fuel filler flap in the direction of
arrow :.
The fuel filler flap opens slightly.
X Open the fuel filler flap fully.
X Turn the fuel filler flap anti-clockwise and
remove it. 162
RefuellingDriving and parking
Page 170 of 405
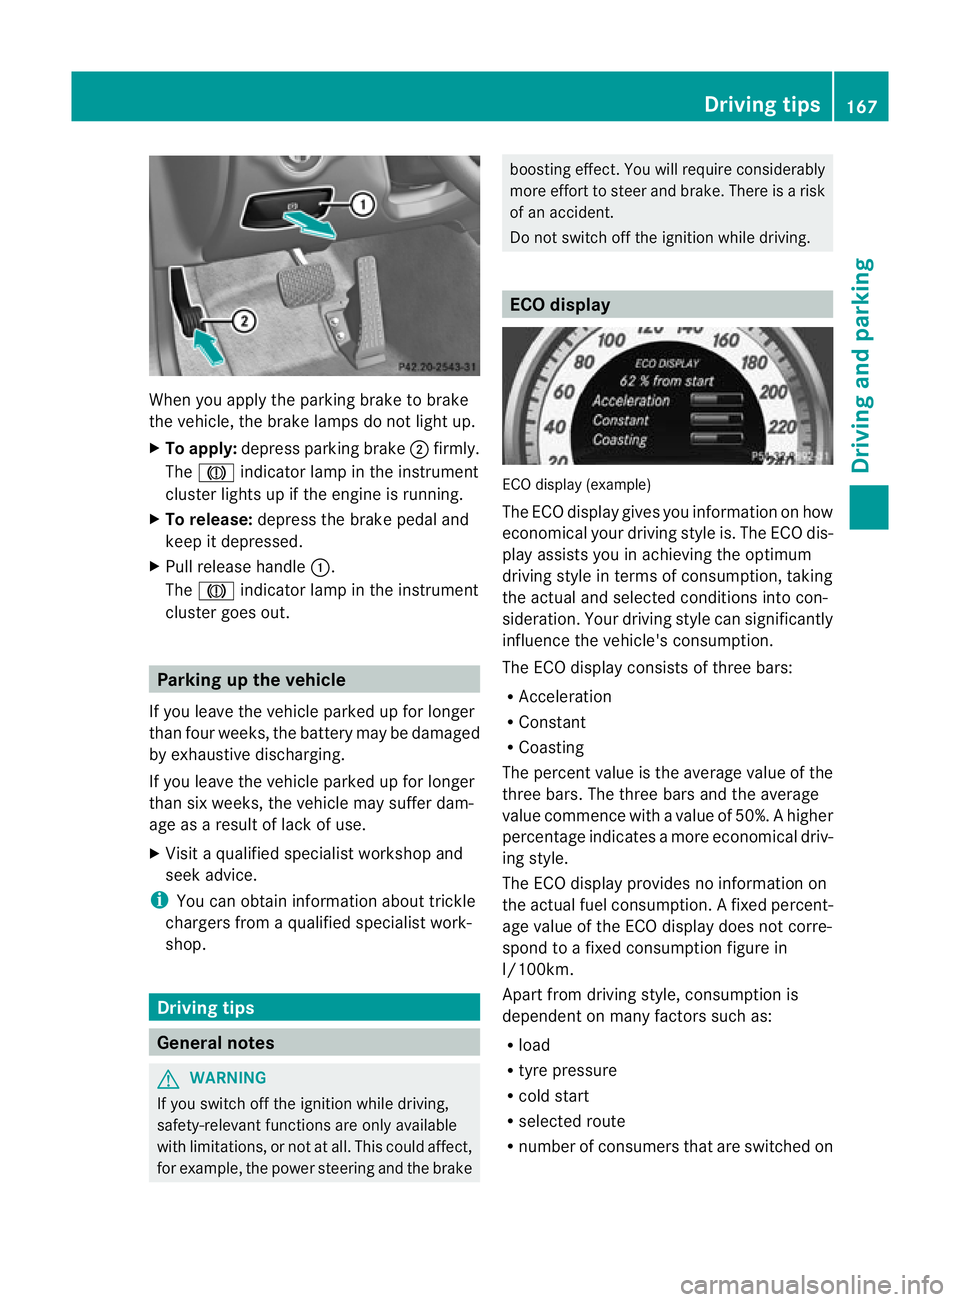
When you apply the parking brake to brake
the vehicle, the brake lamps do not light up.
X To apply: depress parking brake ;firmly.
The J indicator lamp in the instrument
cluster lights up if the engine is running.
X To release: depress the brake pedal and
keep it depressed.
X Pull release handle :.
The J indicator lamp in the instrument
cluster goes out. Parking up the vehicle
If you leave the vehicle parked up for longer
than four weeks, the battery may be damaged
by exhaustive discharging.
If you leave the vehicle parked up for longer
than six weeks, the vehicle may suffer dam-
age as a result of lack of use.
X Visit a qualified specialist workshop and
seek advice.
i You can obtain information about trickle
chargers from a qualified specialist work-
shop. Driving tips
General notes
G
WARNING
If you switch off the ignition while driving,
safety-relevant functions are only available
with limitations, or not at all. This could affect,
for example, the power steering and the brake boosting effect. You will require considerably
more effort to steer and brake. There is a risk
of an accident.
Do not switch off the ignition while driving.
ECO display
ECO display (example)
The ECO display gives you information on how
economical your driving style is. The ECO dis-
play assists you in achieving the optimum
driving style in terms of consumption, taking
the actual and selected conditions into con-
sideration. Your driving style can significantly
influence the vehicle's consumption.
The ECO display consists of three bars:
R
Acceleration
R Constant
R Coasting
The percen tvalue is the average value of the
three bars .The three bars and the average
value commence with a value of 50%. Ahigher
percentage indicates a mor eeconomical driv-
ing style.
The ECO display provides no information on
the actual fuel consumption. Afixed percent-
age value of the ECO display does not corre-
spond to a fixed consumption figure in
l/100km.
Apart from driving style, consumption is
dependent on many factors such as:
R load
R tyre pressure
R cold start
R selected route
R number of consumers that are switched on Driving tips
167Driving and parking Z
Page 172 of 405
i
This also applies if you have activated
cruise control, SPEEDTRONIC or DIS-
TRONIC PLUS.
This will use the braking effect of the engine,
so less braking will be required to prevent the
vehicle from gaining speed. This relieves the
load on the brake system and prevents the
brakes from overheating and wearing too
quickly.
Heavy and light loads G
WARNING
The braking system can overheat if you leave
your foot on the brake pedal while driving.
This increases the braking distance and could
even cause the braking system to fail. There
is a risk of an accident.
Never use the brake pedal as a footrest. Do
not simultaneously depress both the brake
pedal and the accelerator pedal while driving.
! Depressing the brake pedal constantly
results in excessive and premature wear to
the brake pads.
If the brakes have been subjected to a heavy
load, do not stop the vehicle immediately, but
drive on for a short while. This allows the air-
flow to cool the brakes more quickly.
If the brakes have been used only moderately,
you should occasionally test their effective-
ness. To do this, brake more firmly from a
higher speed. This improves the grip of the
brakes.
Wet road surfaces If you have driven for a long time in heavy rain
without braking, there may be a delayed reac-
tion from the brakes when braking for the first
time. This may also occur after the vehicle has
been washed or driven through deep water.
You have to depress the brake pedal more
firmly. Maintain a greater distance from the
vehicle in front.
After driving on a wet road or having the vehi-
cle washed, brake firmly while paying atten- tion to the traffic conditions. This will warm
up the brake discs, thereby drying them more
quickly and protecting them against corro-
sion.
Limited braking performance on salt-
treated roads If you drive on salted roads, a layer of salt
residue may form on the brake discs and
brake pads. This can result in a significantly
longer braking distance.
R
Brake occasionally to remove any possible
salt residue. Make sure that you do not
endanger other road users when doing so.
R Carefully depress the brake pedal and the
beginning and end of a journey.
R Maintain a greater distanc eto the vehicle
ahead.
New brake pads/linings New and replaced brake pads and discs only
reach their optimum braking effect after sev-
eral hundred kilometres of driving. Compen-
sate for this by applying greater force to the
brake pedal.
For safety reasons, Mercedes-Benz recom-
mends that you only have brake pads/linings
fitted to your vehicle which have been
approved for Mercedes-Benz vehicles or
which correspond to an equivalent quality
standard. Brake pads/linings which have not
been approved for Mercedes-Benz vehicles or
which are not of an equivalent quality could
affect your vehicle's operating safety.
AMG high-performance and ceramic
brakes
AMG brake systems are designed for heavy
loads. This may lead to noise when braking.
This is dependent on:
R
speed
R braking force
R environmental conditions, such as temper-
ature and humidity Driving tips
169Driving and parking Z
Page 177 of 405
Deactivating cruise control
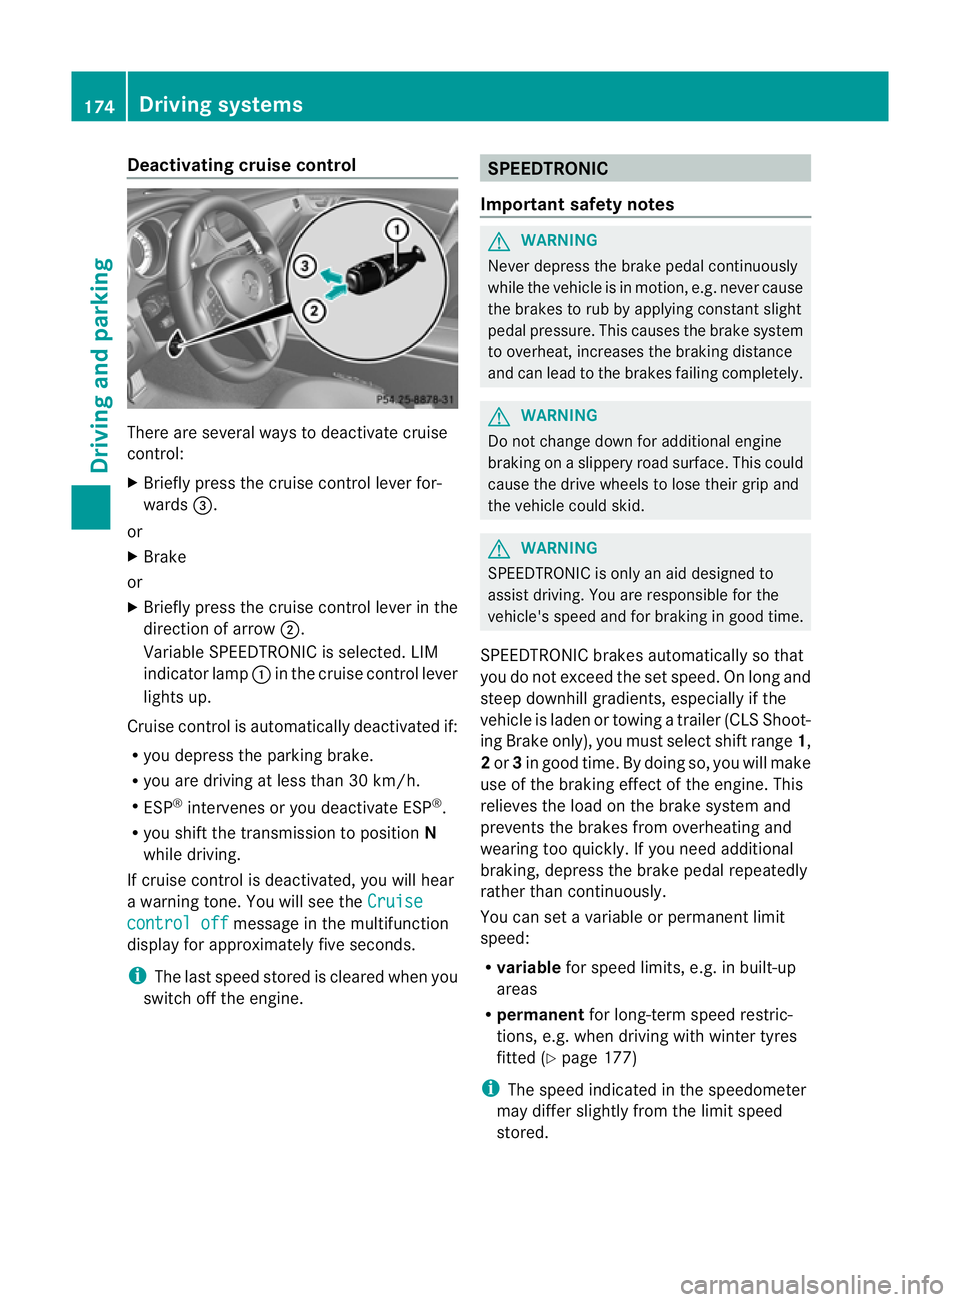
There are several ways to deactivate cruise
control:
X
Briefly press the cruise control lever for-
wards =.
or
X Brake
or
X Briefly press the cruise control lever in the
direction of arrow ;.
Variable SPEEDTRONIC is selected. LIM
indicator lamp :in the cruise contro llever
lights up.
Cruise control is automatically deactivated if:
R you depress the parking brake.
R you are driving at less than 30 km/h.
R ESP ®
intervenes or you deactivate ESP ®
.
R you shift the transmission to position N
while driving.
If cruise control is deactivated, you will hear
a warning tone. You will see the Cruisecontrol off message in the multifunction
display for approximately five seconds.
i The last speed stored is cleared when you
switch off the engine. SPEEDTRONIC
Important safety notes G
WARNING
Never depress the brake pedal continuously
while the vehicle is in motion, e.g. never cause
the brakes to rub by applying constan tslight
pedal pressure. This causes the brake system
to overheat, increases the braking distance
and can lead to the brakes failing completely. G
WARNING
Do not change down for additional engine
braking on a slippery road surface. This could
cause the drive wheels to lose their grip and
the vehicle could skid. G
WARNING
SPEEDTRONIC is only an aid designed to
assist driving. You are responsible for the
vehicle's speed and for braking in good time.
SPEEDTRONIC brakes automatically so that
you do not exceed the set speed. On long and
steep downhill gradients, especially if the
vehicle is laden or towin gatrailer (CLS Shoot-
ing Brake only), you must select shift range 1,
2 or 3in good time. By doing so, you will make
use of the braking effect of the engine .This
relieves the load on the brake system and
prevents the brakes from overheating and
wearing too quickly. If you need additional
braking, depress the brake pedal repeatedly
rather than continuously.
You can set a variable or permanent limit
speed:
R variable for speed limits, e.g. in built-up
areas
R permanent for long-term speed restric-
tions, e.g. when driving with winter tyres
fitted (Y page 177)
i The speed indicated in the speedometer
may differ slightly from the limit speed
stored. 174
Driving systemsDriving and parking
Page 178 of 405
Variable SPEEDTRONIC
General notes
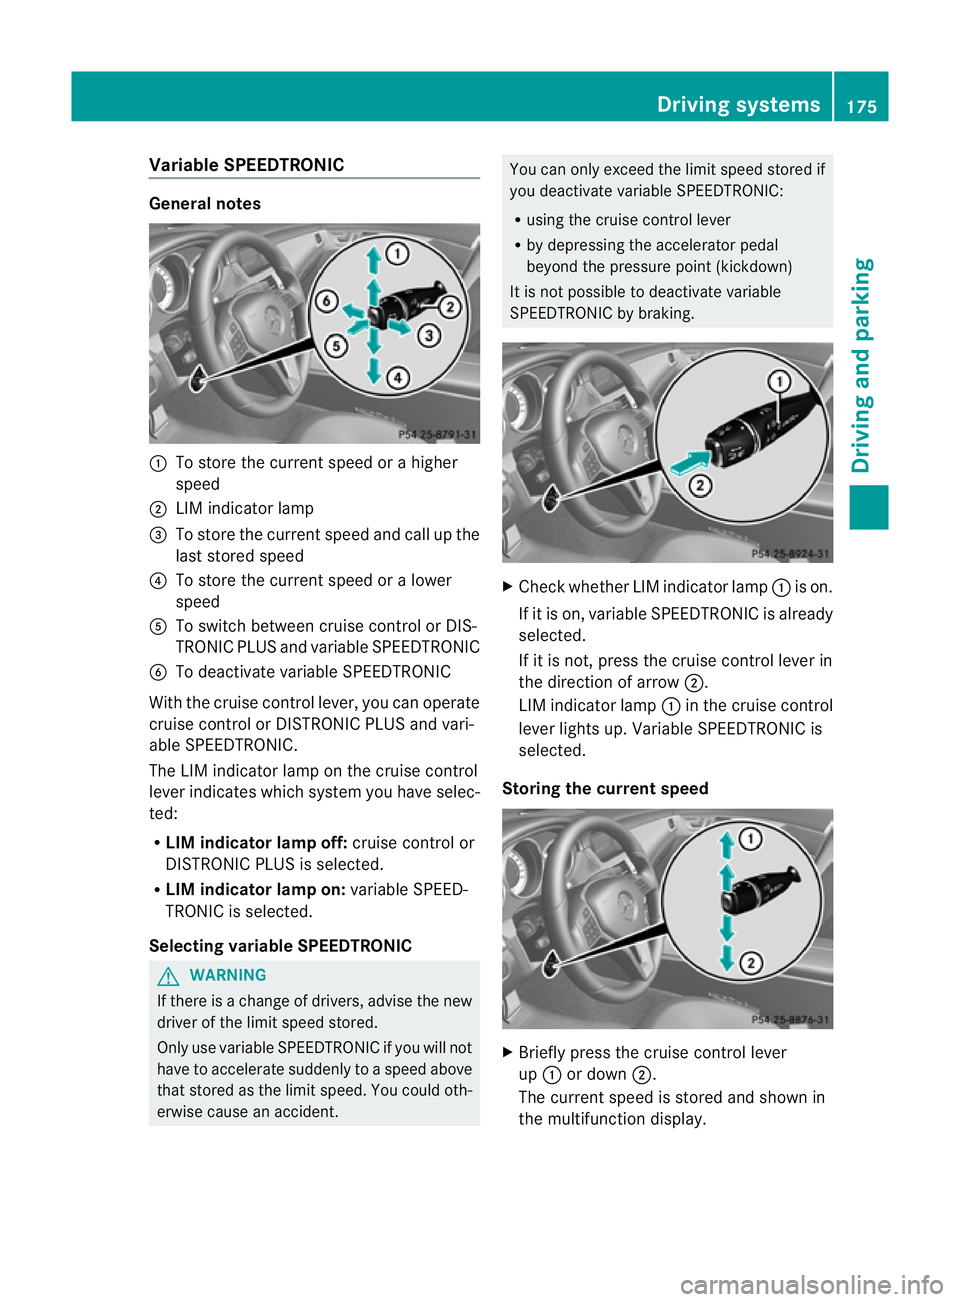
:
To store the current speed or a higher
speed
; LIM indicator lamp
= To store the current speed and call up the
last stored speed
? To store the current speed or a lower
speed
A To switch between cruise control or DIS-
TRONIC PLU Sand variable SPEEDTRONIC
B To deactivate variable SPEEDTRONIC
With the cruise control lever, you can operate
cruise control or DISTRONIC PLUS and vari-
able SPEEDTRONIC.
The LIM indicator lamp on the cruise control
lever indicates which system you have selec-
ted:
R LIM indicator lamp off: cruise control or
DISTRONIC PLU Sis selected.
R LIM indicator lamp on: variable SPEED-
TRONIC is selected.
Selecting variable SPEEDTRONIC G
WARNING
If there is a change of drivers, advise the new
driver of the limit speed stored.
Only use variable SPEEDTRONIC if you will not
have to accelerate suddenly to a speed above
that stored as the limit speed. You could oth-
erwise cause an accident. You can only exceed the limit speed stored if
you deactivate variable SPEEDTRONIC:
R
using the cruise control lever
R by depressing the accelerator pedal
beyond the pressure point (kickdown)
It is not possible to deactivate variable
SPEEDTRONIC by braking. X
Check whether LIM indicator lamp :is on.
If it is on, variable SPEEDTRONIC is already
selected.
If it is not, press the cruise control lever in
the direction of arrow ;.
LIM indicator lamp :in the cruise control
lever lights up. Variable SPEEDTRONIC is
selected.
Storing the current speed X
Briefly press the cruise control lever
up : or down ;.
The current speed is stored and shown in
the multifunction display. Driving systems
175Driving and parking Z
Page 179 of 405
The segments in the multifunction display
light up from the start of the scale up to the
stored speed.
You can use the cruise control lever to limit
the speed to any speed above 30 km/hw hile
the engine is running.
Storing the current speed and calling up
the last stored speed G
WARNING
Only select a stored speed if you know what
that speed is and whether it is suitable for the
current driving and traffic situation. Other-
wise, sudden braking could endanger you or
others. X
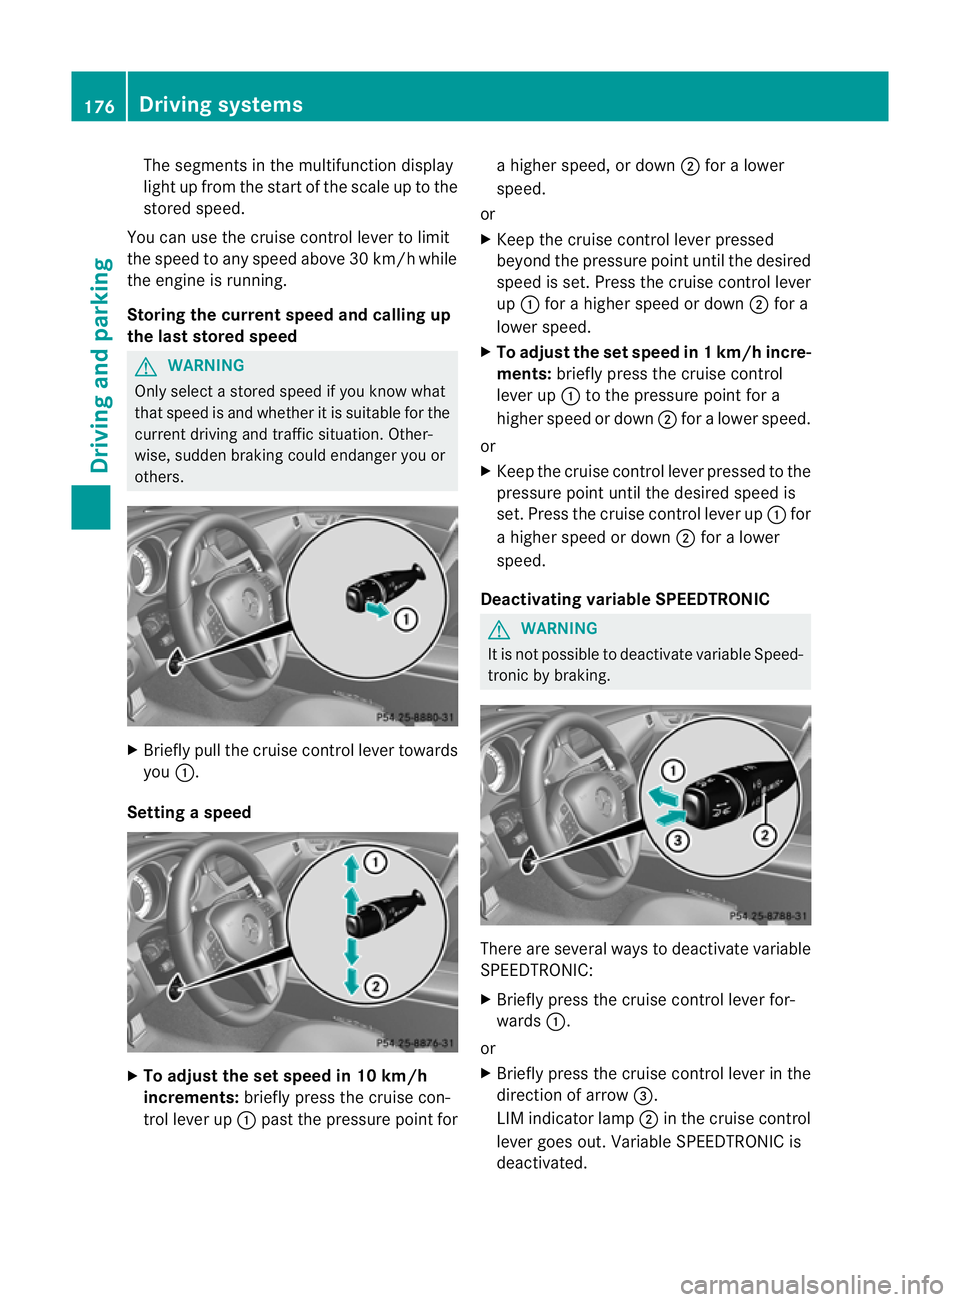
Briefly pull the cruise control lever towards
you :.
Setting aspeed X
To adjust the set speed in 10 km/h
increments: briefly press the cruise con-
trol lever up :past the pressure point for a higher speed, or down
;for a lower
speed.
or
X Keep the cruise control lever pressed
beyond the pressure point until the desired
speed is set. Press the cruise control lever
up : for a higher speed or down ;for a
lowe rspeed.
X To adjust the set speed in 1 km/h incre-
ments: briefly press the cruise control
lever up :to the pressure point for a
higher speed or down ;for a lower speed.
or
X Keep the cruise control lever pressed to the
pressure point until the desired speed is
set. Press the cruise control lever up :for
a higher speed or down ;for a lower
speed.
Deactivating variable SPEEDTRONIC G
WARNING
It is not possible to deactivate variable Speed-
tronic by braking. There are several ways to deactivate variable
SPEEDTRONIC:
X
Briefly press the cruise control lever for-
wards :.
or
X Briefly press the cruise control lever in the
direction of arrow =.
LIM indicator lamp ;in the cruise control
lever goes out. Variable SPEEDTRONIC is
deactivated. 176
Driving systemsDriving and parking
Page 181 of 405
Otherwise, you may fail to recognise dangers
in time, cause an accident and injure yourself
and others. G
WARNING
DISTRONIC PLUS brakes your vehicle up to a
maximum of 4 m/s 2
depending on its speed.
This corresponds to approximately 40% of
your vehicle's maximum braking power. You
must also apply the brakes yourselfift his
braking power is not sufficient.
If DISTRONIC PLUS detects a risk of collision
with avehicle in front, an intermittent warning
tone sounds. In addition, the ·distance
warning lamp in the instrument cluster lights
up. Brake to avoid a collision.
General notes DISTRONIC PLUS regulates the speed and
automatically helps you maintain the dis-
tance to the vehicle detected in front. DIS-
TRONIC PLUS brakes automatically so that
the set speed is not exceeded.
On long and steep downhill gradients, espe-
cially if the vehicle is laden or towing a trailer
(CLS Shooting Brake only), you must select
shift range
1,2or 3in good time. By doing
so, you will make use of the braking effec tof
the engine .This relieves the load on the brake
system and prevents the brakes from over-
heating and wearing too quickly.
If DISTRONIC PLUS detects a slower-moving
vehicle in front, your vehicle is braked in order
to maintain the preset distance to the vehicle
in front.
If you want DISTRONIC PLUS to assist you,
the radar sensor system must be activated
(Y page 243) and operational.
The radar sensor system is switched off auto-
matically in the vicinity of radio telescope
facilities (Y page 398).
If there is no vehicle in front, DISTRONIC
PLUS operates in the same way as cruise
control in the speed range between
30 km/h and 200 km/h. If avehicle is driving in front of you, DISTRONIC operates in the
speed range between 0km/h and
200 km/h.
Do not use DISTRONIC PLUS on roads with
steep gradients.
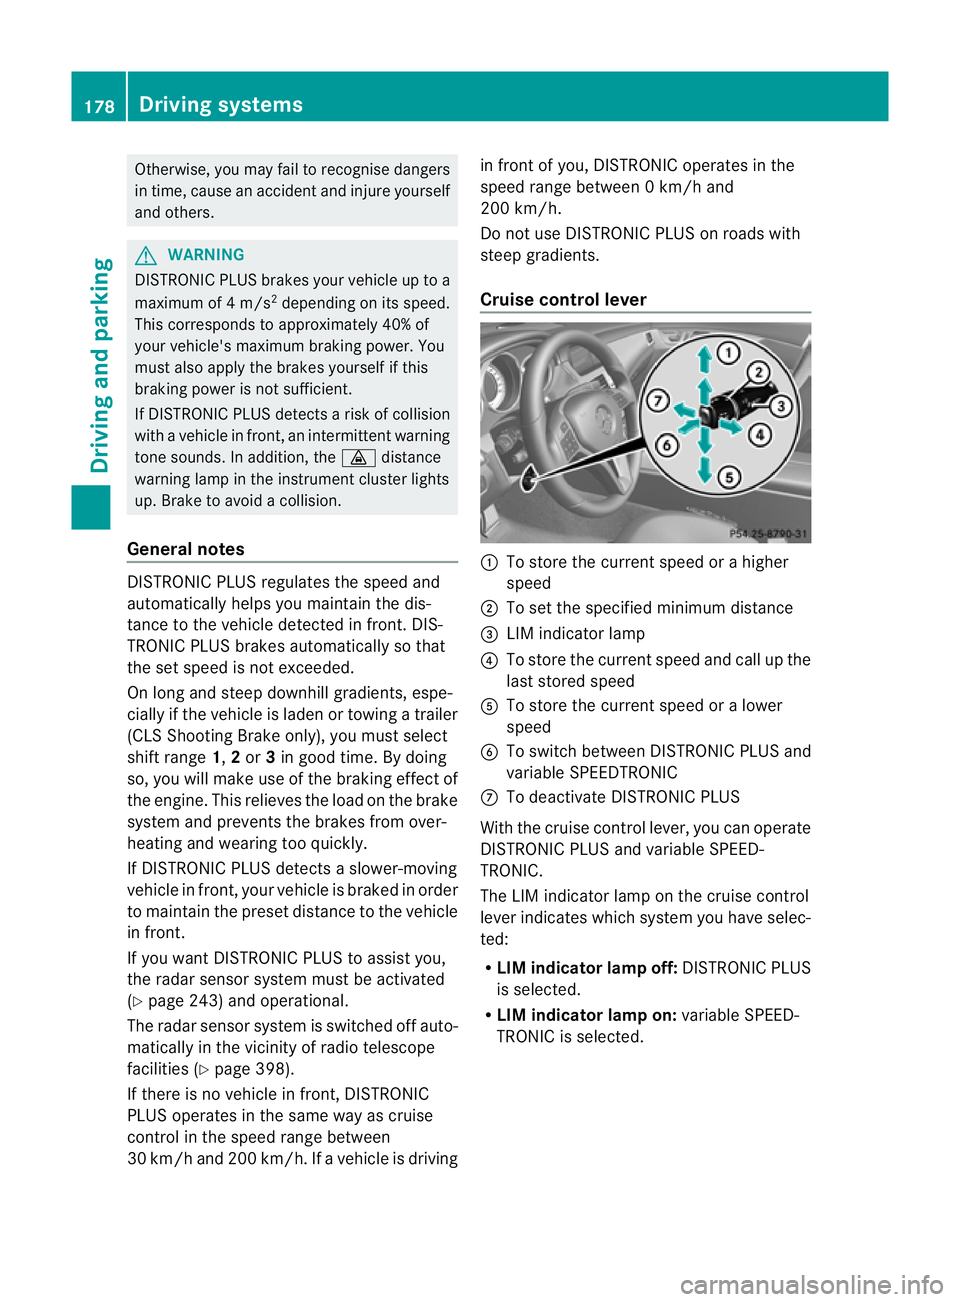
Cruise control lever :
To store the current spee dorahigher
speed
; To set the specified minimum distance
= LIM indicator lamp
? To store the current speed and call up the
last stored speed
A To store the current speed or a lower
speed
B To switch between DISTRONIC PLUS and
variable SPEEDTRONIC
C To deactivate DISTRONIC PLUS
With the cruise control lever, you can operate
DISTRONIC PLUS and variable SPEED-
TRONIC.
The LIM indicator lamp on the cruise control
lever indicates which system you have selec-
ted:
R LIM indicator lamp off: DISTRONIC PLUS
is selected.
R LIM indicator lamp on: variable SPEED-
TRONIC is selected. 178
Driving systemsDriving and parking
Page 187 of 405
You will see the stored speed for about five
seconds when you activate DISTRONIC PLUS.
X Selec tthe Distance display function
using the on-board computer
(Y page 237).
i You will see the stored speed for about
five seconds when you activate DISTRONIC
PLUS.
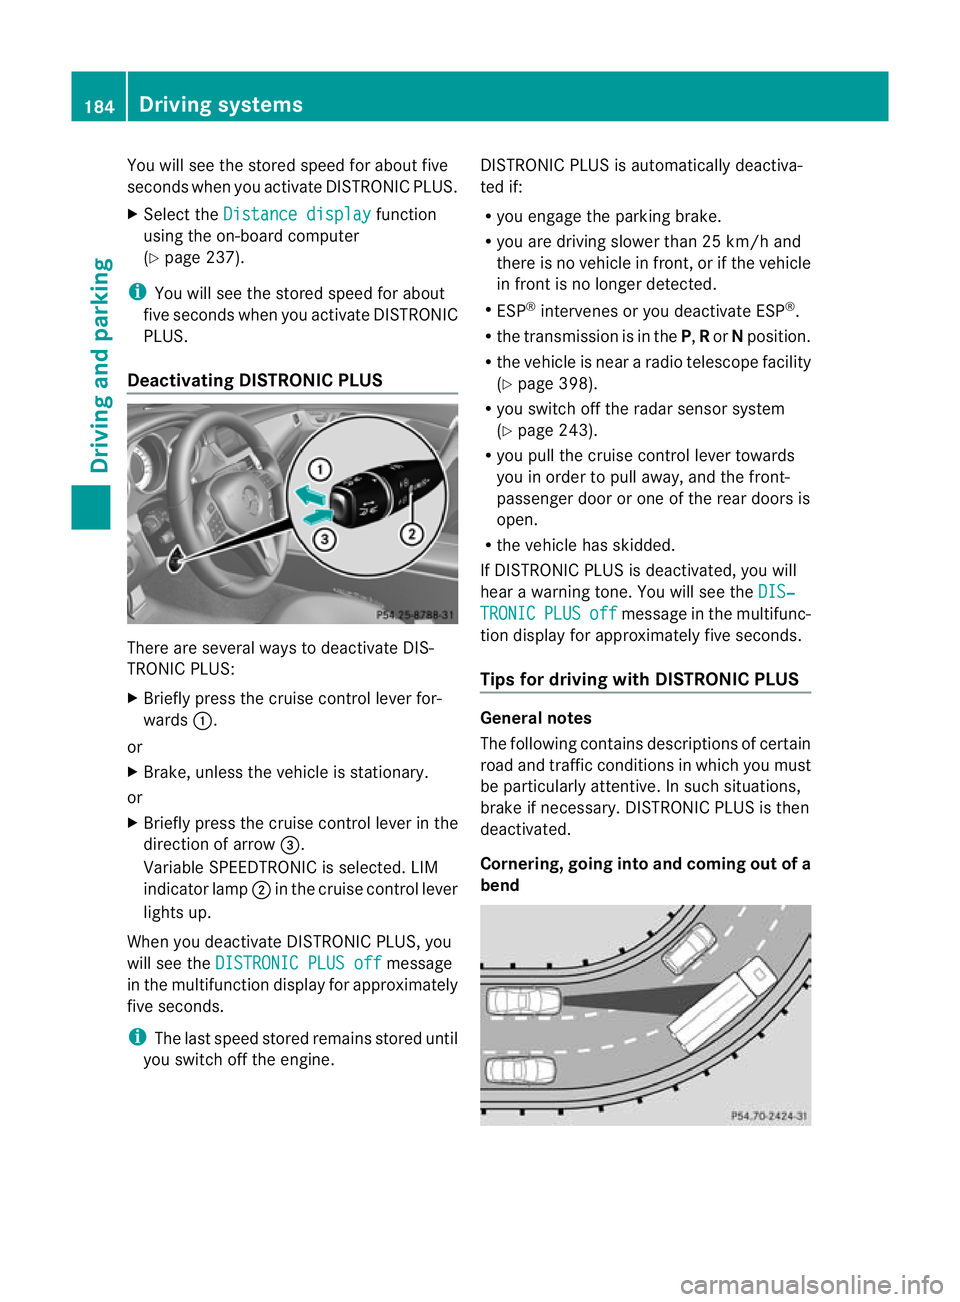
Deactivating DISTRONIC PLUS There are several ways to deactivate DIS-
TRONIC PLUS:
X Briefly press the cruise control lever for-
wards :.
or
X Brake, unless the vehicle is stationary.
or
X Briefly press the cruise control lever in the
direction of arrow =.
Variable SPEEDTRONIC is selected. LIM
indicator lamp ;in the cruise control lever
lights up.
When you deactivate DISTRONIC PLUS, you
will see the DISTRONIC PLUS off message
in the multifunction display for approximately
five seconds.
i The last speed stored remains stored until
you switch off the engine. DISTRONIC PLUS is automatically deactiva-
ted if:
R
you engage the parking brake.
R you are driving slower than 25 km/h and
there is no vehicle in front, or if the vehicle
in front is no longer detected.
R ESP ®
intervenes or you deactivate ESP ®
.
R the transmission is in the P,Ror Nposition.
R the vehicle is near a radio telescope facility
(Y page 398).
R you switch off the radar sensor system
(Y page 243).
R you pull the cruise control lever towards
you in order to pull away, and the front-
passenger door or one of the rear doors is
open.
R the vehicle has skidded.
If DISTRONIC PLUS is deactivated, you will
hear a warning tone. You will see the DIS‐ TRONIC PLUS off message in the multifunc-
tion display for approximately five seconds.
Tips for driving with DISTRONIC PLUS General notes
The following contains descriptions of certain
road and traffic conditions in which you must
be particularly attentive. In such situations,
brake if necessary. DISTRONIC PLUS is then
deactivated.
Cornering, going into and coming out of a
bend184
Driving systemsDriving and parking