2012 MERCEDES-BENZ CLS SHOOTING BRAKE change key battery
[x] Cancel search: change key batteryPage 81 of 405
Changing the settings of the locking
system
You can change the settings of the locking
system. This means that only the driver's door
and the fuel fille rflap are unlocked when the
vehicle is unlocked. This is useful if you fre-
quently travel on your own.
X To change the setting: press and hold
down the %and& buttons on the
key simultaneously for approximately six
seconds until the battery chec klamp
flashes twice ( Ypage 79).
i If the setting of the locking system is
changed within the signal range of the vehi-
cle, pressing the &or% button:
R locks or
R unlocks the vehicle
The key now functions as follows:
X To unlock the driver's door: press the
% button once.
X To unlock centrally: press the%but-
ton twice.
X To lock centrally: press the&button.
The KEYLESS-GO function is changed as fol-
lows:
X To unlock the driver's door: touch the
inner surface of the door handle on the
driver's door.
X To unlock centrally: touch the inner sur-
face of the door handle on the front-
passenger door or the rear door.
X To lock centrally: touch the outer sensor
surface on one of the door handles.
X To restore the factory settings: press
and hold down the %and& buttons
simultaneously for approximately six sec-
onds until the battery check lamp flashes
twice (Y page 79). Emergency key element
General notes If the vehicle can no longer be locked or
unlocked with the key, use the emergency
key element.
If you use the emergenc
ykey element to
unlock and open the driver's door or the boot
lid/tailgate, the anti-thef talarm system will
be triggered (Y page 72).
There are several ways to tur noff the alarm:
X To turn the alarm off with the key: press
the % or& button on the key.
or
X Insert the key into the ignition lock.
or
X To deactivate the alarm with KEYLESS-
GO: press the Start/Stop button in the igni-
tion lock. The key must be in the vehicle.
or
X Lock or unlock the vehicle using KEYLESS-
GO. The key must be outside the vehicle.
If you unlock the vehicle using the emergency
key element, the fuel filler flap will not be
unlocked automatically.
X To unlock the fuel filler flap: insert the
key into the ignition lock.
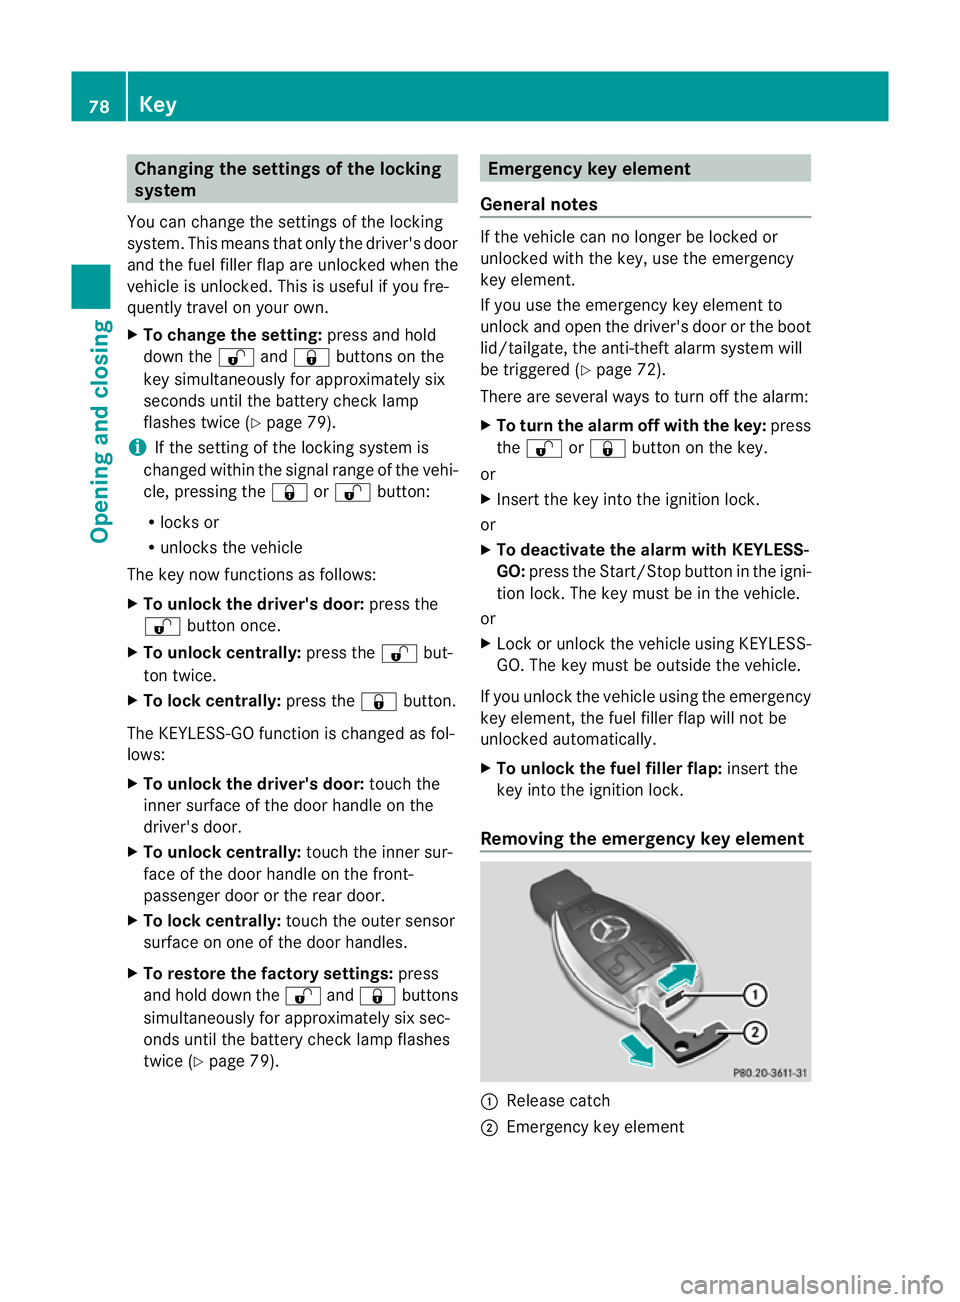
Removing the emergency key element :
Release catch
; Emergency key element 78
KeyOpening and closing
Page 82 of 405
X
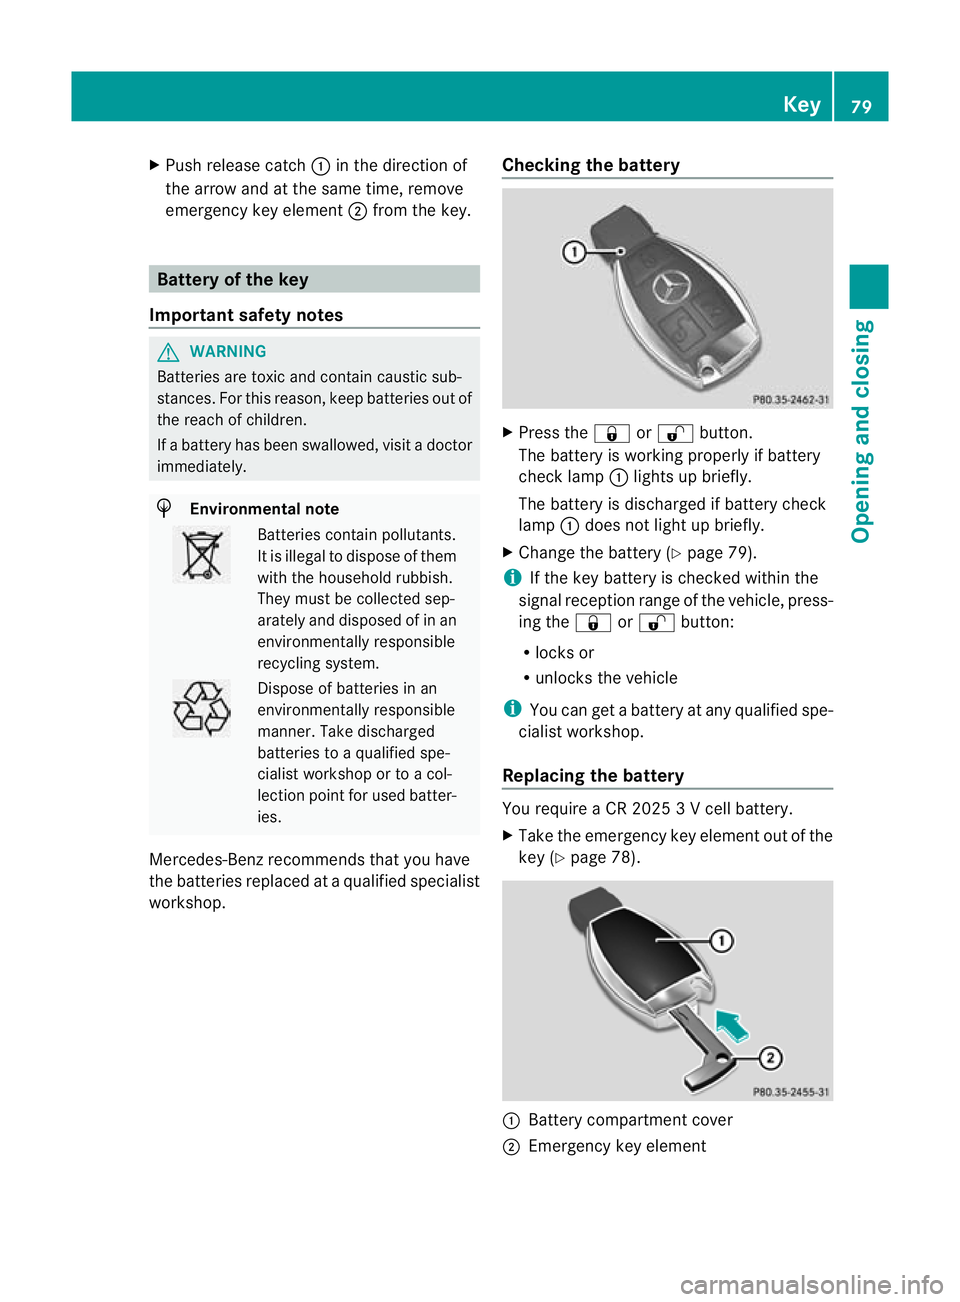
Push release catch :in the direction of
the arrow and at the same time, remove
emergency key element ;from the key. Battery of the key
Important safety notes G
WARNING
Batteries are toxic and contain caustic sub-
stances. For this reason, keep batteries out of
the reach of children.
If a battery has been swallowed, visit a doctor
immediately. H
Environmental note Batteries contain pollutants.
It is illegal to dispose of them
with the household rubbish.
They must be collected sep-
arately and disposed of in an
environmentally responsible
recycling system.
Dispose of batteries in an
environmentally responsible
manner
.Take discharged
batteries to a qualified spe-
cialis tworkshop or to a col-
lection point for used batter-
ies.
Mercedes-Benz recommends that you have
the batteries replaced at a qualified specialist
workshop. Checking the battery X
Press the &or% button.
The battery is working properly if battery
check lamp :lights up briefly.
The battery is discharged if battery check
lamp :does not light up briefly.
X Change the battery (Y page 79).
i If the key battery is checked within the
signal reception range of the vehicle, press-
ing the &or% button:
R locks or
R unlocks the vehicle
i You can get a battery at any qualified spe-
cialist workshop.
Replacing the battery You require a CR 2025 3 V cell battery.
X
Take the emergency key element out of the
key (Y page 78). :
Battery compartment cover
; Emergency key element Key
79Opening and closing Z
Page 84 of 405
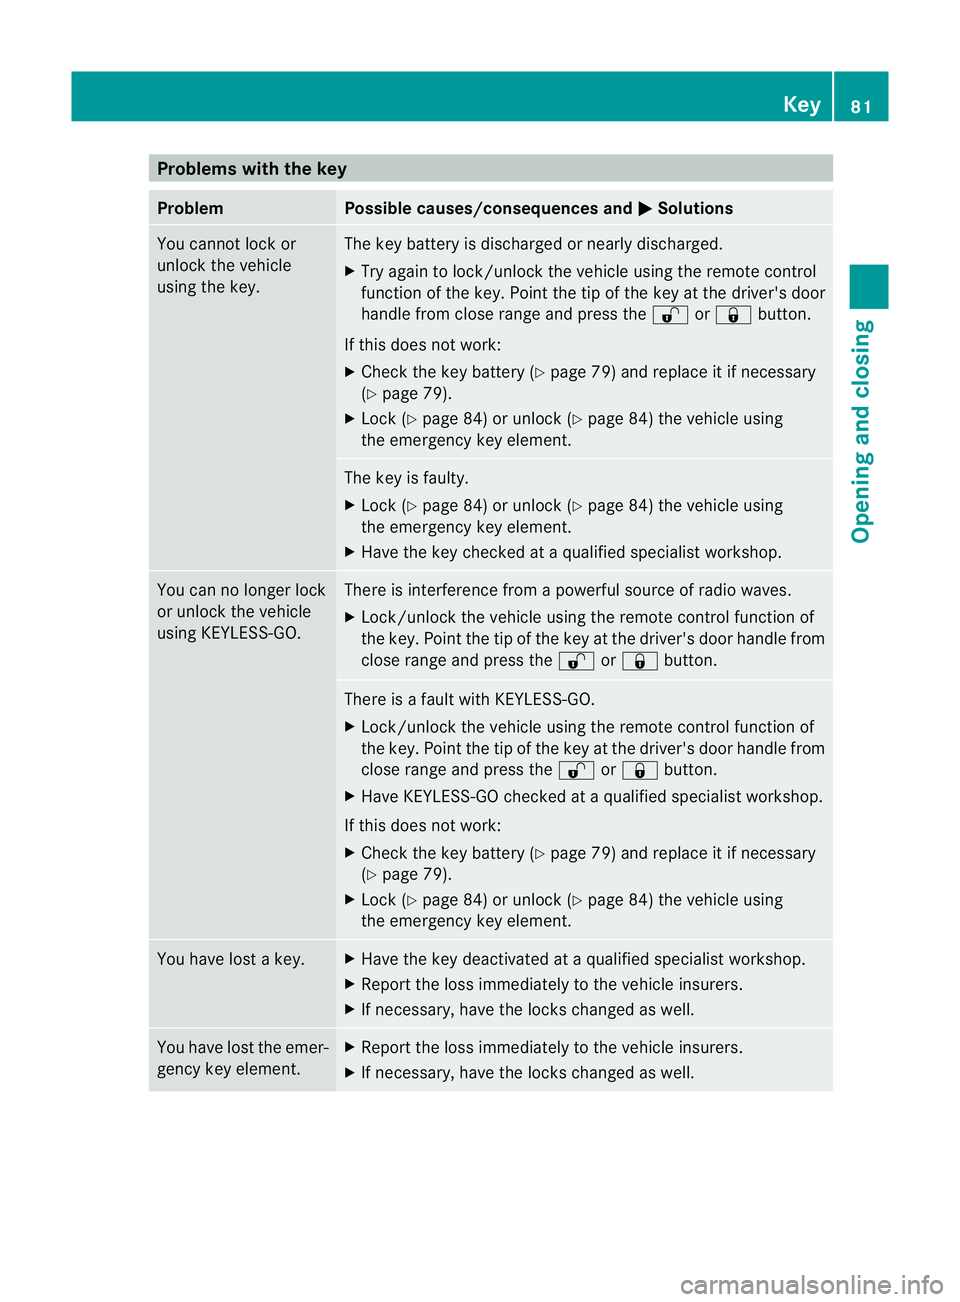
Problems with the key
Problem Possible causes/consequences and
M Solutions
You cannot lock or
unlock the vehicle
using the key. The key battery is discharged or nearly discharged.
X
Try again to lock/unlock the vehicle using the remote control
function of the key. Point the tip of the key at the driver's door
handle from close range and press the %or& button.
If this does not work:
X Check the key battery (Y page 79) and replace it if necessary
(Y page 79).
X Lock (Y page 84) or unlock (Y page 84) the vehicle using
the emergency key element. The key is faulty.
X
Lock (Y page 84) or unlock (Y page 84) the vehicle using
the emergency key element.
X Have the key checked at a qualified specialist workshop. You can no longer lock
or unlock the vehicle
using KEYLESS-GO. There is interference from a powerful source of radio waves.
X Lock/unlock the vehicle using the remote control function of
the key. Point the tip of the key at the driver's door handle from
close range and press the %or& button. There is a fault with KEYLESS-GO.
X
Lock/unlock the vehicle using the remote control function of
the key. Point the tip of the key at the driver's door handle from
close range and press the %or& button.
X Have KEYLESS-GO checked at a qualified specialist workshop.
If this does not work:
X Check the key battery (Y page 79) and replace it if necessary
(Y page 79).
X Lock (Y page 84) or unlock (Y page 84) the vehicle using
the emergency key element. You have lost a key. X
Have the key deactivated at a qualified specialist workshop.
X Report the loss immediately to the vehicle insurers.
X If necessary, have the locks changed as well. You have lost the emer-
gency key element. X
Report the loss immediately to the vehicle insurers.
X If necessary, have the locks changed as well. Key
81Opening and closing Z
Page 142 of 405
is being refuelled. You must therefore switch
off the auxiliary heating at filling stations.
! Operating the auxiliary heating/ventila-
tion draws on the vehicle battery. After you
have heated or ventilated the vehicle a
maximum of two times, drive for a longer
distance.
i Switch the auxiliary heatin gonregularly
once a month for about ten minutes.
The auxiliary heating heats the air in the
passenger compartment to the selected tem-
perature. It does not use the heat of the run-
ning engine to do this. The auxiliary heating
is operated directly using the vehicle's fuel.
For this reason, the tank content must be at
least at reserve fuel level to ensure that the
auxiliary heating functions.
The auxiliary heating/ventilation automati-
cally adjusts to changes in temperature and
weather conditions .For this reason, the aux-
iliary heating could switch from ventilation
mode to heating mode or from heating mode
to ventilation mode.
The auxiliary heating switches off automati-
cally after 50 minutes. This time limit can be
altered. To do this, visit a qualified specialist
workshop.
You cannot use the auxiliary ventilation to
cool the vehicle interior to a temperature
lower than the outside temperature.
Before switching on X
Turn the key to position 2in the ignition
lock.
X Set the temperature.
The auxiliary heating/ventilation can be acti-
vated even when climate control is set to
manual. Optimum comfort can be attained
when the system is set to automatic mode.
Set the temperature to 22 †.
The auxiliary heating/ventilation can be acti-
vated or deactivated using the remote control
or the button on the centre console. The on-board computer can be used to spec-
ify up to three departure times, one of which
may be preselected (Y
page 243).
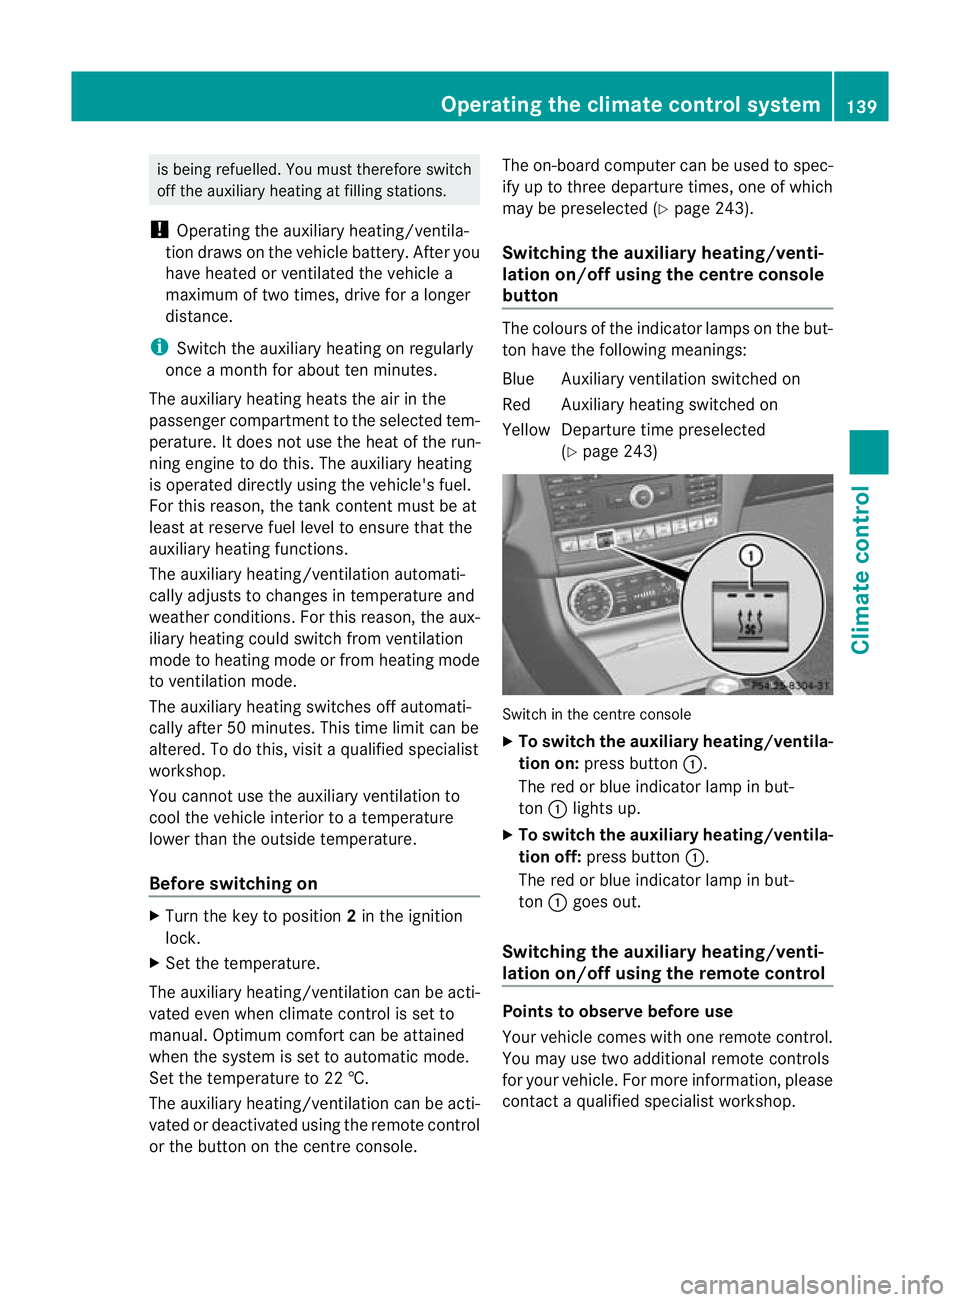
Switching the auxiliary heating/venti-
lation on/off using the centre console
button The colours of the indicator lamps on the but-
ton have the following meanings:
Blue Auxiliary ventilation switched on
Red Auxiliary heating switched on
Yellow Departure time preselected
(Ypage 243) Switch in the centre console
X
To switch the auxiliary heating/ventila-
tion on: press button :.
The red or blue indicator lamp in but-
ton :lights up.
X To switch the auxiliary heating/ventila-
tion off: press button :.
The red or blue indicator lamp in but-
ton :goes out.
Switching the auxiliary heating/venti-
lation on/off using the remote control Points to observe before use
Your vehicle comes with one remote control.
You may use two additional remote controls
for your vehicle. For more information, please
contact a qualified specialist workshop.Operating the climate control system
139Climate control Z
Page 352 of 405
The automatic transmission automatically
shifts to position
Pwhen you open the driver's
or front-passenger door or when you remove
the key from the ignition lock. In order to
ensure that the automatic transmission stays
in position Nwhen towing the vehicle, you
must observe the following points:
X Make sure that the vehicle is stationary and
that the key is in position 0in the ignition
lock.
X Turn the key to position 2in the ignition
lock.
On vehicles with KEYLESS-GO, use the key
instead of the Start/Stop button
(Y page 147).
X Depress and hold the brake pedal.
X Shift the automatic transmission to posi-
tion N.
X Release the brake pedal.
X Release the parking brake.
X Switch on the hazard warning lamps
(Y page 118).
X Leave the key in position 2in the ignition
lock.
i When towing with the hazard warning
lamps switched on, use the combination
switch as usual to signal achange of direc-
tion. In this case, only the turn signals for
the desired direction flash. When you reset
the combination switch, the hazard warn-
ing lamps start flashing again. Transporting the vehicle
! Only lash the vehicle down by the wheels
or wheel rims, not by parts of the vehicle
such as axle or steering components. Oth-
erwise, the vehicle could be damaged.
The towing eye can be used to pull the vehicle
onto a trailer or transporter for transporting
purposes.
The towing eyes or trailer tow hitch can be
used to pull the vehicle onto a trailer or trans-
porter if you wish to transport it. X
Turn the key to position 2in the ignition
lock.
X Shift the automatic transmission to posi-
tion N.
As soon as the vehicle is loaded:
X Prevent the vehicle from rolling away by
applying the parking brake.
X Shift the automatic transmission to posi-
tion P.
X Turn the key in the ignition lock to position
0and remove the key from the ignition
lock.
X Secure the vehicle. Notes for 4MATIC vehicles
! Vehicles with 4MATIC must not be towed
with the front or rear axle raised; otherwise,
the transmission may be damaged.
If the vehicle has transmission damage or
damage to the front or rear axle, have it trans-
ported on a transporter or trailer.
In the event of damage to the electrical
system
If the battery is defective, the automatic
transmission will be locked in position P. To
shift the automatic transmission to position
N, you must provide power to the vehicle's
electrical system in the same way as when
jump-starting (Y page 344).
Have the vehicle transported on a transporter
or trailer. Tow-starting (emergency engine
starting)
! Vehicles with automatic transmission
must not be tow-started. The transmission
may otherwise be damaged.
You can find information on "Jump-starting"
at (Y page 344). Towing and tow-starting
349Breakdown assistance Z