2012 MERCEDES-BENZ CLS SHOOTING BRAKE warning light
[x] Cancel search: warning lightPage 72 of 405
X
To deactivate: press button:until the
å ESP®
OFF warning lamp lights up in
the instrument cluster.
The ÷OFF message appears in the mul-
tifunctio ndisplay.
Deactivate ESP ®
when driving on designa-
ted roads when the vehicle's own over-
steering and understeering characteristics
are desired. Driving without ESP ®
requires
an extremely qualified and experienced
drive rwho is able to cope with these critical
driving conditions.
X To activate: briefly press button :.
The å ESP®
OFF warning lamp in the
instrumentc luster goes out. The ÷ON message appears in the multifunction dis-
play.
ESP ®
is activated automatically when the
engine is started.
If ESP ®
is deactivated and one or more wheels
start to spin, the ÷ESP®
warning lamp in
the instrumen tcluster does not flash. In such
situations, ESP ®
will not stabilise the vehicle.
It may be best to deactivate ESP ®
in the fol-
lowing situations:
R when using snow chains
R in deep snow
R on sand or gravel
If you deactivate ESP ®
:
R ESP ®
no longer improves driving stability.
R traction control is still activated.
R PRE-SAFE ®
is no longer available; nor is it
activated if you brake firmly and ESP ®
inter-
venes.
R PRE-SAFE ®
Brake is no longer available; it
is also not activated if you brake firmly and
ESP ®
intervenes.
R ESP ®
still provides support when you
brake.
R engine torque is no longer limited and the
drive wheels are able to spin .The spinning
of the wheels results in a cutting action for
better traction. Vehicles with ECO start/stop function: the
ECO start/stop function switches the engine
off automatically when the vehicle comes to
a stop. When pulling away again, the engine
starts automatically
.ESP ®
remains in its pre-
viously selected status. Example :ifESP®
was
deactivated before the engine was switched
off, ESP ®
remains deactivated when the
engine is switched on again.
ESP ®
trailer stabilisation G
WARNING
If road and weather conditions are poor,
traile rstabilisation will not be able to prevent
the vehicle/trailer combination from swerv-
ing .Trailers with a high centre of gravity can
tip over before ESP ®
can detect this. There is
a risk of an accident.
Always adapt yourd riving style to the prevail-
ing road and weather conditions.
If yourv ehicle/trailer combination begins to
lurch, you can only stabilise the vehicle/
trailer combination by depressing the brake
firmly.
In this situation, ESP ®
assists you and can
detec tifthe vehicle/trailer combination
begins to lurch. ESP ®
slows the vehicle down
by braking and limiting the engine output until
the vehicle/trailer combination has stabi-
lised.
Trailer stabilisation is active above speeds of
about 65 km/h.
Trailer stabilisation does not work if ESP ®
is
deactivated or disabled because of a mal-
function. EBD (electronic brake force distribu-
tion)
i Observe the "Important safety notes" sec-
tion (Y page 64). Driving safety systems
69Safety Z
Page 73 of 405
G
WARNING
If EBD has malfunctioned, the rear wheels can
still lock, e.g. under full braking. This increa-
ses the risk of skidding and an accident.
You should therefore adapt yourd riving style
to the different handling characteristics. Have
the brake system checked at a qualified spe-
cialist workshop.
Observe informatio nregarding indicator and
warning lamps ( Ypage 279) as well as dis-
play messages (Y page 252).
EBD monitors and controls the brake pres-
sure on the rear wheels to improve driving
stability while braking. ADAPTIVE BRAKE
ADAPTIVE BRAKE enhances braking safety
and offers increased braking comfort. In addi-
tion to the brakin gfunction ,ADAPTIVE BRAKE
also has the HOLD functio n(Ypage 186 )and
hill start assist (Y page 150). PRE-SAFE
®
Brake
i Observe the "Important safety notes" sec-
tion (Y page 64).
PRE-SAFE ®
Brake is only available in vehicles
with DISTRONIC PLUS.
PRE-SAFE ®
Brake can help you to minimise
the ris kofacollisio nwith a vehicle ahead or
reduce the effects of such a collision. If PRE-
SAFE ®
Brake detects a risk of collision, you
will be warned visually and acoustically as
well as by automatic braking. PRE-SAFE ®
Brake cannot prevent a collision without your
intervention.
This function will issue a warning if:
R at speeds of around 30 km/h or more, over
several seconds, the distanc emaintained
to the vehicle travelling in front is insuffi-
cient. The
· distance warning lamp then lights
up in the instrument cluster.
R at a speed of approximately 7km/h or
higher, you very quickly approach a vehicle
in front.
An intermittent warning tone will then
sound and the ·distance warning lamp
will light up in the instrument cluster.
X Brake immediately in order to increase the
distance from the vehicle in front.
or
X Take evasive action provided it is safe to do
so.
From a speed of approximately 7km/h, if the
driver and passengers have fastened their
seat belts, PRE-SAFE ®
Brake can brake the
vehicle automatically at speeds up to approx-
imatel y200 km/h.
Due to the nature of the system, particularly
complicated driving conditions may cause
unnecessary warnings or the unnecessary
intervention of PRE-SAFE ®
Brake.
You can prevent the intervention of the PRE-
SAFE ®
Brake at any time by:
R depressing the accelerato rpedal further
R activating kickdown
R releasing the brake pedal.
The braking action of PRE-SAFE ®
Brake is
ended automatically if:
R you manoeuvre to avoid the obstacle.
R there is no longer any danger of a rear-end
collision.
R there is no longer an obstacle detected in
front of your vehicle.
With the help of the radar sensor system,
PRE-SAFE ®
Brake can detect obstacles that
are in front of your vehicle for an extended
period of time.
At speeds up to approximately 70 km/h, PRE-
SAFE ®
Brake can also detect stationary
obstacles such as stopped or parked vehi-
cles. 70
Driving safet
ysystemsSafety
Page 82 of 405
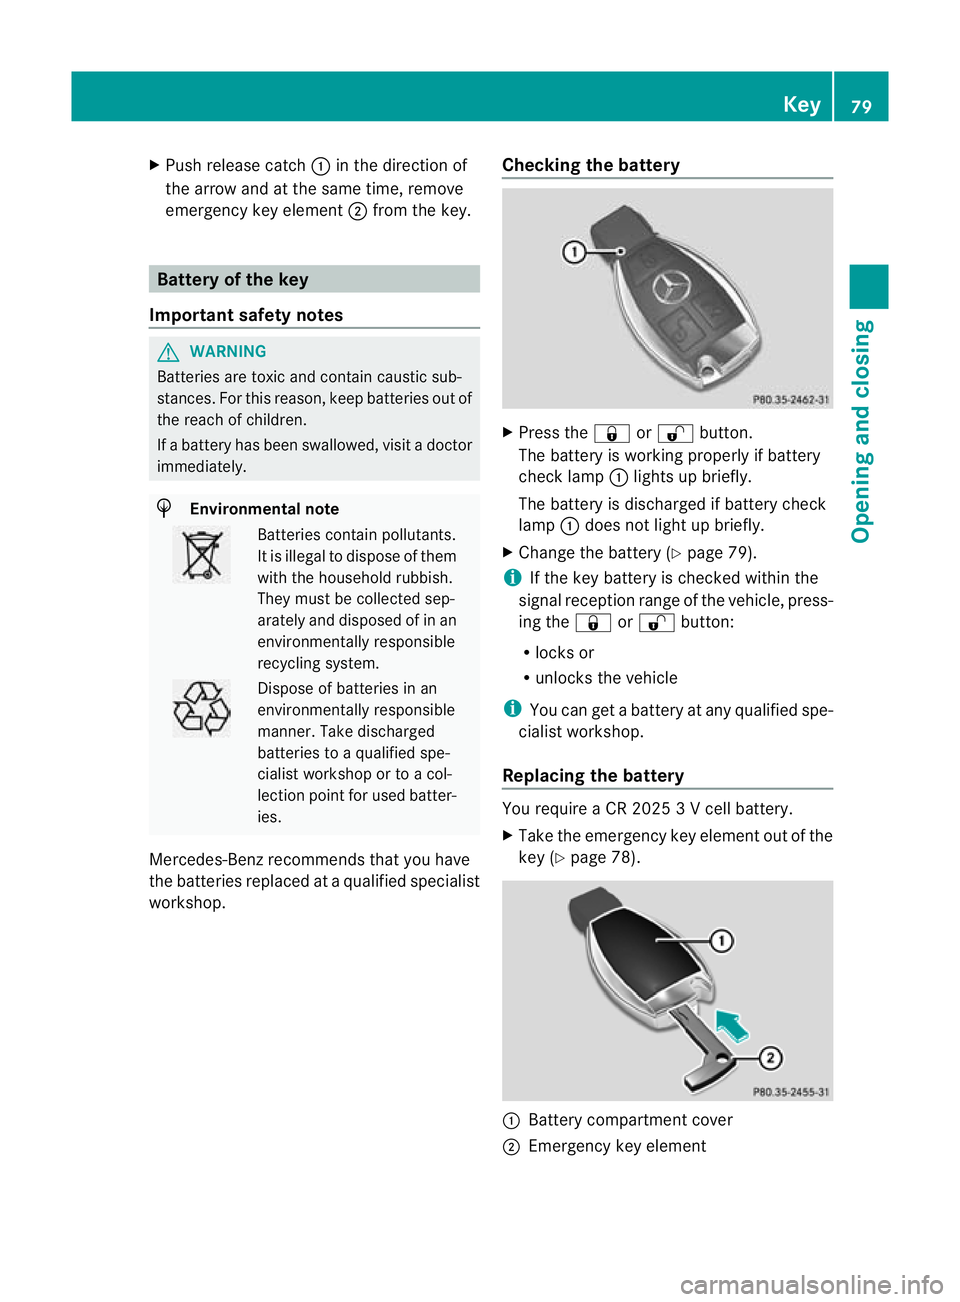
X
Push release catch :in the direction of
the arrow and at the same time, remove
emergency key element ;from the key. Battery of the key
Important safety notes G
WARNING
Batteries are toxic and contain caustic sub-
stances. For this reason, keep batteries out of
the reach of children.
If a battery has been swallowed, visit a doctor
immediately. H
Environmental note Batteries contain pollutants.
It is illegal to dispose of them
with the household rubbish.
They must be collected sep-
arately and disposed of in an
environmentally responsible
recycling system.
Dispose of batteries in an
environmentally responsible
manner
.Take discharged
batteries to a qualified spe-
cialis tworkshop or to a col-
lection point for used batter-
ies.
Mercedes-Benz recommends that you have
the batteries replaced at a qualified specialist
workshop. Checking the battery X
Press the &or% button.
The battery is working properly if battery
check lamp :lights up briefly.
The battery is discharged if battery check
lamp :does not light up briefly.
X Change the battery (Y page 79).
i If the key battery is checked within the
signal reception range of the vehicle, press-
ing the &or% button:
R locks or
R unlocks the vehicle
i You can get a battery at any qualified spe-
cialist workshop.
Replacing the battery You require a CR 2025 3 V cell battery.
X
Take the emergency key element out of the
key (Y page 78). :
Battery compartment cover
; Emergency key element Key
79Opening and closing Z
Page 85 of 405
Problem Possible causes/consequences and
M Solutions
The engine cannot be
started using the key. the on-board voltage is too low.
X
Switch off non-essential consumers, e.g. seat heating or interior
lighting, and try to start the engine again.
If this does not work:
X Check the starter battery and charge it if necessary
(Y page 343).
or
X Jump-start the vehicle (Y page 344).
or
X Consult a qualified specialist workshop. The engine cannot be
started using KEYLESS-
GO. The key is in the
vehicle. Ad
oor is open. Therefore, the key cannot be detected as easily.
X Close the door and try to start the vehicle again. There is interference from a powerful source of radio waves.
X
Start your vehicle with the key in the ignition lock. Doors
Important safety notes
G
WARNING
Only for the United Kingdom: if the vehicle
has been locked with the key or with KEY-
LESS-GO, the double lock function is activa-
ted as standard. It is then not possible to open
the doors from inside the vehicle.
Therefore, do not leave any people behind in
the vehicle, particularly children, elderly peo-
ple or people requiring special assistance. As
a result, they may not be able to free them-
selves in the event of an emergency. They
could be seriously or even fatally injured by
prolonged exposure to extremely high or low
temperatures, for example. In this case, res-
cuing people from outside the vehicle is diffi-
cult.
Deactivate the interior motion sensor before
you lock the vehicle. The doors can then be
opened from the inside after the vehicle has
been locked from the outside. G
WARNING
If children are left unsupervised in the vehicle,
they could:
R open a door from inside the vehicle at any
time, even if it has been locked
R start the vehicle using akey which has been
left in the vehicle
R release the parking brake
They could thereby endanger themselves and
others. Never leave children unsupervised in
the vehicle. Always take the key with you
when leaving the vehicle, even if you are only
leaving it for a short time. Unlocking and opening the doors
from the inside
For all countries except the United King-
dom: you can open a door from inside the
vehicle even if it has been locked. If the vehi-
cle was locked with the key or with KEYLESS-
GO, opening a door from the inside will trigger
the anti-theft alarm system. Switch off the
alarm (Y page 72). 82
DoorsOpening and closing
Page 95 of 405
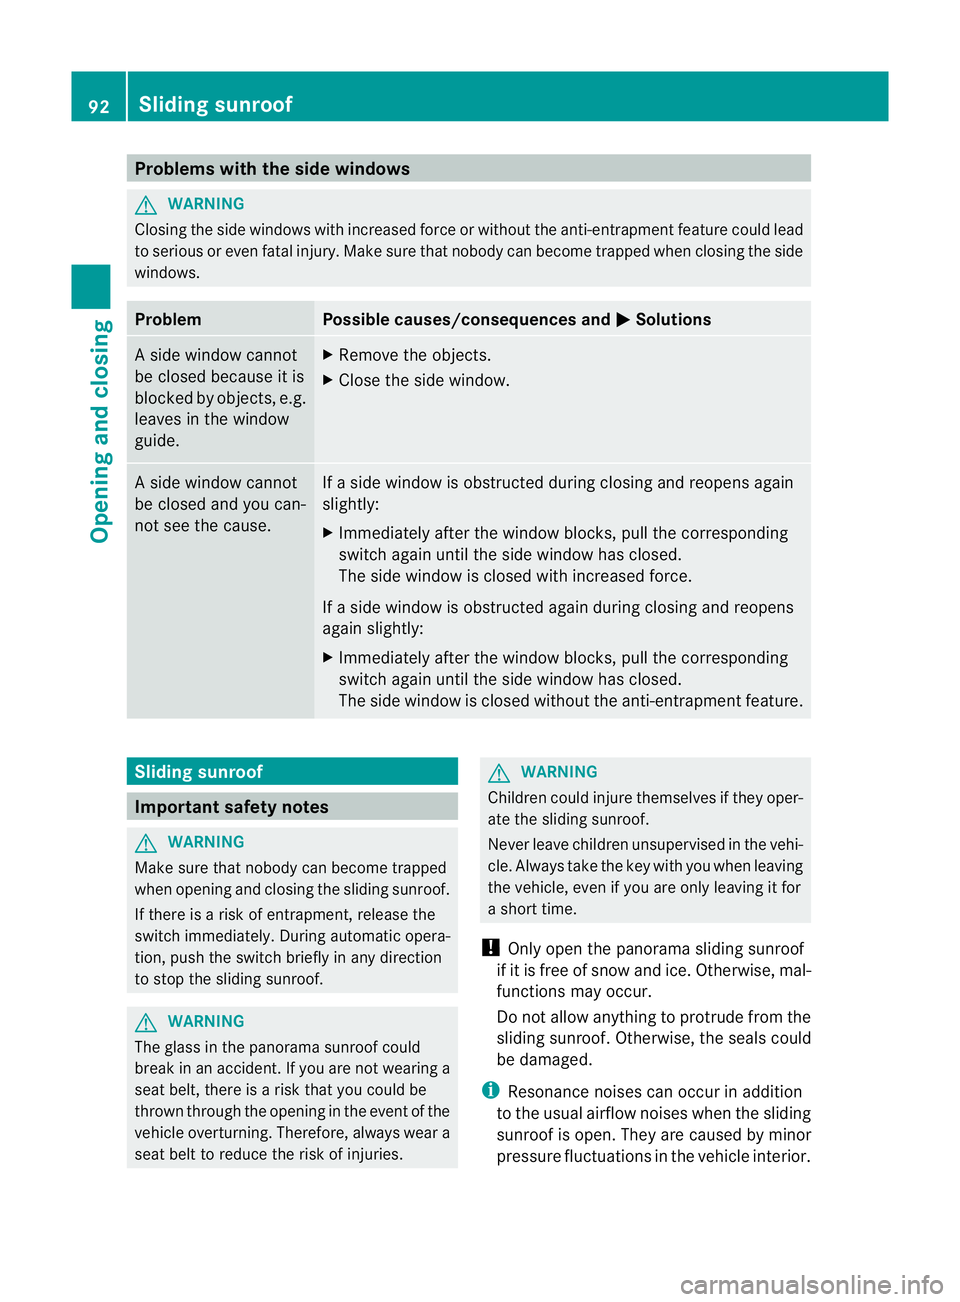
Problems with the side windows
G
WARNING
Closing the side windows with increased force or without the anti-entrapment feature could lead
to serious or even fatal injury. Make sure that nobody can become trapped when closing the side
windows. Problem Possible causes/consequences and
M Solutions
As
ide window cannot
be closed because it is
blocked by objects, e.g.
leaves in the window
guide. X
Remove the objects.
X Close the side window. As
ide window cannot
be closed and you can-
not see the cause. If a side window is obstructed during closing and reopens again
slightly:
X
Immediately after the window blocks, pull the corresponding
switch again until the side window has closed.
The side window is closed with increased force.
If a side window is obstructed again during closing and reopens
again slightly:
X Immediately after the window blocks, pull the corresponding
switch again until the side window has closed.
The side window is closed without the anti-entrapmen tfeature. Sliding sunroof
Important safety notes
G
WARNING
Make sure that nobody can become trapped
when opening and closing the sliding sunroof.
If there is a risk of entrapment, release the
switch immediately. During automatic opera-
tion, push the switch briefly in any direction
to stop the sliding sunroof. G
WARNING
The glass in the panorama sunroof could
break in an accident. If you are not wearing a
seat belt, there is a risk that you could be
thrown through the opening in the event of the
vehicle overturning .Therefore, always wear a
seat belt to reduce the risk of injuries. G
WARNING
Children could injure themselves if they oper-
ate the sliding sunroof.
Never leave children unsupervised in the vehi-
cle. Always take the key with you when leaving
the vehicle, even if you are only leaving it for
a short time.
! Only open the panorama sliding sunroof
if it is free of snow and ice. Otherwise, mal-
functions may occur.
Do not allow anything to protrude from the
sliding sunroof. Otherwise, the seals could
be damaged.
i Resonance noises can occur in addition
to the usual airflow noises when the sliding
sunroof is open. They are caused by minor
pressure fluctuations in the vehicle interior. 92
Sliding sunroofOpening and closing
Page 98 of 405
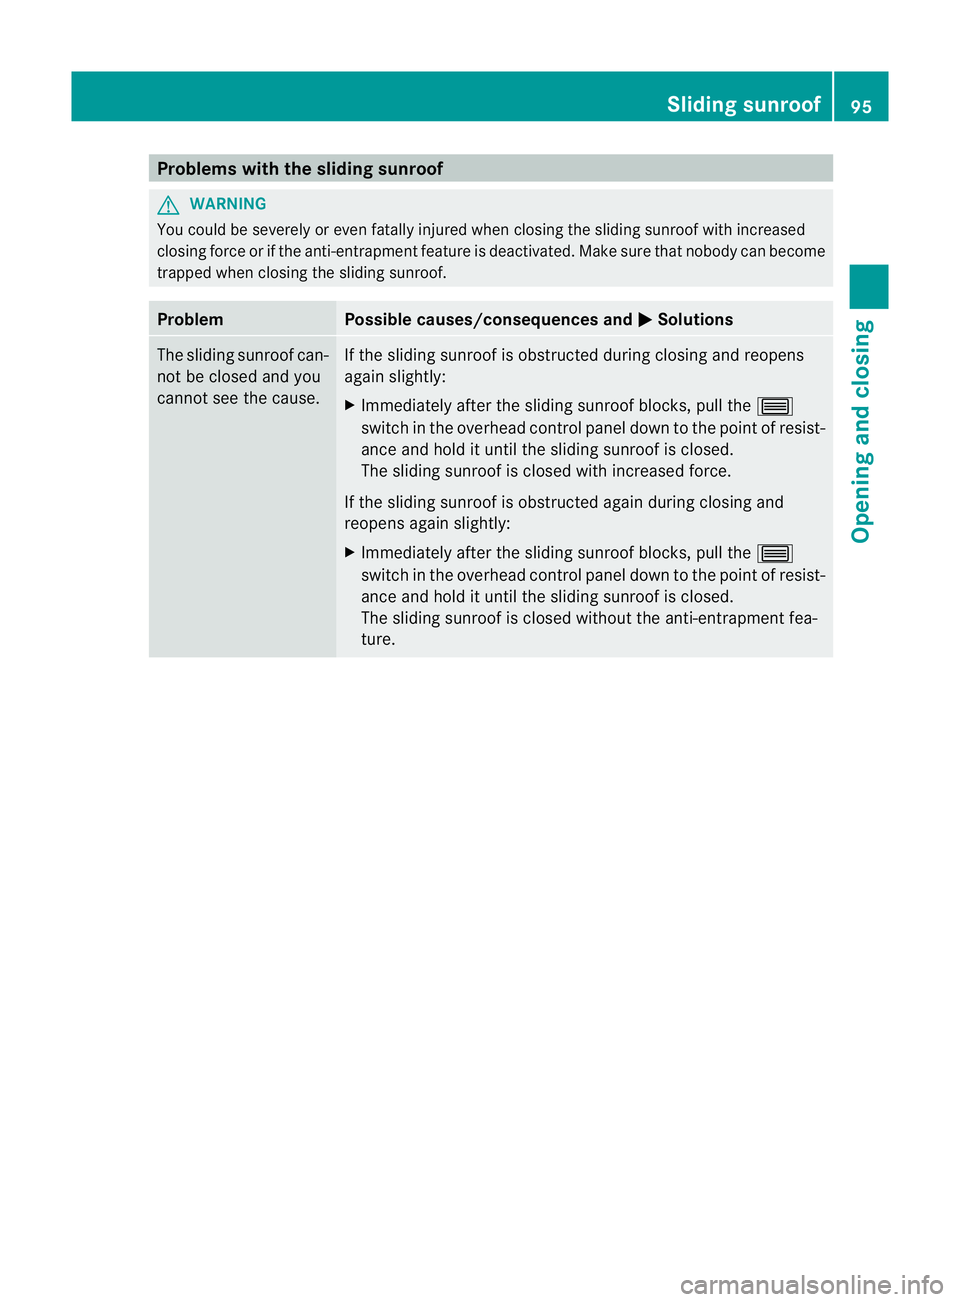
Problems with the sliding sunroof
G
WARNING
You could be severely or even fatally injured when closing the sliding sunroof with increased
closing force or if the anti-entrapment feature is deactivated. Make sure that nobody can become
trapped when closing the sliding sunroof. Problem Possible causes/consequences and
M Solutions
The sliding sunroof can-
not be closed and you
cannot see the cause. If the sliding sunroof is obstructed during closing and reopens
again slightly:
X
Immediately after the sliding sunroof blocks, pull the 3
switch in the overhead control panel down to the point of resist-
ance and hold it until the sliding sunroof is closed.
The sliding sunroof is closed with increased force.
If the sliding sunroof is obstructed again during closing and
reopens again slightly:
X Immediately after the sliding sunroof blocks, pull the 3
switch in the overhead control panel down to the point of resist-
ance and hold it until the sliding sunroof is closed.
The sliding sunroof is closed without the anti-entrapment fea-
ture. Sliding sunroof
95Opening and closing Z
Page 107 of 405
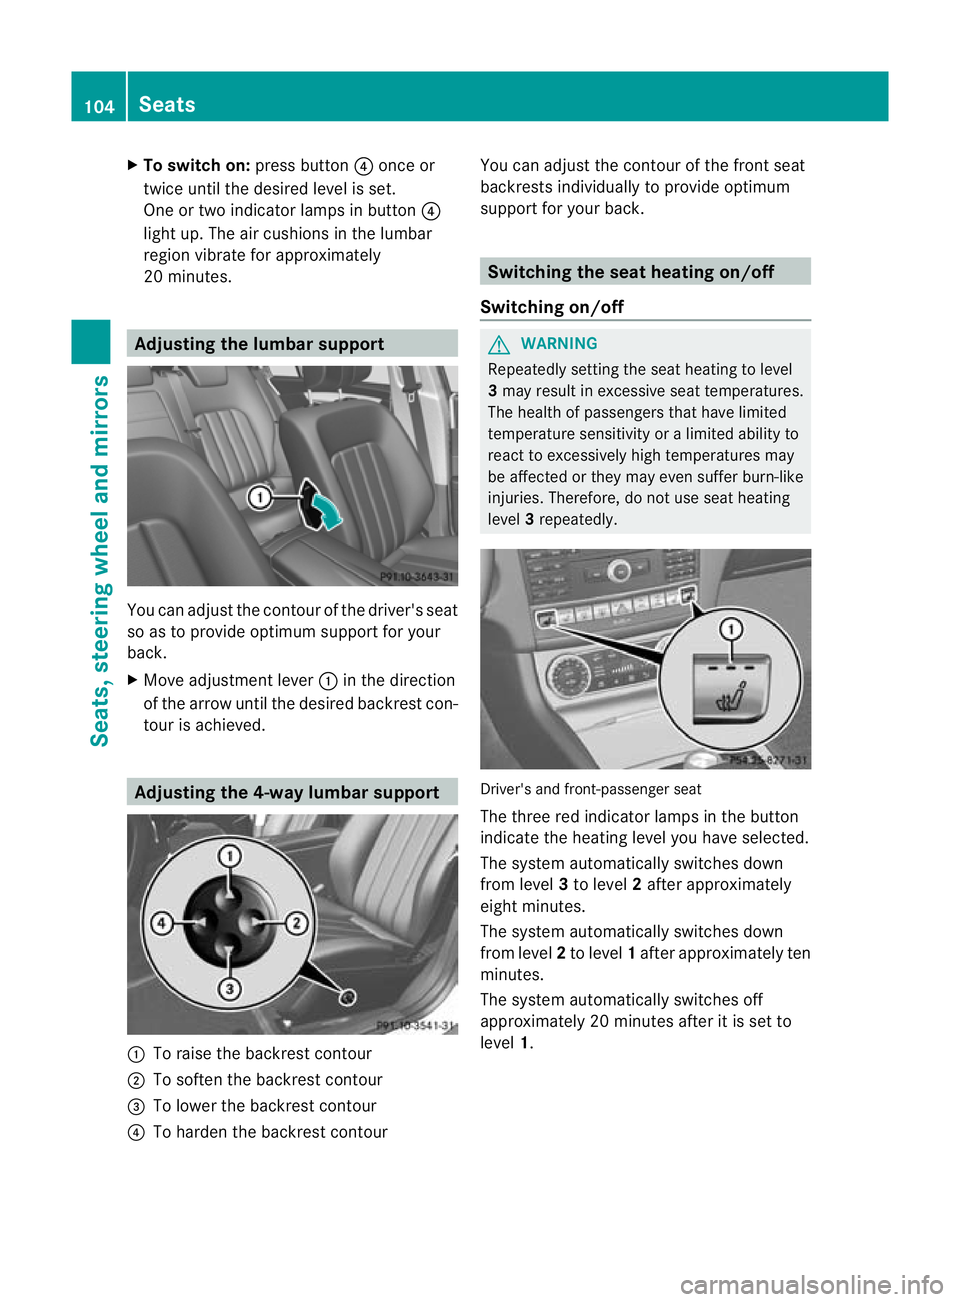
X
To switc hon:press button ?once or
twice until the desired level is set.
One or two indicator lamps in button ?
light up. The air cushions in the lumbar
region vibrate for approximately
20 minutes. Adjusting the lumbar support
You can adjust the contour of the driver's seat
so as to provide optimum support for your
back.
X
Move adjustment lever :in the direction
of the arrow until the desired backrest con-
tour is achieved. Adjusting the 4-way lumbar support
:
To raise the backrest contour
; To soften the backrest contour
= To lower the backrest contour
? To harden the backrest contour You can adjust the contour of the front seat
backrests individually to provide optimum
support for your back. Switching the seat heating on/off
Switching on/off G
WARNING
Repeatedly setting the seat heating to level
3 may result in excessive seat temperatures.
The health of passengers that have limited
temperature sensitivity or a limited ability to
react to excessively high temperatures may
be affected or they may even suffer burn-like
injuries. Therefore, do not use seat heating
level 3repeatedly. Driver's and front-passenger seat
The three red indicator lamps in the button
indicate the heating level you have selected.
The system automatically switches down
from level
3to level 2after approximately
eight minutes.
The system automatically switches down
from level 2to level 1after approximately ten
minutes.
The system automatically switches off
approximately 20 minutes after it is set to
level 1. 104
SeatsSeats, steering wheel and mirrors
Page 108 of 405
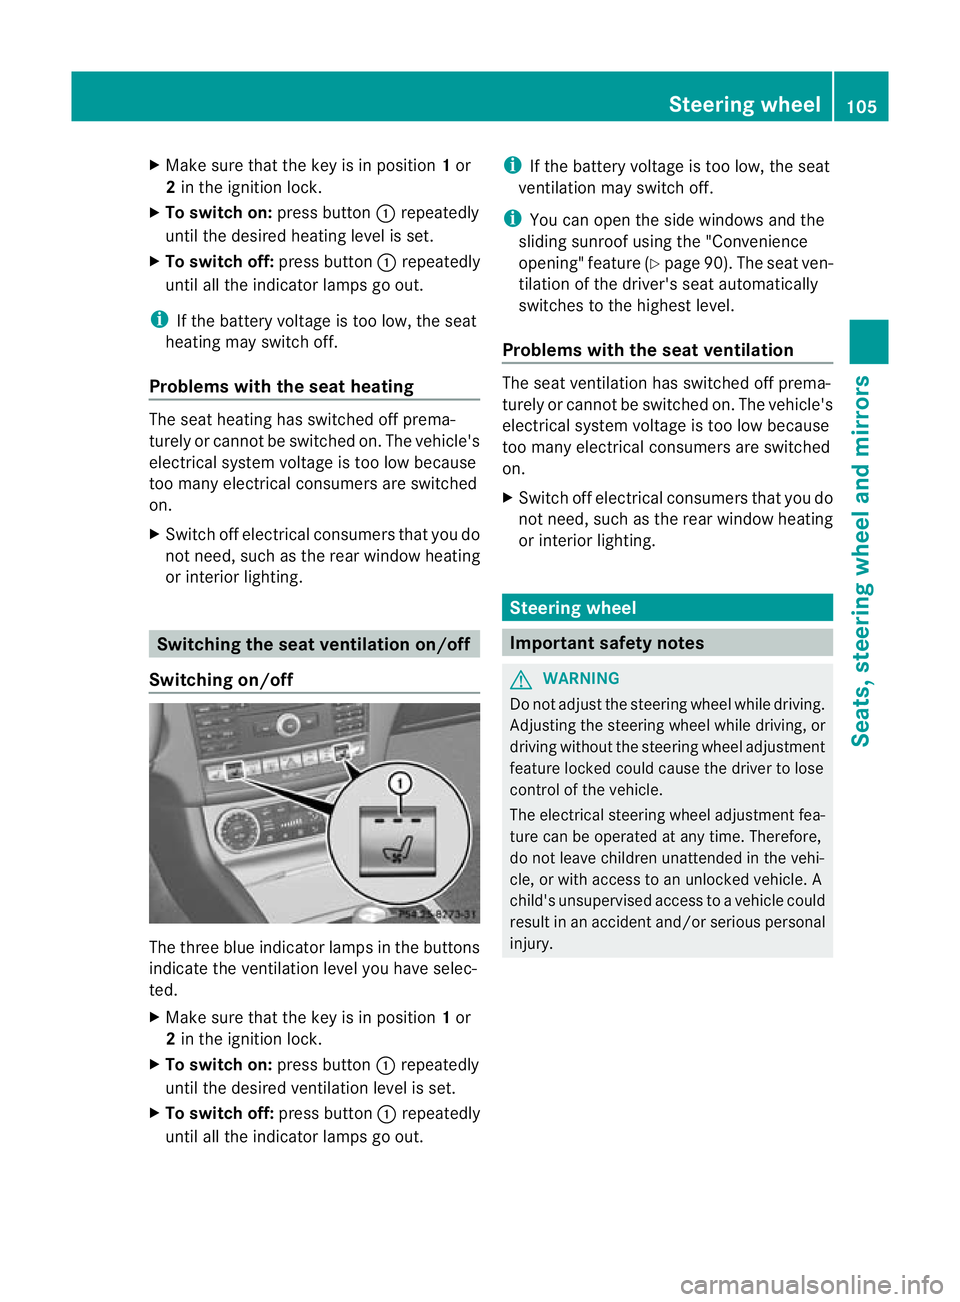
X
Make sure that the key is in position 1or
2 in the ignition lock.
X To switch on: press button:repeatedly
until the desired heating level is set.
X To switch off: press button:repeatedly
until all the indicator lamps go out.
i If the battery voltage is too low, the seat
heating may switch off.
Problems with the seat heating The seat heating has switched off prema-
turely or cannot be switched on. The vehicle's
electrical system voltage is too low because
too many electrical consumers are switched
on.
X Switch off electrical consumers that you do
not need, such as the rear window heating
or interior lighting. Switching the seat ventilation on/off
Switching on/off The three blue indicator lamps in the buttons
indicate the ventilation level you have selec-
ted.
X Make sure that the key is in position 1or
2 in the ignition lock.
X To switch on: press button:repeatedly
until the desired ventilation level is set.
X To switch off: press button:repeatedly
until all the indicator lamps go out. i
If the battery voltage is too low, the seat
ventilation may switch off.
i You can open the side windows and the
sliding sunroof using the "Convenience
opening" feature (Y page 90). The seat ven-
tilation of the driver's seat automatically
switches to the highest level.
Problems with the seat ventilation The seat ventilation has switched off prema-
turely or cannot be switched on. The vehicle's
electrical system voltage is too low because
too many electrical consumers are switched
on.
X
Switch off electrical consumers that you do
not need, such as the rear window heating
or interior lighting. Steering wheel
Important safety notes
G
WARNING
Do not adjust the steering wheel while driving.
Adjusting the steering wheel while driving, or
driving without the steering wheel adjustment
feature locked could cause the driver to lose
control of the vehicle.
The electrical steering wheel adjustment fea-
ture can be operated at any time. Therefore,
do not leave children unattended in the vehi-
cle, or with access to an unlocked vehicle. A
child's unsupervised access to a vehicle could
result in an accident and/or serious personal
injury. Steering wheel
105Seats, steering wheel and mirrors Z