2012 MERCEDES-BENZ CLS SHOOTING BRAKE turn signal
[x] Cancel search: turn signalPage 10 of 405
Centre console
Lowe rsection .................................. 35
Lowe rsection (AMG vehicles) ..........36
Uppe rsection .................................. 34
Changing bulbs
Important safety notes ..................123
Overview of bul btypes .................. 124
Reversing lamps ............................ 124
Child-proof locks
Important safety notes ....................63
Rea rdoors ....................................... 63
Children
In the vehicle ................................... 53
Restraint systems ............................ 53
Child seat
Automatic recognition .....................55
ISOFIX .............................................. 56
On the front-passenger sea t............ 54
Problem (malfunction) .....................59
Recommendations ...........................61
Suitable positions ............................ 59
Top Tether ....................................... 57
Cigarette lighter ................................ 307
Cleaning Mirro rturn signal ........................... 328
Trailer tow hitch ............................. 329
Climate control
Auxiliary heating/ventilation .......... 138
Controlling automatically ...............134
Convenience opening/closing
(air-recirculatio nmode) ................. 137
Cooling with aird ehumidification..133
Demisting the windows .................. 136
Demisting the windscreen .............136
Important safety notes ..................130
Indicator lamp ................................ 134
Information on using
THERMOTRONIC automatic cli-
mate control .................................. 133
Notes on using THERMATIC auto-
matic climate control .....................131
Overview of systems ......................130
Problems with cooling with air
dehumidification ............................ 134
Problem with the rear window
heating .......................................... 137
Rea rcontrol panel ......................... 132
Setting the aird istribution.............135 Setting the airflow
.........................135
Setting the airv ents...................... 142
Setting the climate mode (AIR
FLOW) ............................................ 134
Setting the temperature ................134
Setting the temperature,
THERMATI C................................... 134
Setting the temperature,
THERMOTRONIC ............................ 135
Switching air-recirculation mode
on/off ............................................ 137
Switching on/off ........................... 133
Switching residual hea ton/off ......138
Switching the rear window heat-
ing on/off ...................................... 137
Switching the ZONE function on/
off .................................................. 136
THERMATIC automatic climate
control (2-zone) ............................. 131
THERMOTRONIC (3-zone) auto-
matic climate control .....................132
Coat hooks ......................................... 296
Cockpit Overview .......................................... 28
see Instrument cluster
Collapsible emergency spare
wheel
see Emergency spare wheel
COMAND display
Cleaning ......................................... 330
COMAND Online
see separate operating instructions
Combination switch ..........................117
Consumption statistics (on-board
computer) .......................................... 231
Convenience box ............................... 299
Convenience closing feature ..............90
Convenience opening/closing (air-
recirculation mode) ........................... 137
Convenience opening feature ............90
Coolan t(engine)
Checkin gthe level ......................... 323
Display message ............................ 259
Important safety notes ..................392
Temperature (on-board computer) .246
Temperature gauge ........................ 228
Warning lamp ................................. 285 Index
7
Page 16 of 405

Important safety notes
....................76
Loss ................................................. 81
Modifying the programming .............78
Positions (ignition lock) .................147
Problem (malfunction) .....................81
Starting the engine ........................149
KEYLESS-GO
Convenience closing ........................91
Display message ............................ 275
Locking ............................................ 77
Start/Stop button .......................... 147
Starting the engine ........................149
Unlocking ......................................... 77
Keyp ositions
Key ................................................ 147
KEYLESS GO .................................. 147
Kickdown
Driving tips .................................... 157
Manual drive program ....................160
Kneebag ............................................... 44L
Lamps see Warning and indicator lamps
Lane detection (automatic)
see Lane Keeping Assist
Lane Keeping Assist
Activating/deactivating .................238
Display message ............................ 264
Function/informatio n.................... 210
Lane package ..................................... 208
Lap time (RACETIMER) ......................246
Lashing eyelets ................................. 295
Licence plate lamp (display mes-
sage) ................................................... 257
Lighting see Lights
Lights
Activating/deactivating the Intel-
ligent Ligh tSystem ........................ 240
Activating/deactivating the inte-
rior lighting delayed switch-off .......242
Active light function .......................119
Automatic headlamp mode ............115
Cornering light function .................119
Dipped-bea mheadlamps ............... 115
Driving abroad ............................... 114Foglamps (extended range)
...........120
Hazard warning lamps ...................118
Headlamp flasher ........................... 118
Ligh tswitc h................................... 114
Main-beam headlamps ................... 117
Motorway mode ............................. 119
Parking lamps ................................ 117
Rea rfoglamp ................................. 116
Setting brightness for display/
switches (on-board computer) .......240
Setting the ambient lighting
brightness (on-board computer) ....241
Setting the ambient lighting col-
our (on-board computer) ................ 241
Side lamps ..................................... 116
Switching Adaptive Highbeam
Assist on/off ................................. 241
Switching the daytime driving
lights on/off (on-board computer) .240
Switching the exterio rlighting
delayed switch-off on/off (on-
board computer )............................ 242
Switching the surround lighting
on/off (on-board computer) ..........242
Turn signals ................................... 117
see Changing bulbs
see Interior lighting
Light sensor (display message) .......258
LIM indicator lamp Cruise control ................................ 172
DISTRONI CPLUS ........................... 178
Variabl eSPEEDTRONIC .................175
Limiting the speed
see SPEEDTRONIC
Loading guidelines ............................290
Locking see Centra llocking
Locking (doors)
Automatic ........................................ 84
Emergency locking ........................... 84
From inside (central locking but-
ton) .................................................. 83
Locking centrally
see Centra llocking
Locking verification signal (on-
board computer) ............................... 243
Luggage compartment cover ...........297 Index
13
Page 22 of 405
Temperature
Coolant .......................................... 228
Coolant (on-board computer) ......... 246
Engine oil (on-board computer) ...... 246
Outside temperature ..................... .228
Setting (climate control) ................134
TEMPOMAT
Function/notes ............................. 171
Theft-deterrent system
ATA (Anti-Theft Alarm system) .........72
Immobiliser ...................................... 72
Through-loading feature ...................293
Timing (RACETIMER) .........................246
Tiredness Assist see ATTENTION ASSIST
TIREFIT kit .......................................... 338
Top Tether ............................................ 57
Total distance recorder ....................230
Tow-away protection ..........................73
Towing Important safety notes ..................346
With the rear axle raised ................348
Towing atrailer
Activ eBlind Spot Assist .................215
Active Lane Keeping Assist ............217
Active Parking Assist .....................197
Axle load, permissible ....................398
Bulb failure indicator for LED
lamps ............................................. 223
ESP ®
(Electroni cStability Pro-
gram) ............................................... 69
Towing away
Fitting the towing eye. ...................347
Removing the towing eye. ..............348
With both axles on the ground .......348
Tow-starting
Emergency engine starting ............349
Important safety notes ..................346
Trailer
Display message ............................ 274
Trailer coupling
see Towing atrailer
Trailer towing
7-pin connector ............................. 223
Blind Spot Assist ............................ 210
Cleaning the trailer tow hitch ......... 329
Coupling up atrailer ...................... 221Decoupling
atrailer ....................... 221
Driving tips .................................... 219
Folding in the ball coupling ............221
Folding out the ball coupling ..........220
Important safety notes ..................217
Lights displa ymessage .................. 255
Mounting dimensions ....................396
Parktroni c...................................... 193
Power supply ................................. 222
Shift range ..................................... 157
Trailer loads ................................... 398
Transmission
see Automatic transmission
Transmission position display .........155
Transmission position display
(DIRECT SELECTl ever)...................... 155
Transporting the vehicle ..................349
Trim pieces (cleaning instructions) .331
Trip computer (on-board com-
puter) ................................................. .231
Trip meter Calling up ....................................... 230
Resetting (on-board computer) ......232
Turn signal
see Turn signals
Turn signals
Switching on/off ........................... 117
TV
Operating (on-board computer) .....234
see Separate operating instructions
Two-way radio
Frequencies ................................... 383
Installatio n..................................... 383
Transmission output (maximum) .... 383
Type identification plate
see Vehicle identification plate
Tyre pressure
Calling up (on-board computer) .....360
Display message ............................ 268
Not reached (TIREFIT) ....................339
Reached (TIREFIT) ..........................339
Recommended ............................... 357
Tyre pressure loss warning
Important safety notes ..................358
Restarting ...................................... 359 Index
19
Page 35 of 405
Warning and indicator lamps
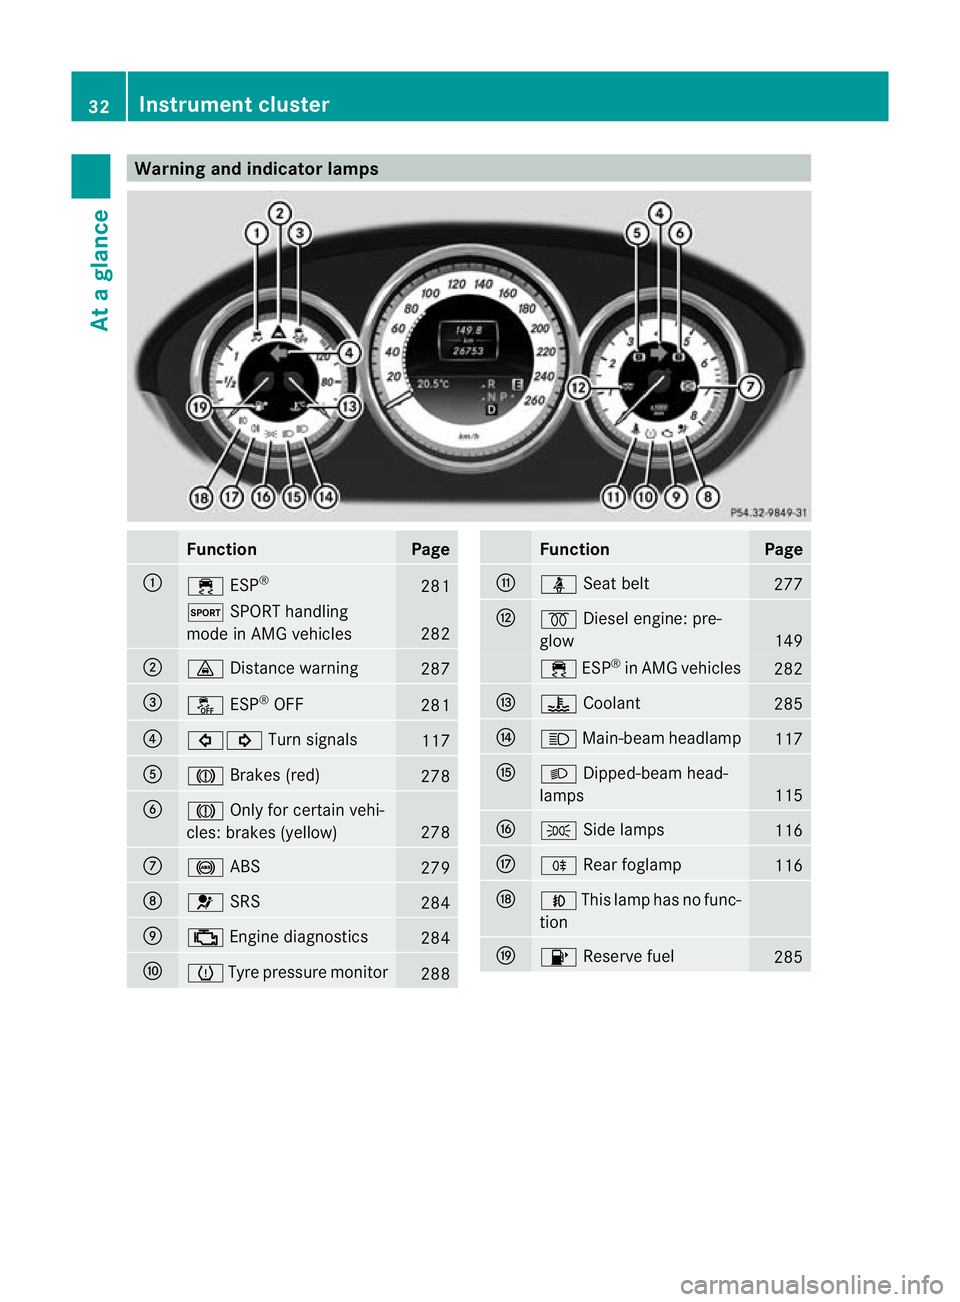
Function Page
:
÷
ESP® 281
M
SPORT handling
mode in AMG vehicles 282
;
·
Distance warning 287
=
å
ESP®
OFF 281
?
#!
Turn signals 117
A
J
Brakes (red) 278
B
J
Only for certain vehi-
cles: brakes (yellow) 278
C
!
ABS 279
D
6
SRS 284
E
;
Engine diagnostics 284
F
h
Tyre pressure monitor 288 Function Page
G
ü
Seat belt 277
H
%
Diesel engine: pre-
glow 149
÷
ESP®
in AMG vehicles 282
I
?
Coolant 285
J
K
Main-beam headlamp 117
K
L
Dipped-bea mhead-
lamps 115
L
T
Side lamps 116
M
R
Rear foglamp 116
N
N
This lamp has no func-
tion O
8
Reserve fuel 28532
Instrument clusterAt a glance
Page 58 of 405
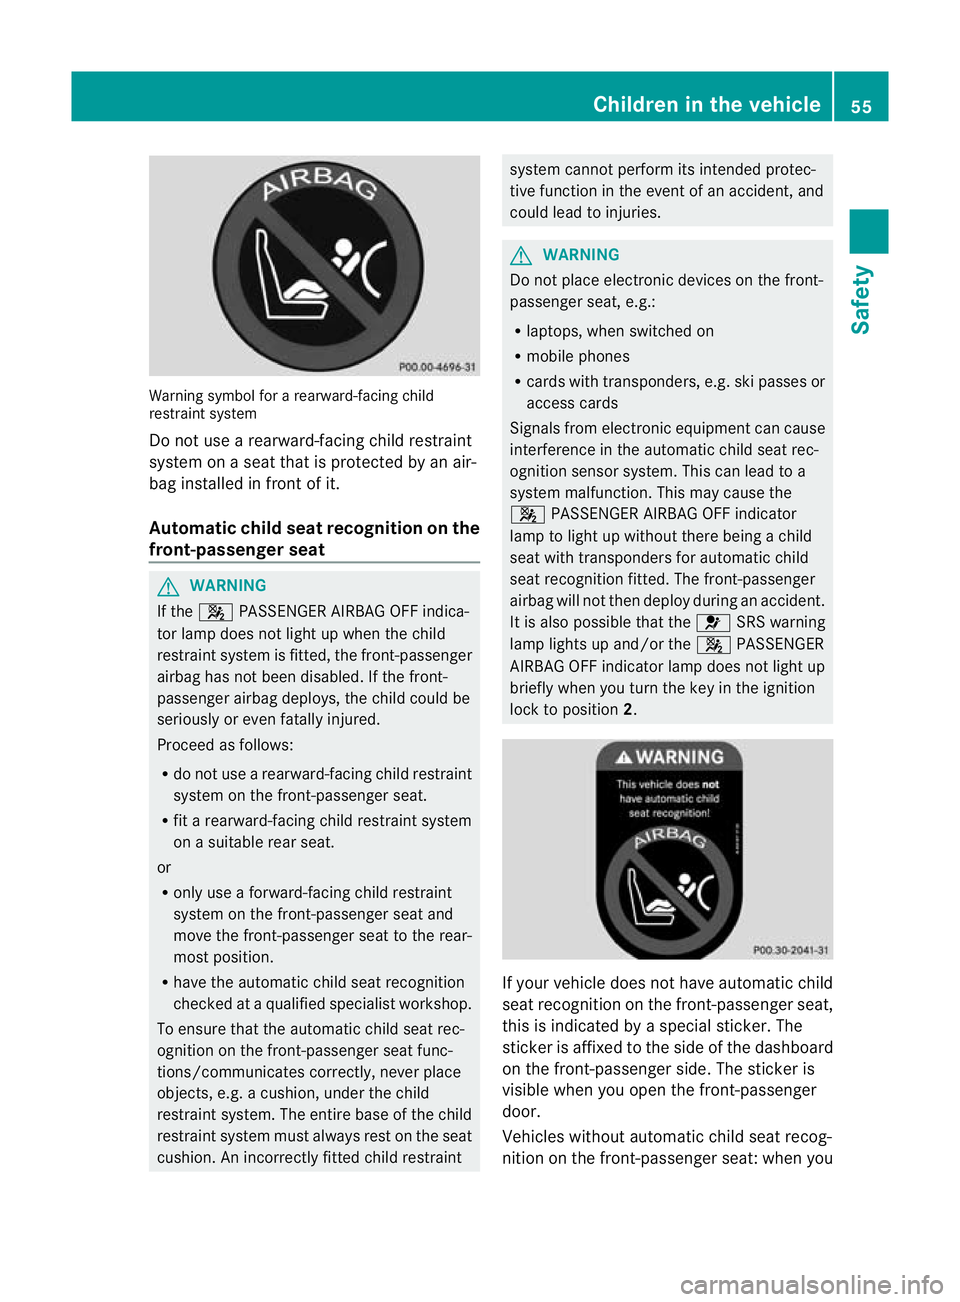
Warning symbol for a rearward-facing child
restraint system
Do not use a rearward-facing child restraint
system on a seat that is protected by an air-
bag installed in fron tofit.
Automatic chil dseat recognition on the
front-passenger seat G
WARNING
If the 4 PASSENGER AIRBAG OFF indica-
to rlamp does no tlight up when the child
restraint system is fitted, the front-passenger
airbag has not been disabled. If the front-
passenger airbag deploys, the child could be
seriously or even fatally injured.
Proceed as follows:
R do not use a rearward-facing child restraint
system on the front-passenge rseat.
R fit a rearward-facing child restraint system
on a suitable rear seat.
or
R only use a forward-facing child restraint
system on the front-passenger seat and
move the front-passenger seat to the rear-
most position.
R have the automatic child seat recognition
checked at a qualified specialist workshop.
To ensure that the automatic child seat rec-
ognition on the front-passenger seat func-
tions/communicates correctly, never place
objects, e.g. a cushion, under the child
restraint system. The entire base of the child
restraint system must always rest on the seat
cushion. An incorrectly fitted child restraint system cannot perform its intended protec-
tive function in the event of an accident, and
could lead to injuries.
G
WARNING
Do not place electronic devices on the front-
passenger seat, e.g.:
R laptops, when switched on
R mobile phones
R cards with transponders, e.g. ski passes or
access cards
Signals from electronic equipment can cause
interference in the automatic child seat rec-
ognition sensor system. This can lead to a
system malfunction. This may cause the
4 PASSENGER AIRBAG OFF indicator
lamp to light up without there being a child
seat with transponders for automatic child
seat recognition fitted. The front-passenger
airbag will not then deploy during an accident.
It is also possible that the 6SRS warning
lamp lights up and/or the 4PASSENGER
AIRBAG OFF indicator lamp does not light up
briefly when you turn the key in the ignition
lock to position 2. If your vehicle does not have automatic child
seat recognition on the front-passenger seat,
this is indicated by a special sticker. The
sticker is affixed to the side of the dashboard
on the front-passenger side. The sticker is
visible when you open the front-passenger
door.
Vehicles without automatic child seat recog-
nition on the front-passenger seat: when you Children in the vehicle
55Safety Z
Page 80 of 405
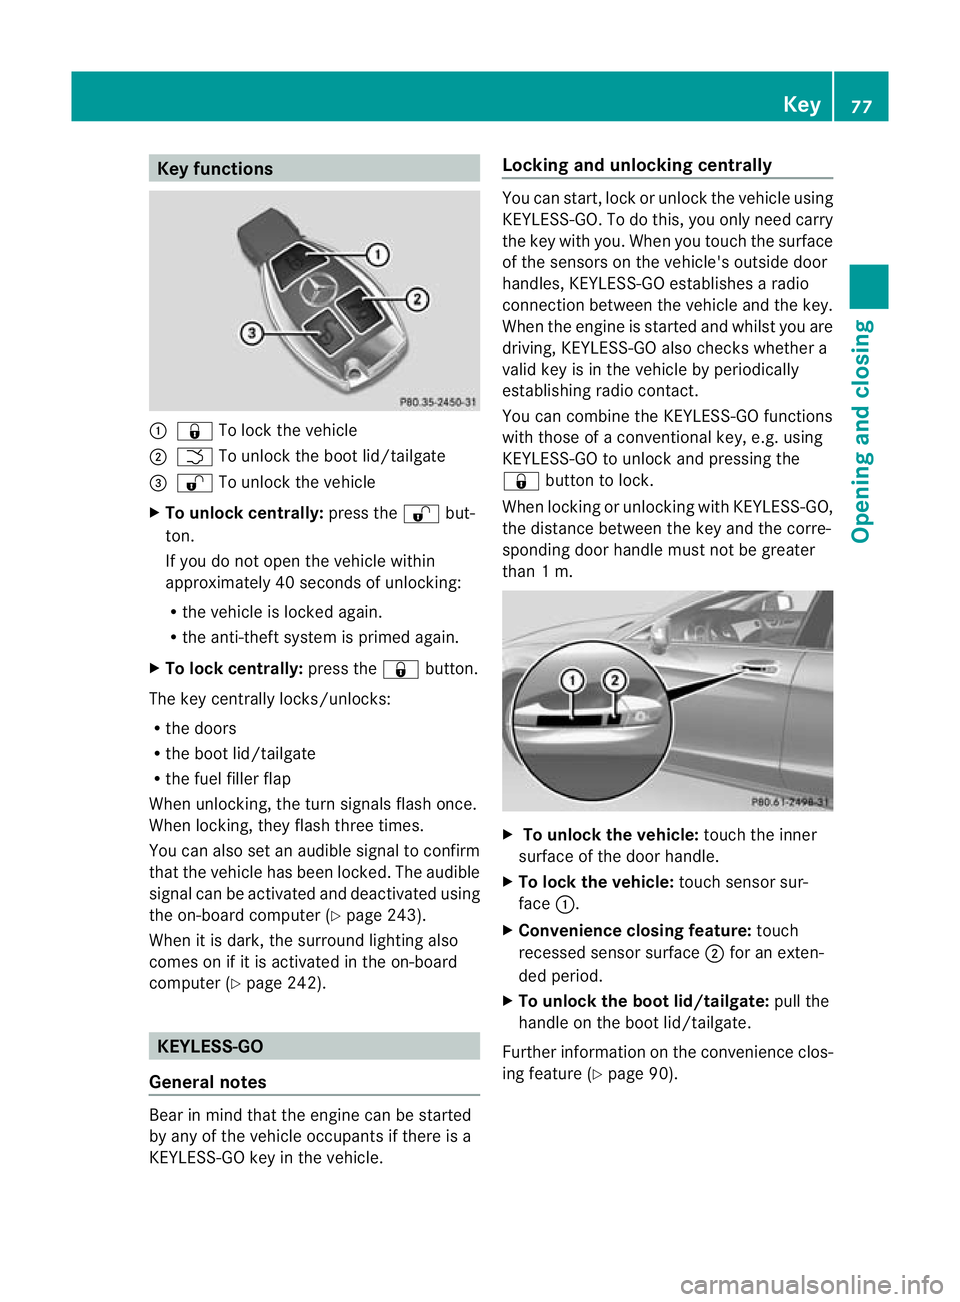
Key functions
:
& To loc kthe vehicle
; F To unlock the boot lid/tailgate
= % To unlock the vehicle
X To unlock centrally: press the%but-
ton.
If you do not open the vehicle within
approximately 40 seconds of unlocking:
R the vehicle is locked again.
R the anti-theft system is primed again.
X To lock centrally: press the&button.
The key centrally locks/unlocks:
R the doors
R the boot lid/tailgate
R the fuel filler flap
When unlocking, the turn signals flash once.
When locking, they flash three times.
You can also set an audible signal to confirm
that the vehicle has been locked. The audible
signal can be activated and deactivated using
the on-board computer (Y page 243).
When it is dark, the surround lighting also
comes on if it is activated in the on-board
computer (Y page 242). KEYLESS-GO
General notes Bear in mind that the engine can be started
by any of the vehicle occupants if there is a
KEYLESS-GO key in the vehicle. Locking and unlocking centrally You can start, lock or unlock the vehicle using
KEYLESS-GO. To do this, you only need carry
the key with you. When you touch the surface
of the sensors on the vehicle's outside door
handles, KEYLESS-GO establishes a radio
connection between the vehicle and the key.
When the engine is started and whilst you are
driving, KEYLESS-GO also checks whether a
valid key is in the vehicle by periodically
establishing radio contact.
You can combine the KEYLESS-GO functions
with those of a conventional key, e.g. using
KEYLESS-GO to unlock and pressing the
&
button to lock.
When locking or unlocking with KEYLESS-GO,
the distance between the key and the corre-
sponding door handle must not be greater
than 1 m. X
To unlock the vehicle: touch the inner
surface of the door handle.
X To lock the vehicle: touch sensor sur-
face :.
X Convenience closing feature: touch
recessed sensor surface ;for an exten-
ded period.
X To unlock the boot lid/tailgate: pull the
handle on the boot lid/tailgate.
Further information on the convenience clos-
ing feature (Y page 90). Key
77Opening and closing Z
Page 81 of 405
Changing the settings of the locking
system
You can change the settings of the locking
system. This means that only the driver's door
and the fuel fille rflap are unlocked when the
vehicle is unlocked. This is useful if you fre-
quently travel on your own.
X To change the setting: press and hold
down the %and& buttons on the
key simultaneously for approximately six
seconds until the battery chec klamp
flashes twice ( Ypage 79).
i If the setting of the locking system is
changed within the signal range of the vehi-
cle, pressing the &or% button:
R locks or
R unlocks the vehicle
The key now functions as follows:
X To unlock the driver's door: press the
% button once.
X To unlock centrally: press the%but-
ton twice.
X To lock centrally: press the&button.
The KEYLESS-GO function is changed as fol-
lows:
X To unlock the driver's door: touch the
inner surface of the door handle on the
driver's door.
X To unlock centrally: touch the inner sur-
face of the door handle on the front-
passenger door or the rear door.
X To lock centrally: touch the outer sensor
surface on one of the door handles.
X To restore the factory settings: press
and hold down the %and& buttons
simultaneously for approximately six sec-
onds until the battery check lamp flashes
twice (Y page 79). Emergency key element
General notes If the vehicle can no longer be locked or
unlocked with the key, use the emergency
key element.
If you use the emergenc
ykey element to
unlock and open the driver's door or the boot
lid/tailgate, the anti-thef talarm system will
be triggered (Y page 72).
There are several ways to tur noff the alarm:
X To turn the alarm off with the key: press
the % or& button on the key.
or
X Insert the key into the ignition lock.
or
X To deactivate the alarm with KEYLESS-
GO: press the Start/Stop button in the igni-
tion lock. The key must be in the vehicle.
or
X Lock or unlock the vehicle using KEYLESS-
GO. The key must be outside the vehicle.
If you unlock the vehicle using the emergency
key element, the fuel filler flap will not be
unlocked automatically.
X To unlock the fuel filler flap: insert the
key into the ignition lock.
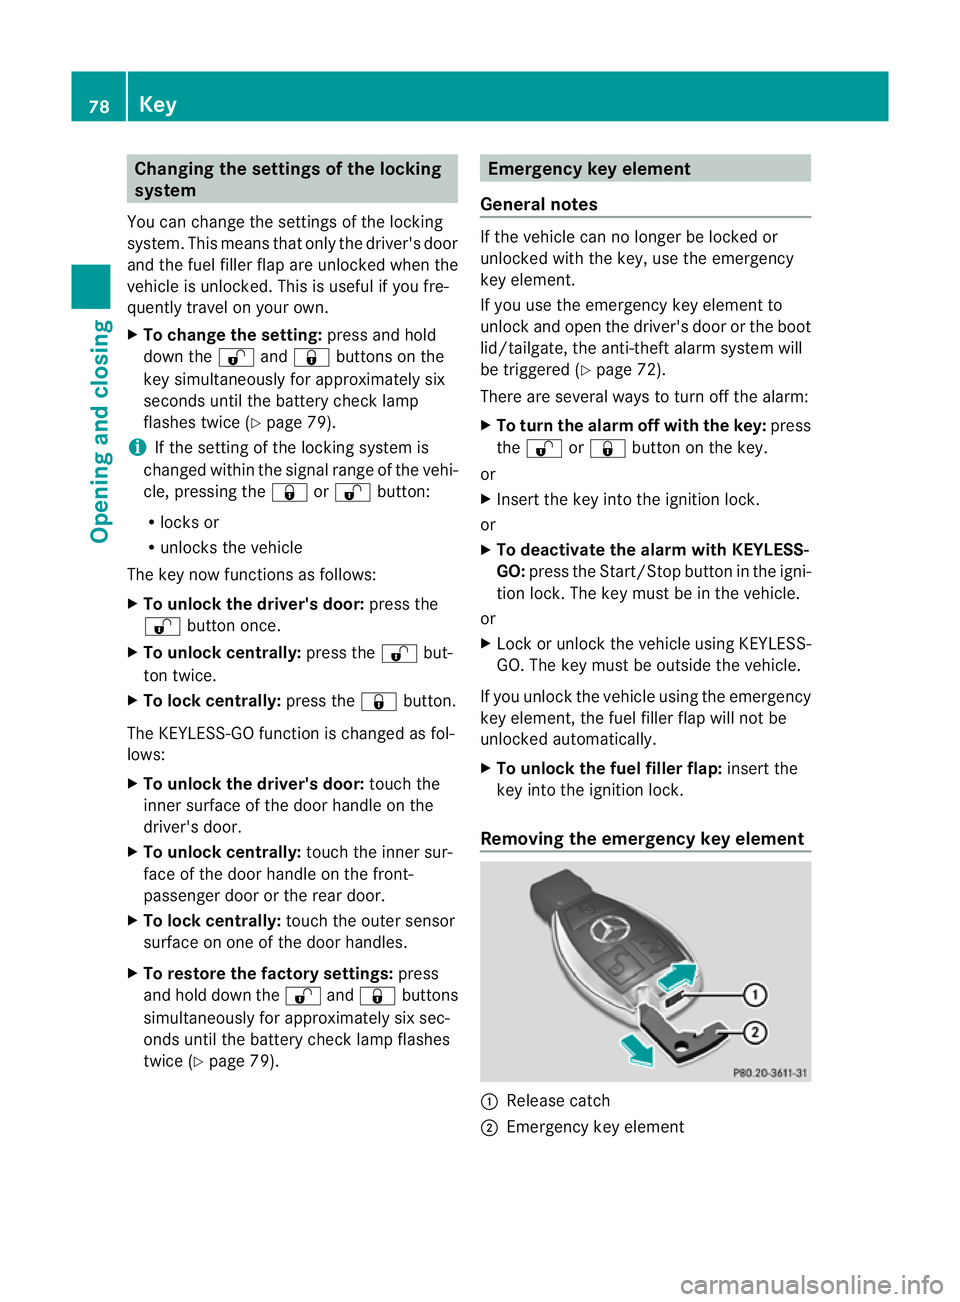
Removing the emergency key element :
Release catch
; Emergency key element 78
KeyOpening and closing
Page 120 of 405
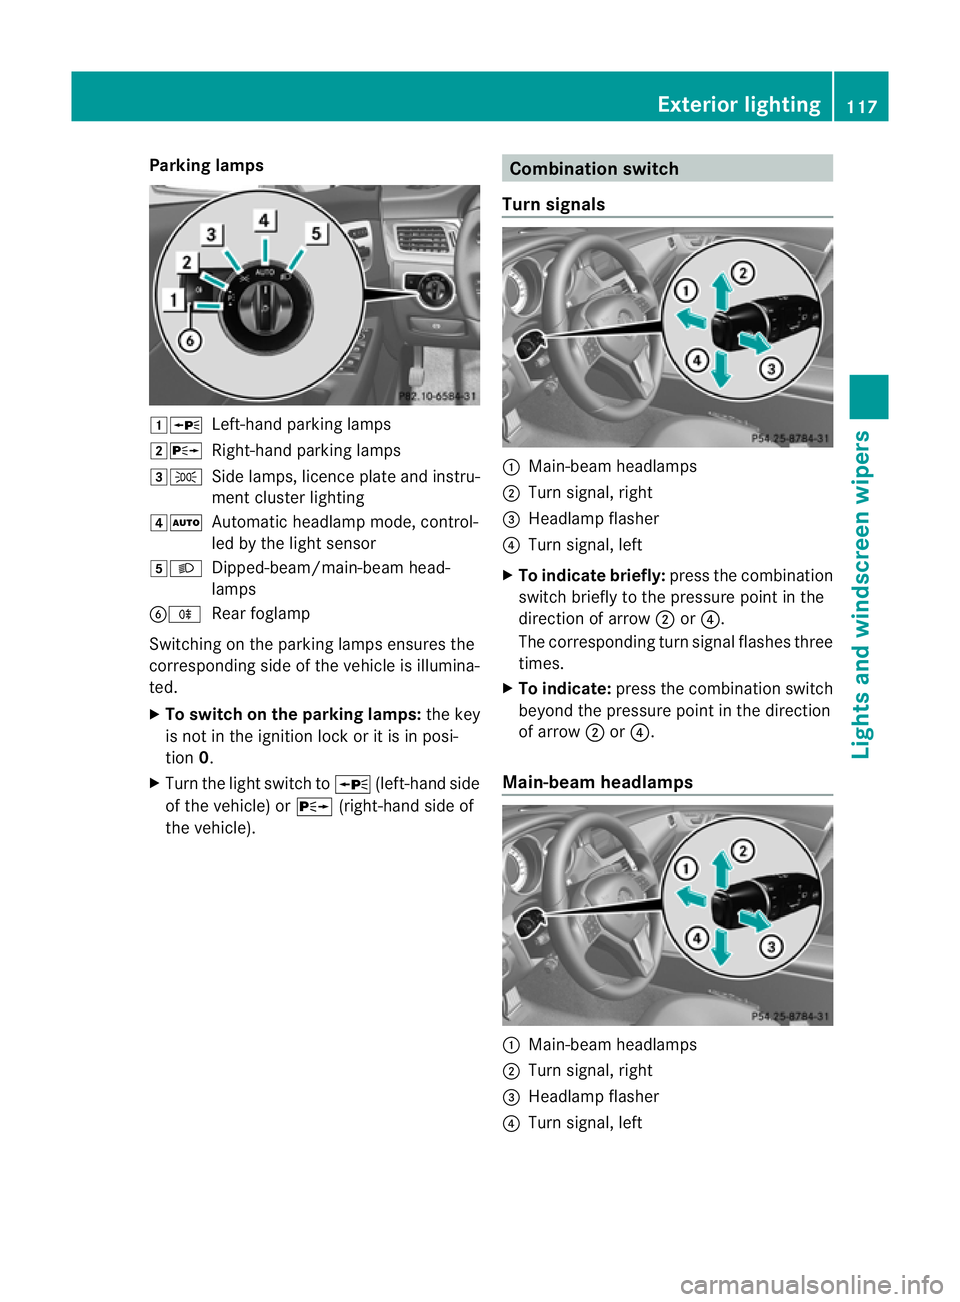
Parking lamps
1W
Left-hand parking lamps
2X Right-hand parking lamps
3T Side lamps, licence plate and instru-
ment cluster lighting
4Ã Automatic headlamp mode, control-
led by the light sensor
5L Dipped-beam/main-beam head-
lamps
BR Rear foglamp
Switching on the parking lamps ensures the
corresponding side of the vehicle is illumina-
ted.
X To switch on the parking lamps: the key
is not in the ignition lock or it is in posi-
tion 0.
X Turn the light switch to W(left-hand side
of the vehicle) or X(right-hand side of
the vehicle). Combination switch
Turn signals :
Main-beam headlamps
; Turn signal, right
= Headlamp flasher
? Turn signal, left
X To indicate briefly: press the combination
switch briefly to the pressure point in the
direction of arrow ;or?.
The corresponding turn signal flashes three
times.
X To indicate: press the combination switch
beyond the pressure point in the direction
of arrow ;or?.
Main-beam headlamps :
Main-beam headlamps
; Turn signal, right
= Headlamp flasher
? Turn signal, left Exterior lighting
117Lights and windscreen wipers Z