2012 MERCEDES-BENZ CLS SHOOTING BRAKE height adjustment
[x] Cancel search: height adjustmentPage 19 of 405
Rear compartment
Setting the ai rvents. ..................... 143
Rear-compartment seat belt sta-
tus indicator ........................................ 52
Rear foglamp Display message ............................ 257
Switching on/off ........................... 116
Rear seat
Display message ............................ 273
Rear seat (folding the backrest for-
wards/back) ...................................... 293
Rear Seat Entertainment System see Separate operating instructions
Rear-view mirror
Anti-dazzle mode (automatic) ........109
Dipping (manual )........................... 108
Rear window blind ............................305
Rear window heating Problem (fault) ............................... 137
Switching on/off ........................... 137
Rear window wiper
Replacing the wiper blade .............. 127
Switching on/off ........................... 126
Refuelling
Fuel gauge ............................... 30, 227
Important safety notes ..................161
Notes for AMG vehicles .................388
Refuelling proces s......................... 162
see Fuel
Remote control
Auxiliary heating/ventilation .......... 139
Changing the batteries (auxiliary
heating) ......................................... 141
Garage door opener .......................311
Programming (garage door
opener) .......................................... 312
Replacing the battery (auxiliary
heating remote control) .................... 141
Reserve (fuel tank) see Fuel
Reserve fuel
Display message ............................ 260
Warning lamp ................................. 285
Residual heat (climate control) ........138
Restraint system see SRS (Supplemental Restraint
System) Rev counter
........................................ 228
Reverse gear (selector lever) ...........154
Reversing camera Cleaning instructions .....................329
Function/notes ............................. 198
Switching on/off ........................... 199
Reversing lamp
Changing bulbs .............................. 124
Reversing lamp (display message) ..257
Roller sunblind Rea rwindow .................................. 305
Roof carrier ........................................ 302
Roof lining and carpets (cleaning
instructions) ...................................... 332
Roof load (maximum) ........................394 S
Safety Childre ninthe vehicle ..................... 53
Child restraint systems ....................53
Safety net
Attaching ....................................... 298
Important safety information .........298
Safety system
see Driving safety system
Seat
Folding the backres t(rear com-
partment) forwards/back ..............295
Seat backrest display message .....273
Seat belt
Adjusting the driver's and front-
passenger sea tbelt ......................... 50
Adjusting the height ......................... 50
Belt force limiter .............................. 52
Belt tensione r.................................. 52
Centre rear-compartment sea t........ 51
Cleaning ......................................... 331
Display message ............................ 253
Fastening ......................................... 50
Important safety guidelines .............49
Rea rseat belt status indicator .........52
Releasing ......................................... 51
Switching belt adjustment on/off
(on-board computer) ......................245
Warning lamp ................................. 277
Warning lamp (function) ................... 51 16
Index
Page 53 of 405
been approved by Mercedes-Benz for your
vehicle.
Seat belts are the most effective means of
restraining the movement of vehicle occu-
pants in the event of an accident. This
reduces the risk of vehicle occupants coming
into contact with parts of the vehicle interior.
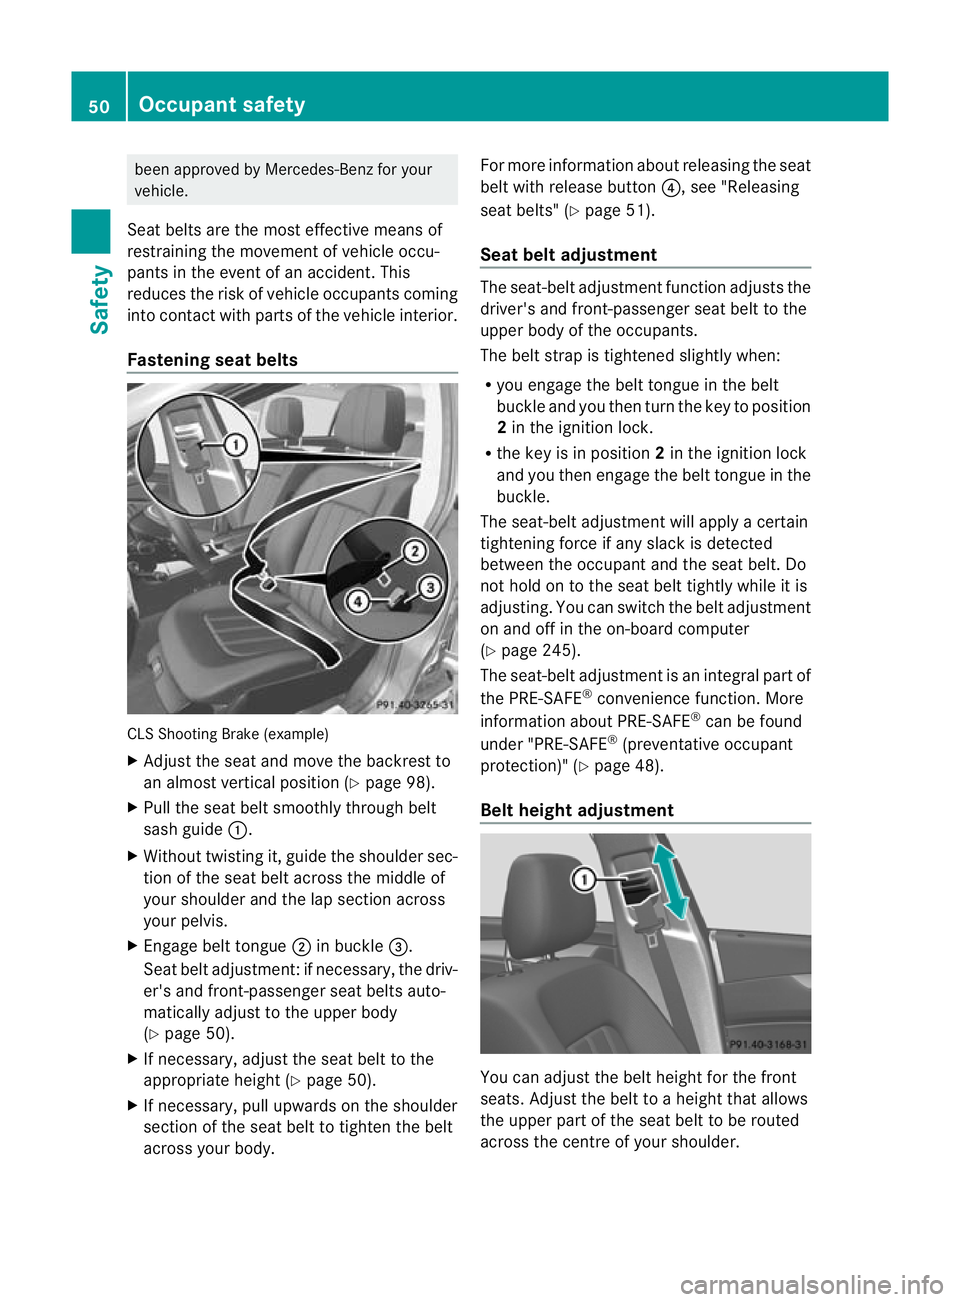
Fastening seat belts CLS Shooting Brake (example)
X Adjust the seat and move the backrest to
an almost vertical position (Y page 98).
X Pull the seat belt smoothly through belt
sash guide :.
X Without twisting it, guide the shoulder sec-
tion of the seat belt across the middle of
your shoulder and the lap section across
your pelvis.
X Engage belt tongue ;in buckle =.
Seat belt adjustment :ifnecessary, the driv-
er's and front-passenger seat belts auto-
matically adjust to the upper body
(Y page 50).
X If necessary, adjust the seat belt to the
appropriate height (Y page 50).
X If necessary, pull upwards on the shoulder
section of the seat belt to tighten the belt
across your body. For more information about releasing the seat
belt with release button
?, see "Releasing
seat belts" (Y page 51).
Seat belt adjustment The seat-belt adjustment function adjusts the
driver's and front-passenger seat belt to the
upper body of the occupants.
The belt strap is tightened slightly when:
R
you engage the belt tongue in the belt
buckle and you then turn the key to position
2in the ignition lock.
R the key is in position 2in the ignition lock
and you then engage the belt tongue in the
buckle.
The seat-belt adjustment will apply a certain
tightening force if any slack is detected
between the occupant and the seat belt. Do
not hold on to the seat belt tightly while it is
adjusting. You can switch the belt adjustment
on and off in the on-board computer
(Y page 245).
The seat-belt adjustment is an integral part of
the PRE-SAFE ®
convenience function. More
information about PRE-SAFE ®
can be found
under "PRE-SAFE ®
(preventative occupant
protection)" (Y page 48).
Belt height adjustment You can adjust the belt height for the front
seats. Adjust the belt to a height that allows
the upper part of the seat belt to be routed
across the centre of your shoulder.50
Occupant safetySafety
Page 102 of 405
Seats
Important safety notes
G
WARNING
The seats can still be adjusted when there is
no key in the ignition lock. For this reason,
children should never be left unsupervised in
the vehicle. They could adjust the seats and
become trapped. G
WARNING
Only adjust the driver's seat when the vehicle
is stationary. You will otherwise be distracted
from the road and traffic conditions and you
could lose control of the vehicle as a result of
the seat moving. This could cause an acci-
dent. G
WARNING
If you adjust the seat height carelessly, you or
others could be trapped and thereby injured.
Children in particular could unintentionally
press the buttons to electrically adjust the
seats and become trapped.
Take care that:
R while moving the seats, your hands do not
get under the lever assembly of the seat
adjustment system.
R children in the vehicle do not slide their
hands under the levers. G
WARNING
Make sure that nobody can become trapped
when adjusting the seats.
Observe the notes on airbags.
Secure children as recommended; see the
"Children in the vehicle" section. G
WARNING
Make sure that the back of your head is sup-
ported at eye level by the central area of the
head restraint .Ifyour head is not supported
correctly by the head restraint, you could suf-
fer a severe neck injury in the event of an accident
.Never drive if the head restraints are
not engaged and set correctly. G
WARNING
As eat belt can only offer its intended degree
of protection when the backrest is almost ver-
tical and the occupant is sitting upright. Avoid
seat positions that do not allow the seat belt
to be routed correctly. Adjust the backrest so
that it is as upright as possible. Never travel
with the backrest reclined too far backwards.
You could otherwise be seriously or even
fatally injured in the event of an accident or
sudden braking.
! To avoid damage to the seats and the seat
heating, observe the following information:
R do not spill any liquids on the seats. If
liquid is spilled on the seats, dry them as
soon as possible.
R if the seat covers are damp or wet, do not
switch on the seat heating. The seat
heating should also not be used to dry
the seats.
R clean the seat covers as recommended;
see the "Interior care" section.
R do not transport heavy loads on the
seats. Do not place sharp objects on the
seat cushions, e.g. knives, nails or tools.
The seats should only be occupied by
passengers, if possible.
R when the seat heating is in operation, do
not cover the seats with insulating mate-
rials, e.g. blankets, coats, bags, seat cov-
ers, child seats or booster seats.
! To avoid damage to the seats and the seat
heating, observe the following information:
R do not spill any liquids on the seats. If
liquid is spilled on the seats, dry them as
soon as possible.
R if the seat covers are damp or wet, do not
switch on the seat heating. The seat
heating should also not be used to dry
the seats. Seats
99Seats, steering wheel and mirrors Z
Page 103 of 405
R
clean the sea tcovers as recommended;
see "Interior care".
R do not transport heavy loads on the
seats. Do not place sharp objects on the
seat cushions, e.g. knives, nails or tools.
The seats should only be occupied by
passengers, if possible.
R when the seat heating is in operation, do
not cover the seats with insulating mate-
rials, e.g. blankets, coats, bags, seat cov-
ers, child seats or booster seats.
! Make sure that there are no objects in the
footwell or behind the seats when moving
the seat back. There is a risk that the seats
and/or the objects could be damaged.
i The head restraints in the front seats are
fitted with the NECK-PRO system
(Y page 46). For this reason, it is not pos-
sible to remove the head restraints from
the front seats.
For more information, contact a qualified
specialist workshop.
i Further related subjects:
R Rear bench seat through-loading fea-
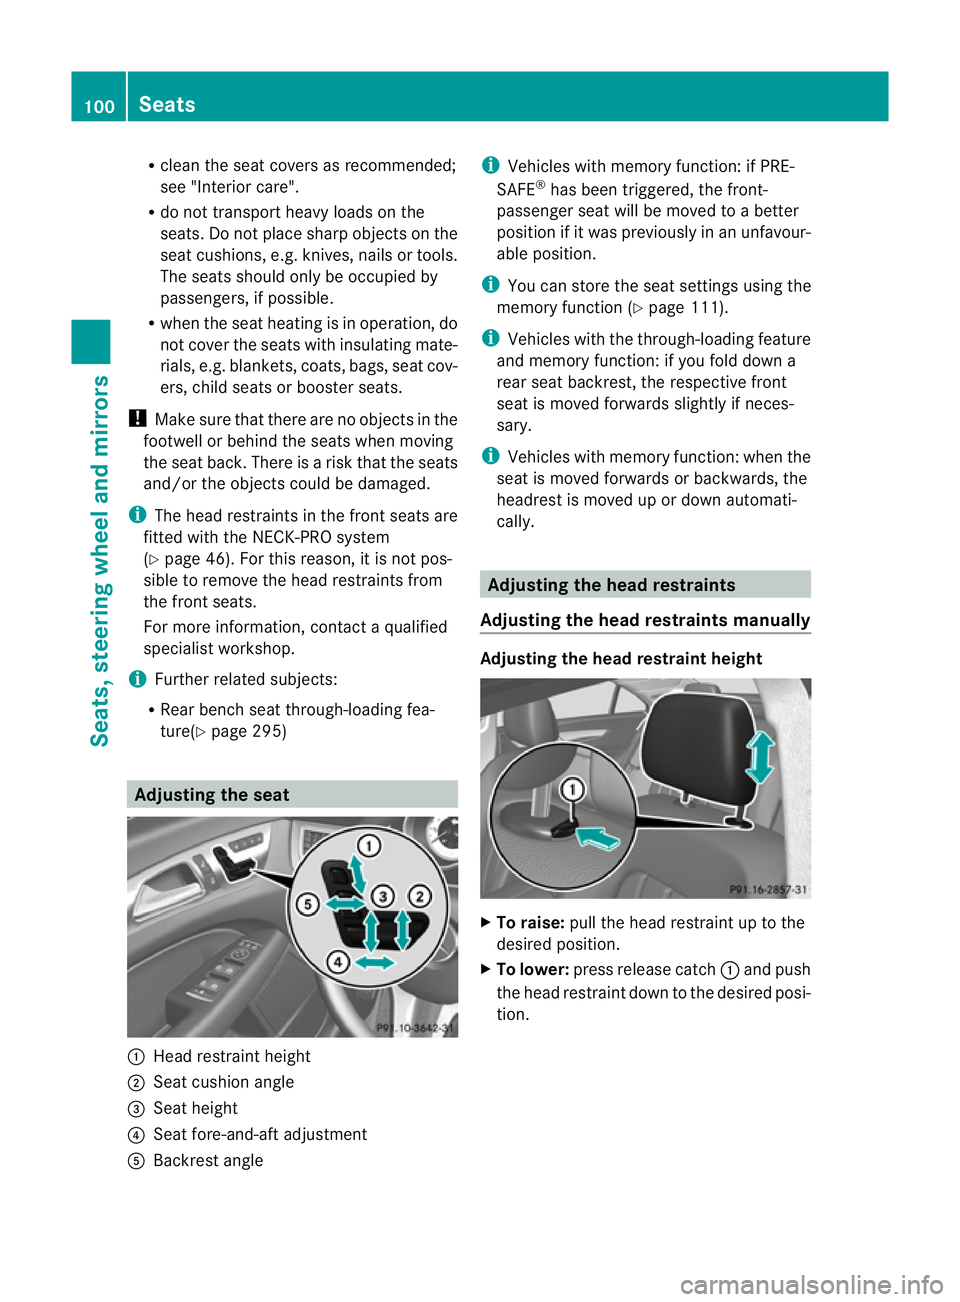
ture(Y page 295) Adjusting the seat
:
Head restraint height
; Seat cushion angle
= Seat height
? Seat fore-and-aft adjustment
A Backrest angle i
Vehicles with memory function: if PRE-
SAFE ®
has been triggered, the front-
passenger seat will be moved to a better
position if it was previously in an unfavour-
able position.
i You can store the seat settings using the
memory function (Y page 111).
i Vehicles with the through-loading feature
and memory function: if you fold down a
rear seat backrest, the respective front
seat is moved forwards slightly if neces-
sary.
i Vehicles with memory function: when the
seat is moved forwards or backwards, the
headrest is moved up or down automati-
cally. Adjusting the head restraints
Adjusting the head restraints manually Adjusting the head restraint height
X
To raise: pull the head restraint up to the
desired position.
X To lower: press release catch :and push
the head restraint down to the desired posi-
tion. 100
SeatsSeats, steering wheel and mirrors
Page 104 of 405
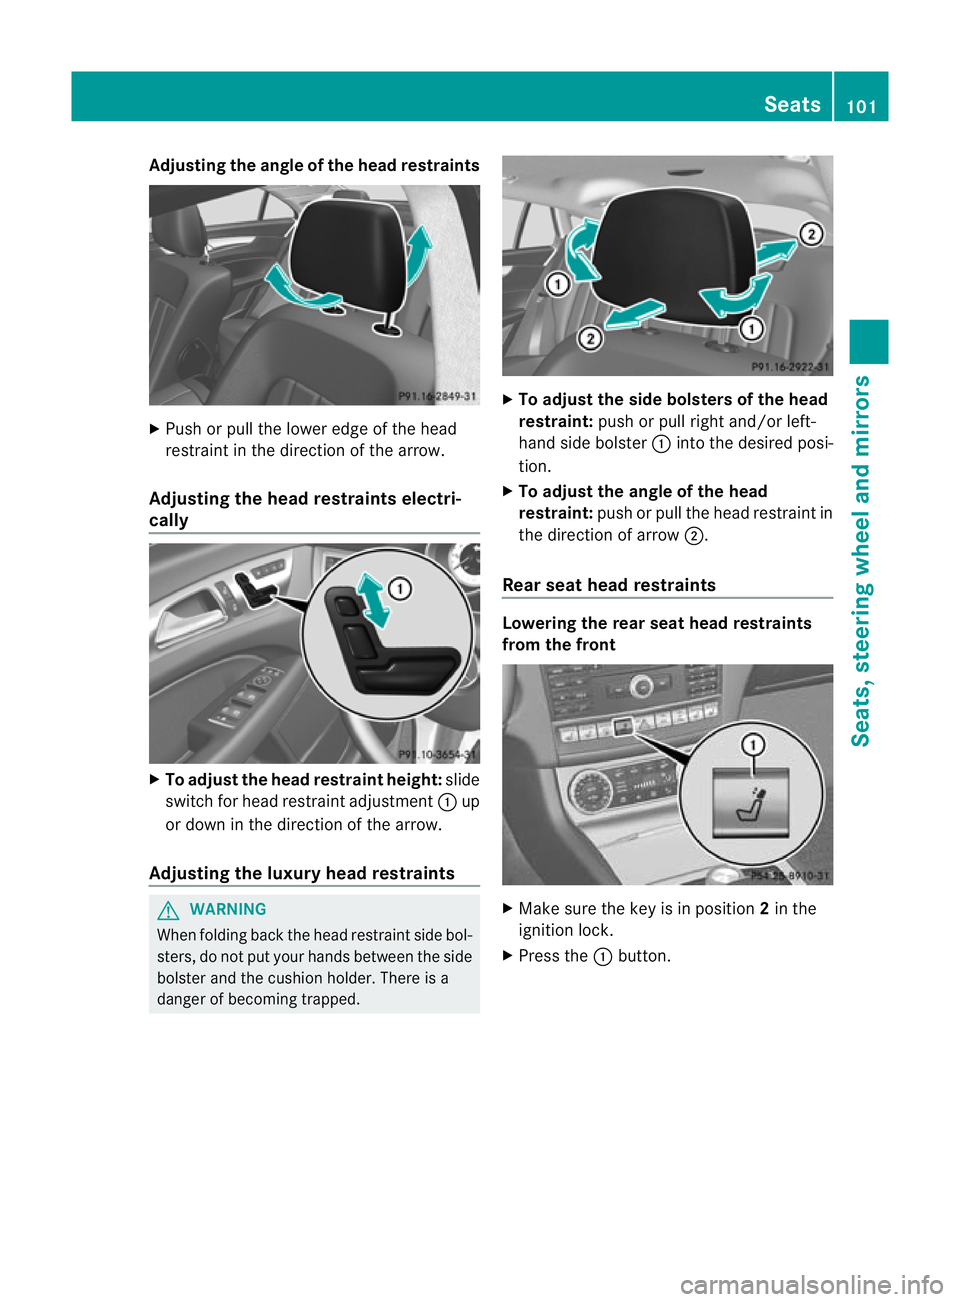
Adjusting th
eangle of the head restraints X
Push or pull the lower edge of the head
restraint in the direction of the arrow.
Adjusting the head restraints electri-
cally X
To adjust the head restraint height: slide
switch for head restraint adjustment :up
or down in the direction of the arrow.
Adjusting the luxury head restraints G
WARNING
When folding back the head restraint side bol-
sters, do not put your hands between the side
bolster and the cushion holder. There is a
danger of becoming trapped. X
To adjust the side bolsters of the head
restraint: push or pull right and/or left-
hand side bolster :into the desired posi-
tion.
X To adjust the angle of the head
restraint: push or pull the head restraint in
the direction of arrow ;.
Rear seat head restraints Lowering the rear seat head restraints
from the front
X
Make sure the key is in position 2in the
ignition lock.
X Press the :button. Seats
101Seats, steering wheel and mirrors Z
Page 109 of 405
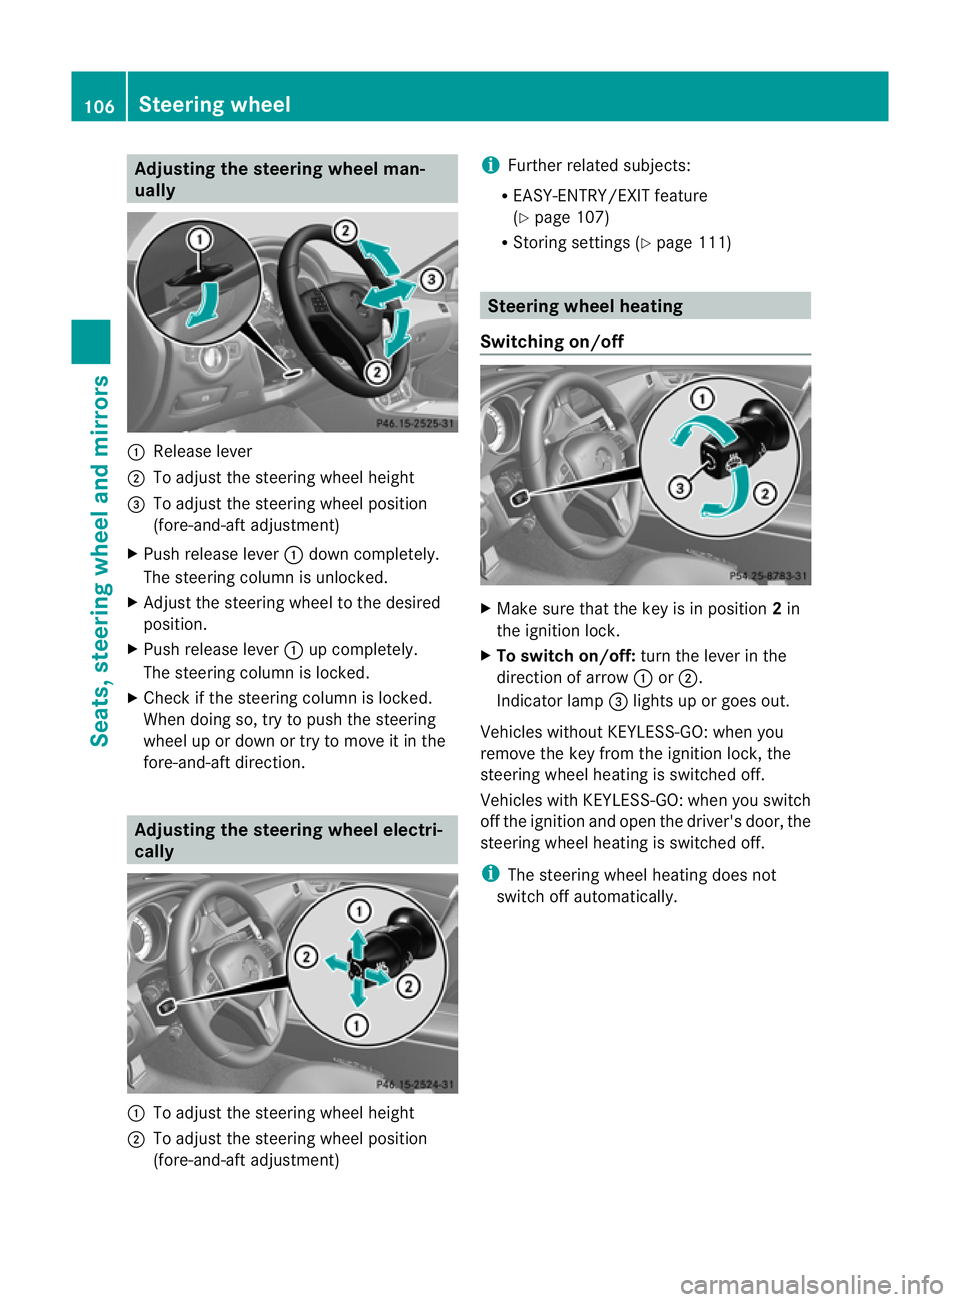
Adjusting the steering wheel man-
ually :
Release lever
; To adjust the steering wheel height
= To adjust the steering wheel position
(fore-and-aft adjustment)
X Push release lever :down completely.
The steering column is unlocked.
X Adjus tthe steering wheel to the desired
position.
X Push release lever :up completely.
The steering column is locked.
X Check if the steering column is locked.
When doing so, try to push the steering
wheel up or down or try to move it in the
fore-and-aft direction. Adjusting the steering wheel electri-
cally
:
To adjust the steering wheel height
; To adjust the steering wheel position
(fore-and-aft adjustment) i
Further related subjects:
R EASY-ENTRY/EXIT feature
(Y page 107)
R Storing settings (Y page 111) Steering wheel heating
Switching on/off X
Make sure that the key is in position 2in
the ignition lock.
X To switch on/off: turn the lever in the
direction of arrow :or;.
Indicator lamp =lights up or goes out.
Vehicles without KEYLESS-GO: when you
remove the key from the ignition lock, the
steering wheel heating is switched off.
Vehicles with KEYLESS-GO: when you switch
off the ignition and open the driver's door, the
steering wheel heating is switched off.
i The steering wheel heating does not
switch off automatically. 106
Steering wheelSeats, steering wheel and mirrors