2012 MERCEDES-BENZ CLS SHOOTING BRAKE ad blue
[x] Cancel search: ad bluePage 9 of 405

Important safety notes
..................340
Jump starting ................................. 344
Belt
see Seat belt
Belt force limiters (activation) ...........41
Belt tensioner Activation ......................................... 41
Function .......................................... .52
Blind Spo tAssist
Activating/deactivating .................238
Display message ............................ 264
Notes/function .............................. 208
Trailer towing ................................. 210
see Active Blind Spot Assist
Bluetooth ®
SAP V3 telephone mod-
ule see Separate operating instructions
Bonnet
Closing .......................................... .321
Display message ............................ 273
Opening ......................................... 320
Boot
Emergency release ..........................88
Boot lid
Display message ............................ 272
Opening dimensions ......................394
Boot load (maximum) ........................ 394
Bottle holders .................................... 304
Box (boot) .......................................... .299
Brake Assist System see BAS (Brake Assist System)
Brake fluid
Display message ............................ 252
Notes ............................................. 392
Brake lamps
Adaptive .......................................... .66
Display message ............................ 256
Brakes
ABS .................................................. 64
BAS .................................................. 64
BAS PLUS ........................................ 65
Brake fluid (notes) .........................392
Display message ............................ 250
Driving tips .................................... 168
High-performance brake system ....169
Important safety notes ..................168Parking brake
................................ 166
Warning lamp ................................. 278
Breakdown
see Flat tyre
see Towing away
Bulbs
see Changing bulbs C
Calling up a fault see Display messages
Car
see Vehicle
Care
Automatic car wash .......................325
Carpets .......................................... 332
Display ........................................... 330
Exhaust pip e.................................. 329
Exterior lighting ............................. 328
Gea rors electo rlever .................... 331
High-pressure cleaner .................... 326
Interior ........................................... 330
Matt paintwork .............................. 327
Nigh tView Assist Plus ...................330
Notes ............................................. 325
Paint .............................................. 327
Plastic trim .................................... 330
Reversing camera ..........................329
Roof lining ...................................... 332
Seat bel t........................................ 331
Seat cover ..................................... 331
Sensors ......................................... 328
Steering wheel ............................... 331
Trim pieces .................................... 331
Washing by hand ........................... 326
Wheels ........................................... 327
Windows ........................................ 328
Wiper blades .................................. 328
Wooden trim .................................. 331
Car wash (care) ................................. 325
CD player/CD changer(on-board
computer) .......................................... 234
Central locking Automatic locking (on-board com-
puter) ............................................. 243
Locking/unlocking (key ).................. 77 6
Index
Page 108 of 405
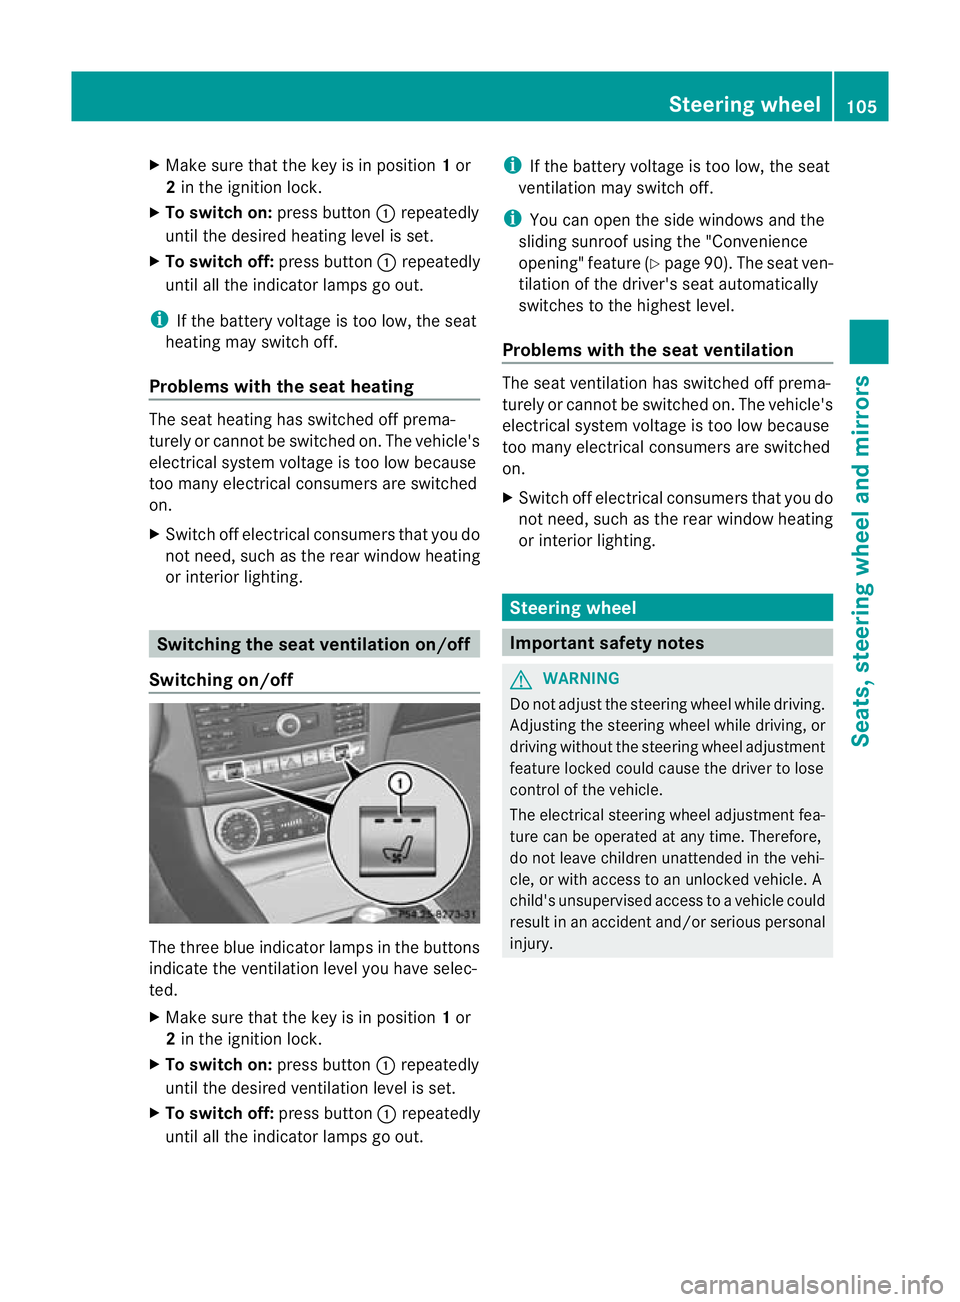
X
Make sure that the key is in position 1or
2 in the ignition lock.
X To switch on: press button:repeatedly
until the desired heating level is set.
X To switch off: press button:repeatedly
until all the indicator lamps go out.
i If the battery voltage is too low, the seat
heating may switch off.
Problems with the seat heating The seat heating has switched off prema-
turely or cannot be switched on. The vehicle's
electrical system voltage is too low because
too many electrical consumers are switched
on.
X Switch off electrical consumers that you do
not need, such as the rear window heating
or interior lighting. Switching the seat ventilation on/off
Switching on/off The three blue indicator lamps in the buttons
indicate the ventilation level you have selec-
ted.
X Make sure that the key is in position 1or
2 in the ignition lock.
X To switch on: press button:repeatedly
until the desired ventilation level is set.
X To switch off: press button:repeatedly
until all the indicator lamps go out. i
If the battery voltage is too low, the seat
ventilation may switch off.
i You can open the side windows and the
sliding sunroof using the "Convenience
opening" feature (Y page 90). The seat ven-
tilation of the driver's seat automatically
switches to the highest level.
Problems with the seat ventilation The seat ventilation has switched off prema-
turely or cannot be switched on. The vehicle's
electrical system voltage is too low because
too many electrical consumers are switched
on.
X
Switch off electrical consumers that you do
not need, such as the rear window heating
or interior lighting. Steering wheel
Important safety notes
G
WARNING
Do not adjust the steering wheel while driving.
Adjusting the steering wheel while driving, or
driving without the steering wheel adjustment
feature locked could cause the driver to lose
control of the vehicle.
The electrical steering wheel adjustment fea-
ture can be operated at any time. Therefore,
do not leave children unattended in the vehi-
cle, or with access to an unlocked vehicle. A
child's unsupervised access to a vehicle could
result in an accident and/or serious personal
injury. Steering wheel
105Seats, steering wheel and mirrors Z
Page 121 of 405
X
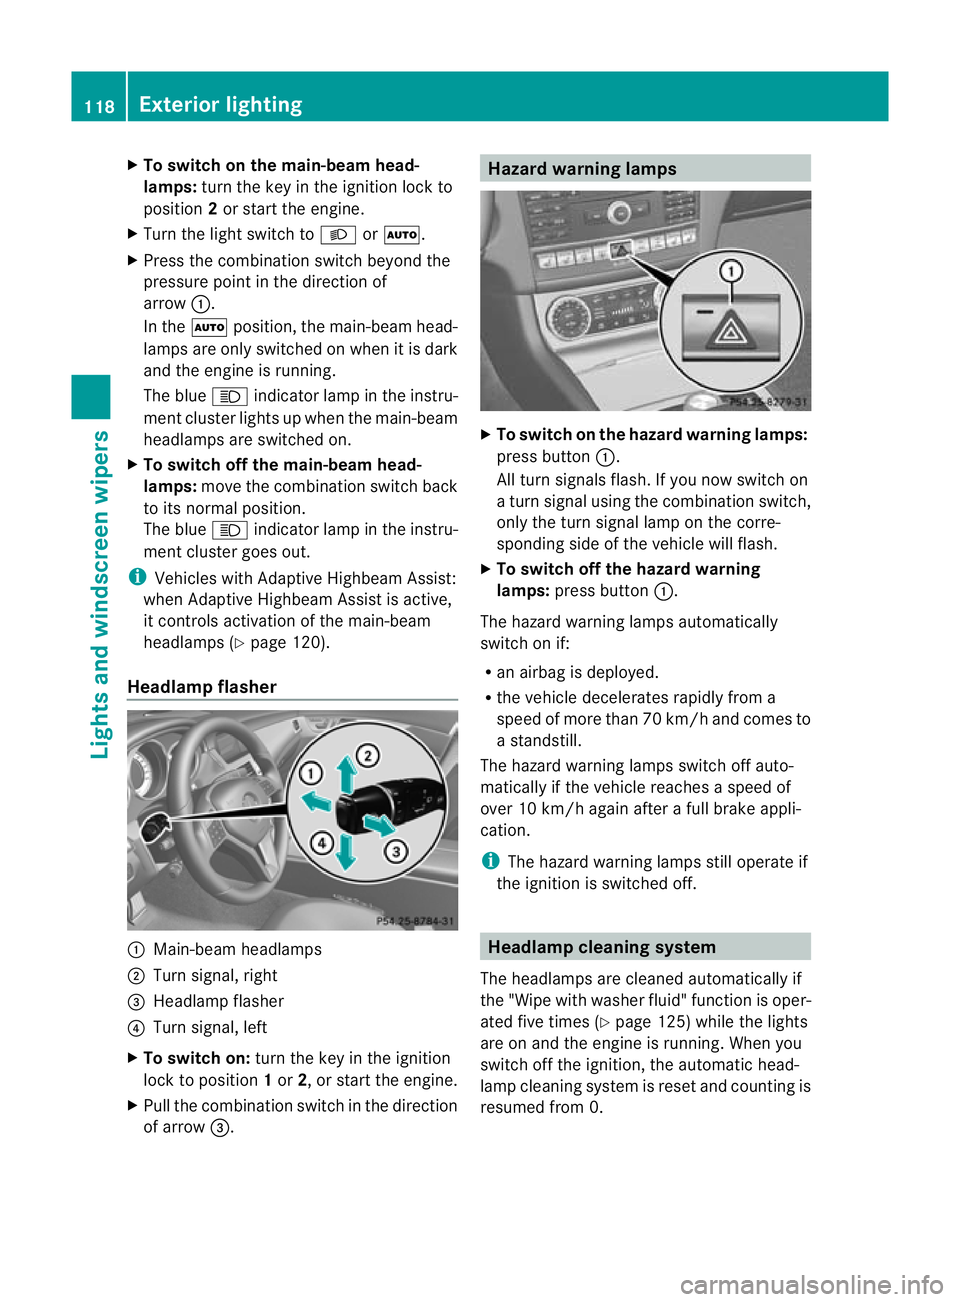
To switch on the main-beam head-
lamps: turn the key in the ignition lock to
position 2or start the engine.
X Turn the light switch to LorÃ.
X Press the combinatio nswitc hbeyond the
pressure point in the direction of
arrow :.
In the Ãposition, the main-beam head-
lamps are only switched on when it is dark
and the engine is running.
The blue Kindicator lamp in the instru-
ment cluster lights up when the main-beam
headlamps are switched on.
X To switch off the main-beam head-
lamps: move the combination switch back
to its normal position.
The blue Kindicator lamp in the instru-
ment cluster goes out.
i Vehicles with Adaptive Highbeam Assist:
when Adaptive Highbeam Assist is active,
it controls activation of the main-beam
headlamps (Y page 120).
Headlamp flasher :
Main-beam headlamps
; Turn signal, right
= Headlamp flasher
? Turn signal, left
X To switch on: turn the key in the ignition
lock to position 1or 2, or start the engine.
X Pull the combination switch in the direction
of arrow =. Hazard warning lamps
X
To switch on the hazard warning lamps:
press button :.
All turn signals flash. If you now switch on
a turn signal using the combination switch,
only the turn signal lamp on the corre-
sponding side of the vehicle will flash.
X To switch off the hazard warning
lamps: press button :.
The hazard warning lamps automatically
switch on if:
R an airbag is deployed.
R the vehicle decelerates rapidly from a
speed of more than 70 km/ha nd comes to
a standstill.
The hazard warning lamps switch off auto-
matically if the vehicle reaches a speed of
over 10 km/h again after a full brake appli-
cation.
i The hazard warning lamps still operate if
the ignition is switched off. Headlamp cleaning system
The headlamps are cleaned automatically if
the "Wipe with washe rfluid" function is oper-
ated five times (Y page 125) while the lights
are on and the engine is running. When you
switch off the ignition, the automatic head-
lamp cleaning system is reset and counting is
resumed from 0. 118
Exterior lightingLights and windscreen wipers
Page 142 of 405
is being refuelled. You must therefore switch
off the auxiliary heating at filling stations.
! Operating the auxiliary heating/ventila-
tion draws on the vehicle battery. After you
have heated or ventilated the vehicle a
maximum of two times, drive for a longer
distance.
i Switch the auxiliary heatin gonregularly
once a month for about ten minutes.
The auxiliary heating heats the air in the
passenger compartment to the selected tem-
perature. It does not use the heat of the run-
ning engine to do this. The auxiliary heating
is operated directly using the vehicle's fuel.
For this reason, the tank content must be at
least at reserve fuel level to ensure that the
auxiliary heating functions.
The auxiliary heating/ventilation automati-
cally adjusts to changes in temperature and
weather conditions .For this reason, the aux-
iliary heating could switch from ventilation
mode to heating mode or from heating mode
to ventilation mode.
The auxiliary heating switches off automati-
cally after 50 minutes. This time limit can be
altered. To do this, visit a qualified specialist
workshop.
You cannot use the auxiliary ventilation to
cool the vehicle interior to a temperature
lower than the outside temperature.
Before switching on X
Turn the key to position 2in the ignition
lock.
X Set the temperature.
The auxiliary heating/ventilation can be acti-
vated even when climate control is set to
manual. Optimum comfort can be attained
when the system is set to automatic mode.
Set the temperature to 22 †.
The auxiliary heating/ventilation can be acti-
vated or deactivated using the remote control
or the button on the centre console. The on-board computer can be used to spec-
ify up to three departure times, one of which
may be preselected (Y
page 243).
Switching the auxiliary heating/venti-
lation on/off using the centre console
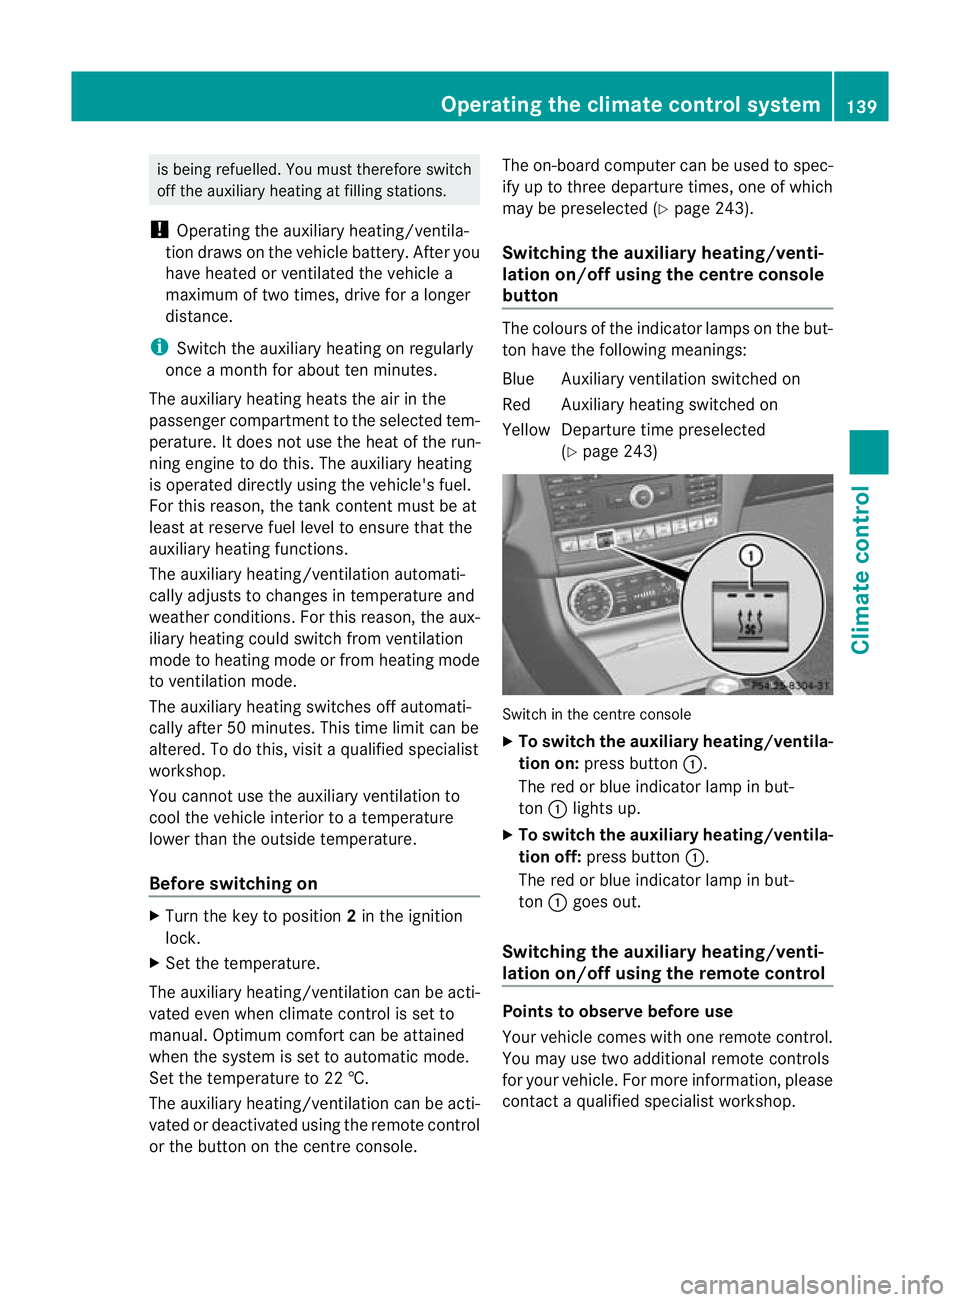
button The colours of the indicator lamps on the but-
ton have the following meanings:
Blue Auxiliary ventilation switched on
Red Auxiliary heating switched on
Yellow Departure time preselected
(Ypage 243) Switch in the centre console
X
To switch the auxiliary heating/ventila-
tion on: press button :.
The red or blue indicator lamp in but-
ton :lights up.
X To switch the auxiliary heating/ventila-
tion off: press button :.
The red or blue indicator lamp in but-
ton :goes out.
Switching the auxiliary heating/venti-
lation on/off using the remote control Points to observe before use
Your vehicle comes with one remote control.
You may use two additional remote controls
for your vehicle. For more information, please
contact a qualified specialist workshop.Operating the climate control system
139Climate control Z
Page 238 of 405
X
To select the next or previous scene:
briefly press the 9or: button.
X To select ascene from the scene list
(rapid scrolling): press and hold the
9 or: buttonuntil desired
scene :has been reached. Telephone menu
Introduction G
WARNING
Observe the legal requirements of the country
in which you are currently driving regarding
the use of mobile phones in the vehicle.
If it is permitted to use mobile phones while
the vehicle is in motion, you should only use
them when the road and traffic conditions
allow. Otherwise, you may be distracted from
the traffic conditions, cause an accident and
injure yoursel fand others.
X Switch on the mobile phone (see the sep-
arate operating instructions).
X Switch on the audio system or COMAND
Online; see the separate operating instruc-
tions.
X Insert the mobile phone into the bracket
(Y page 311).
or
X Establish a Bluetooth ®
connection to the
audio system or COMAND Online; see the
separate operating instructions.
X Press the =or; button on the steer-
ing wheel to select the Tel menu.
You will see one of the following display mes-
sages in the multifunctio ndisplay:
R Please enter PIN :t
he mobile phone has
been placed in the mobile phone bracket
and the PIN has not been entered.
When you enter your PIN via the mobile
phone, LINGUATRONIC, the audio system or COMAND Online, the mobile phone
searches for a network.
R Telephone ready or the name of the net-
work provider: the mobile phone has found
a network and is ready to receive.
R Telephone No service : there is no net-
work available or the mobile phone is
searching for a network.
i You can obtain further information about
suitable mobile phones and connecting
mobile phones via Bluetooth ®
:
R from any Mercedes Benz Service Centre
R on the Internet at: http://
www.mercedes-benz.com/connect
Accepting acall Example: incoming call
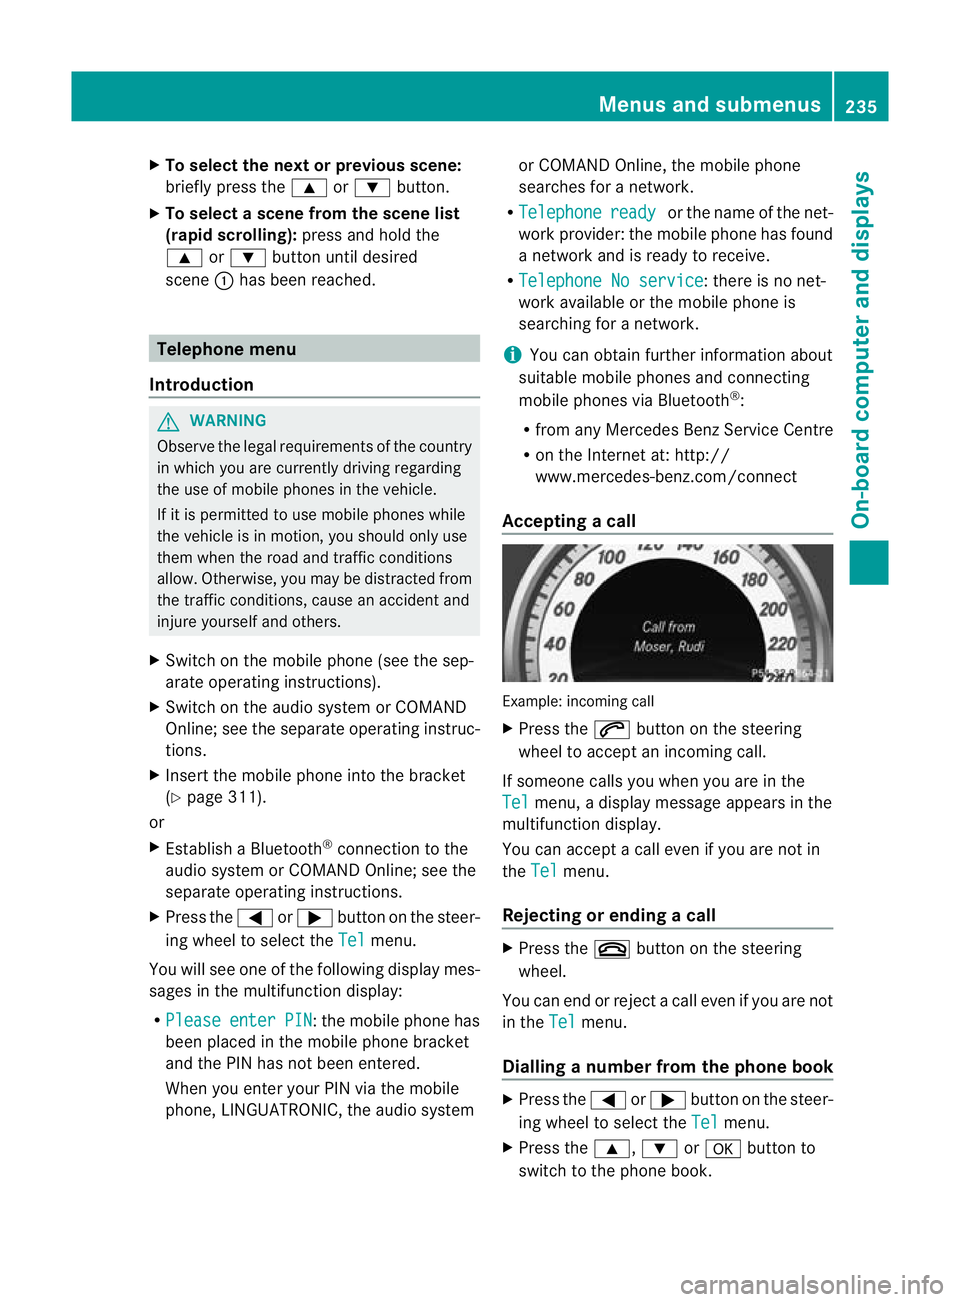
X
Press the 6button on the steering
wheel to accep tanincoming call.
If someone calls you when you are in the
Tel menu, a display message appears in the
multifunctio ndisplay.
You can accept a call even if you are not in
the Tel menu.
Rejecting or ending acall X
Press the ~button on the steering
wheel.
You can end or reject a call even if you are not
in the Tel menu.
Dialling anumber from the phone book X
Press the =or; button on the steer-
ing wheel to select the Tel menu.
X Press the 9,:ora button to
switch to the phone book. Menus and submenus
235On-board computer and displays Z
Page 249 of 405
submenu, you must turn the key to position
1
in the ignition lock. AMG menu in AMG vehicles
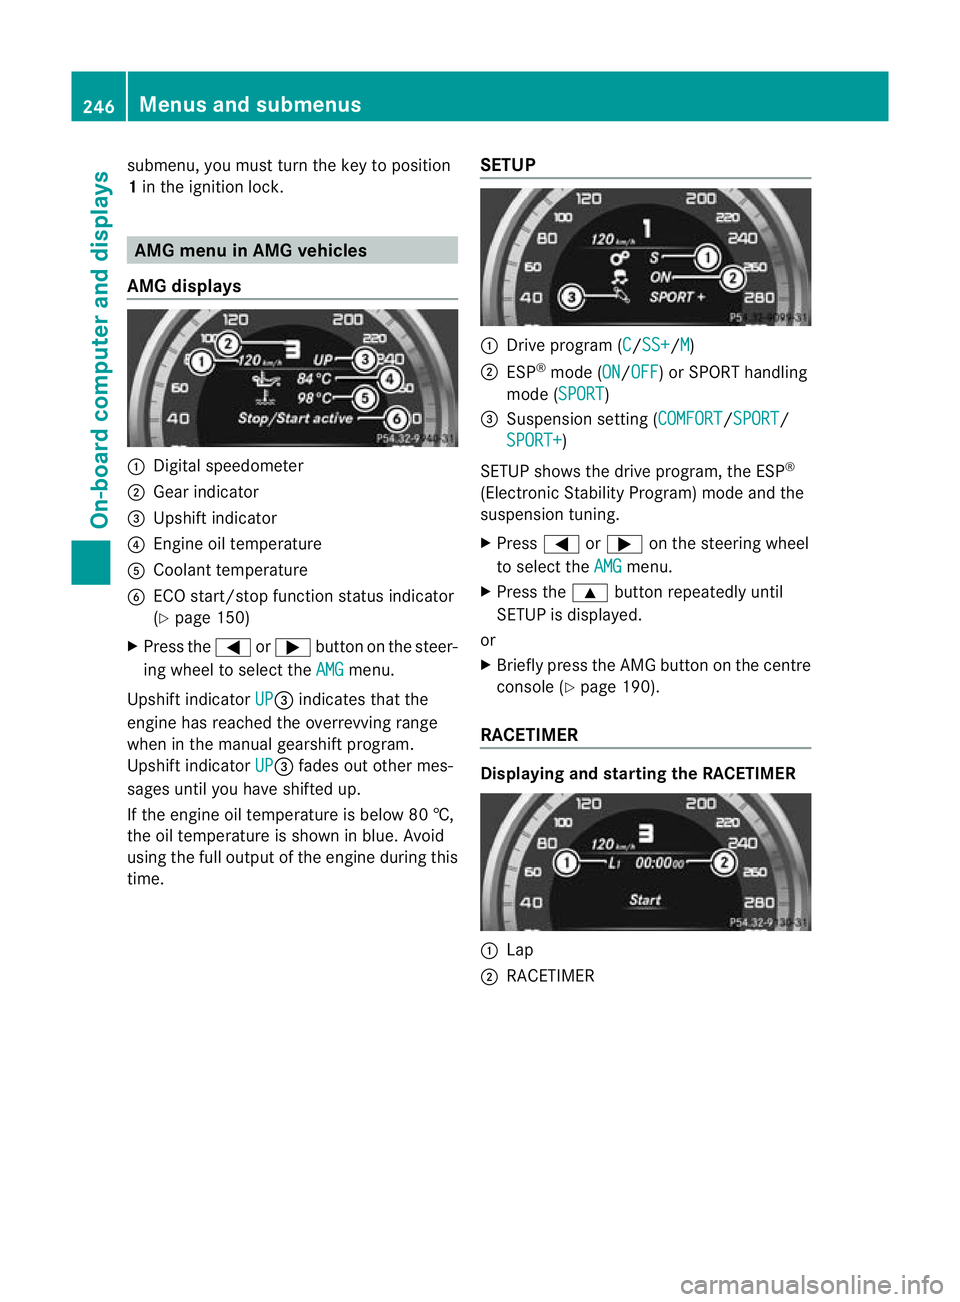
AMG displays :
Digital speedometer
; Gear indicator
= Upshift indicator
? Engine oil temperature
A Coolant temperature
B ECO start/stop function status indicator
(Y page 150)
X Press the =or; button on the steer-
ing wheel to select the AMG menu.
Upshift indicator UP =
indicates that the
engine has reached the overrevving range
when in the manual gearshift program.
Upshift indicator UP =
fades out other mes-
sages until you have shifted up.
If the engine oil temperature is below 80 †,
the oil temperature is shown in blue. Avoid
using the full output of the engine during this
time. SETUP :
Drive program (C /SS+ /M )
; ESP ®
mode (ON /OFF ) or SPORT handling
mode (SPORT )
= Suspension setting (COMFORT /SPORT /
SPORT+ )
SETUP shows the drive program, the ESP ®
(Electronic Stability Program) mode and the
suspension tuning.
X Press =or; on the steering wheel
to select the AMG menu.
X Press the 9button repeatedly until
SETUP is displayed.
or
X Briefly press the AMG button on the centre
console (Y page 190).
RACETIMER Displaying and starting the RACETIMER
:
Lap
; RACETIMER 246
Menus and submenusOn-board computer and displays
Page 313 of 405
An exterio
raerial has the following advan-
tages:
R it conducts the electromagnetic fields gen-
erated by a wireless device to the exterior.
R the field strength in the vehicle interior is
lower than in a vehicle that does not have
an exterior aerial.
i There are various mobile phone brackets
that may be fitted in your vehicle; in some
cases, these are country-specific.
i You can connect a Bluetooth ®
-capable
mobile phone with Audio 20, Audio 50 or
COMAND Online via the Bluetooth ®
inter-
face. This also applies if your vehicle is
equipped with convenience telephony.
More information on suitable mobile phones,
mobile phone brackets and on connecting
Bluetooth ®
-capable mobile phones with
Audio 20, Audio 50 or COMAND Online can
be obtained:
R at your Mercedes-Benz Service Centre
R on the Internet at http://www.mercedes-
benz.com/connect
i The functions and services available when
you use the phone depend on your mobile
phone model and service provider.
Using amobile phone If the mobile phone is inserted in the mobile
phone bracket, you can speak to the person
you are calling using the hands-free system.
X
Open the telephone compartment
(Y page 292).
X If required by the desig nofthe mobile
phone bracket, install the sliding adapter
(Y page 311).
X Insert the mobile phone into the mobile
phone bracket (see the separate installa-
tion instructions for the mobile phone fit-
ting).
i On some mobile phone brackets, you first
have to connect the mobile phone via Blue-
tooth ®
to the mobile phone bracket (see the separate operating instructions for the
mobile phone bracket).
If this is the case, the mobile phone does
not have to be inserted into the bracket for
you to be able to use the telephone func-
tions. However, the charging function and
aerial function are not available.
Operating the mobile phone You can operate the telephone using the
6
and~ buttons on the multifunction
steering wheel. You can operate other mobile
phone functions via the on-board computer
(Y page 235).
When you remove the key from the ignition
lock, the mobile phone stays switched on.
However, you can no longer use the hands-
free system.
If you have an active call and would like to
take the key out of the ignition lock, first
remove the mobile phone from the bracket.
Otherwise, the call is ended.
i When using a bracket connected to the
mobile phone via Bluetooth ®
:
If you wish to continue a call in private
mode, you will need to perform the neces-
sary steps on the mobile phone. Informa-
tion can be found in the separate mobile
phone operating instructions.
i When using a bracket connected to the
mobile phone via Bluetooth ®
and you wish
to proceed with a call:
Switch to private mode before removing
the key from the ignition lock. Otherwise, it
may take up to 20 seconds, before the
mobile phone separates from the system.
Only then can the telephone call continue.
Information on the necessary steps for set-
ting up "private mode" can be found in the
separate mobile phone operating instruc-
tions.
i Not all mobile phones support "private
mode". 310
FeaturesStowing and features
Page 372 of 405
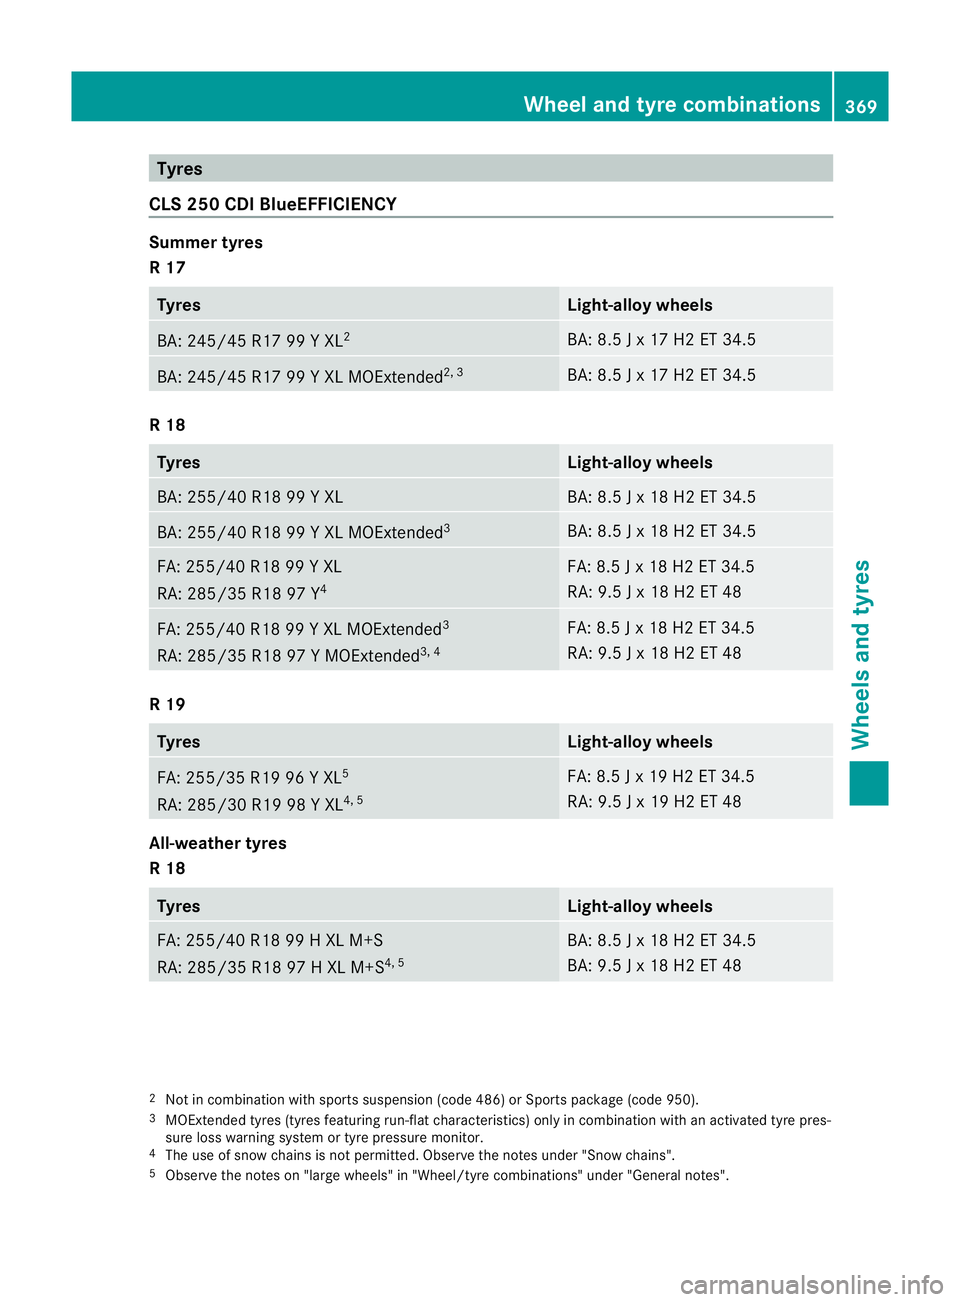
Tyres
CLS 250 CDI BlueEFFICIENCY Summer tyres
R 17
Tyres Light-alloy wheels
BA: 245/4
5 R17 99 Y XL 2 BA: 8.5 J x 17 H2 ET 34.5
BA: 245/45 R17 99 Y XL MOExtended
2, 3 BA: 8.5 J x 17 H2 ET 34.5
R 18
Tyres Light-allo
ywheels BA: 255/40 R18 99 Y XL BA: 8.5 J x 18 H2 ET 34.5
BA: 255/40 R18 99 Y XL MOExtended
3 BA: 8.5 J x 18 H2 ET 34.5
FA: 255/40 R18 99 Y XL
RA: 285/35 R18 97 Y
4 FA: 8.5 J x 18 H2 ET 34.5
RA: 9.5 J x 18 H2 ET 48
FA: 255/40 R18 99 Y XL MOExtended
3
RA: 285/35 R18 97 Y MOExtended 3, 4 FA: 8.5 J x 18 H2 ET 34.5
RA: 9.5 J x 18 H2 ET 48
R 19
Tyres Light-alloy wheels
FA: 255/35 R19 96 Y XL
5
RA: 285/30 R19 98 Y XL 4, 5 FA: 8.5 J x 19 H2 ET 34.5
RA: 9.5 J x 19 H2 ET 48
All-weather tyres
R 18
Tyres Light-alloy wheels
FA: 255/40 R18 99 H XL M+S
RA: 285/35 R18 97 H XL M+S
4, 5 BA: 8.5 J x 18 H2 ET 34.5
BA: 9.5 J x 18 H2 ET 48
2
Not in combination with sports suspension (code 486) or Sports package (code 950).
3 MOExtended tyres (tyres featuring run-fla tcharacteristics) only in combination with an activated tyre pres-
sure loss warning system or tyre pressure monitor.
4 The use of snow chains is not permitted. Observe the notes under "Snow chains".
5 Observe the notes on "large wheels" in "Wheel/tyre combinations" under "General notes". Wheel and tyre combinations
369Wheels and tyres Z