2012 MERCEDES-BENZ CLS SHOOTING BRAKE fuse box
[x] Cancel search: fuse boxPage 14 of 405

Folding in whe
nlocking (on-board
computer) ...................................... 245
Out of position (troubleshooting) ...109
Parking position ............................. 110
Resetting ....................................... 109
Storing settings (memory func-
tion) ............................................... 111F
Faul tmessage
see Display messages
Filler cap
see Fuel filler flap
Fire extinguisher ............................... 335
First-aid kit ......................................... 334
Fitting awheel
Removing awheel .......................... 365
Fitting wheels
Fitting awheel ............................... 366
Lowering the vehicle ......................366
Raising the vehicle .........................364
Securing the vehicle against roll-
ing away ........................................ 363
Flat tyre
MOExtended tyres .........................337
Preparing the vehicle .....................336
TIREFIT kit ...................................... 338
Floormat ............................................ .317
Foglamps (extende drange) .............. 120
Frequencies Garage door opener .......................314
Mobile phone ................................. 383
Two-way radio ................................ 383
Front foglamps
Display message ............................ 257
Fuel
Additives ........................................ 389
Consumption information ..............390
Consumption statistics ..................231
Displaying the current consump-
tion ................................................ 231
Displaying the range ......................231
Fuel gauge ............................... 30, 227
Grade (petrol) ................................ 387
Important safety notes ..................386
Notes for AMG vehicles .................388
Problem (malfunction) ...................164Quality (diesel
)............................... 389
Refuelling ...................................... .161
Tank content/reserve fuel .............387
Fuel filler flap
Emergency release ........................163
Opening/closing ............................ 162
Fuel filte r(white display message) .261
Fuel level Calling up the range (on-board
computer) ...................................... 231
Gauge ...................................... 30, 227
Fuel reserve
see Fuel
Fuel tank
Capacity ........................................ 387
Problem (malfunction) ...................164
Fuse allocation chart (vehicle tool
kit) ...................................................... 335
Fuses Allocation chart ............................. 350
Before changing ............................. 350
Fuse box in the boot ......................351
Fuse box in the engine compart-
ment .............................................. 350
Fuse box in the luggage compart-
ment .............................................. 351
Important safety notes ..................350 G
Garage door opener Clearing the memory .....................313
Frequencies ................................... 314
Important safety notes ..................311
Opening/closing the garage door ..313
Programming (button in the rear-
view mirror) ................................... 312
Gear indicator (on-board com-
puter) ................................................. .246
Gearshift program SETUP (on-board computer) ..........246
Genuine Mercedes-Benz parts .........382
Glove compartment ..........................291 Index
11
Page 353 of 405

Electrical fuses
Important safety notes
G
WARNING
Only use fuses that have been approved for
Mercedes-Ben zvehicles and which have the
correct fuse rating for the systems con-
cerned. Do not attempt to repair or bridge
faulty fuses. Using fuses which have not been
approved or attempting to repair or bridge
faulty fuses could cause the fuse to be over-
loaded and result in a fire. Have the cause
traced and rectified at a qualified specialist
workshop.
! Only use fuses that have been approved
for Mercedes-Benz vehicles and which
have the correct fuse rating for the system
concerned. Otherwise, components or sys-
tems could be damaged.
The fuses in your vehicle serve to close down
faulty circuits. If afuse blows, all the compo-
nents on the circuit and their functions stop
operating.
Blown fuses must be replace dwith fuses of
the same rating, which you can recognise by
the colour and fuse rating. The fuse ratings
are listed in the fuse allocation chart.
If the newly inserted fuse also blows, have the
cause traced and rectified at a qualified spe-
cialist workshop, e.g. a Mercedes-Benz
Service Centre. Before replacing a fuse
X Secure the vehicle against rolling away
(Y page 165).
X Switch off all electrical consumers.
X Turn the key to position 0in the ignition
lock and remove it (Y page 147).
or
X On vehicles with KEYLESS-GO, make sure
the ignition is switched off (Y page 147).
All indicator lamps in the instrumen tcluster
must be off. The fuses are located in various fuse boxes:
R
fuse box in the engine compartmen tonthe
left-hand side of the vehicle, when viewed
in the direction of travel
R CLS Coupé: fuse box in the boot on the
right-hand side of the vehicle, when viewed
in the direction of travel
R CLS Shooting Brake: fuse box in the lug-
gage compartmentont he right-hand side
of the vehicle, when viewed in the direction
of travel
CLS Coupé: the fuse allocation chart is loca-
ted in the vehicle tool kit in the stowage com-
partment under the boot floor (Y page 335).
CLS Shooting Brake: the fuse allocation
chart is located in the vehicle tool kit in the
stowage compartmentu nderthe luggage
compartment floor (Y page 335). Fuse box in the engine compartment
G
WARNING
Make sure that the windscreen wipers are
turned off and the key is pulled out of the igni-
tion lock before you open the cover of the fuse
box. Otherwise, the windscreen wipers and
the wiper rods above the cover could be set
in motion. This could lead to you or others
being injured by the wiper rods.
! Make sure that no moisture can enter the
fuse box when the cover is open.
! When closing the cover, make sure that it
is lying correctly on the fuse box. Moisture
seeping in or dirt could otherwise impair
the operation of the fuses.
X Make sure that the windscreen wipers are
switched off.
X Open the bonnet. 350
Electrical fusesBreakdown assistance
Page 354 of 405

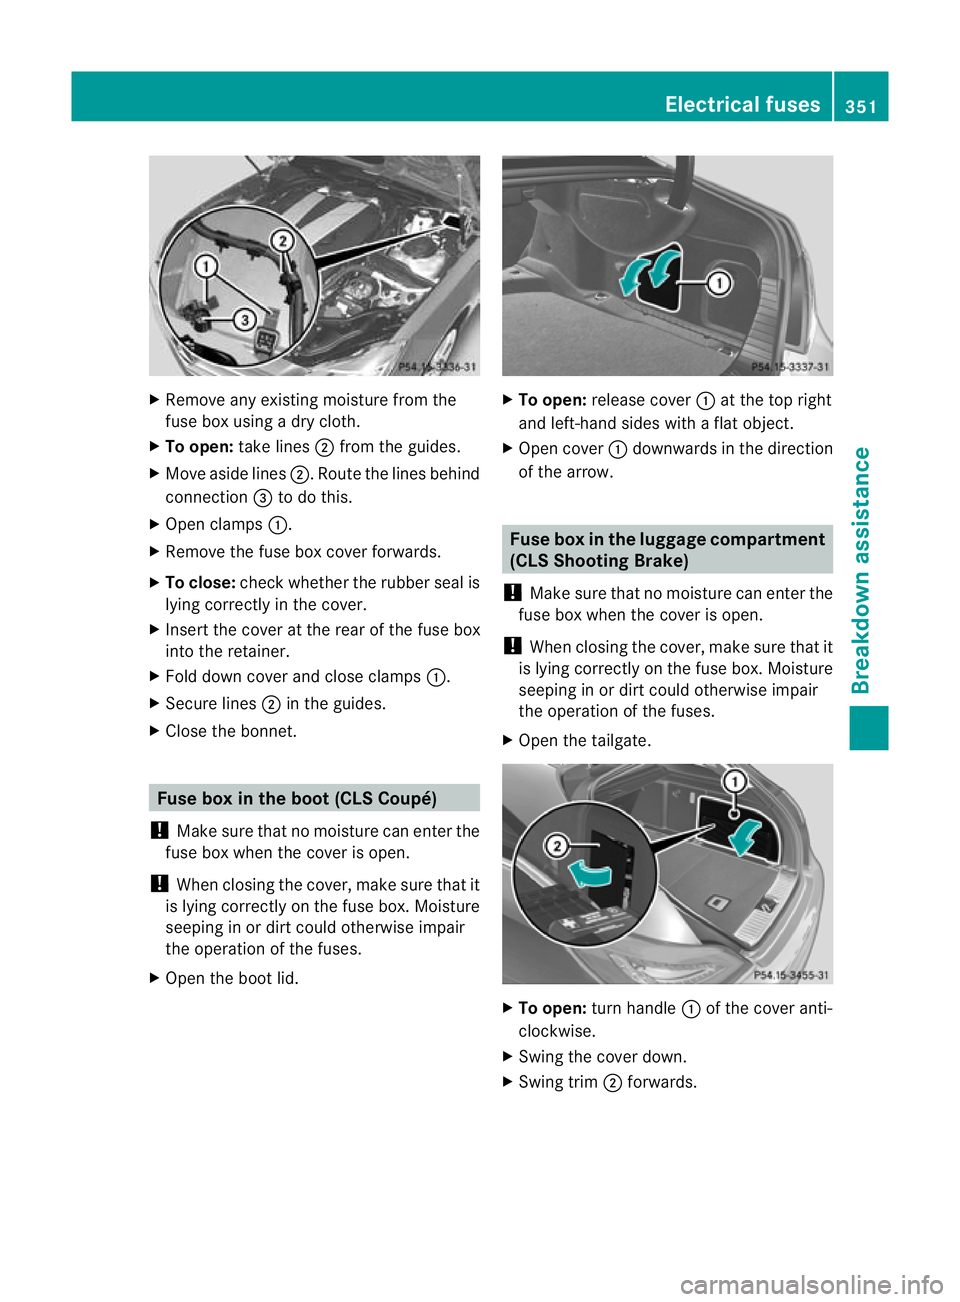
X
Remove any existing moisture from the
fuse box using a dry cloth.
X To open: take lines ;from the guides.
X Move aside lines ;.Route the lines behind
connection =to do this.
X Open clamps :.
X Remove the fuse box cover forwards.
X To close: check whether the rubber seal is
lying correctly in the cover.
X Insert the cover at the rear of the fuse box
into the retainer.
X Fold down cover and close clamps :.
X Secure lines ;in the guides.
X Close the bonnet. Fuse box in the boot (CLS Coupé)
! Make sure that no moisture can enter the
fuse box when the cover is open.
! When closing the cover, make sure that it
is lying correctly on the fuse box. Moisture
seeping in or dirt could otherwise impair
the operation of the fuses.
X Open the boot lid. X
To open: release cover :at the top right
and left-hand sides with a flat object.
X Open cover :downwards in the direction
of the arrow. Fuse box in the luggage compartment
(CLS Shooting Brake)
! Make sure that no moisture can enter the
fuse box when the cover is open.
! When closing the cover, make sure that it
is lying correctly on the fuse box. Moisture
seeping in or dirt could otherwise impair
the operation of the fuses.
X Open the tailgate. X
To open: turn handle :of the cover anti-
clockwise.
X Swing the cover down.
X Swing trim ;forwards. Electrical fuses
351Breakdown assistance Z