2012 MERCEDES-BENZ CLS SHOOTING BRAKE fold seats
[x] Cancel search: fold seatsPage 41 of 405
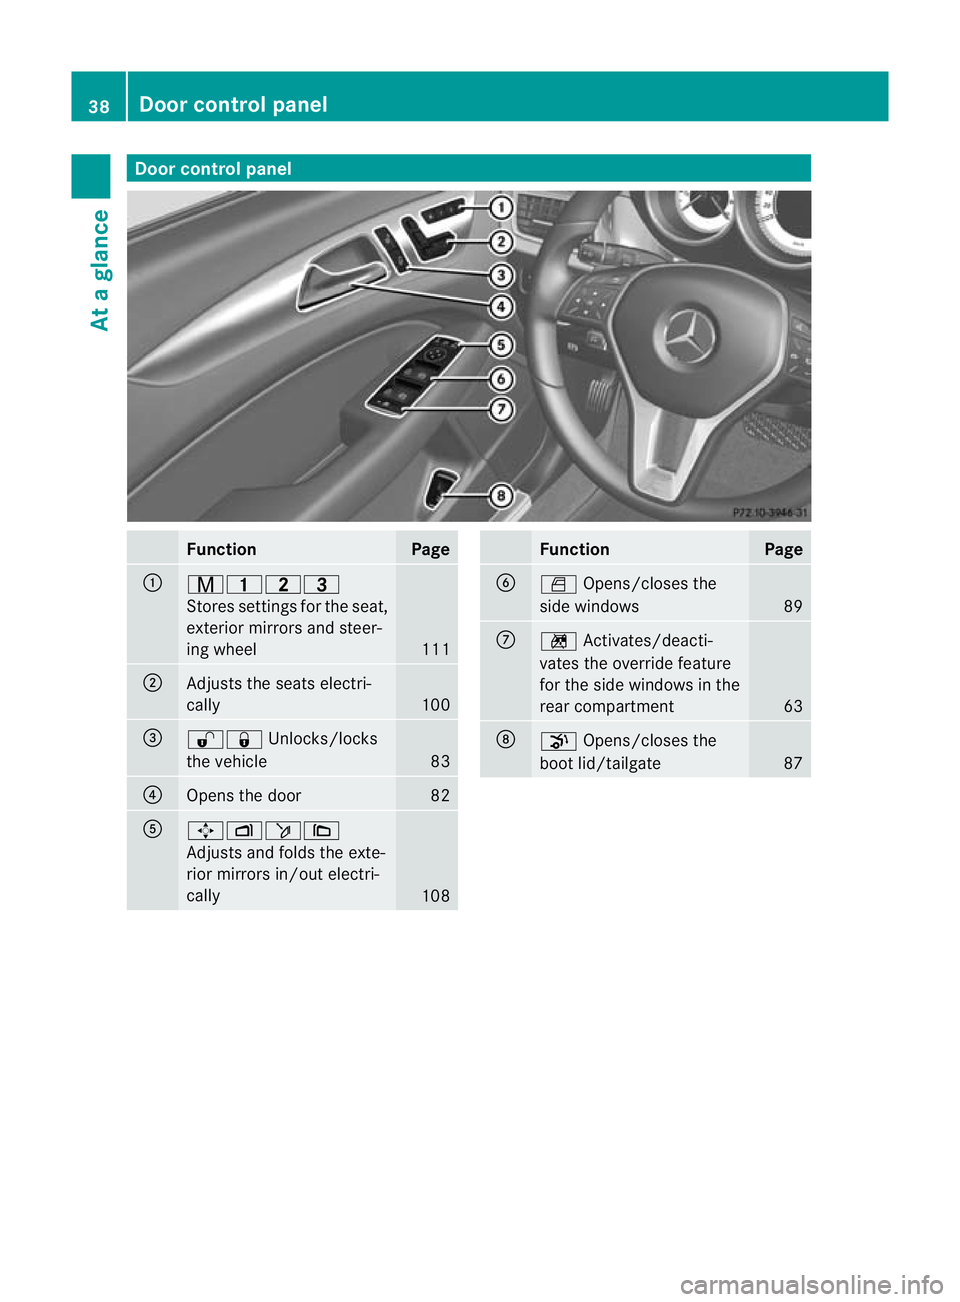
Door control panel
Function Page
:
r45=
Stores settings fo
rthe seat,
exterior mirrors and steer-
ing wheel 111
;
Adjusts the seats electri-
cally
100
=
%&
Unlocks/locks
the vehicle 83
?
Opens the door 82
A
7Zö\
Adjusts and folds the exte-
rior mirrors in/out electri-
cally
108 Function Page
B
W
Opens/closes the
side windows 89
C
n
Activates/deacti-
vates the override feature
for the side windows in the
rear compartment 63
D
p
Opens/closes the
boot lid/tailgate 8738
Doorc
ontrol panelAt a glance
Page 59 of 405
tur
nthe key to position 2inthe ignition lock,
the 4 PASSENGER AIRBAG OFF indicator
lamp lights up briefly, but does not have any
function. It does not indicate that there is
automatic child seat recognition on the front-
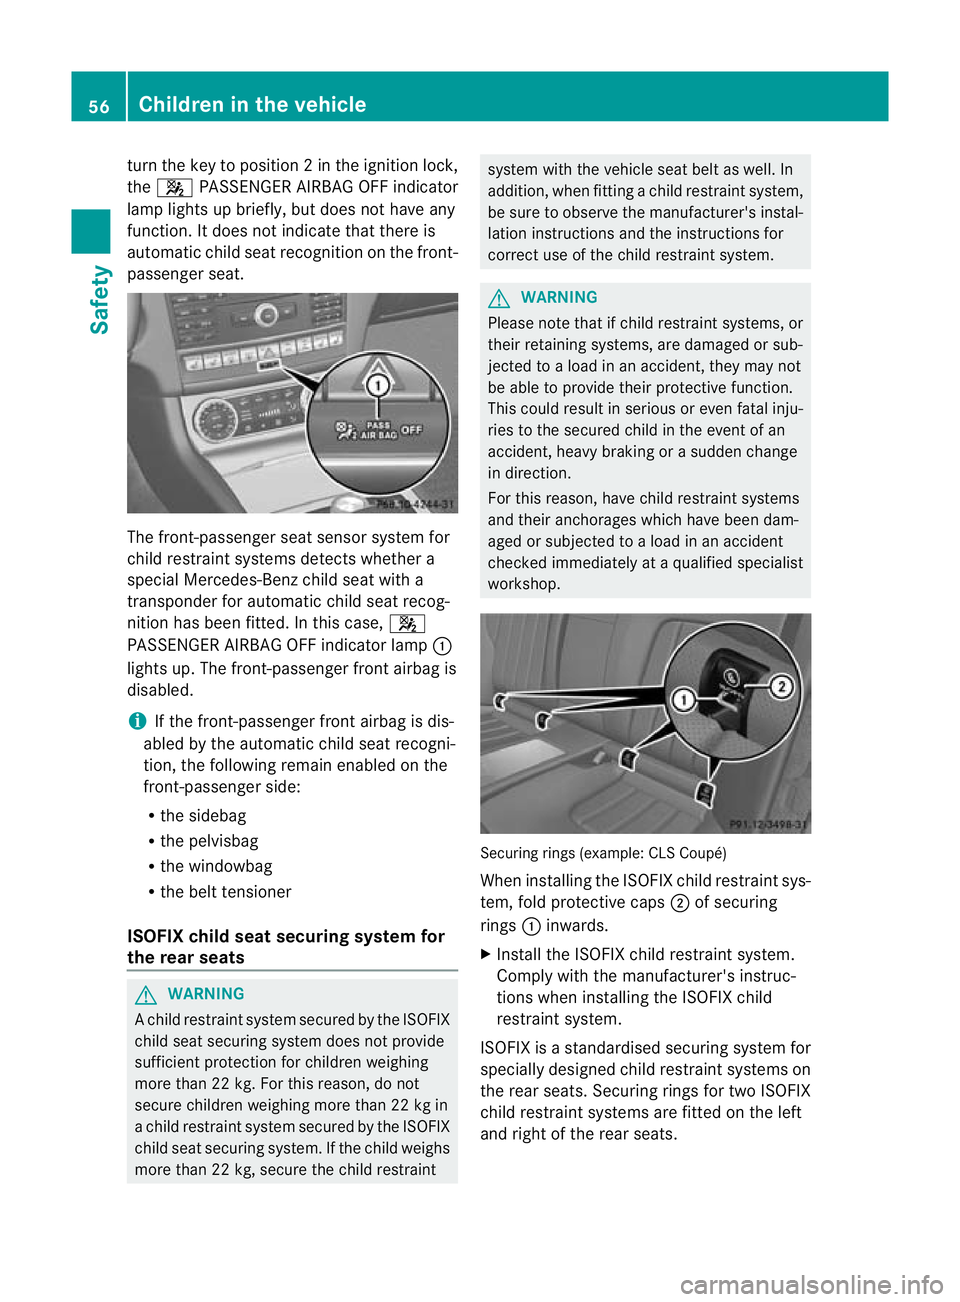
passenger seat. The front-passenger seat sensor system for
child restraint systems detects whether a
special Mercedes-Ben zchild seat with a
transponder for automatic child seat recog-
nition has been fitted. In this case, 4
PASSENGER AIRBAG OFF indicator lamp :
lights up. The front-passenger front airbag is
disabled.
i If the front-passenger front airbag is dis-
abled by the automatic child seat recogni-
tion, the following remain enabled on the
front-passenger side:
R the sidebag
R the pelvisbag
R the windowbag
R the belt tensioner
ISOFIX child seat securing system for
the rear seats G
WARNING
Ac hild restraint system secured by the ISOFIX
child seat securing system does not provide
sufficient protection for children weighing
more than 22 kg. For this reason, do not
secure children weighing more than 22 kg in
a child restraint system secured by the ISOFIX
child seat securing system. If the child weighs
more than 22 kg, secure the child restraint system with the vehicle seat belt as well. In
addition, when fitting a child restraint system,
be sure to observe the manufacturer's instal-
lation instructions and the instructions for
correct use of the child restraint system.
G
WARNING
Please note that if child restraint systems, or
their retaining systems, are damaged or sub-
jected to a load in an accident, they may not
be able to provide their protective function.
This could result in serious or even fatal inju-
ries to the secured child in the event of an
accident, heavy braking or a sudden change
in direction.
For this reason, have child restraint systems
and their anchorages which have been dam-
aged or subjected to a load in an accident
checked immediately at a qualified specialist
workshop. Securing rings (example: CLS Coupé)
When installing the ISOFIX child restraint sys-
tem, fold protective caps
;of securing
rings :inwards.
X Install the ISOFIX child restraint system.
Comply with the manufacturer's instruc-
tions when installing the ISOFIX child
restraint system.
ISOFIX is a standardised securing system for
specially designed child restraint systems on
the rear seats. Securing rings for two ISOFIX
child restraint systems are fitted on the left
and right of the rear seats. 56
Children in the vehicleSafety
Page 103 of 405
R
clean the sea tcovers as recommended;
see "Interior care".
R do not transport heavy loads on the
seats. Do not place sharp objects on the
seat cushions, e.g. knives, nails or tools.
The seats should only be occupied by
passengers, if possible.
R when the seat heating is in operation, do
not cover the seats with insulating mate-
rials, e.g. blankets, coats, bags, seat cov-
ers, child seats or booster seats.
! Make sure that there are no objects in the
footwell or behind the seats when moving
the seat back. There is a risk that the seats
and/or the objects could be damaged.
i The head restraints in the front seats are
fitted with the NECK-PRO system
(Y page 46). For this reason, it is not pos-
sible to remove the head restraints from
the front seats.
For more information, contact a qualified
specialist workshop.
i Further related subjects:
R Rear bench seat through-loading fea-
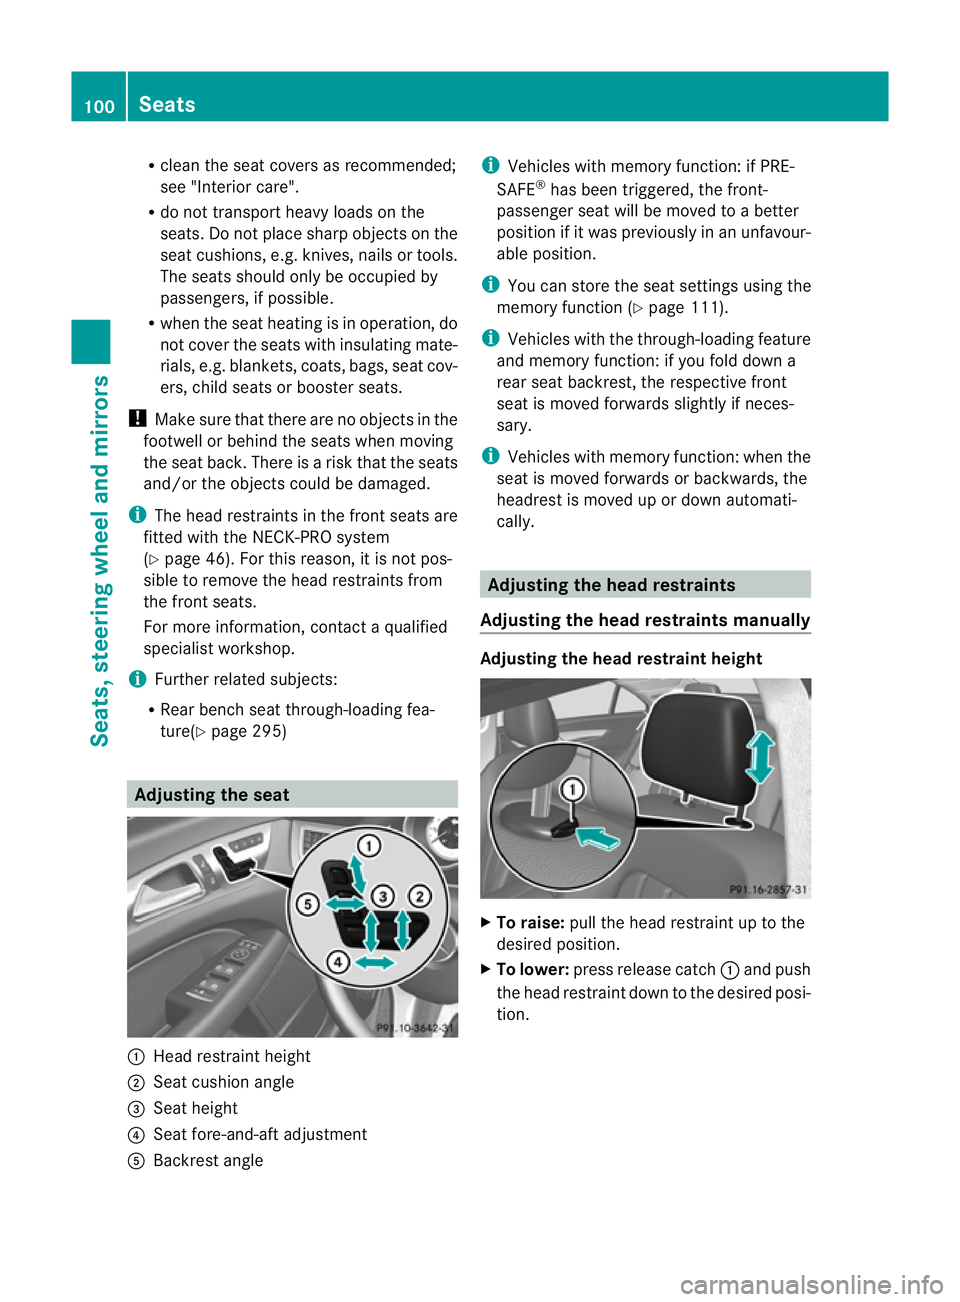
ture(Y page 295) Adjusting the seat
:
Head restraint height
; Seat cushion angle
= Seat height
? Seat fore-and-aft adjustment
A Backrest angle i
Vehicles with memory function: if PRE-
SAFE ®
has been triggered, the front-
passenger seat will be moved to a better
position if it was previously in an unfavour-
able position.
i You can store the seat settings using the
memory function (Y page 111).
i Vehicles with the through-loading feature
and memory function: if you fold down a
rear seat backrest, the respective front
seat is moved forwards slightly if neces-
sary.
i Vehicles with memory function: when the
seat is moved forwards or backwards, the
headrest is moved up or down automati-
cally. Adjusting the head restraints
Adjusting the head restraints manually Adjusting the head restraint height
X
To raise: pull the head restraint up to the
desired position.
X To lower: press release catch :and push
the head restraint down to the desired posi-
tion. 100
SeatsSeats, steering wheel and mirrors
Page 104 of 405
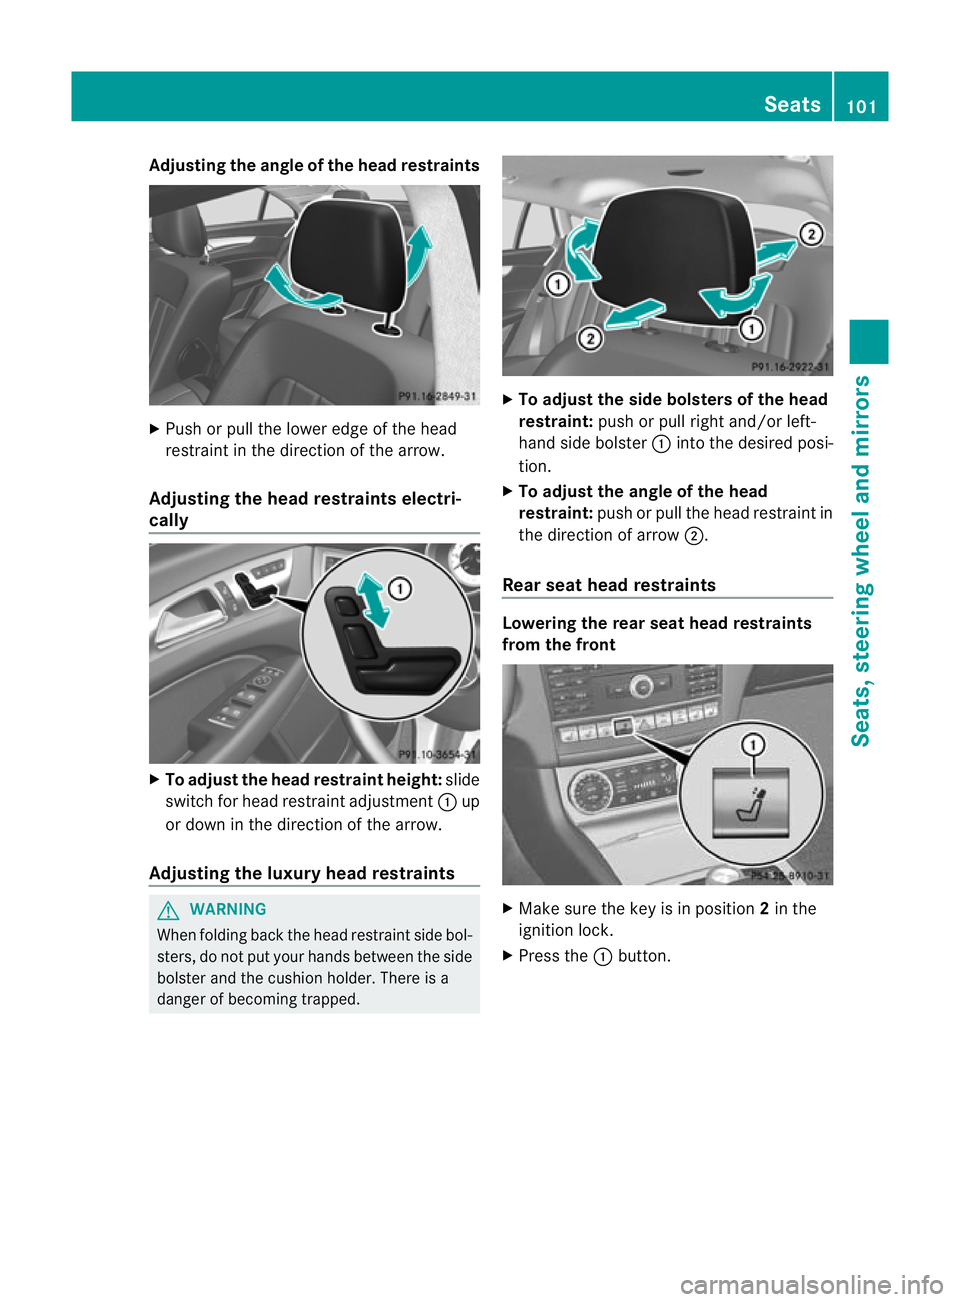
Adjusting th
eangle of the head restraints X
Push or pull the lower edge of the head
restraint in the direction of the arrow.
Adjusting the head restraints electri-
cally X
To adjust the head restraint height: slide
switch for head restraint adjustment :up
or down in the direction of the arrow.
Adjusting the luxury head restraints G
WARNING
When folding back the head restraint side bol-
sters, do not put your hands between the side
bolster and the cushion holder. There is a
danger of becoming trapped. X
To adjust the side bolsters of the head
restraint: push or pull right and/or left-
hand side bolster :into the desired posi-
tion.
X To adjust the angle of the head
restraint: push or pull the head restraint in
the direction of arrow ;.
Rear seat head restraints Lowering the rear seat head restraints
from the front
X
Make sure the key is in position 2in the
ignition lock.
X Press the :button. Seats
101Seats, steering wheel and mirrors Z
Page 112 of 405
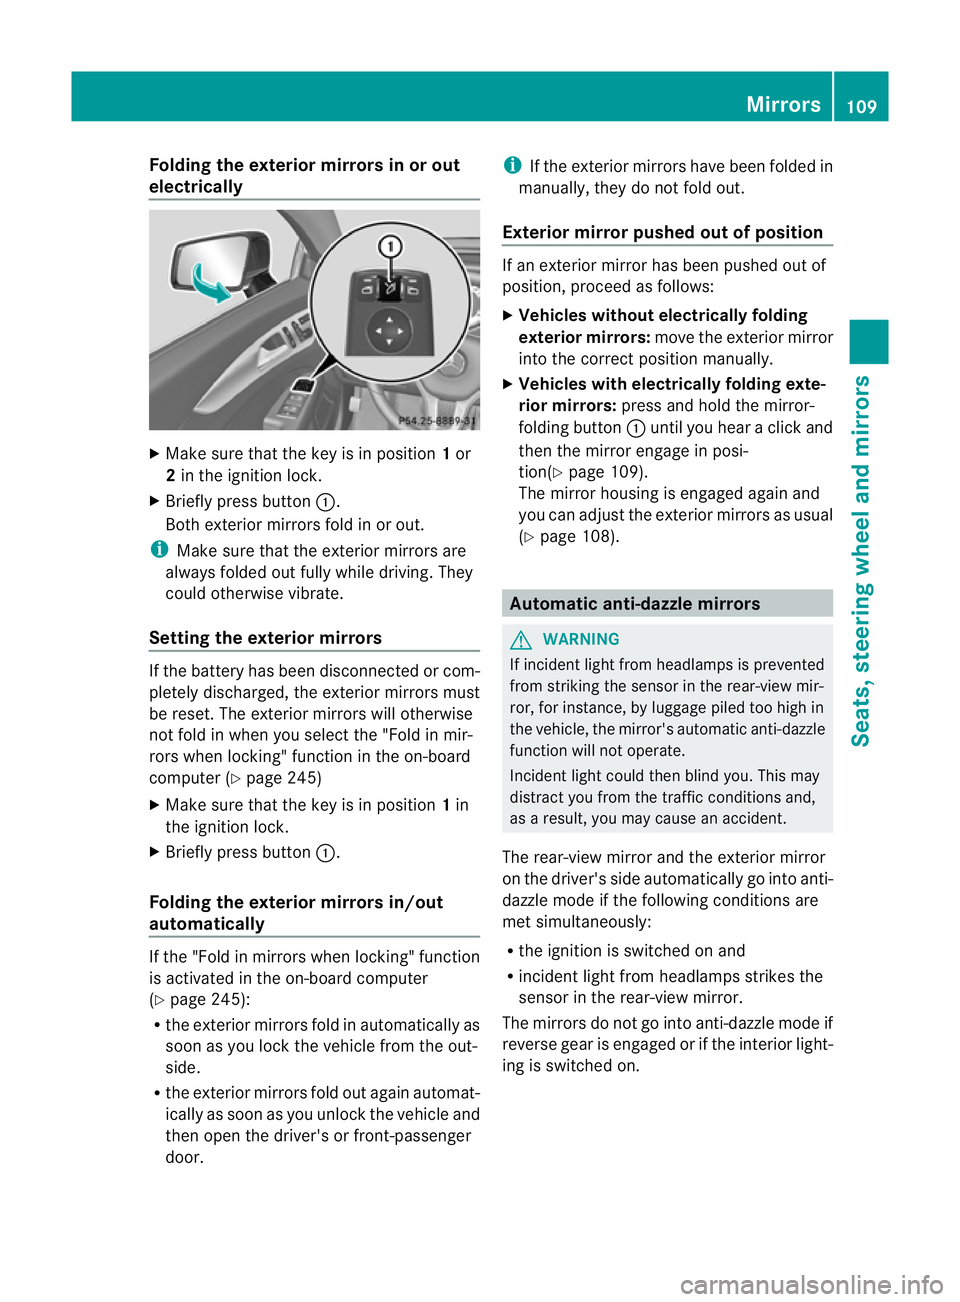
Folding the exterior mirrors in or out
electrically X
Make sure that the key is in position 1or
2 in the ignition lock.
X Briefly press button :.
Both exterior mirrors fold in or out.
i Make sure that the exterior mirrors are
always folded out fully while driving .They
could otherwise vibrate.
Setting the exterior mirrors If the battery has been disconnected or com-
pletely discharged, the exterior mirrors must
be reset. The exterior mirrors will otherwise
not fold in when you select the "Fold in mir-
rors when locking" function in the on-board
computer (Y page 245)
X Make sure that the key is in position 1in
the ignition lock.
X Briefly press button :.
Folding the exterior mirrors in/out
automatically If the "Fold in mirrors when locking" function
is activated in the on-board computer
(Y page 245):
R the exterior mirrors fold in automatically as
soon as you lock the vehicle from the out-
side.
R the exterior mirrors fold out again automat-
ically as soon as you unlock the vehicle and
then open the driver's or front-passenger
door. i
If the exterior mirrors have been folded in
manually, they do not fold out.
Exterior mirror pushed out of position If an exterior mirror has been pushed out of
position, proceed as follows:
X
Vehicles without electrically folding
exterior mirrors: move the exterior mirror
into the correct position manually.
X Vehicles with electrically folding exte-
rior mirrors: press and hold the mirror-
folding button :until you hear a click and
then the mirror engage in posi-
tion(Y page 109).
The mirror housing is engaged again and
you can adjust the exterior mirrors as usual
(Y page 108). Automatic anti-dazzle mirrors
G
WARNING
If incident light from headlamps is prevented
from striking the sensor in the rear-view mir-
ror, for instance, by luggage piled too high in
the vehicle, the mirror's automatic anti-dazzle
function will not operate.
Incident light could then blind you. This may
distract you from the traffic conditions and,
as a result, you may cause an accident.
The rear-view mirror and the exterior mirror
on the driver's side automatically go into anti-
dazzle mode if the following conditions are
met simultaneously:
R the ignition is switched on and
R incident light from headlamps strikes the
sensor in the rear-view mirror.
The mirrors do not go into anti-dazzle mode if
reverse gear is engaged or if the interior light-
ing is switched on. Mirrors
109Seats, steering wheel and mirrors Z
Page 295 of 405
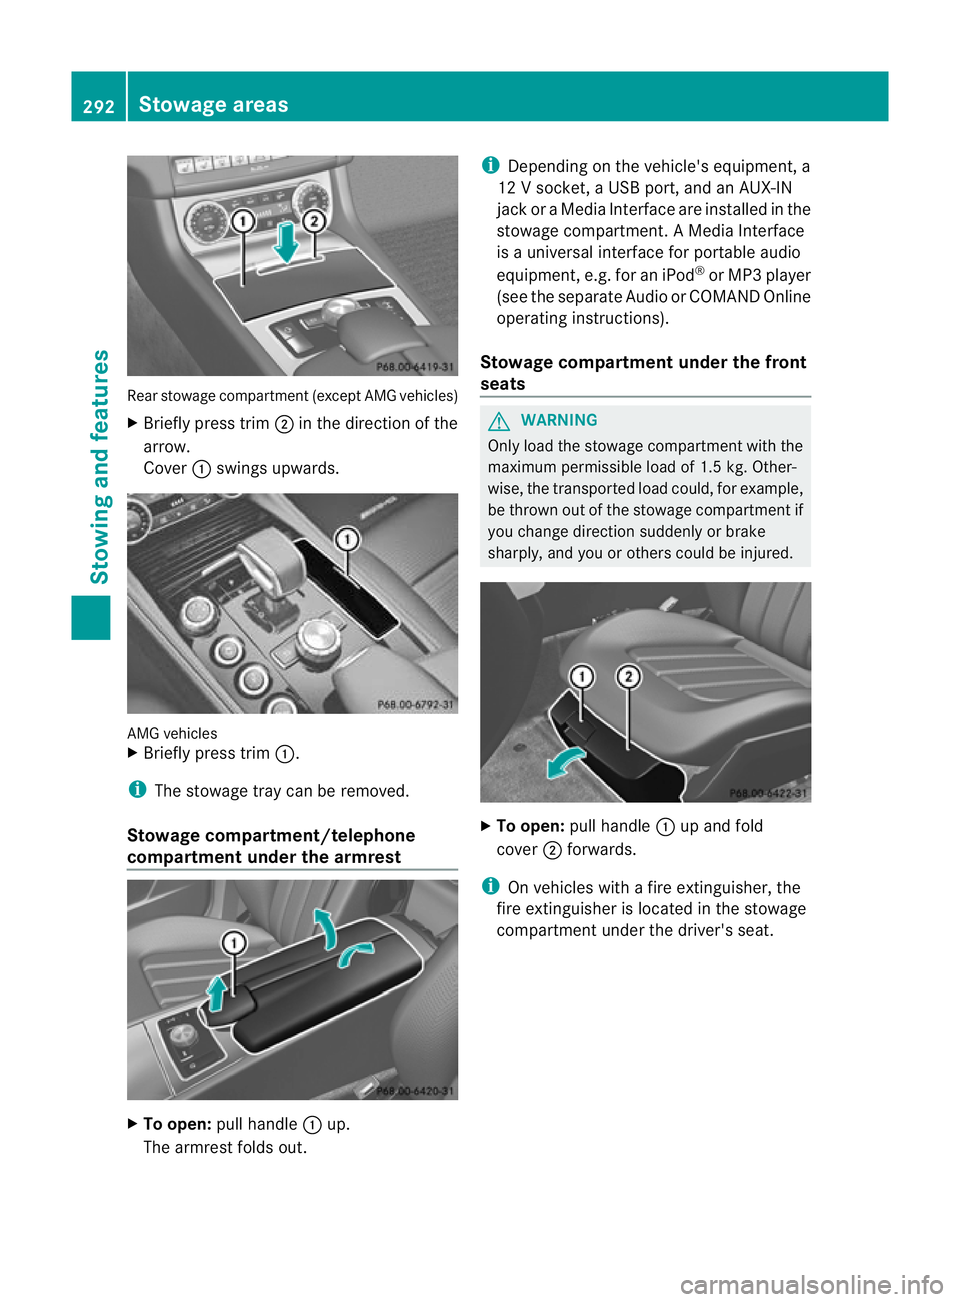
Rear stowage compartmen
t(except AMG vehicles)
X Briefly press trim ;in the direction of the
arrow.
Cover :swings upwards. AMG vehicles
X
Briefly press trim :.
i The stowage tray can be removed.
Stowage compartment/telephone
compartment under the armrest X
To open: pull handle :up.
The armrest folds out. i
Depending on the vehicle's equipment, a
12 V socket, a USB port, and an AUX-IN
jack or a Media Interface are installed in the
stowage compartment. A Media Interface
is a universal interface for portable audio
equipment, e.g. for an iPod ®
or MP3 player
(see the separate Audio or COMAND Online
operating instructions).
Stowage compartment under the front
seats G
WARNING
Only load the stowage compartment with the
maximum permissible load of 1.5 kg. Other-
wise, the transported load could, for example,
be thrown out of the stowage compartment if
you change direction suddenly or brake
sharply, and you or others could be injured. X
To open: pull handle :up and fold
cover ;forwards.
i On vehicles with a fire extinguisher, the
fire extinguisher is located in the stowage
compartment under the driver's seat. 292
Stowage areasStowing and features
Page 298 of 405
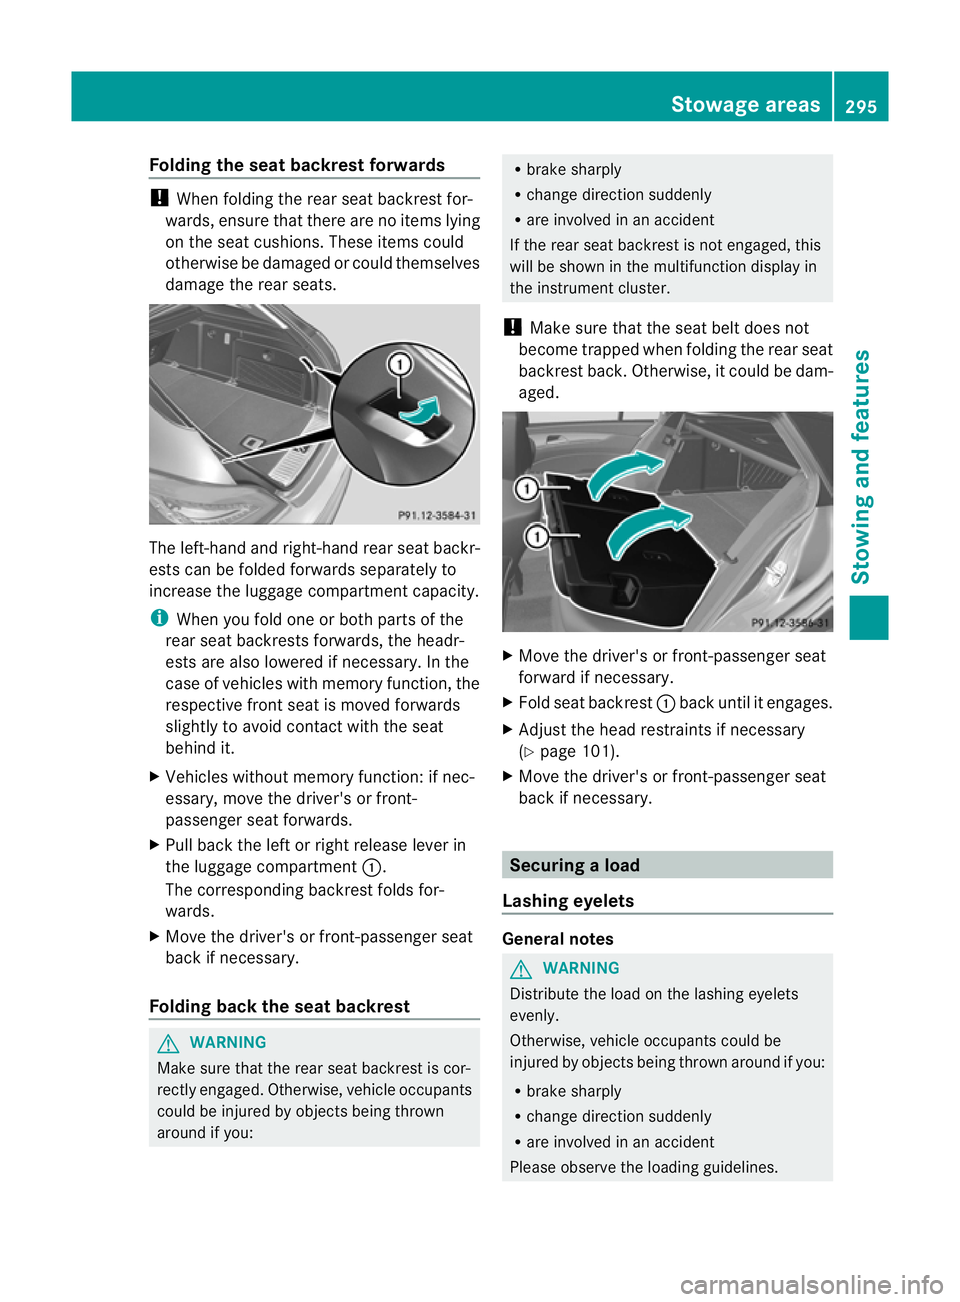
Folding the seat backrest forwards
!
When folding the rear seat backrest for-
wards, ensure that there are no items lying
on the seat cushions. Thes eitems could
otherwise be damaged or could themselves
damage the rea rseats. The left-hand and right-hand rear seat backr-
ests can be folded forwards separately to
increase the luggage compartment capacity.
i When you fold one or both parts of the
rear seat backrests forwards, the headr-
ests are also lowered if necessary. In the
case of vehicles with memory function, the
respective fron tseat is moved forwards
slightly to avoid contact with the seat
behind it.
X Vehicles without memory function: if nec-
essary, move the driver's or front-
passenger seat forwards.
X Pull back the left or right release lever in
the luggage compartment :.
The corresponding backrest folds for-
wards.
X Move the driver's or front-passenger seat
back if necessary.
Folding back the seat backrest G
WARNING
Make sure that the rear seat backrest is cor-
rectly engaged. Otherwise, vehicle occupants
could be injured by objects being thrown
around if you: R
brake sharply
R change direction suddenly
R are involved in an accident
If the rear seat backrest is not engaged, this
will be shown in the multifunction display in
the instrument cluster.
! Make sure that the seat belt does not
become trapped when folding the rear seat
backrest back. Otherwise, it could be dam-
aged. X
Move the driver's or front-passenger seat
forward if necessary.
X Fold seat backrest :back until it engages.
X Adjust the head restraints if necessary
(Y page 101).
X Move the driver's or front-passenger seat
back if necessary. Securing
aload
Lashing eyelets General notes
G
WARNING
Distribute the load on the lashing eyelets
evenly.
Otherwise, vehicle occupants could be
injured by objects being thrown around if you:
R brake sharply
R change directio nsuddenly
R are involved in an accident
Please observe the loading guidelines. Stowage areas
295Stowing and featu res Z