2012 MERCEDES-BENZ CLS SHOOTING BRAKE change time
[x] Cancel search: change timePage 4 of 405
Welcome to the world of Mercedes-Benz
Before you first drive off, read this Owner's
Manual carefully and familiarise yourself with
yourv ehicle. For your own safety and a longer
vehicle life, follow the instructions and warn-
ing notices in this manual. Disregarding them
may lead to damage to the vehicle or personal
injury.
The equipment or model designation of your
vehicle may vary according to:
R model
R order
R country variant
R availability
The illustrations in this manual show a left-
hand-drive vehicle. On right-hand-drive vehi-
cles, the layout of components and controls
differs accordingly.
Mercedes-Benzi s constantly updating its
vehicles to the state of the art.
Mercedes-Benz therefore reserves the right
to introduce changes in the following areas:
R design
R equipment
R technical features
Therefore, descriptions may vary from those
of your own vehicle.
The following are integral components of the
vehicle:
R Owner's Manual
R Service Booklet
R equipment-dependent supplements
Keep printed copies of the documents in the
vehicle at all times. If you sell the vehicle,
always pass the documents on to the new
owner.
i You can get to know the important fea-
tures of your vehicle in the interactive Own-
er's Manual on the Internet at:
http://www.mercedes-benz.de/
betriebsanleitung The technical documentation team at
Daimler AG wishes you safe and pleasant
motoring.
2185840681Z102 É2185840681Z102XËÍ
Page 25 of 405
Protection of the environment
General notes
H
Environmental note
Daimler's declared policy is one of compre-
hensive environmental protection.
The objectives are for the natural resources
which form the basis of our existence on this
planet to be used sparingly and in a manner
which takes the requirements of both nature
and humanity into account.
You too can help to protect the environment
by operating your vehicle in an environmen-
tally-responsible manner.
Fuel consumption and the rate of engine,
transmission, brake and tyre wear depend on
the following factors:
R operating conditions of your vehicle
R your personal driving style
You can influence both factors. You should
bear the following in mind:
Operating conditions:
R avoid short trips as these increase fuel con-
sumption.
R make sure that the tyre pressures are
always correct.
R do not carry any unnecessary weight.
R keep an eye on the vehicle's fuel consump-
tion.
R remove roof racks once you no longer need
them.
R a regularly serviced vehicle will contribute
to environmental protection. You should
therefore adhere to the service intervals.
R always have service work carried out at a
qualified specialist workshop.
Personal driving style:
R do not depress the accelerator pedal when
starting the engine.
R do not warm up the engine with the vehicle
stationary.
R drive carefully and maintain a safe distance
from the vehicle in front. R
avoid frequent, sudden acceleration.
R change gear in good time and use each gear
only up to Ôof its maximum engine speed.
R switch off the engine in stationary traffic. Returning an end-of-life vehicle
Mercedes-Benz will take back your
Mercedes-Benz to dispose of it in an environ-
mentally responsible manner, in accordance
with the European Union (EU) End of Life
Vehicles Directive.
The End of Life Vehicles Directive applies to
vehicles with a gross vehicle weight of up to
3.5 t, in accordance with national regulations.
For several years, Mercedes-Benz has been
meeting all the legal requirements for a
design which allows for recycling and re-use.
There is a network of return points and dis-
assembly plants which can recycle your vehi-
cle in an environmentally-responsible man-
ner. The methods employed in vehicle and
parts recycling are constantly being devel-
oped and improved. This means that your
Mercedes-Benz will also continue to meet
even the increased recycling quotas in the
future in good time. You can obtain further
information from your national Mercedes-
Benz homepage or your national hotline num-
ber. Product information
Mercedes-Benz recommends that you use
genuine Mercedes-Benz parts, conversion
parts and accessories that have been
approved for the type of vehicle.
Mercedes-Benz tests genuine parts and con-
version parts and accessories that have been
specifically approved for your vehicle for their
reliability, safety and suitability. Despite
ongoing market research, Mercedes-Benz is
unable to assess other parts. Therefore,
Mercedes-Benz accepts no responsibility for
the use of such parts in Mercedes-Benz vehi- 22
Introduction
Page 52 of 405
Information abouts
eat belt adjustment, a
convenience function integrated into PRE-
SAFE ®
, can be found in the "Seat belt adjust-
ment" section (Y page 50). Seat belts
Important safety notes G
WARNING
A seat belt which is not worn correctly, or
which has not been engaged in the seat belt
buckle correctly, cannot provide the intended
level of protection. Under certain circumstan-
ces, this could cause severe or even fatal inju-
ries in the event of an accident.
Therefore, make sure that all occupants —in
particular, pregnan twomen —wear their seat
belts correctly at all times.
R The seat belt must fit snugly on your body
and must not be twisted.Therefore, avoid
wearing bulky clothing, e.g. a winter coat.
The shoulder section of the belt must be
routed across the centre of your shoulder
—onn o account across your neck or under
your arm —and pulled tight against your
uppe rbody. The lap belt must always pass
across your lap as low down as possible, i.e.
over your hip joints —not across your abdo-
men. If necessary, push the seat belt
slightly downwards and adjust it by pulling
it in the direction the seat belt retracts.
R Do not route the seat belt strap over sharp
or fragile objects. Please make sure that
such objects are not on or in your clothing,
e.g. spectacles, pens or keys etc. The seat
belt strap could become damaged and tear
during an accident and you or other vehicle
occupants could be injured.
R Only one person should use each seat belt
at any one time. Children must never travel
sitting on the lap of another occupant. The
child will not be secured in the event of an
accident, heavy braking or sudden change
of direction .This may result in the child or other occupants being seriously or fatally
injured.
R Persons under 1.50 mtall cannot wear the
seat belts correctly. For this reason secure
persons less than 1.50 m tall in specially
designed, suitable restraint systems.
R Children unde r1.50 mtall and younger
than twelve years of age canno twear the
seat belts correctly. For this reason secure
them in special suitable child restraint sys-
tems installed on a suitable seat. Additional
information can be found in the Operating
Instructions in the chapter "Safety", "Chil-
dren in the Vehicle". Observe the installa-
tion instructions of the child restraint sys-
tem manufacturer.
R Do not secure an object with a seat belt if
the seat belt is also being used by one of
the vehicle's occupants. G
WARNING
The seat belt does not offer the intended level
of protection unless the backrest is almost
vertical. Under certain circumstances, this
could cause severe or even fatal injuries in the
event of an accident.
Before starting a journey, make sure that the
seat is properly adjusted and that the back-
rest is almost vertical. G
WARNING
Ad irty or damaged seat belt or one that has
been modified or subjected to a load in an
accident no longer offers the intended level of
protection. Under certain circumstances, this
could cause severe or even fatal injuries in the
event of an accident.
For this reason, chec kregularly that the seat
belts are not damaged or dirty.
Always have damaged seat belts or seat belts
that have been subjected to a load in an acci-
dent replaced at a qualified specialist work-
shop.
For safety reasons, Mercedes-Benz recom-
mends that you only use seat belts which have Occupant safety
49Safety
Z
Page 82 of 405
X
Push release catch :in the direction of
the arrow and at the same time, remove
emergency key element ;from the key. Battery of the key
Important safety notes G
WARNING
Batteries are toxic and contain caustic sub-
stances. For this reason, keep batteries out of
the reach of children.
If a battery has been swallowed, visit a doctor
immediately. H
Environmental note Batteries contain pollutants.
It is illegal to dispose of them
with the household rubbish.
They must be collected sep-
arately and disposed of in an
environmentally responsible
recycling system.
Dispose of batteries in an
environmentally responsible
manner
.Take discharged
batteries to a qualified spe-
cialis tworkshop or to a col-
lection point for used batter-
ies.
Mercedes-Benz recommends that you have
the batteries replaced at a qualified specialist
workshop. Checking the battery X
Press the &or% button.
The battery is working properly if battery
check lamp :lights up briefly.
The battery is discharged if battery check
lamp :does not light up briefly.
X Change the battery (Y page 79).
i If the key battery is checked within the
signal reception range of the vehicle, press-
ing the &or% button:
R locks or
R unlocks the vehicle
i You can get a battery at any qualified spe-
cialist workshop.
Replacing the battery You require a CR 2025 3 V cell battery.
X
Take the emergency key element out of the
key (Y page 78). :
Battery compartment cover
; Emergency key element Key
79Opening and closing Z
Page 126 of 405
The interior lighting automatically switches
on if you:
R unlock the vehicle
R open a door
R remove the key from the ignition lock
The interior lighting is activated for a short
time when the key is removed from the igni-
tion lock. You can activate this delayed
switch-off using the on-board computer
(Y page 242).
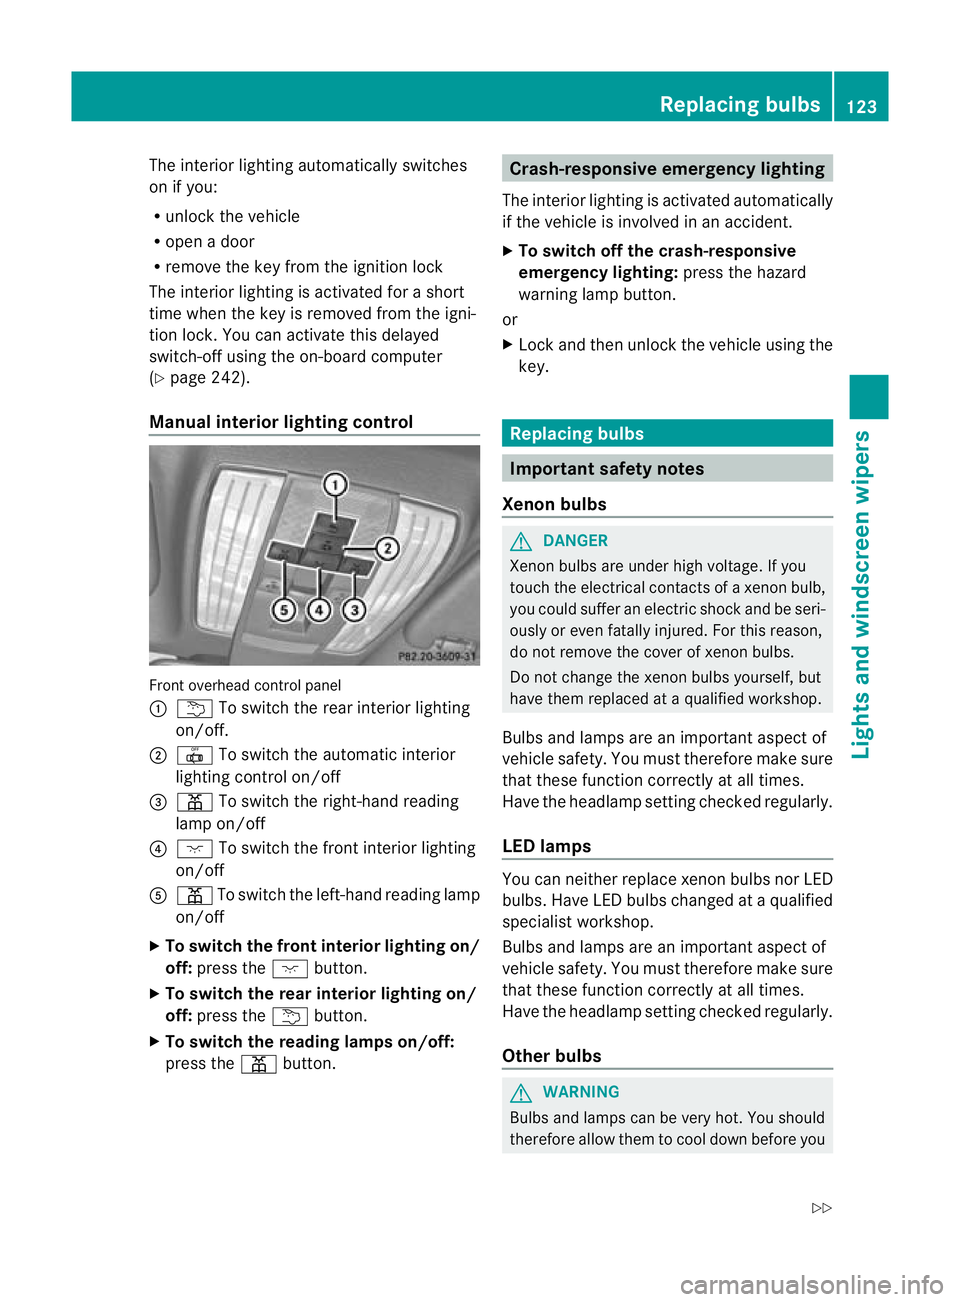
Manual interior lighting control Front overhead control panel
:
u To switch the rear interior lighting
on/off.
; | To switch the automatic interior
lighting control on/off
= p To switch the right-hand reading
lamp on/off
? c To switch the front interior lighting
on/off
A p To switch the left-hand reading lamp
on/off
X To switch the front interior lighting on/
off: press the cbutton.
X To switch the rear interior lighting on/
off: press the ubutton.
X To switch the reading lamps on/off:
press the pbutton. Crash-responsive emergency lighting
The interior lighting is activated automatically
if the vehicle is involved in an accident.
X To switch off the crash-responsive
emergency lighting: press the hazard
warning lamp button.
or
X Lock and then unlock the vehicle using the
key. Replacing bulbs
Important safety notes
Xenon bulbs G
DANGER
Xenon bulbs are under high voltage. If you
touch the electrical contacts of a xenon bulb,
you could suffer an electric shock and be seri-
ously or even fatally injured. For this reason,
do not remove the cover of xenon bulbs.
Do not change the xenon bulbs yourself, but
have them replaced at a qualified workshop.
Bulbs and lamps are an importan taspect of
vehicle safety. You must therefore make sure
that these function correctly at all times.
Have the headlamp setting checked regularly.
LED lamps You can neither replace xenon bulbs nor LED
bulbs. Have LED bulbs changed at a qualified
specialist workshop.
Bulbs and lamps are an important aspect of
vehicle safety. You must therefore make sure
that these function correctly at all times.
Have the headlamp setting checked regularly.
Other bulbs
G
WARNING
Bulbs and lamps can be very hot. You should
therefore allow them to cool down before you Replacing bulbs
123Lights and windscreen wipers
Z
Page 127 of 405
change them. Otherwise, you could be burned
if you touch them.
Keep bulbs ou
tofthe reach of children. Oth-
erwise, they could damage the bulbs, for
example, and injure themselves.
Never use a bulb which has been dropped.
Such a bulb may break or even explode and
injure you.
Halogen bulbs are pressurised and can
explode when you change them, particularly
if they are very hot. You should therefore wear
eye protection and gloves when you are
changing them.
There are bulbs other than xenon and LED
bulbs that you cannot replace. Replace only
the bulbs listed (Y page 124). Have the bulbs
that you cannot replace yourself changed at
a qualified specialist workshop.
If you require assistance changing bulbs, con-
sult a qualified specialist workshop.
Do not touch the glass tube of new bulbs with
your bare hands. Even minor contamination
can burn into the glass surface and reduce
the service life of the bulbs. Always use a lint-
free cloth or only touch the base of the bulb
when fitting.
Only use bulbs of the correct type.
If the new bulb still does not light up, consult
a qualified specialist workshop.
Bulbs and lamps are an important aspect of
vehicle safety. You must therefore make sure
that these function correctly at all times.
Have the headlamp setting checked regularly. Overview of bulb replacement
–bulbs
You can replace the following bulbs. The
details for the bulb type can be found in the
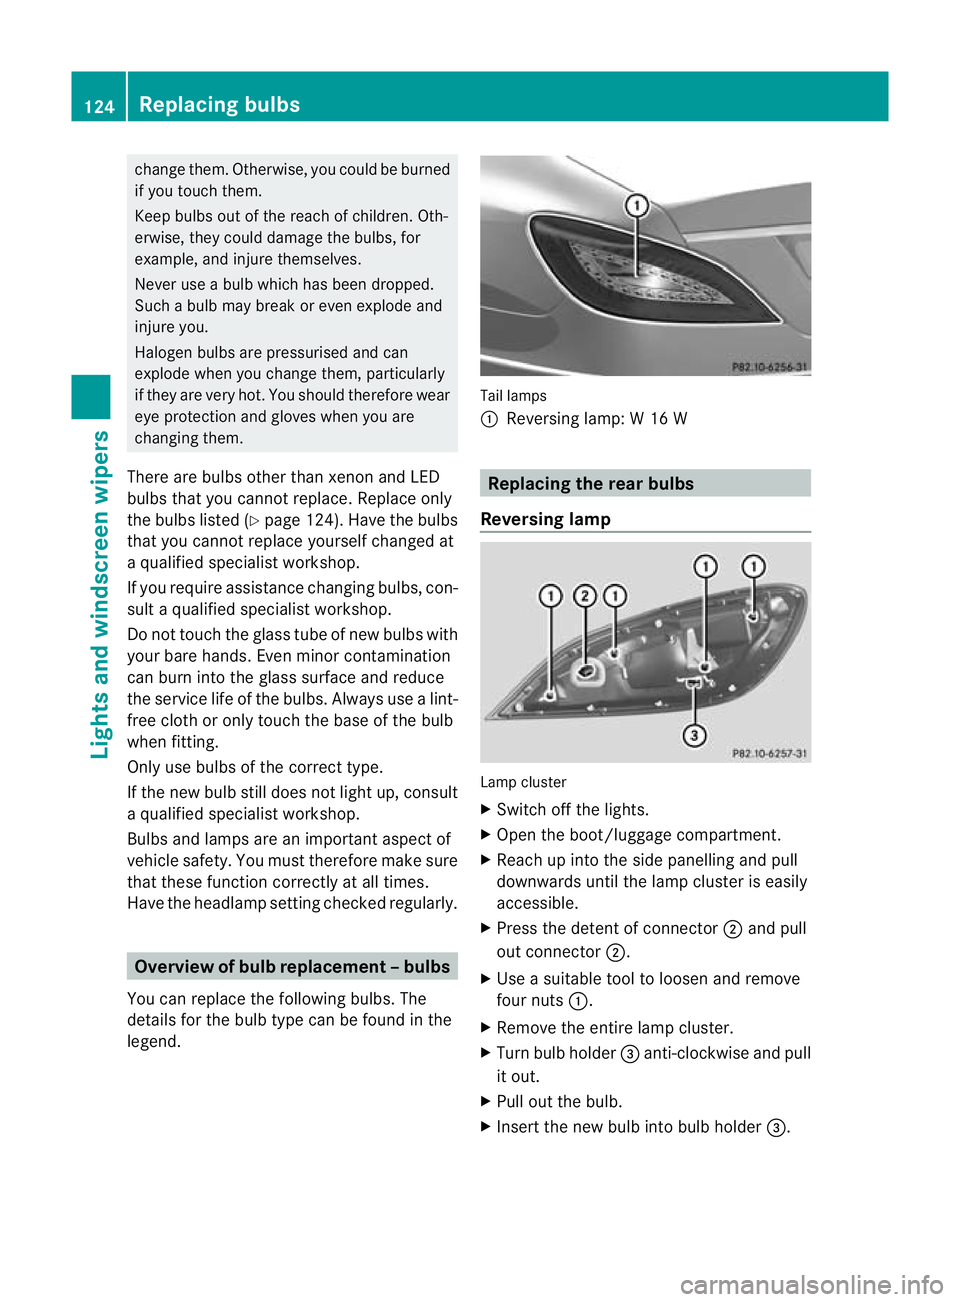
legend. Tail lamps
:
Reversing lamp: W 16 W Replacing the rear bulbs
Reversing lamp Lamp cluster
X
Switch off the lights.
X Open the boot/luggage compartment.
X Reach up into the side panelling and pull
downwards until the lamp cluster is easily
accessible.
X Press the detent of connector ;and pull
out connector ;.
X Use a suitable tool to loosen and remove
four nuts :.
X Remove the entire lamp cluster.
X Turn bulb holder =anti-clockwise and pull
it out.
X Pull out the bulb.
X Insert the new bulb into bulb holder =.124
Replacing bulbsLights and windscreen wipers
Page 137 of 405
Switching on/off
X
To activate: press the¿button.
The indicator lamp in the ¿button lights
up.
X To deactivate: press the¿button.
The indicator lamp in the ¿button goes
out. The cooling with air dehumidification
function has a delayed switch-of ffeature.
Problems with the cooling with air
dehumidification function When you press the
¿button, the indica-
tor lamp in the button flashes three times or
remains off. You can no longer switch on the
cooling with air dehumidification function.
X Visit a qualified specialist workshop. Setting climate control to automatic
mode
In automatic mode, the set temperature is
maintained automatically at a constan tlevel.
The system automatically regulates the tem-
perature of the dispensed air, the airflow and
the air distribution.
Automatic mode will achieve optimal opera-
tion if cooling with air dehumidification is also
activated. If desired, cooling with air dehu-
midification can be deactivated.
X Turn the key to position 2in the ignition
lock.
X Set the desired temperature.
X To activate: press theÃbutton.
The indicator lamp in the Ãbutton lights
up. Automatic air distribution and airflow
are activated.
i THERMOTRONIC automatic climate con-
trol: when automatic mode is activated, you
can select a climate mode (Y page 134).X
To select manually: press the_but-
ton.
or
X Press the IorK button.
The indicator lamp in the Ãbutton goes
out. Setting the climate mode
In automatic mode you can select the follow-
ing climate modes:
FOCUS high airflow that is set slightly cooler
MEDIUM medium airflow, standard setting
DIFFUSEl ow airflow that is set slightly
warmer and with less of adraught
X Turn the key to position 2in the ignition
lock.
X Press the Ãbutton.
X Press the ñbutton repeatedly until the
desired climate mode appears in the dis-
play. Setting the temperature
THERMATIC automatic climate control Different temperatures can be set for the
driver's and front-passenge rsides.
X Turn the key to position 2in the ignition
lock.
X To increase/reduce: turn control:or
B clockwise or anti-clockwise
(Y page 131).
Only change the temperature setting in
small increments. Start at 22 †. 134
Operating the climate control systemClimate control
Page 142 of 405
is being refuelled. You must therefore switch
off the auxiliary heating at filling stations.
! Operating the auxiliary heating/ventila-
tion draws on the vehicle battery. After you
have heated or ventilated the vehicle a
maximum of two times, drive for a longer
distance.
i Switch the auxiliary heatin gonregularly
once a month for about ten minutes.
The auxiliary heating heats the air in the
passenger compartment to the selected tem-
perature. It does not use the heat of the run-
ning engine to do this. The auxiliary heating
is operated directly using the vehicle's fuel.
For this reason, the tank content must be at
least at reserve fuel level to ensure that the
auxiliary heating functions.
The auxiliary heating/ventilation automati-
cally adjusts to changes in temperature and
weather conditions .For this reason, the aux-
iliary heating could switch from ventilation
mode to heating mode or from heating mode
to ventilation mode.
The auxiliary heating switches off automati-
cally after 50 minutes. This time limit can be
altered. To do this, visit a qualified specialist
workshop.
You cannot use the auxiliary ventilation to
cool the vehicle interior to a temperature
lower than the outside temperature.
Before switching on X
Turn the key to position 2in the ignition
lock.
X Set the temperature.
The auxiliary heating/ventilation can be acti-
vated even when climate control is set to
manual. Optimum comfort can be attained
when the system is set to automatic mode.
Set the temperature to 22 †.
The auxiliary heating/ventilation can be acti-
vated or deactivated using the remote control
or the button on the centre console. The on-board computer can be used to spec-
ify up to three departure times, one of which
may be preselected (Y
page 243).
Switching the auxiliary heating/venti-
lation on/off using the centre console
button The colours of the indicator lamps on the but-
ton have the following meanings:
Blue Auxiliary ventilation switched on
Red Auxiliary heating switched on
Yellow Departure time preselected
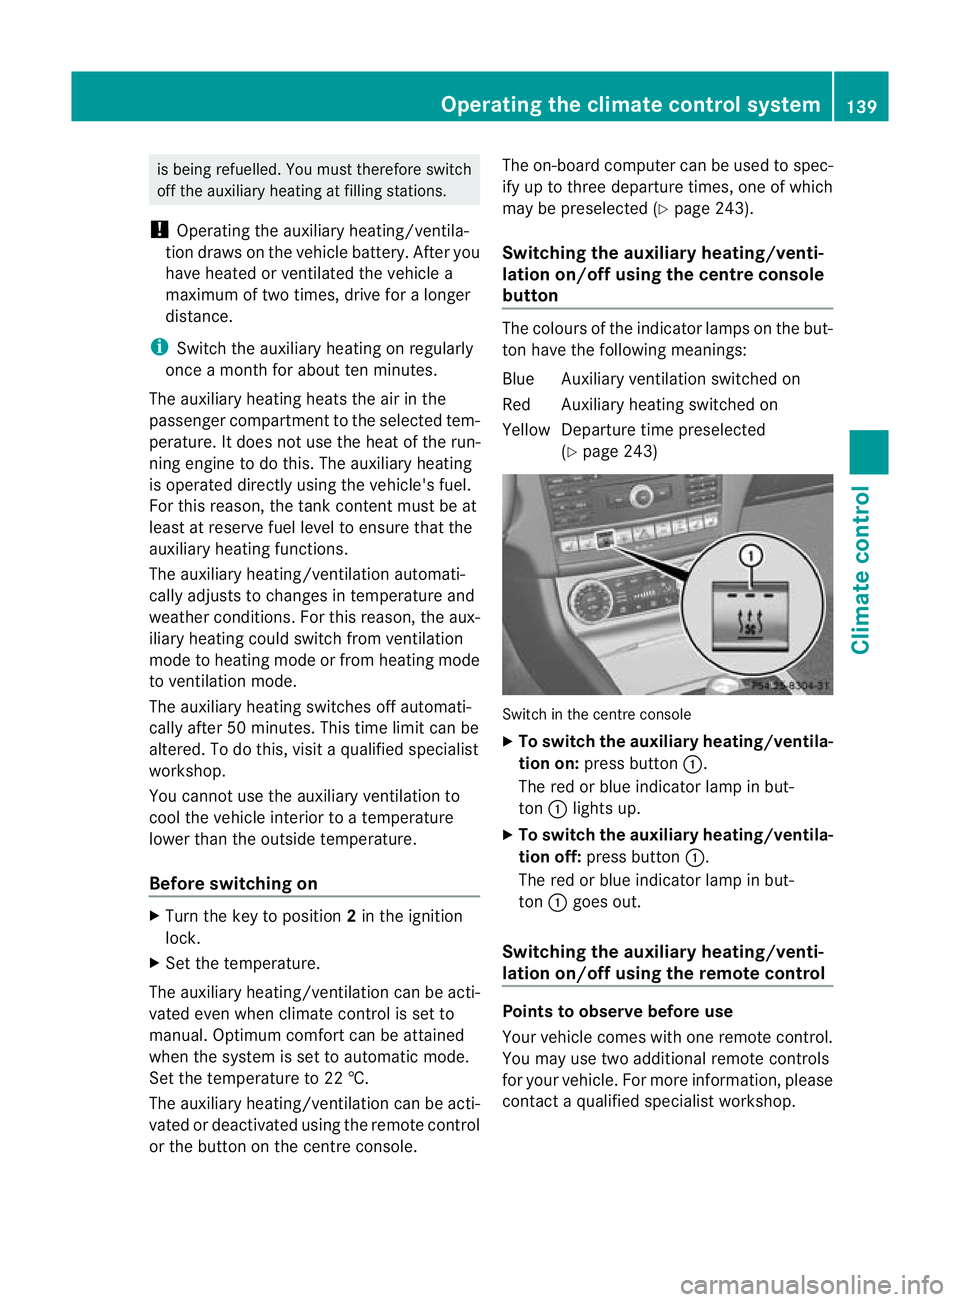
(Ypage 243) Switch in the centre console
X
To switch the auxiliary heating/ventila-
tion on: press button :.
The red or blue indicator lamp in but-
ton :lights up.
X To switch the auxiliary heating/ventila-
tion off: press button :.
The red or blue indicator lamp in but-
ton :goes out.
Switching the auxiliary heating/venti-
lation on/off using the remote control Points to observe before use
Your vehicle comes with one remote control.
You may use two additional remote controls
for your vehicle. For more information, please
contact a qualified specialist workshop.Operating the climate control system
139Climate control Z